


Ironpeddler
-
Posts
75 -
Joined
-
Last visited
-
Days Won
1
Content Type
Profiles
Forums
Gallery
Posts posted by Ironpeddler
-
-
Got a call from service yesterday telling me they are going to replace the seals with a newer version on the supposed new, maybe refurbished, PTU. Special tool need they tell me. Will be without out vehicle for awhile. Thankfully it is being covered under extended warranty.
That is true. They need it to get the front passenger side axle out. I saw it a while back on a YouTube video, that's what lead me back to a Ford dealership to do the job.
Good luck!
-
 1
1
-
-
Welcome to the club. Hard to believe, huh? Never a recall because Ford has never admitted an issue with the PTU...publicly. Then you'd think they would do some sort of a redesign other than a drain plug...but no. Honestly, since I've had this car it's been a nightmare of major problems. Last week I just got done with a $2,500.00 tab to fix the AC...seats & dash had to come out. And I guess the front fascia was removed too as the clips that hold it in place around the marker lights all came out and now it looks terrible. It took them 10 days to fix the AC system, now it has to go back for cosmetics. The list just keeps on growing...never again will I buy a Ford.
PS: check a few other dealers, I had my PTU done for just under $1,500.00 here in Southern NJ.
-
Gary,
I didn't take any pictures, but I followed the post on pg.13 (
Used a 5/16 bit for the pilot hole. Pretty much the same location. I just took my best guess, didn't do any measuring. Took awhile to get through the casing: 1, I bought a cheap bit and 2 the casing was about an inch thick. After I broke through I let the oil drain. Went back through with a 9/16 bit, then tapped the hole with a 3/8 NPT tap, then put the fill plug in with a 5/16 hex. I put some tephlon tape around the plug just to be safe. Filled the ptu with 75w x 140 axel lube with an oil can. Drove the car about 5 miles to get the fluid moving and no leaks!
Bought the plug from Grainger $6 Item # 4CCF4
Bought the same tap and die set from Harbor freight $12
Genuine Ford Fluid XY-75W140-QL SAE 75W-140 Synthetic Rear Axle Lubricant - 1 Quart $22
Hope this helps!
AWESOME! Thanks! Once the weather warms up I'll give it a go.
-
Just wanted to add to the discussion.... I have a 2013 Edge with 95k miles. I came across this topic and decided to change the ptu fluid imagining it has never been done. I could only siphon out about 2oz due to it being so thick. I ended up putting in a drain plug shown earlier in the thread. Put the front end of the car on jacks, drilled into the bottom of the ptu, let the oil drain for about 10mins, tapped it, put the plug in and filled it. I was surprised by how thick the casing is but overall it was a simple job and only took about 2 hours from start to cleanup. Edge is getting better gas mileage and coasts a lot better as well. I plan on changing this every 12 months which is about every other oil change.
Great job! Did you happen to take any photos of the job? I'm curious where you drilled the hole on the PTU unit. Also, what size drill bit, depth drilled, tap size, plug used, etc. I'd do this in a heartbeat if I had a more clear understanding of the procedure.
I had mine replaced about a year ago and it probably needs a fluid change by now and the dealer refuses to do it saying it's not necessary. So I asked them, if not necessary, why did it fail? They then said...'we just don't do that job'.
Thanks!
~Gary
-
I have worked with both monroe and KYB. I am personally going with KYB for the front and will be doing the same on the rear. The monroe shocks and struts just felt too soft. KYB seem to feel firmer. My research and experience also confirms your thoughts that monroes do not last very long which is why I am going with KYB.
Here is a link to my Youtube channel. Just subscribe and you will be notified of all new videos I upload.
https://www.youtube.com/channel/UCJb7karK2nhyA7G1BW6xESg
Keep the bellows and bump stops in place the bellows help protect the shaft and the bump stop (of course) stops the bumps should you hit a really hard pot hole. Will be replacing my front struts soon and a video will be put up on my youtube channel. Rears will also be replaced. This however will be on the 2011 vice the 2008, which is not much of a difference overall. Note: you can reuse the bellows and bump stop from the old struts unless they are damaged.
You have a bearing mount going bad or actually has gone bad. The bumping will increase. Based on your miles and driving habits start planning now and buying parts and by winter time you should be ready to install them (both) replace both at the same time.
As far as bearing mounts I am going with the Moog bearing mounts. I have tried others and they have failed both times and the Moogs held up when the others did not. It was an expensive job to replace failed parts twice. Just an FYI
Mac, where are the front bump stops located on your old 2008 Edge? Do you remember? I have the same year and I'm experiencing some bottoming out issues.
Thanks!!
-
Hi all,
I have read most the thread and it was really helpful with all the information. My Ford Edge 2008 with 98k km also got the PTO issue and now the car is at the mechanic's place. He told me the PTO is to be replaced, so I guess I will have to buy a new one. But the problem is in the fact that I live in Baku, Azerbaijan, which almost doubles the price of a new PTO if I order one from US. New one costs 1600usd plus shipping around 600 usd.
Does anyone know any other optimal way I could find a new PTO for a lesser price or a shipping fee?
See if one of the vendors on eBay will ship to you. There are quite a few that sell the newest version to use as a replacement.
Good luck!
-
1
-
-
Okay, I'm late to the party, but my dealer just told me yesterday that I need a new PTU for my 2011 MKX -- $1,900.
Never heard of that much gear oil being added before.
The price quote to replace it seems high. I just had mine done here in NJ at $1,500 and that included 7% sales tax.
Maybe try a Ford dealer, same vehicle, but they charge less.
-
1
-
-
I'm going to bump this thread before I break out the BFH.
I've removed the caliper, and this is what is behind it:

Behind the spindle itself:

Removing the sensor thingy with a torx bit 30:

Side shot:

Top View:

So I'm pretty lost as to what else I have to loosen to remove the rear rotor. Do I just pry like hell on the rear of the rotor (rubber type material towards the inside of the vehicle)? Are there other bolts to remove first?
Thanks in advance....
Bro....can you get your pictures back up? Thanks....getting ready to replace the rear rotors ASAP (once the rain stops!)
-
I know macbwt did a video on the 2011 rear brakes, not sure about his 2008. All kinds of fun stuff on his channel
https://www.youtube.com/channel/UCJb7karK2nhyA7G1BW6xESg/videos
Do you have the instructions for the rear brakes? You have a 2007-10 Edge, right?
EDIT: If the 2008 matches 2007 instructions, it doesn't say anywhere that you have to deal with the EBrake. Now if you are removing the brake disc shield or the caliper support plate, yes, the EBrake comes into play.
Brake Rotor/Disc
Removal
- Remove the wheel and tire assembly. For additional information, refer to Section 204-04 .
-
CAUTION: Do not allow the brake caliper and anchor plate assembly to hang from the brake hose or damage to the hose can occur.
Remove the 2 brake caliper anchor plate bolts and position the brake caliper and anchor plate assembly aside.- Support the brake caliper and anchor plate assembly using mechanic's wire.
- Remove the brake disc.
Installation
- Clean and dry the brake disc-to-hub mounting surface and apply a thin coat of anti-seize lubricant where indicated.
- Install the brake disc onto the wheel hub.
- Position the brake caliper and anchor plate assembly and install the 2 brake caliper anchor plate bolts.
- Tighten to 55 Nm (41 lb-ft).
- Install the wheel and tire assembly. For additional information, refer to Section 204-04 .
- Test the brakes for normal operation.
Brake Pads
Removal
WARNING: Use of any other than approved DOT 3 brake fluid will cause permanent damage to brake components and will render the brakes inoperative. Failure to follow these instructions may result in personal injury.
WARNING: Carefully read cautionary information on product label. For EMERGENCY MEDICAL INFORMATION seek medical advice. In the USA or Canada on Ford/Motorcraft products call: 1-800-959-3673. For additional information, consult the product Material Safety Data Sheet (MSDS) if available. Failure to follow these instructions may result in personal injury.
CAUTION: Brake fluid is harmful to painted and plastic surfaces. If brake fluid is spilled onto a painted or plastic surface, immediately wash it with water.
- Check the brake fluid level in the brake master cylinder reservoir.
- If required, remove the fluid until the brake master cylinder reservoir is 1/2 full.
- Remove the wheel and tire assembly. For additional information, refer to Section 204-04 .
-
CAUTION: Do not pry in the caliper sight hole to retract the pistons, as this can damage the pistons and boots.
CAUTION: Do not allow the brake caliper to hang from the brake hose or damage to the hose can occur.
Remove the 2 brake caliper guide pin bolts and position the caliper aside.- Support the caliper using mechanic's wire.
-
CAUTION: Install new brake pads if they are worn past the specified thickness above the metal backing plates. Install new brake pads in complete axle sets.
Remove the 2 brake pads, shims and slide clips. Inspect the brake pads and shims for wear, damage or contamination.- Discard the slide clips.
Installation
-
CAUTION: Protect the caliper piston and boots when pushing the caliper piston into the bores.
NOTE: Make sure the caliper piston boot is clean and free of foreign material.
If installing new brake pads, using a suitable tool and a worn brake pad, compress the disc brake caliper pistons into the caliper. - Install the 2 brake pads, shims and new slide clips to the brake caliper anchor plate.
-
CAUTION: Make sure that the caliper guide pin boots are fully seated or damage to the caliper guide pin boots can occur.
NOTE: Make sure that the brake caliper hose is not twisted during caliper installation.
Position the brake caliper on the anchor plate and install the 2 guide pin bolts.- Tighten to 26 Nm (19 lb-ft).
- Install the wheel and tire assembly. For additional information, refer to Section 204-04 .
- Fill the brake master cylinder reservoir with clean, specified brake fluid.
- Test the brakes for normal operation.
Thanks! Yeah, I'm doing brakes & rotors this time. Living near the ocean with the salt air rusts the rotors very quickly. When I had the PTU replaced, the Ford service tech said they were bad....but I thought it was a ploy for more business. Then I got a small vibration in the passenger's side front wheel, so I figured he was right and it was time for a full replacement. So I got all new rotors and brakes and waited for the weather to warm up to do the job. When I took the first one off (the side they pulled the axle on to put in the new PTU) it was easy and quite rusted....but they did the heavy lifting on that one during the job. BUT the other side that hadn't been touched in three years...man, that one was glued on with rust!....and it was flaking very badly on the backside. He wasn't kidding! Check it out....
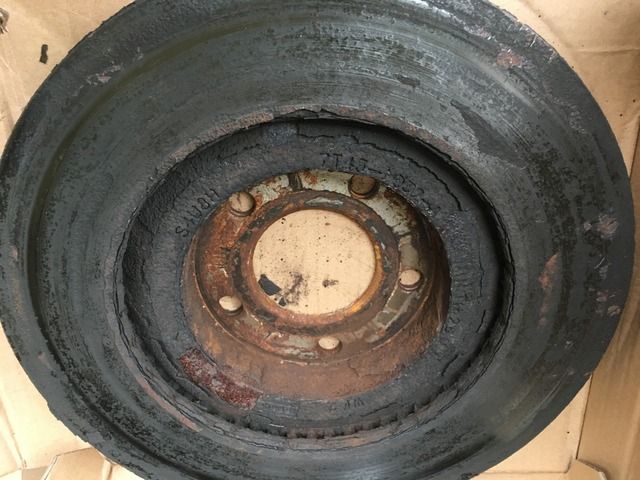
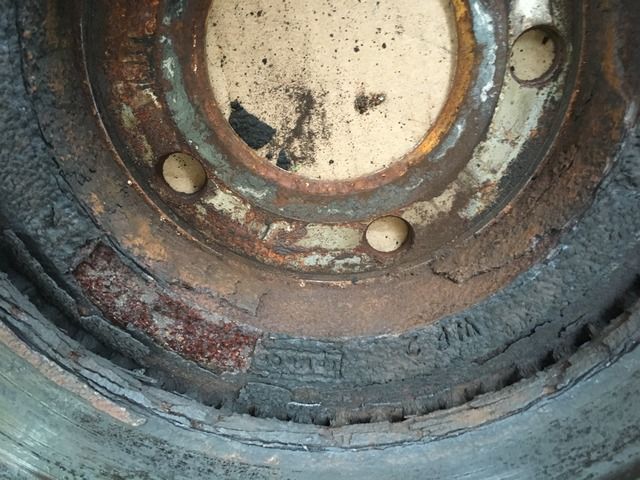


A video I saw a few months back made a comment on how to spin the rotor to line up the service hole for the e-brake adjustment and how to back off of it. That's what I'm looking for now.
Sorry for the thread jack!....and as always, thank you for the advice!
-
1
-
Engine oil. Still nothing, zip, nada on PTU fluid change
 In older MYs, the maintenance guide Ford puts out for cars/trucks/SUVs did say 60K fluid changes in event of special operating conditions, but no idea on the 2015/16.
Thanks....now that I just had a new PTU installed, I want to make sure this one doesn't blow like the last one. I'm just trying to get a handle on the maintenance interval for it.
As hard as it is to get plugs in it...and swap out the PTU....at least one thing is easy, I just did front brakes & rotors today and it took me all of an hour or so. Now I have to get a handle on the rears and how to loosen up the E-brake to get that rotor off.
-
Very true, that may actually work now that the IOLM is actually trying to take the type of driving into account (pg 403):
When to expect the message prompting you to change your oil
Interval Vehicle use and example
Normal 7500-10000 miles (12000-16000 km)
Normal commuting with highway driving
No, or moderate, load or towing
Flat to moderately hilly roads
No extended idling
Severe 5000-7499 miles (8000-11999 km)
Moderate to heavy load or towing
Mountainous or off-road conditions
Extended idling
Extended hot or cold operation
Extreme 3000-4999 miles (4800-7999 km)
Maximum load or towing
Extreme hot or cold operation
This is engine oil or PTU oil change?
-
I just had mine replaced about a month and a half ago. I asked it they would use Amsoil and they said no...it had to be what Ford specified. I asked again saying it exceeded Fords spec and they still refused. I was told here on the forum to make sure it was properly filled after the new unit was installed. The dealer assured me that it was. That's as far as I was able to go with that issue.
Keep us posted on your results. Good luck!

-
I've been having the same leaking issues from the PTU vent on my newly acquired 2008 Taurus X AWD, so I've been researching the issue and that lead me here. Seeing that the leaks come from the vent on top, I decided to dig in and find out how to solve the issue. I removed the intake pipe, throttle body, and because I have rear heat the two hoses coming off of the thermostat housing. This is where that got me:
To liberate the vent valve from the PTU, I first tried to pry off the jiggle hat. After about an hour of no progress, Anger won out over patience and a slip lock pliers was implemented and both the hat and valve came out as a unit:
It took a bit of prying to get the hat off of the valve, but here is what it looks like inside. Honestly I was expecting just an open tube in the fitting:
I took the opportunity to try to clean out as much as I could from the top. Here is the first batch of 12 Qtips. There were two more batches:
Then the valve went back in without its hat, as I had other plans on how and where it would vent:
My idea was to retrofit the updated vent tube from the 2013+ Taurus models, and here it is in all its glory:
I did need an extra foot of tubing and a fitting to put the two together. The ID of the vent tube is 3/8" and the OD of the vent on the PTU is 1/2". I couldn't find a proper reducer, so I heated the end of the 3/8" stub hose and gorillaed it on the vent. So far, it's not leaking from the vent or the tube that's pressed on. At this point I think I'll just start changing out as much of the fluid as I can for fresh stuff as often as my schedule allows and hope at some point it starts to clean up. The finished project:
Hope this helps anyone who had the same questions I did about the vent valve that Google just couldn't answer.
Nice job and great write up. Did you add more fluid to the PTU unit during your retrofit?
-
I've been having the same leaking issues from the PTU vent on my newly acquired 2008 Taurus X AWD, so I've been researching the issue and that lead me here. Seeing that the leaks come from the vent on top, I decided to dig in and find out how to solve the issue. I removed the intake pipe, throttle body, and because I have rear heat the two hoses coming off of the thermostat housing. This is where that got me:
To liberate the vent valve from the PTU, I first tried to pry off the jiggle hat. After about an hour of no progress, Anger won out over patience and a slip lock pliers was implemented and both the hat and valve came out as a unit:
It took a bit of prying to get the hat off of the valve, but here is what it looks like inside. Honestly I was expecting just an open tube in the fitting:
I took the opportunity to try to clean out as much as I could from the top. Here is the first batch of 12 Qtips. There were two more batches:
Then the valve went back in without its hat, as I had other plans on how and where it would vent:
My idea was to retrofit the updated vent tube from the 2013+ Taurus models, and here it is in all its glory:
I did need an extra foot of tubing and a fitting to put the two together. The ID of the vent tube is 3/8" and the OD of the vent on the PTU is 1/2". I couldn't find a proper reducer, so I heated the end of the 3/8" stub hose and gorillaed it on the vent. So far, it's not leaking from the vent or the tube that's pressed on. At this point I think I'll just start changing out as much of the fluid as I can for fresh stuff as often as my schedule allows and hope at some point it starts to clean up. The finished project:
Hope this helps anyone who had the same questions I did about the vent valve that Google just couldn't answer.
Did you add for fluid to the PTU unit as well?
-
Ironpedeler;
What were your symptoms?
Well, it started out with a few black drip marks on my driveway, no other symptoms...and I noticed them because I have a concrete driveway. They were very small...and if I had an asphalt driveway I may not have noticed them. When I had my next oil change, I asked the guy to check to see where it was coming from. After the service, he asked me if the car was hard to turn? I said no, he asked because the power steering fluid was almost empty. He filled it and said to keep an eye on it. I then moved the car to different parts of my driveway to see if it was still leaking...and it slowed down and then stopped. So I figured it may have been the PS pump as the guy put in a sealer with the new fluid.
Within a month or two I started to hear a low hum from the front. At first I thought it was a wheel bearing...and having already replaced the rear bearings, I figured it was the fronts now failing. I jacked the car up and grabbed it 12 o'clock & 6 o'clock and did the jiggle. Seemed tight. I then did the research here and found out it was the PTU failing. I did the suck-out-the-old-lube (none came out) and added the new synthetic lube and I think all that did was buy me a little more time, the damage was already done at that point. I then figured out that the reason the spotting stopped was the PTU ran out of lube. When I added the proper amount, it then dripped the new fluid on the driveway...when I got back under the car, the seals from the drive-shaft and axle were both dripping wet.
As time went on, the hum turned into a low rumble that turned into a slight vibration (drive shaft, front PS axle I figured) as I took off and it would subside as I picked up speed (the speed centered the shafts within the lose bearing)....then after another month or so the vibration got worse. I was hardly using the vehicle at this point (my son was using it to commute to work, 4 miles round trip) and it finally got to the point to where it was making a noise like metal in a coffee can. This whole time frame was October 2014 to July 2015. I had it parked in my driveway until last week when I finally had it fixed...$1,500.63 was my final total. Now that the PTU noises are gone...I do in fact need front wheel bearings. The 'roar' of those spinning were muffled by the PTU noises. Ford quoted me $647.00 to change both fronts....no new hub w/new bearings, just pressing in new FoMoCo bearings into my existing hub.
Hope this helps.
-
The PTU I got from a Ford dealer came without enough fluid in it. Make sure they double check the fluid in yours.
Thanks for the heads up I'll definitely mention that to them.
-
Well, my 2008 Edge SEL AWL goes in tomorrow for a new PTU. I was quoted $1,525.00+.....the Service Writer said 5 hours of labor plus the part.
I dreaded this day....now all I have to do is make sure they install the latest version of this weak link!
-
Ugh. This forum is become a checklist!
- brake booster failure? Check!
- ptu leak? Check!
Just waiting for my APIM to go...
I still love my edge... It's currently sitting at the dealership. I noticed oil drops on my garage floor (the epoxy still looks new, 6 years later!). Took it in yesterday and I am driving a 2014 Passat until tomorrow (I've had worse loaners).
According to my service advisor they plan on replacing the PTU gasket/seal and refilling with oil. We shall see.
On a positive note this saves 400 something miles I would have otherwise put on my edge (headed down to MD for two days).
Consider yourself lucky, at least your issues are covered under warranty. My Edge has been sitting in my driveway for 4 months because it's been rendered useless. I'll have to tow it to the dealer and who knows what else they'll find wrong with it other than the PTU unit...and quite frankly, I don't have the money to sink into it.
But it sure looks pretty in my driveway!
What a travesty that Ford knows all about these documented issue and still produces the same faulty product year after year.
-
1
-
-
The seal issue has nothing to do with maintenance, but the unit internally failing due to the fluid completely breaking down due to wear just over 100k miles can be prevented.....
Who knew?
-
If you first changed your PTU fluid at 120k miles, then you waited too late from what I have read.
The PTU is constantly driving the front axle(and occasionally both the rear and front axles) and it has less that a quart of fluid to lubricate the gears so the fluid breaks down quickly well before 100k miles, hell from what I read the PTU fluid start breaking down as soon as 60k miles.
Hard comment to make when you take into account that the part is billed as 'Lifetime Lubricated' and had no maintenance schedule as per FMC. What has been established here is that it in fact needs to be changed because of all the failures.
-
If you ARE paying for a new PTU, see if the mechanic will install a drain plug per the_natrix's instructions. Despite the revisions, I am not sure the basic issue has been resolved. Also try to get it filled with Amsoil gear oil, not Motorcraft.
All good points. I just wonder if either would void the Ford warranty.
-
Those are ball park "normal" prices from what I've seen I was quoted $1,600.00. I've seen prices from the 1200 range to 1600
Thank bro...in some weird way that makes me feel better. Just didn't want to get porked on the job. I asked about the replacement part number and all quoted the same number...AT4Z 7251-D...so that represents the latest redesign of the unit.
Ugh, sorry to hear, ironpeddler!
Thanks bro...so sucks. It really pisses me off that Ford has this issue for over 6 years and hasn't addressed it via recall. When they say it's all about the money, it's all about the money!
But I will tell you guys this, there isn't ONE PERSON that I come across in a parking lot (mall, supermarket, parking garage, etc.) with an AWD Edge or Flex that I don't tell them about this failure...I have made it my mission to spread the word to present owners about this. I wish someone would have done this for me. To a person, everyone I've approached has been thankful and some have already started seeing the 'black dots' on their driveway or garage floor.
What were your mileage when you changed out your PTU fluid?
About 115 - 120k I think...not really sure. But, I did see the black drip marks for about 1 1/2 years prior to learning about this issue. I had no tell tail sign of any problems with the PTU and was told by my mechanic that the drip marks were a slow leak in the power steering pump and not to worry about it...he said keep an eye on the level and change it out if it effected the steering.
Oh well....just got to suck it up and move forward.
-
Well, even after cleaning out the PTU and putting in Royal Purple, it still gave out on me...I guess I was too late. The vibration shakes the car incredibly and it now leaks from every bearing, so I guess I'm as close to a catastrophic failure as one could get short of hearing an explosion. I haven't moved the car in weeks. I called around and so far I got prices of $1,450.00 and $1,387.00 (plus NJ tax) to replace it.
Has anyone else gotten replacement quotes around the country in this range?...more?...less? I'm curious to know.
Thanks guys.
2008 Edge ABS Module Replacement
in Brakes, Chassis & Suspension
Posted
I'm having the same issue. I had the brake booster replaced last Friday (impossible to push the brake pedal to stop the car) by my local mechanic since the dealership couldn't get the car in for over two weeks. While they had it, I asked them to check why the ABS, anti-skid icon, and orange wrench were on (have been for 3 months) to see if they could fix it. They said they couldn't but didn't elaborate because I picked it up after hours.
Is this a $2,000 job?