


Mark Camilleri
-
Posts
13 -
Joined
-
Last visited
Content Type
Profiles
Forums
Gallery
Posts posted by Mark Camilleri
-
-
What "wax" should I use on the black plastic on the bottoms of the doors?
DO NOT USE TIRE SHINE!!!!
I use Meguiar's Quik Interior Detailer. It brings out such a nice shine on the plastic. It leaves absolutely no residue. I live by this product for interior and exterior. Also after you wash and dry your car use Meguiars Ultimate Quick Detailer....WOW!!
Good Luck.
-
if you pull it off, it will be cool and give those that do not have puddle lamps the opportunity to do a mod to get them. post up images for sure, and any tips hints (including wire colors you tied into) on your process.
yo Lex, can you just swap the exisiting bulb for the puddle lamps too LED bulbs?
-
I have a good deal of a very good 8 inches subwoofer, but I do not want to go too deep into modifications, so I was wondering of the lot of people that have exchanged the stock subwoofer, does anybody had a picture, and can provide the dimensions of the stock subwoofer, I know it is 8 inches, but I need the depth, how many holes, connectors if any, and also if it is dual voice coil or just standard single voice coil, if possible the impedances, etc....(you can measure it with multimeter)
Any help will be really appreciated...thanks guys...
The best thing to do is go the JL Audio website and look at their stealth boxes. These are sub woofers specifically made for your vehicle, in this instant a Ford Edge. It takes roughly 1 hour to install, with no cutting and use of existing hardware. Hope this helps.
-
alright first of all, im familiar with HIDs and how to hook MOST of them up. Ive had HIDs on my other two cars and my bike with no problems. but with the edge, i cant seem to get them working when i turn the headlights on, they flicker on then immediately off. do i use a relay? and if so, how do i wire it up? and also, would i encounter a similar problem with the fogs as well? I'm using GT HID kit i picked up from Chevrolet for 215 bucks... thanks in advance
I just installed HID 80000K on my 09 EDGE and ran into the same problem. A relay is needed because the correct ampage is not being sent to the unit. Run a power supply from your battery with a relay for each bulb and you will be fine. This is a problem that is unique to Ford. All in took me 35mins, and the result was amazing; better than I expected.
Hope this helps.
-
ha ha you made me laugh.... a rare funny comment from akirby shows there infact is a sense of humor buried in there :tease:
actually, given the rear view camera and backup sensors, I have no interest in this one.. but I would love to see the outside mirrors fold in when you park, that is a great option and with tighter and tighter parking spots & shrinking garage space, kind of a no brainer...
Lex, I find it funny that my brother's 2006 F-150 Lariat has the ability to fold the side view mirrors by holding down the adjustment knob on the door panel; but my 2009 Edge LTD does not....weird. As for the tilting mirror, my fathers 2003 X5 has that option and it is useful. However, the blind spot mirror on the 09's is a life saver, you never have to look back.
-
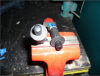
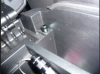
Fisrt I have to say that when I opened the box I was expecting a better looking unit. But enough about that. It took me 2 1/2 hours to install the unit. The biggest problem was putting that rubber edging around the unit. It would not stay on, I eventually had to use some spray adhesive and pieces of velcro. The next problem is installing the new screws for the MAP sensor. I am glad that I have small fingers to fit inside the tube to hold the screws. And they are an unknow button head screw which I tried about 30 or 40 of the sizes I had but none fit. The next pain was that they fail to tell you that you need to move the positive battery cable out of the way so you can bolt the unit to the battery tray. Once it was all bolted in and I bent the metal shroud to get it to fit, I went to close the hood and the unit is so tight I had to push down with some effort to close the hood.
I wanna say that I am pretty mechanically inclined so you guys can make your own decisions on the unit.
I will post photos of it tomorrow.
Next project: HID kit which looks very simple and the Gibson exhaust.
I was told that once this in-take is installed, the car has to be tuned with a tuner? What is the performance difference? Is it worth the price, and from what I understand the hassel?
-
Hello All, I've been a member of the forums since I bought my edge in 2007 but haven't posted much. While I love my Edge I have an issue recently come up that maybe someone on here has experienced. The remote starter suddently stopped working. I press button, the horn beeps (as it always did) then after 3 seconds the horn beeps 6 times and the car never starts. this just started happening within the past 2 weeks but i've had the starter installed for over a year now. Any one have this issue before?
Thanks!
07carbonsel+

I have an 09 LTD AWD, and I was having trouble with the starter in the start as well. My problem was that the dealership, did not by pass the alwam. If you check the manual for the starter, the 6 beeps means something. After referring to the book, if you do not find a solution you are going to have to go to the dealership.
-
My biggest and only complaint is that my temperature read-out seems to be several degrees off from the temperature.
This makes the outside temperature from the Edge look warmer than it actually is!!!!!! WHAT A SCAM!
I am seriously thinking about a class-action lawsuit as I feel this is a conspiracy by Ford Motors.
WOW! I am PISSED!

What scam are you talking about? How does FORD get any further ahead because the temperature is different? Could it possibly be something is wrong with you temperature control. You should seriously think about a class-action lawsuit, so you can lose. Then you will realize that you are WASTING everyone’s time with this rhetoric. This site is used for USEFULL and HELPFUL information; not your indifference to FORD. For the record I have a 09 Limited AWD.....NOT ONE PROBLEM
-
Hey Everyone!
I know this is what everyone has been waiting for! After trying to take all of the input from all of the forum members I am proud to introduce the all new FlashTech HID system! Here are a few new things about the kit!
1) GENERATION 5 HID BALLAST. Most Advanced Digital Ballast on the Market! These were designed with the Ford Edge in mind, specifically to address the flickering issues you experience with older generation kits. The new ballast not only functions better, but is now approximately 25% smaller, thus allowing for easier install in tighter spaces! Install times are now 1/5th of similar kits! This new ballast also gets rid of the high beam flicker without any need for a capacitor or diode!
These kits do not use capacitors, resistors, "cancellers" or other electrical fixes that "trick" the vehicle into operating correctly. These kits are designed to function perfectly on your vehicle, without the hassle of "electrical fixes." We worked very closely with the manufacturer to ensure we would not have the issues that we have had with the previous Oracle HID kits.
2) All new packaging has been designed! Some of this was for the new national roll out of our FlashTech brand, but the packaging was also streamlined as well. The box is smaller, more durable, and will not allow anything to move during shipping!
3) Latest Technology Lifetime FlashTech Bulbs. We have kept our lifetime warranty but have significantly upgraded our new bulbs. The overall constructions of the actual bulbs, as well as the base, have all been improved.
4) There is a new install guide. The new kit is very straightforward when installing.
Unique Coatings & Automotive Lighting Specialties Pricing:
$170.00 Single Beam Kit (Single HID bulb)
This is the lowest Price you will ever see for this kit!
This price includes a full LIFETIME WARRANTY on all components!
Also if you would like to add HID’s to any other vehicle, kits are available for any size and color HID kit for any car! Email or pm me to ask about bulb size applications.
Product Description:
* (2) FLASHTECH HID GEN 5 Digital Ballasts
* (2) FLASHTECH HID Plug and Play Bulbs with water proof seal
* (2) FLASHTECH HID mounting brackets
* (1) FLASHTECH HID plug and play wiring harness (where required)
* (1) package of hardware
* FLASHTECH Installation Written Instructions
* Lifetime warranty against manufacture defects!
Dude where can I buy this kit?
Thanks,
-
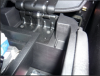
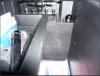
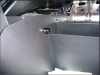
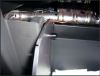
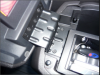
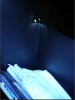
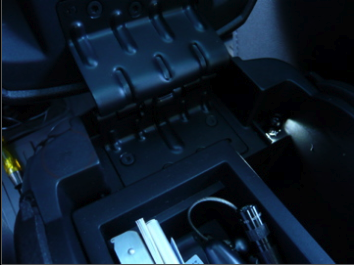
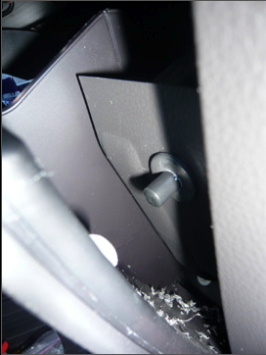
Here you go.. my latest project - another first of it's kind. It has irked me for some time that when I open the center console, anything below the top inch is invisible in pitch black. Similar with the glove box, impossible to see into at night. So, I solved it by wiring up cool LED lights into my center console AND the glove box. Pretty sweet mod that worked out exactly as I planned. Should have been stock in my opinion. But hey, solved the Vista roof light issue, so solved this one as well.
PRODUCTS USED
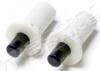
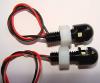
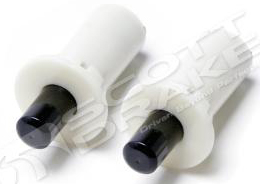
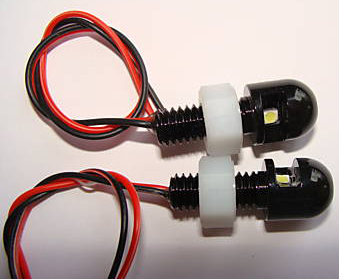
In searching for little LED lights, I found some awesome ones - in black - for motorcycles on ebay. Very affordable. came as a pair. I also got some plunger pin style courtesy dome/door light activation switches off ebay. They came as white, I primed and painted those black. I also dremmeled down the one for the center console as the lip was too round and I just cut off extra material for a better ft. In total, this is about $34 in parts and 1-1.5 hour of time. Results seem to be well worth it.
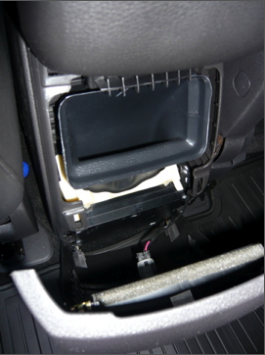
CENTER CONSOLE
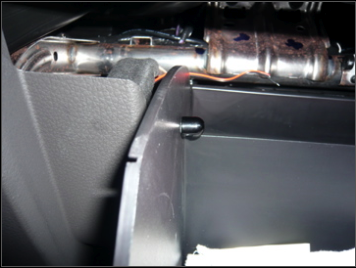
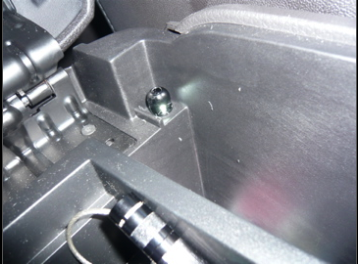
I mounted the light in the drivers side corner of the center console so it aims into the console. could do it either side, but this worked for me. means I can never put the little moveable change holder nearest me, but that is fine for me. I keep it on the pass side anyway so I can look into the center console. I drilled a hole for it and slid the wires down. I accessed the wires by pulling off the rear passenger vent panel and viola, right there is ground and power with the rear cig lighter port! perfect! I then drilled the hold for the plunger on the opposite side up at the lip of the console so the plunger is activated as the door closes. I had to dremmel this hole wider as the light in switch is wider than the bit I had an dremmel allowed for more precision. I then wired up ground to switch from ground at cig lighter, ground out of switch to LED light, power back to cig lighter. this way, the switch brakes the connection when console shuts.
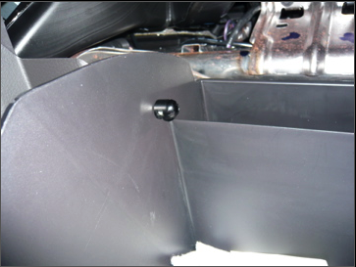
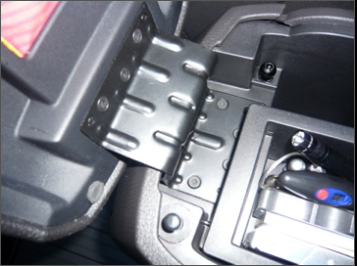
GLOVE BOX
On this one, I mounted the LED light in the upper left corner aiming down. it moves in and out with the door open/close as it is mounted to door. I put the plunger switch on the opposite side (pass) and placed it right in line with the rubber foot so the rubber foot would reach the plunger and push it closed. as above, used dremmel to get perfect tight fit. I ran ground from switch to the frame rail you can see right inside the glove box where the glove box wire spool is attached that allows the box to open slow and smooth. as a matter of fact, perfect hole right there to bolt wire into to get ground. then ran ground out from switch to the LED and I tapped power into the cig lighter near the front cubby hole. to access it, I pulled the center NAV/climate control panel away and wired right into the cig lighter power wire.
Enjoy the photos....


SOCAL.........
I want to put HID lights on my 09 EDGE, I saw that you installed it aswell; I have 2 questions.
1) Is it hard to install, is there an excessive amount of electricle and
2) Will this void my warranty?
Thanks,
COOL WHIP!!!!
-
I bought an 09 EDGE LTD AWD, roughly 3 weeks ago and no smell on mine either.
-
hey guys please take a look at the picture below, and see if you could help me find the company that makes the black grille and light cover please. My Edge is a 09 Limited AWD.
LOVE THE TRUCK!!!!!!!!!!!!!!!!!!!!!!!!!1


My "Murdered" Dark Ink Metallic.
in Interior, A.C., Heat, Interior Trim
Posted
SICK TRUCK. What paint did you use, on the grille, and fog lights? I would love to do this to my truck. I am in Toronto, Canada, so will have to wait until the spring/summer.
Your help is appreciated.
Thanks.