

frybel
-
Posts
31 -
Joined
-
Last visited
-
Days Won
2
Content Type
Profiles
Forums
Gallery
Posts posted by frybel
-
-
Yup, I've got it wired +/- in to the PWM directly from the battery and then +/- from the PWM to the DRL control box. I wonder if it has something to do with the Phillips control box itself? I'd like to try and isolate the box from the entire circuit to see if that's what's causing it, but I think the Phillips setup uses it as a power distribution block. I'm not sure that I can direct wire the LEDs to a 12v source. One thing I do notice now that didn't happen before is when the engine 1st cranks on the LEDs flicker a few times before going solid where before they were instant on...but of course I have no idea what that means.
Edit: Dan, I just read your response in the Angel Eye thread that the best part about the Phillips LEDs is that they dim automatically when the lights come on. I know you're using the 8 LED kits for your projects, but do they use the same control box as the one I used for my job?
http://store.ijdmtoy.com/Philips-Day-Light-LED-Daytime-Running-Lights-DRL-p/led_ddl_sku_7c.htm
The (very) basic wiring diagram that came with the set shows 2 other setups, one which uses an orange wire, the other that uses a yellow wire connected to "small lamp". I assume it means to tap into the marker lamps in the headlight harness, but I really have no idea where to do that. Is this how you're wiring in your LEDs?
-
Please, I do not want to highjack frybel’s DRL thread, so if you want any specific information or to ask any questions relating to what I described above, please PM me. Do not post it here. Unless frybel objects, replies with comments and/or opinions would be welcomed. If I get a good number of PMs from interested members, I will begin a new thread specifically concerning my Light Strip DRL / Light Bar Upgrades.
Thanks, Dan
No worries Dan, this is exactly what I started this thread for! :happy feet:
On a less happy note, the PWM did not work to dim the LEDs. It retains full brightness until I turn the knob to about 60% and then goes into full strobe mode. I got one of their techs on the phone and he was really confused as to what would be causing it to go from solid to strobing. He thought it may be something with the way Ford cycles the power in the electrical system. Does this sound right to any of you electrical folk? The PWM cycles on the negative side of the circuit, so he had me move the ground from the battery to the chassis which had zero effect. Any ideas?
-
That should do it.
Perfect! Thanks man. I'll report back once everything's wired up.
-
LEDS generally won't work below a certain voltage, so dimming would have to be accomplished with a Pulse Width Modulator that can cycle the led on and off (this happens faster than the eye can see and it gives the same effect as dimming)
So to dim to 50% brightness, the led would go on and off for equal amounts of time (think 1/100th of a second)
So something like this would work?
http://compare.ebay.com/like/320831230151?var=lv<yp=AllFixedPriceItemTypes&var=sbar
-
You're going to run into the issue of the bulb that Ford decided to use in the HID headlights.
They are new, low mercury, D3S bulbs with built in igniter that put out ~4500K color temp.
If you want brighter, you need to upgrade to a 50W ballast and bulb. Problem is, those are not readily available yet for D3S bulbs.
You could either wait for them to be developed (about another year I'm guessing) OR do a retrofit that replaces the projector with a bulb that has much more availability such as the D2S.
Hey Cal,
I've been searching previous posts, I thought you had posted before about color matching your HIDs w/ your LED bars in front, but I can't find it anywhere....
I replaced my light bars in front with the 6000K Phillips ones and now I want to match the color of the OEM HIDs. I don't need them any brighter, just closer to the 6000K range, so would I need to upgrade the ballast to 50W or just find replacement D3S bulbs from 5000K - 6000K? They don't have to be a perfect match, it's just a pretty glaring difference between the nice blueish white of the LEDs and the yellowish output of the OEMs. All the D3S that I've found online @ 6000K seem to be some cheap Chinese ones, which makes me wary of the quality. Do Phillips, Sylvania, Osram, etc.. make replacement D3S @ 6000K?
-
These LEDs need to run at 15 - 16V (that's what the original control box provided). At normal battery voltages, they're too dim so just hooking them to a 12V source wouldn't work. I saw the same reports from people saying that they just cut out the failed control module and wired it directly to the battery. They must not be too concerned about how much light they produce.
On mine, everything is hooked up to a switched 12V source so it's all automatic, the switches are only there so I can select what I want to have as DRLs. Most of the time I just run with the lower LED bars, but if I want to, I can have the headlights lit as DRLs, or both. I don't use the switches to turn them on as they are on whenever the engine is running.
Thanks, but I like having them as bright as they are now all the time. Like I said, at night, they match the 6000K HID kit I have installed.
Hey Dr.Edge,
Looks good! Just wondering, are your LEDs too bright at night? I've been flashed a couple times by oncoming cars and was interested in milosm's idea about being able to dim them at night. I had my wife drive behind me and they're not blinding, I think it's just when they hit at the perfect angle that it's bothering oncoming traffic. I thought that Kc300c had posted somewhere that he had tapped his yellow wire into the head light assembly and that dimmed his LEDs at night. The only wiring diagrams I saw for the Phillips led me to believe that if they were wired unto the headlights that the LEDs would turn off automatically when the lights kicked on (not really what I want) My control box is still working fine, so I guess that's what's boosting the voltage enough to keep them bright but I only need them super bright during the day to use as DRLs, at night I'm fine with letting the HIDs do their thing. It's to the point where I've thought of tinting the lenses or installing a switch to just kick them off at night
Milosm,
Not really an electrical expert by any means...I know my way around a voltmeter and how to secure a strong splice, but that's about it, Is the rewiring fom parallel to series something that recognizes when the headlights are on and then lowers the input/output (?) power? I looked at your post and you said that you had a simple sketch on how to do that. Can you post that sketch?
I love this mod. Super glad I did it and it definitely increases safety during the day, I just don't want it to detract from that safety at night.
-
Sync Destinations software will require a Sync system with AppLink.
Does anyone know if AppLink will be included in the "performance upgrade"?
According to one of the Ford reps in their booth at CES it will not be included in the upgrade, but it is "in the works" to have it added "down the road" his words, not mine...gotta love the ambiguity.
-
An Audiocontrol Lc2i, a small amp, and a good 8 in the stock box works pretty well, also.
Dingo, you have any pics of your setup? I've finally had enough of the Sony "premium" system and I'm ready for an overhaul. I'm looking at running exactly what you described and just wanted some advice on where you tapped the factory line out and what you replaced the sub with. Thanks.
-
Very cool! Thanks for sharing!
Are those OEM HID headlights? How does the color compare? Looks pretty close in the picture.
They are the OEM HIDs. I think I saw on here somewhere that the OEMs are 4300K. The LEDs are 6000K so they're definitely off a little from the headlights, just a little bit bluer...doesn't show in the pics very well. But I figure I'll find some 6000K bulbs to replace the factory ones when they burn out.
Way to come through as promised! with a GREAT write up at that!!
They look very nice!
Mind posting a picture of the spread against a wall about 10' or 15' away with your next shots?
Thanks man! Glad you found this post over here....I couldn't find the one from a few weeks ago to link. I'll see if I can find a flat wall to get the spread later tonight.
-
I just purchased the Thule racks for a 2010 and it fit perfectly on my 2011. Thule has not yet updated their fit guides.
You have any pics of the rack installed? It's July, but I'm already thinking boarding season!!!

Just want to get some feedback on asthetics, MPGs, wind noise, etc... before dropping a few hundred $.
Thanks.
-
Oops! Hit the picture limit.....here's the rest.
Real world shots coming soon.....
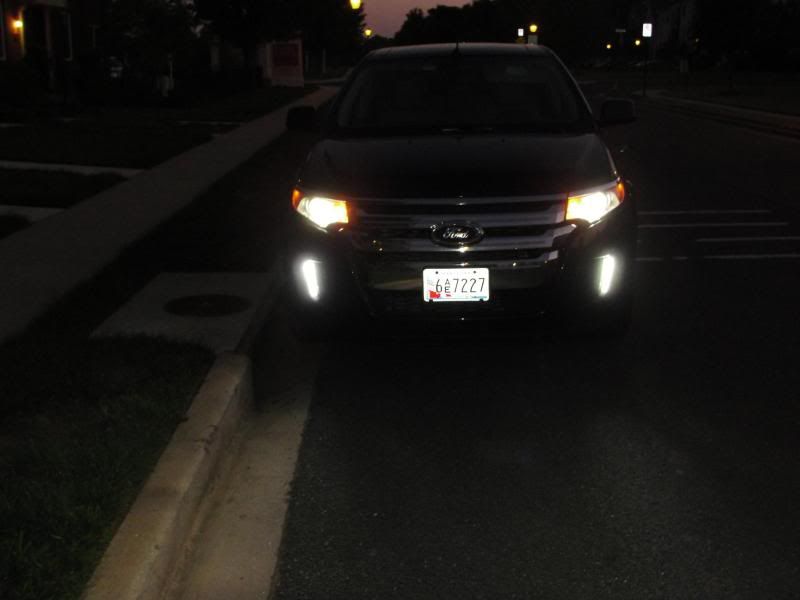
-
 3
3
-
-
Hey gang,
Like so many others on here I wanted a DRL solution for the 2011+ models, and was less than impressed with the underpowered LED strips integrated into the new bumper style. It's curious that Ford would do such a beautiful job designing the new front end to fall flat with the OEM lighting. So with limited pre-fab solutions , the DIY bug came out....... I'm hoping we can consolidate a lot of info, ideas, etc... into this thread since there are quite a few floating around on the forum. This is what I did and I'm pretty happy with the results. Those of you out there with more technical prowess, dremmel skills, imagination and especially patience, might do a cleaner job, but anyway........
Bumper comes off.
I followed the instructions on this site. It's for '09 and earlier, but it's almost exactly the same for 2011+. I didn't use jack stands or ramps, although ramps would definitely make getting the 8 underbody screws easier to get at. Just crank the wheels all the way left or right, put on the parking brake and get to work. Oh yeah, make sure you have a blanket or something protective on the floor when you yank the bumper off. It's not heavy, just awkward, and it wants to go face down fast.
http://mechanixtrix.com/Article/Article.aspx?ArticleId=405
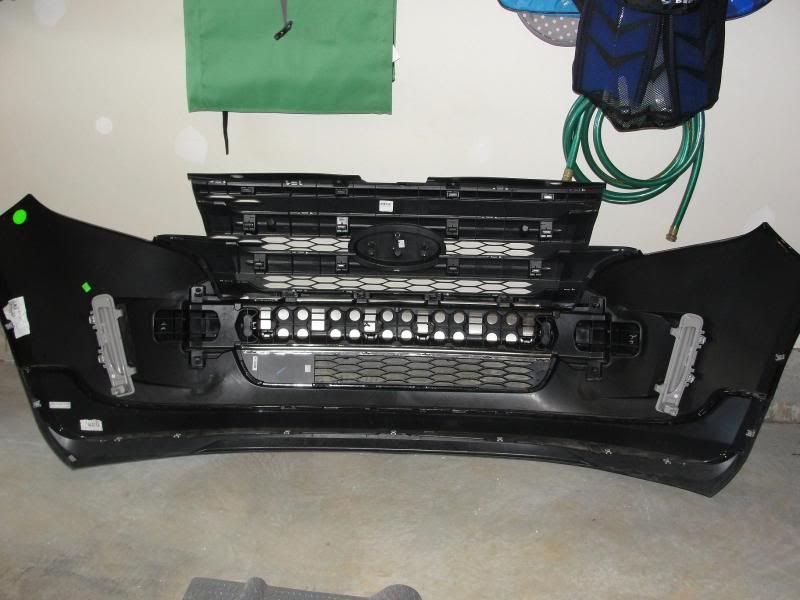
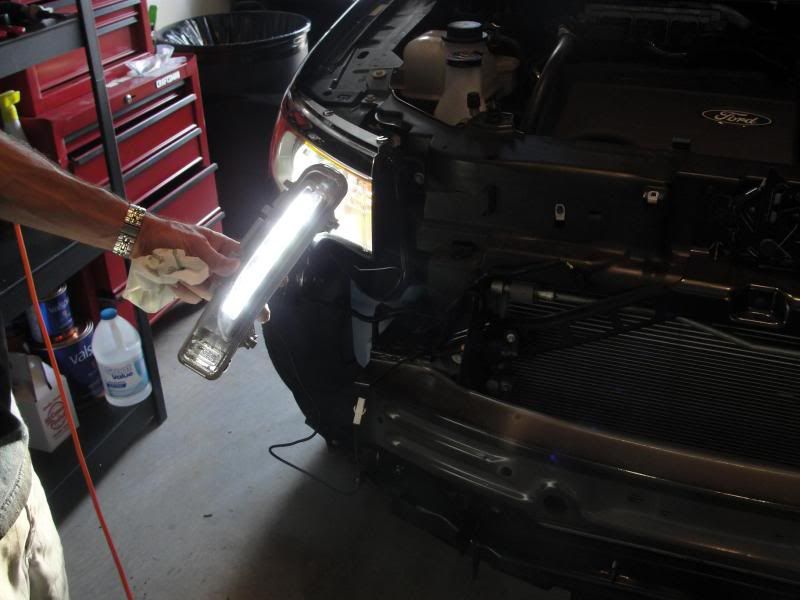
Remove the LED housings
Each housing is held in place by 2 angled tabs and 2 metal clips. I used 2 small screwdrivers to pry the teeth of the clips away from the tabs and they popped right off.
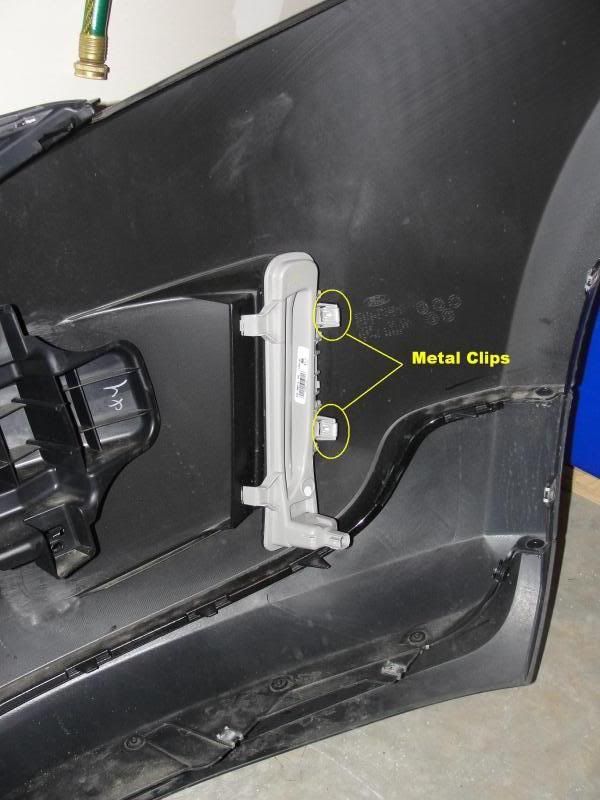
The reason the OEM strips aren't very bright is that the entire assembly consists of a single LED that fires vertically through the diffuser tube that runs the length of the housing.
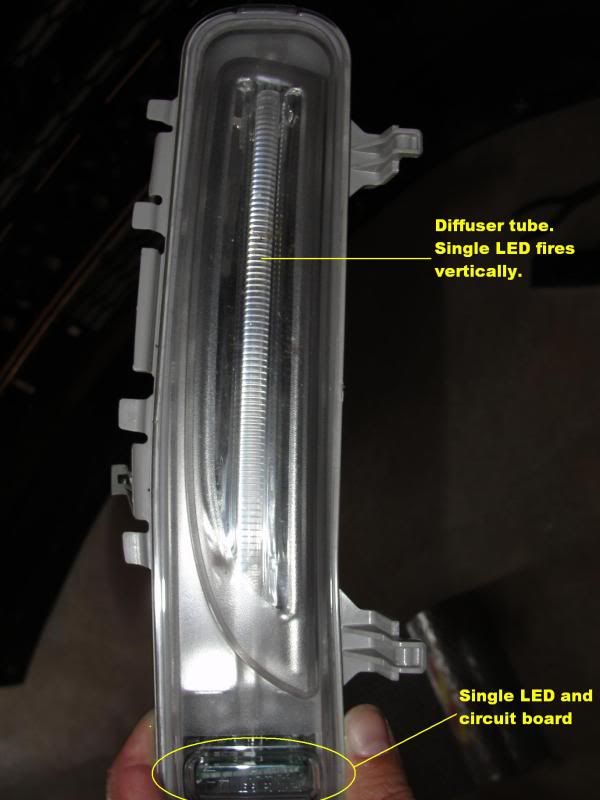
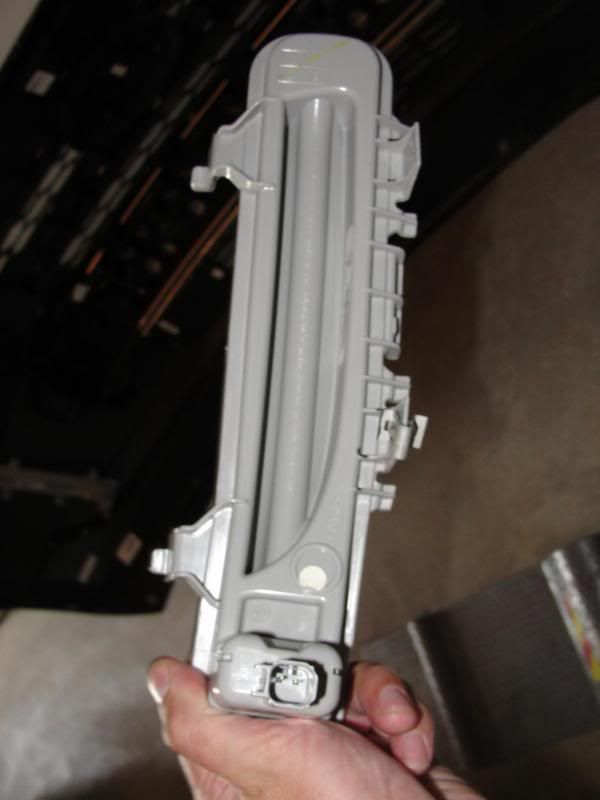
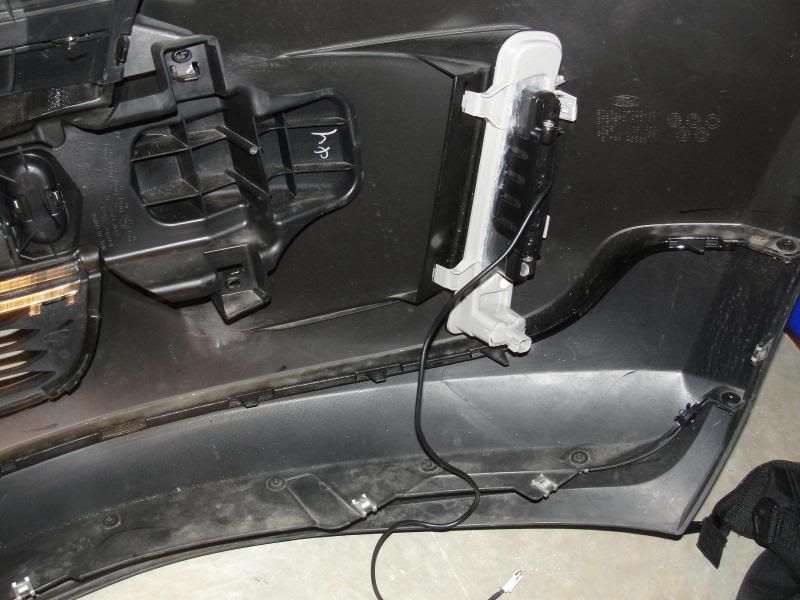
Mark, cut and remove the internal components in the light housing
I cut the clip attachment off the bottom of the housing to break and remove the LED, circuit board and diffuser.....at this point there's no going back. There's a reflector behind all the "guts" that I decided to leave in and cut an opening to fit the new LED assembly.
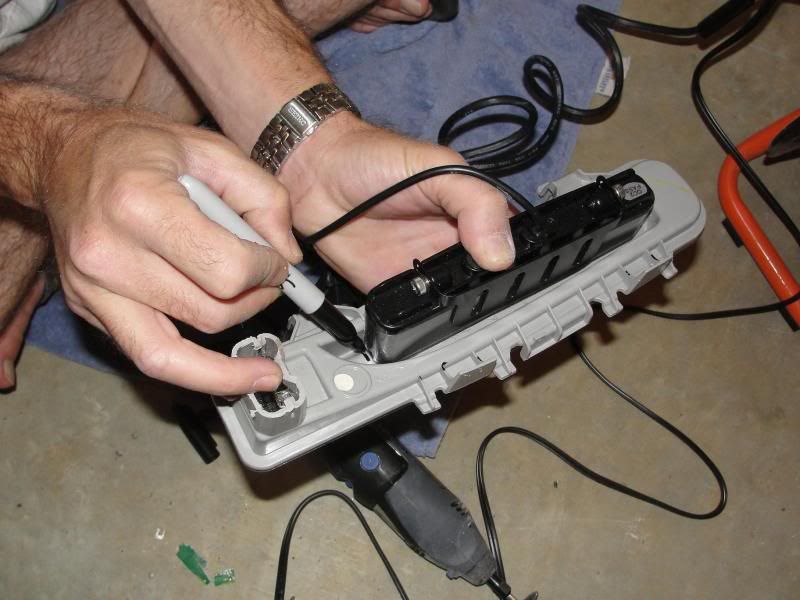
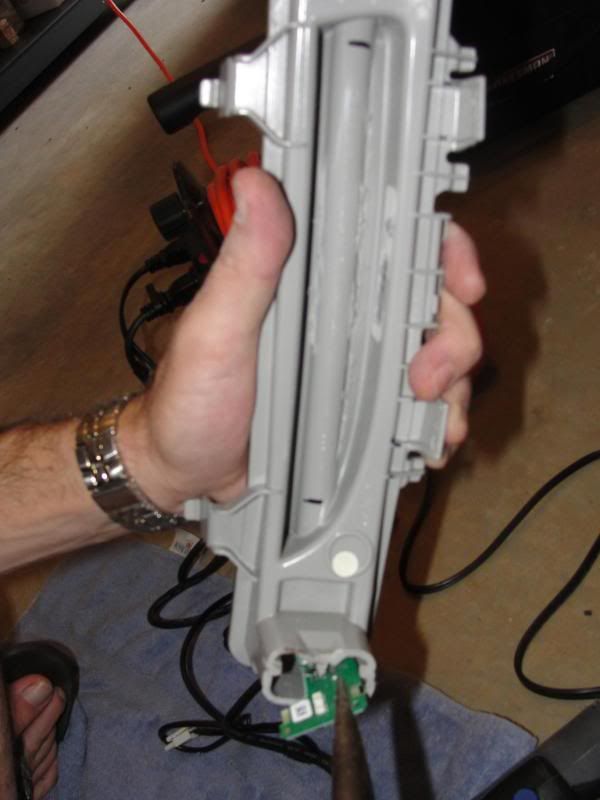
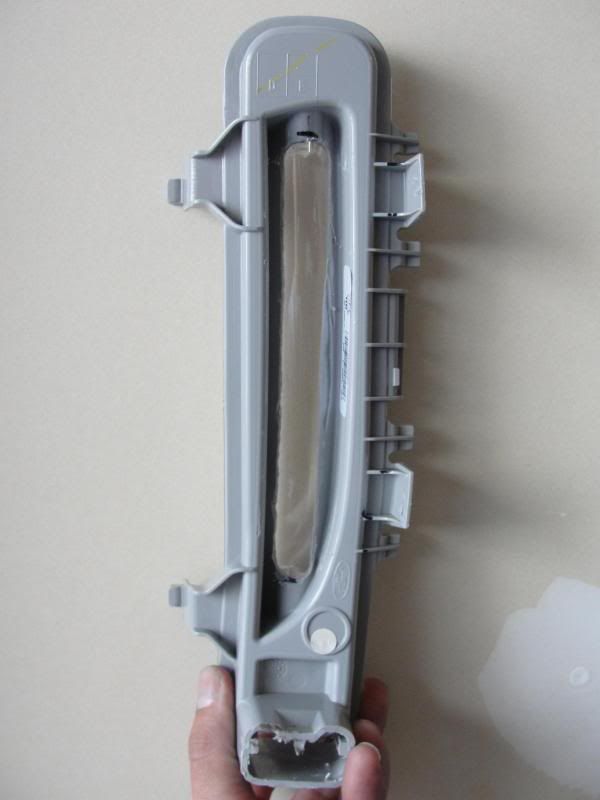
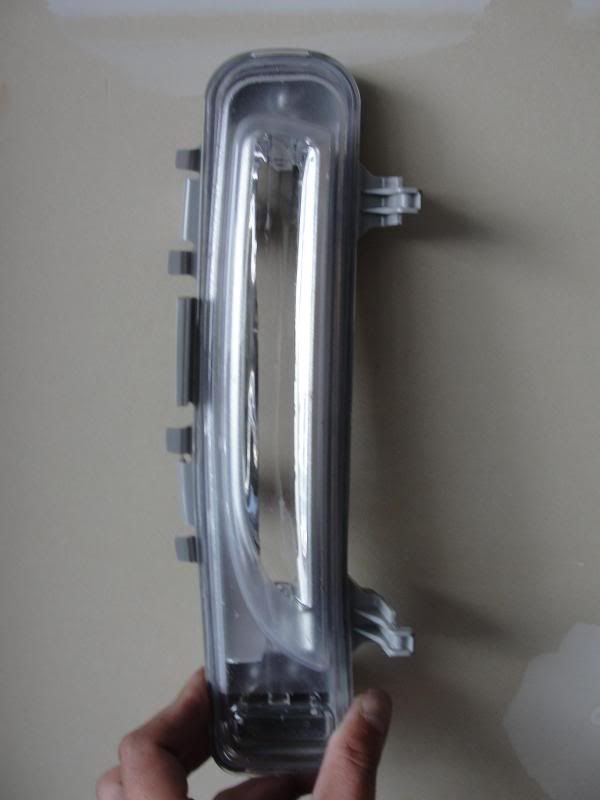
Here's where more dremmel skill and/or patience may help some of you. The cuts came out fairly clean, but the angled design of the factory housing doesn't perfectly complement the straight design of the LEDs....probably why Ford went with a single, vertical firing option. At first I used a heat gun to try and loosen the glue and pull the lens of the front to give me more room to work with and hopefully be able to take apart the entire assembly. I couldn't get the lens off...the plastic was getting close to the point of melting and the lens still wouldn't budge. I couldn't find any screws of tabs holding it together, but if anyone else tries this and finds a way to pull the front lens off please post results as I think this will allow for a cleaner retrofit.
Fit the LEDs
I used this kit from ijdmtoy.com
http://store.ijdmtoy.com/Philips-Day-Light-LED-Daytime-Running-Lights-DRL-p/led_ddl_sku_7c.htm
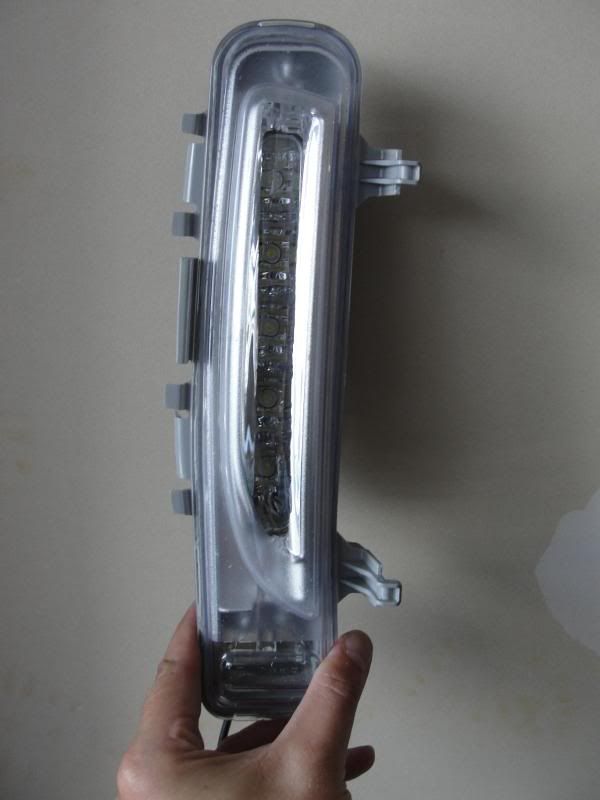
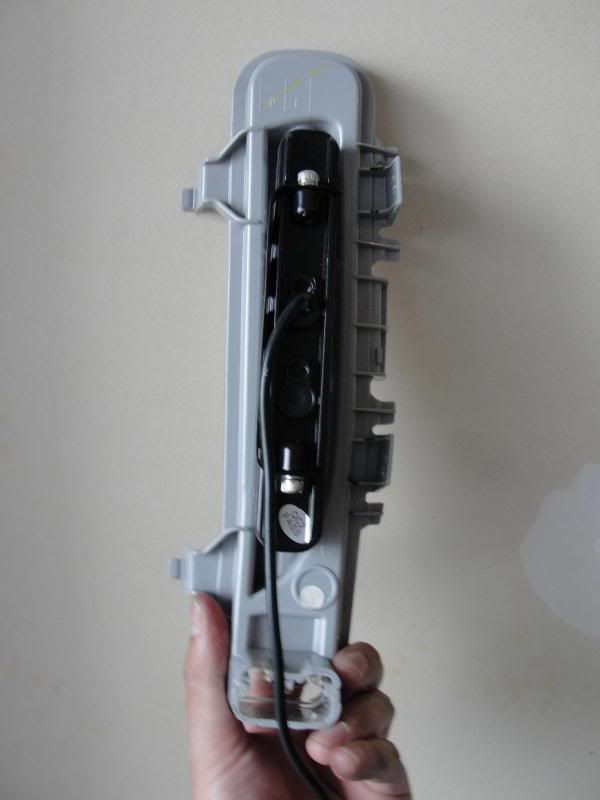
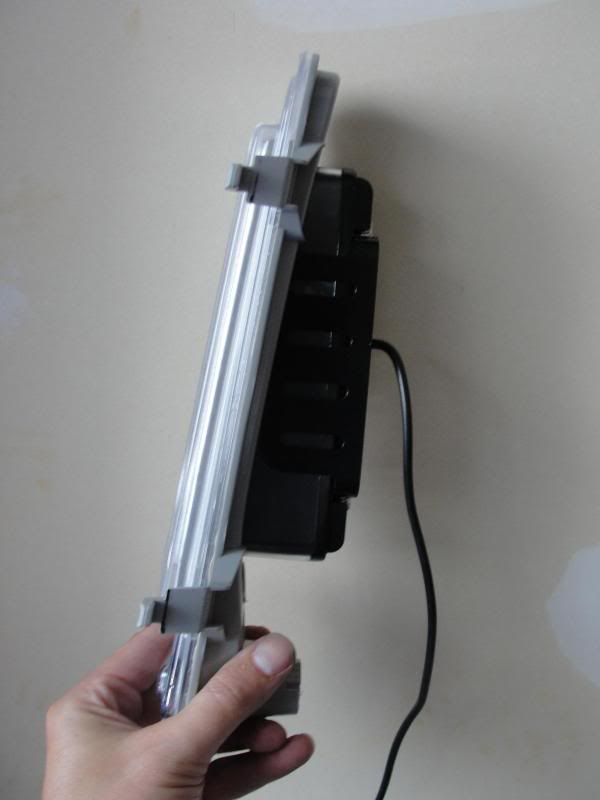
And used some RTV silicone sealant to make the new housing watertight.
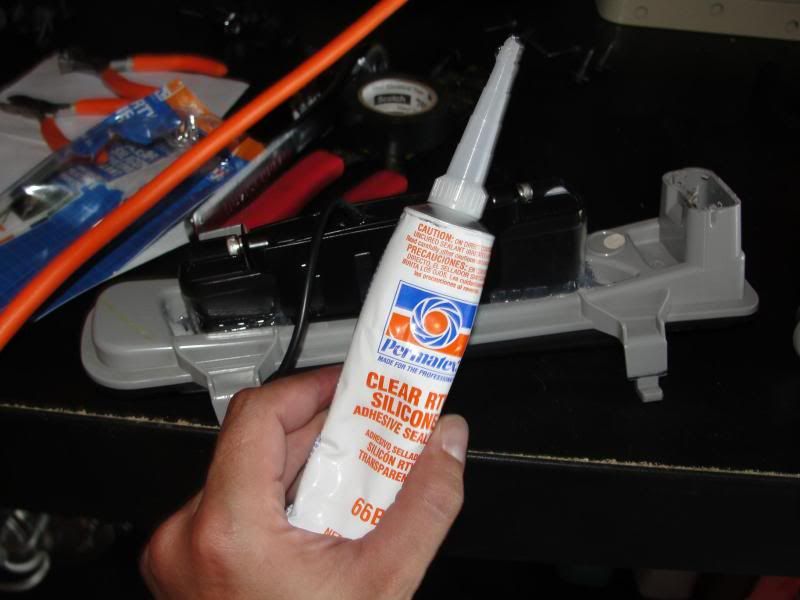
Wire in the DRL control box.
This Phillips product is actually pretty versatile. The control box has a couple of different ways to wire it (relayed/switched, in line with parking/fogs, direct to terminal) along with the corresponding diagrams on the box. I chose to wire it directly to the +/- terminals on the battery so it powers up whenever the car is on. BAM!!!! DRLs!!!! The LEDs will also activate briefly with lock/unlock, and turn off when the headlamps do upon exiting the vehicle. They remain on during remote start.
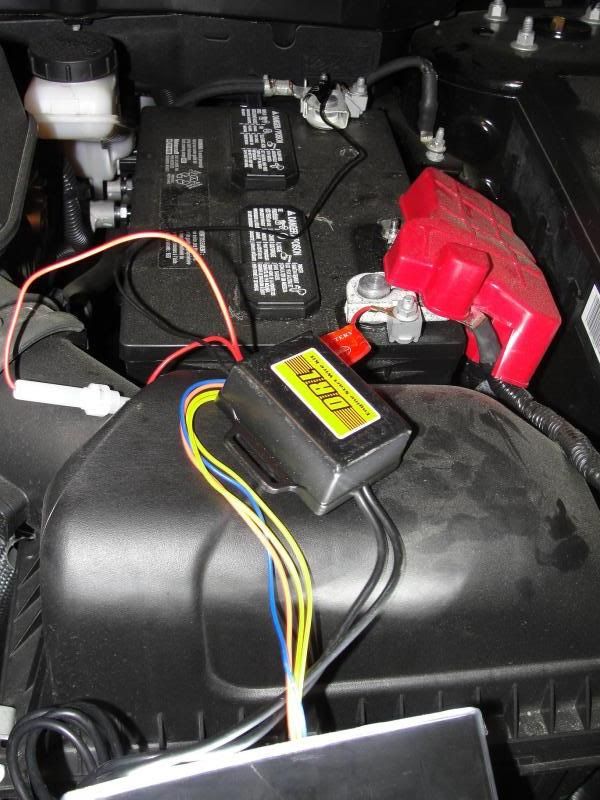
You'll need to mount the control box somewhat near the middle front of the engine bay unless you want to splice additional length into either of the leads. There are 3' leads from the control box and each LED with a connector harness on the ends. In order to make sure the wires weren't near heat sources or blocking any airflow I centered the mount against the grill using zip tie through a pre-existing hole on top of the radiator support and around one of the electrical wire looms. Another option would be to splice some additional wire into the +/- leads to the battery. It looks like simple 12 gauge and would open up a ton of other mount points for the control box.
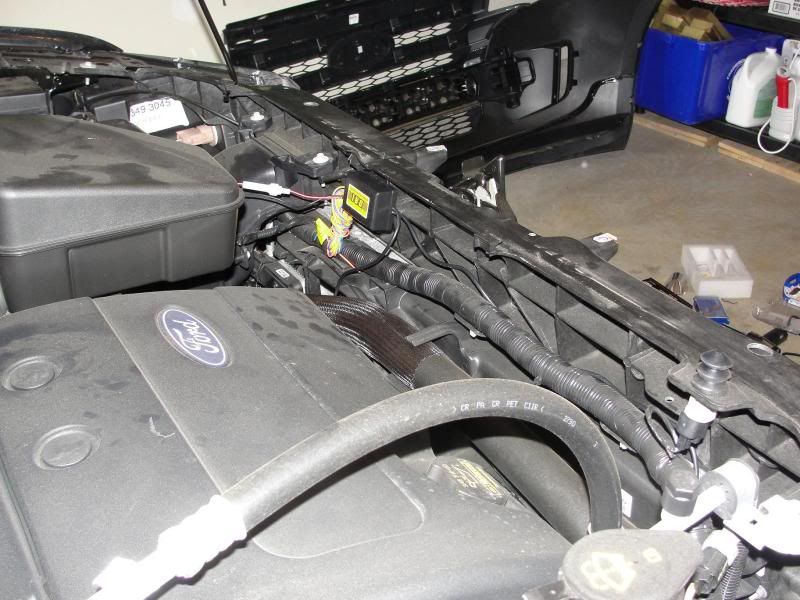
Coming from DIY mods on German cars for the last 15 years, the amount of space and ease of wire routing in this engine bay was like Christmas in July!!!
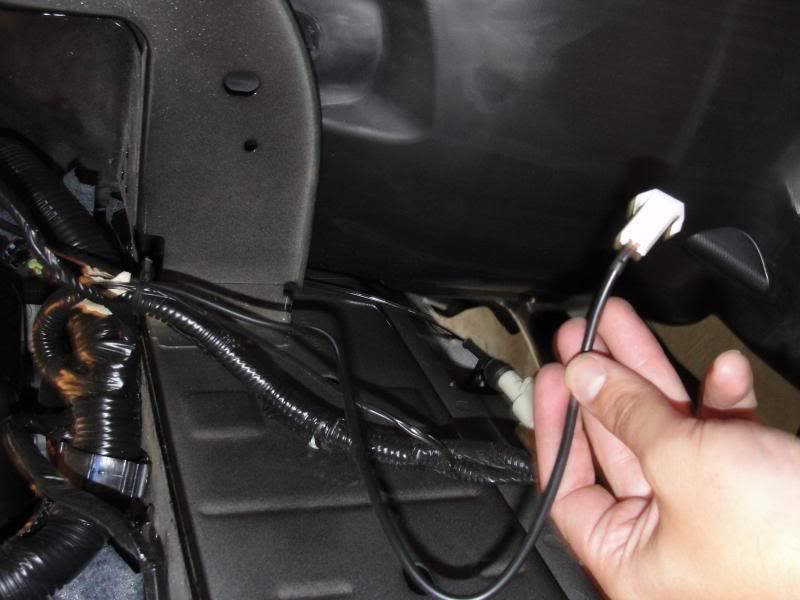
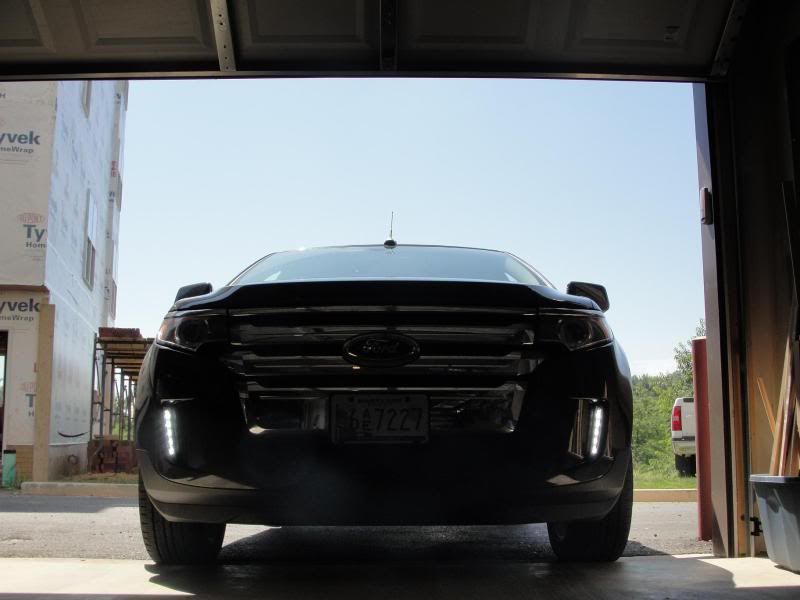
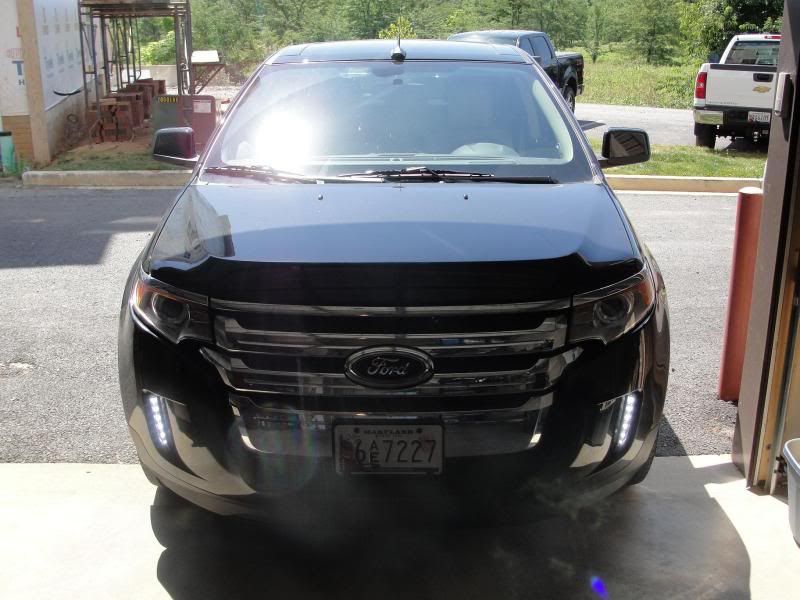
Test, clip in housing, reattach bumper and ENJOY!!!
I'll post some better daytime and nighttime pics of what they look like soon. The pictures above don't do the brightness justice as they do really look like the Benz LEDs coming down the road. I have an idea to scuff the lenses with a fine grit sandpaper to hide the interior reflector cuts and also diffuse the individual LEDs. Also, the temp on the LEDs doesn't match that of the factory HIDs, so once those bulbs burn out I'll be replacing with 6000K to have a nice uniform color.
I know this was a long, picture laden post, but I wanted to start this thread in hopes of helping people do what I did, or come up with better ideas/approaches. Thanks for reading!
-
 2
2
-
-
Dude that's awesome...thanks so much for the advice and the link! Now I'm thinking you've got the right idea with taking the bumper off...who knows how tricky the retrofit will be, or what kind of fabrication needs to be done.
I'll try to take detailed pics and put together a diy for anyone else who's interested.
-
Actually I did have a look.
While wrapping my grille in vinyl, I pull the front bumper cover and had a good look back there. There's enough room in there to mount a desktop computer if you wanted.

Unfortunately, my camera (phone) was acting up that day so I only have one image of it:

This shot was from the wheel well with the liner pulled back. You could get to this point on each side without taking the full bumper cover off (although it takes only 10 minutes after the first time).
You can see where the pigtail connected to there at the bottom of the light bar. The LED sits in there firing upwards shooting a beam the length of the bar. There are about 4 clips holding the whole unit in (I didn't venture far enough to take them out yet as I was busy wrapping the grille). Looks like you could remove just the grey plastic and cut out (dremel) a section to fit your light bars in back and fire them through the bar.
Plenty of room to mount a relay if you wanted to change how the lights were controlled.
I'm thinking about putting some LED bars in there with a controller that would display a "power on" sequence on start up. We'll see.
Which LEDs did you purchase?
These ones
http://store.ijdmtoy.com/Philips-Day-Light-LED-Daytime-Running-Lights-DRL-p/led_ddl_sku_7c.htm
Sounds like they should fit pretty soundly back there.
Did you jack up the Edge and take the wheel off before pulling the cover back? And were there only the 2 screws you first surmised (and plenty of clips I'm sure) holding it in place?
The vinyl wrap looks great btw. Thanks for the pic!
-
 1
1
-
-
yogregb did it.
We presume that he installed the lights behind his current bar. I was going to check behind there and see what kind of room there is. Seems to be just 2 hex to remove by the wheel well for access. Will probably do that this weekend.
search DRL light bar here and on Google to find out the type of thing he used. They were about $150.00 for the knock off philips-type DRL led bars.
Hey Cal3, you ever get a chance to pull the bars out? I ordered the Phillips yogregb used and will be installing next week, just wondering if you had any insight in getting the OEMs out of there before I inevitably start breaking things back there

-
HI All,
I am adding two subs to my Edge, one which is for a JL sub I am adding, one is for the 4 speakers I already replaced. I am now trying to add an re-q5 unit which strips the audio from the head unit and passes clean, unaltered sound to the amp which then does all the processing. I need access to the back of the screen where the wiring harness is, but can't seem to get back there. I can see the wires coming off the head unit (stock MFT) when I take off the glove box, but I need better access to tap into the wires coming off of the head unit. Can anyone assist me on where to start removing the center stack area so I can get directly behind the touch screen? This is the last remaining piece I need to finish my setup so any help is appreciated!!
Thanks.
Nice setup Spongers! Sounds like a vast improvement over the Sony stocker. I thought it was pretty decent when I first bought the Edge, but after my first extended road trip with the windows down and volume up I need to upgrade some things.
1st, door speakers. Crutchfield has a good range of 6x8s for the front and rear and since this is the easiest part figured I'd do it this weekend....how hard were the door panels to remove? I haven't looked at them yet and Crutchfield doesn't have instructions in their master install. Any tips?
-
Awesome! Thanks Cal3, guess that string started up since I was here last.....would love to get a mash up of your knowledge and yogreg's experience thus far to get a thread write-up going on this awesome diy.
-
I just made up my wire haness with relay and diodes to hook up my vertical led strip lights as DRLs. I will be installing this set up Sat. the 19th...will post pics when done. Hope to install a 5k hid kit at the same time. I just can't decide which kit to go with, retro/solutions sounds good but is way more expensive compared to others...we will see!
Bump-da-bump!
yogregb, you ever finish this up? Pics?
-
So there's been plenty of talk about stretching out the width of the tires to get more ground contact, but I'm actually more interested in upping the diameter a little bit.....going from the stock 245/50/20, to 245 (or 255)/60/20. I think the Edge would look a lot better if it sat about an inch taller. My concern is any drawbacks from going up in sidewall size. Obviously, more sidewall = smoother ride, but I'm more worried about changing the handling characteristics at high speeds, aerodynamics, etc. An inch in sidewall isn't a huge change, but it throws the speedo off by about 4 mph and most likely dip the mpgs some too.
Anybody gone with taller tires yet, or know of any adverse effects? Thanks.
-
I just made up my wire haness with relay and diodes to hook up my vertical led strip lights as DRLs. I will be installing this set up Sat. the 19th...will post pics when done. Hope to install a 5k hid kit at the same time. I just can't decide which kit to go with, retro/solutions sounds good but is way more expensive compared to others...we will see!
Looking forward to some pics, and hopefully a write up if all is sucessful!
-
You're right. You should notice the absence of cold.
I notice the heated seat more in the passenger seat where my friend's blanket sits. The blanket holds the heat in so it's more noticeable.
Try running the car for 10-15 minutes
Ran it for 10 minutes again this morning. The driver's seat feels the same temp as the back seats. I'm wondering if it needs to be looked at by the dealer. For those of you who notice the difference, are the seat warmer icons lit up on the MFT screen when when you actually start (depress brake and push button) the vehicle?
-
I picked my Limited up already installed with Gen 2, and I can't imagine how bad the touch screen responsiveness was before for people to say it is better now. The Pioneer AVIC Z-110BT I had in my last car was lightning fast in touch screen response AND had the tabbed alphabetization reffered to in 7(
 of the letter. I luckily haven't experienced any of the other issues, but points 6 and 7(
 are valid and inexcusable oversights in a (potentially) great system.
HaHa! Whoops! I guess i just accidentally figured out the HTML formatting for 7(
 .......meant to say 7-b
 -
I picked my Limited up already installed with Gen 2, and I can't imagine how bad the touch screen responsiveness was before for people to say it is better now. The Pioneer AVIC Z-110BT I had in my last car was lightning fast in touch screen response AND had the tabbed alphabetization reffered to in 7(
 of the letter. I luckily haven't experienced any of the other issues, but points 6 and 7(
 are valid and inexcusable oversights in a (potentially) great system.
 -
I've done hundreds of installs but this will be the first time I've opted to keep the factory headunit in one of my personal cars.
That picture looks hella scary eh'
My sentiments exactly!! It really is an impressive system, much better than the Dynaudio ones in the premium VW setups. My fiancee is soooo happy that I really like this system and I won't be spending hours tearing apart the dash. While I haven't done hundreds of installs, I've reworked every single one of my previous vehicles and quite a few of my friends'. Really everything that's lacking in the system could be fixed with an outboard processor and just upgrading the speakers. I'm still waiting for the trusty old Crutchfield research to be done, but does anyone know the speaker specs in all the locations? I'm assuming the standard Ford 6"x8" in the doors?
Oh yeah, since I'm keeping the MFT and Sony, if anyone wants to buy the AVIC Z-110BT I had in my VW pm me.

LED Strip Retrofit. '11 Limited. DIY.
in Glass, Lenses, Lighting, Mirrors, Sunroof (BAMR), Wipers
Posted
Wealth of info guys, thanks! I think it's becoming a tad clearer now. Dingo, good observation about the "Phillips style". I thought the control box and packaging looked a little....umm...cheesy I guess is a nice way to put it, compared to what a Phillips product would look like. So after looking at the real Phillips diagram it does appear that they are similar, so if I am going to operate on the assumption that the orange wire out of my control box is similar to the Phillips one I should be able to connect it to the position light wire and if there truly is a modulator in the control box it should dim the LEDs at night. I'll go with this route 1st as it involves connecting one wire instead of all the splicing required to direct wire from the PWM to the DRLs.
Sooooo....I'm really hoping that is the way you have yours wired up Dan and that you can tell me which wire in the headlight harness is the one I need to tap in to.