


chipdog4
-
Posts
24 -
Joined
-
Last visited
-
Days Won
1
Content Type
Profiles
Forums
Gallery
Posts posted by chipdog4
-
-
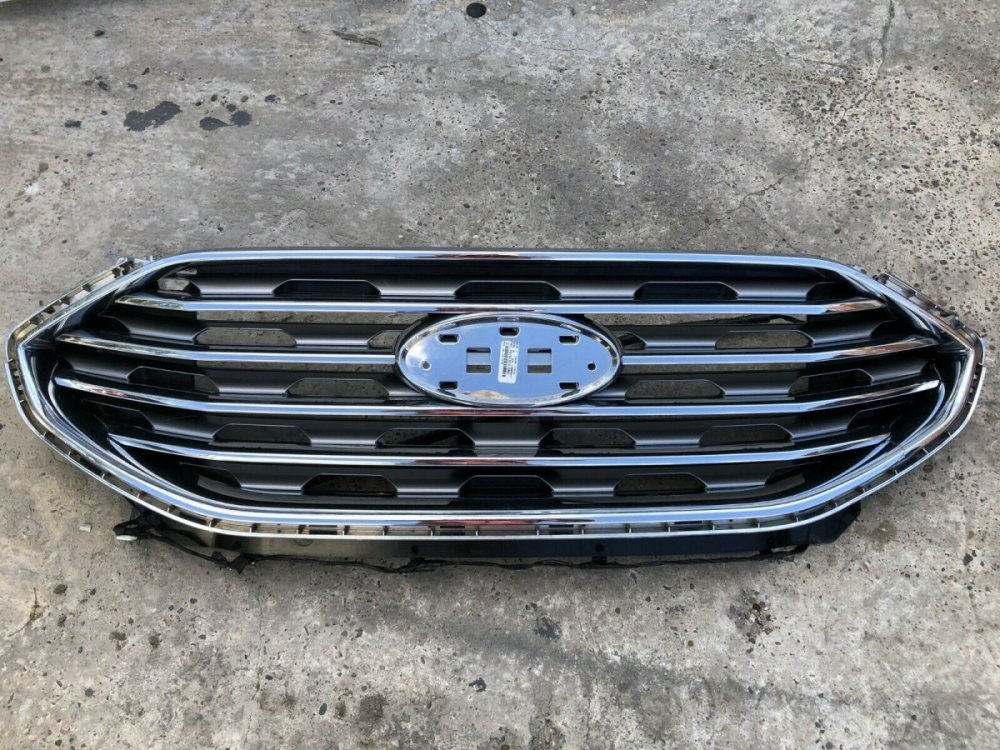
I know these top 2 parts numbers are correct as I bought one of each.
KT4Z-8200-BA is the ST grille without camera
KT4Z-8200-KA is the ST LINE grille without camera - same honeycomb grille as ST but without the ST badge in the lower corner.
These I'm not positive on.
KT4Z-8200-DA is the ST grille with camera (there's an ebay ad with pictures - this part number is more than likely correct)
I'm thinking KT4Z-8200-XA is the ST LINE grille with camera, but for some reason is coming up as over $1,000 (a polish website has pictures)
The ST with camera is showing up discounted and quite the deal at $160. I gave about $300 for each without camera grille.
https://www.fordpartsgiant.com/parts/ford-grille_assy_radiator_kt4z-8200-da.html
There's a couple other part numbers I'm thinking are: one for Titanium Elite, one for 19-23 with and without camera (chrome bars), and one for the new base model grille.
https://parts.autonationfordwhitebearlake.com/search?search_str=KT4Z-8200
-
 1
1
-
-
I removed the factory sub and installed the MB Quart 8". Not a huge difference in sound.
I can feel the bass a little more and there's no distortion at any volume.
Was it worth the $60 and the time to install it? Possibly
I was in a rush and didn't take any pictures. I did shove a couple handfuls of polyfill in the enclosure before sealing up the sub.
From this thread,
" Coil #1 Purple/Blue is Positive, Yellow/Blue is Negative.
Coil #2 Yellow/Purple is Positive, Green/Blue is Negative. "
I had Yellow and Purple on one coil and Green and Black on the other coil (all solid colors, no stripes). Black and (IIRC) purple were negative, yellow and green were positve.
-
15 hours ago, PrinzII said:
2022 has not been kind to my 2018 Edge.....
a) My wife got into a an accident in March and I had to put it in the Body Shop for a week. I had a Lexus NX as a rental but it really did not compare.b) I broke the passenger side mirror this past Saturday when backing out of my parking space. I checked with the dealership and, to fix it, it will cost me $1000 #neededadefibrillatorafterhearingthatprice
I am scouring junkyards to find a matching replacement. I am also going to call my body shop to see how much it will cost for them to replace it.
c) Still hunting for that ever-elusive Vignale grille.
regarding c.
I looked them up when I was considering a 15-18, I bought a 19 instead.
One is the front camera version, one isn't. US dealers should be able to get one. There's some on the Ebay ~ over $1,000
GT4Z-8200-VA
GT4Z-8200-XA (think this is front camera version)
This member bought a used one from overseas and then resold here stateside.
-
1
-
-
Why do you need new piston rings? You have to completely take apart the engine to replace them.
Standard would indicate factory bore size. The other one indicated as .50mm O/S is oversized for when you have a catastrophic event and the cylinders need to be bored oversized to remove scratches or gouges.
-
1
-
-
3 hours ago, enigma-2 said:
Aren't the OE subs 2 ohms?
The 2015-2018 Sony subwoofers probably were, but everything I could find for the newer B&O subs in other Fords said they were 4 ohms. So I measured mine to make sure.
And I went ahead and bought one of the MB Quart subs. Not sure when I'll get around to installing it.
-
Vinyl is probably going to be way cheaper
Looks like there's several variations (probably because it comes with some of the buttons, like autopark)
Almost impossible to verify without a picture.
https://www.tascaparts.com/search?search_str=KT4Z-58044D90
$200-$400
KT4Z-58044D90-AA (silky black without autopark)
KT4Z-58044D90-AB (twilight without autopark)
KT4Z-58044D90-AD
KT4Z-58044D90-AC
KT4Z-58044D90-BA
KT4Z-58044D90-CA (satin aluminum with autopark)
KT4Z-58044D90-DA (satin aluminum without autopark)
-
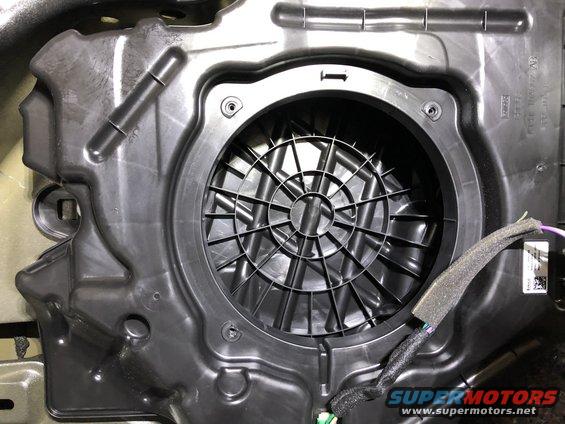
I'll be upgrading my 2019 Bang & Olufsen sub in the near future.
Wanted to check out what was in there currently.
It's a dual voice coil. Measure 4 ohms.
The mounting depth is very shallow 3 1/2"
This box looks to be easier to modify for a slightly deeper sub than the 15-18 Sony enclosure with the molded nub behind the sub.
Here's a photo of the 15-18 Sony enclosure
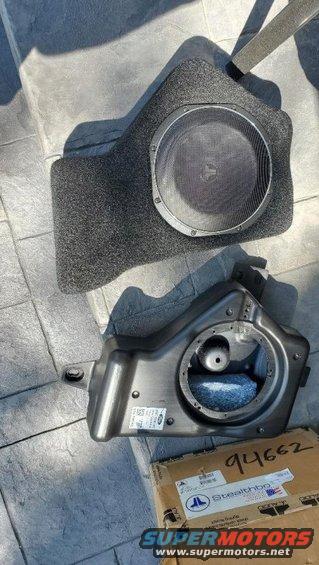
Here's the 19-22 B&O enclosure. (picture rotated on me)
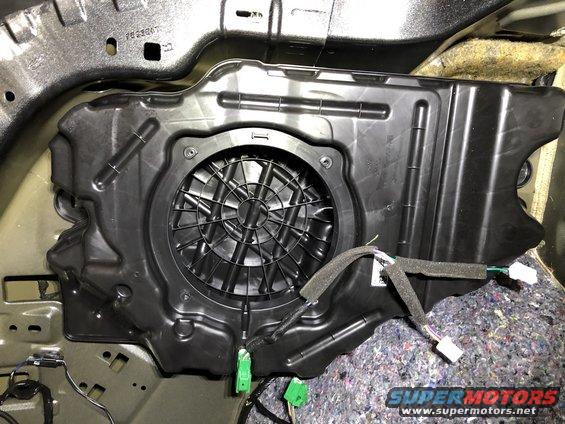
The reinforcement webbing could be sanded down for a deeper sub (probably get a 1/4" and a then quite a few more subwoofer choices.)
Dual voice coil, 4 ohms each
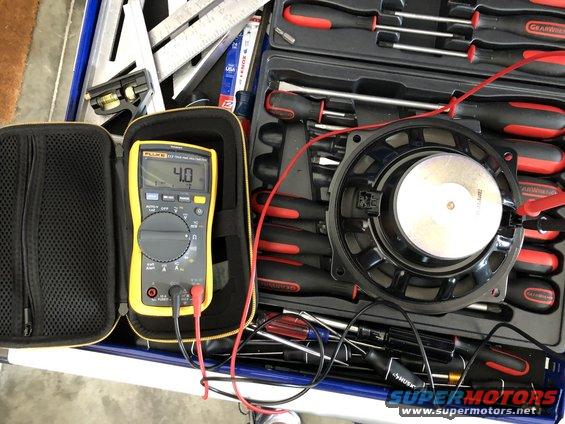
The subs above will work, in the 4 ohm version.
Kicker 48CWRT84
https://www.crutchfield.com/p_20648CT84/Kicker-48CWRT84.html?tp=111
Rockford Fosgate P3SD4-8
https://www.crutchfield.com/p_575P3SD48/Rockford-Fosgate-P3SD4-8.html?tp=111
MB Quart DS1-204
-
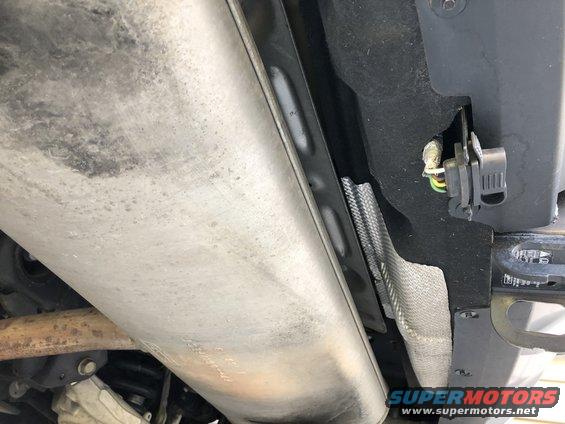
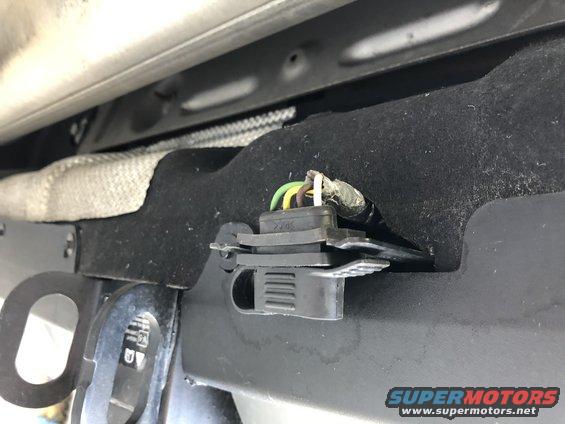
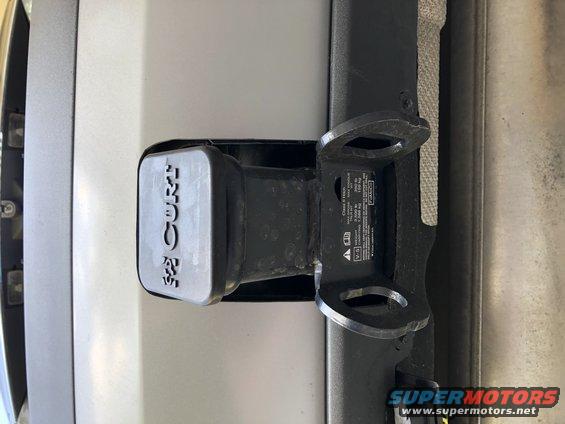
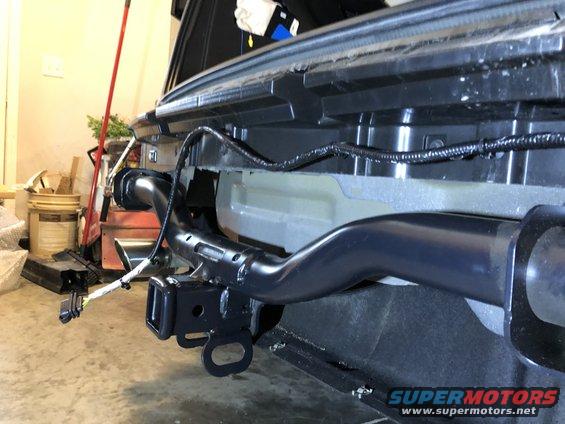
Nice find Haz!
Crazy to see how much they cut out on the one with the tow package. I had to make a small cut for the wiring harness and that was it. The hitch does contact the cover and presses it down about a 1/4" right below the receiver tube.
And someone asked about taking the bumper off to mount this, you should be able to get it in there with the bumper on. From the photos above, there's no mounts above the muffler either, just one on each side.

-
2
-
 1
1
-
-
16 hours ago, Haz said:
So, absent feedback from other GEN 2 Edge owners, I'll offer the results of my online research.
Edge Workshop Manuals from model years 2015-to-2022 show a panel, the Rear Center Bumper Cover Shield, which attaches to the bottom of the bumper cover with six screws, extends forward then upward between the muffler and the bumper bar or factory hitch bar, with the top leg screwed to the underside of the cargo area floor structure.
The following Workshop Manual images have the pictured Rear Center Bumper Cover Shield outlined in yellow...
...
I searched online OEM parts-sellers and Ford's own FordParts.com, and no reference to the Rear Center Bumper Cover Shield exists, including among illustrations of rear bumper cover buildups.
I then pulled VINs for all GEN 2 model years from Edge's equipped with the Tow Package currently offered for sale online, and for each VIN, I ran Historical Vehicle Bill of Material reports, which list parts numbers of components specifically installed on each vehicle. Again, no reference to the Rear Center Bumper Cover Shield existed.
If your zip-tie tethers to your rear bumper cover prove unsatisfying, you could take the Workshop Manual document from the PDF download link below, to your local dealer's Parts Department to see if their resources show the Rear Center Bumper Cover Shield.
Rear Bumper Cover - Removal and Installation - 2022 Edge Workshop Manual.pdf
As an alternative to this potential ghost part that escaped removal from GEN 2 Workshop Manual illustrations, you could fashion a V-shaped brace out of sheet plastic or other suitable material, like the brace molded with a live-hinge into the bottom edge or rear bumper covers of GEN 1+ Edges, which attaches with a single screw to the underside of the cargo area floor, between the muffler and the bumper bar or hitch bar, which is a fairly compact area...
Aloha!
That's interesting, I installed the Ford hitch on my 2019 and reinstalled the all the bumper cover shields underneath. They fit with the hitch in place, but the mounting tab for the trailer wiring harness sticks down and was interfering with the felt cover. I had to trim it to fit there, maybe a 2"x3" square.
I'll try to remember to get some pictures tonight.
-
1
-
1
-
-
On 7/9/2022 at 10:24 AM, Olwiseone said:
I returned from my vacation and am deciding on what day I want to embark on this project. I was thinking about this. Can I reuse the bolts from the bumper bar or do I need new ones?
Thamks again
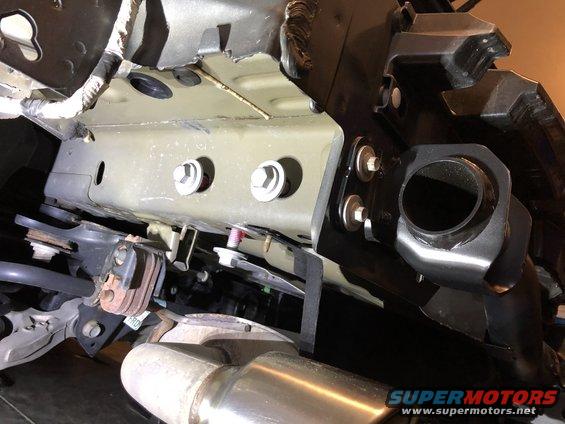
There are 8 bolts for the crash bar, you reuse 4 of them on the hitch, and there are an additional 6 larger bolts (M12 possibly?) that do the bulk of securing the hitch to the body.
-
1
-
-
You're welcome.
It seems like a big job, but it's not bad. Mostly time consuming.
The small bolts for the wheelwells and I think some under the bumper in the rear use a 5.5mm socket or 7/32".
I would suggest wiring like Haz did.
I plan on doing finishing the wiring (inside the rear hatch) like the factory with the tow module and and an additional harness. It costs quite a bit more.
Some of that info is found in this thread.
-
On 6/26/2022 at 8:20 PM, Olwiseone said:
Hi Haz, I was able to purchase an oem hitch from a friend at a great price. I got underneath and realized that it sides into the body instead of over like the aftermarket. Now all o have to do is see how brave I am at tackling this myself.
Thanks for the great info.
There's some helpful photos in this thread.
After removing all the bolts from the bumper cover (underneath and in the wheelwells), I started by pulling the cover out at the wheelwells and going up towards the taillights. Under the taillights, you have to pry all the hooks on the bumper off the body. (The taillights pull straight out the back once the bolt is removed.)
I would get a second person to help you take off and put back on the bumper cover. I wound up swinging mine into the ground and leaving a small scratch in it. I cut out the bumper cover with a jigsaw. An oscillating multitool may be better... Sand the cut edge smooth. Remove the foot sensors first! I installed the split sensor made for the hitch.
Taking my time with cutting out the notch, I spent about 10 hours start to finish.
Unbolt the crash bar.
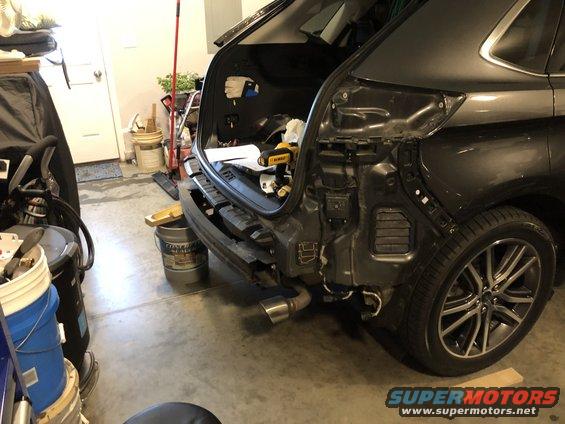
Slide in the hitch
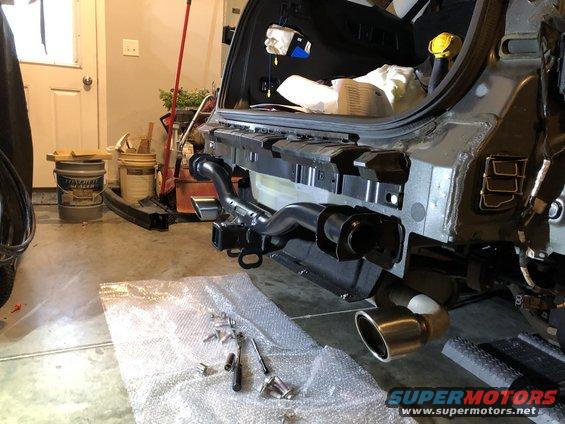
Tighten the 5 bolts on each side
Here's where I installed the harness
-
1
-
-
I was feeling a slight surge/buck over the winter and then in February, it was full on, surging in every gear, any temp, all the time. Made me really hate the Edge.
Got it into the dealer in April for the TSB and they weren't satisfied with it after the TSB reset. I believe the service writer said they then replaced the valve body.
Surging is completely gone, drives like it should now.
-
1
-
-
I guess it depends on the F150 wheels, but I thought most F150s used the large seat like the Edge lugnuts on the left.
I picked up some Gorilla 61148CX to use when my factory Edge lugnut's caps start rusting and falling off. They are little taller and stick out past the wheel a bit more.
http://www.gorilla-auto.com/lug-nuts-page-09
24 pack
https://www.ebay.com/itm/334151861559?epid=1433548720&hash=item4dcd00c537:g:5zIAAOSwe31hRNk6
20 pack
https://www.ebay.com/itm/181391077645?epid=622863125&hash=item2a3bc0310d:g:rJ0AAOSw77RiYbgl
-
Oh, also got my new summer wheels and tires installed a week or two ago.
The wheels are the 20" optional wheels (takeoffs from FB marketplace) and Nitto 421 tires.
-
1
-
-
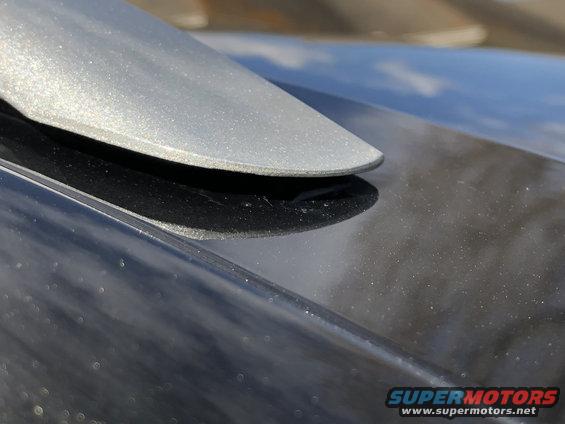
I purchased a new bar and it arrived yesterday, so I installed it. And it looked the same when I snugged up the bolts. ?
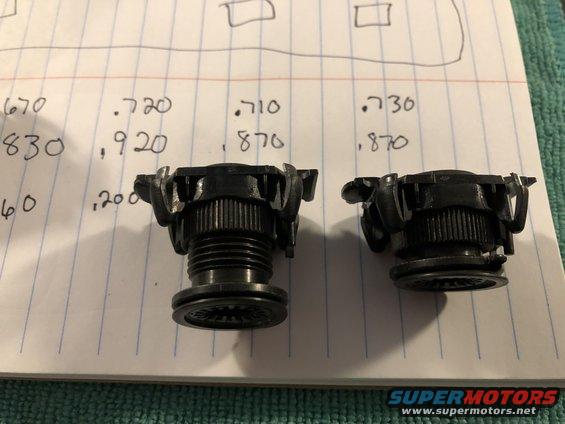
So I started looking at the the "roof rack retainers" (spacer that inserts into the roof) and noticed they were different heights.
I started filing on one to make it shorter to pull the bar closer to the roof and noticed it was actually growing.
Doh! Discovered the spacers are adjustable. I then adjusted them all to the minimum height they collapse to and reinstalled the new bar.
It's touching the roof in some places now, so it better be sealed up good. I wish they were contoured better to match the roof.
I'd be interested to know how the set the height on those at the factory.
They probably don't and just grab them from a container and slap them in...
Very dirty under the old bar.

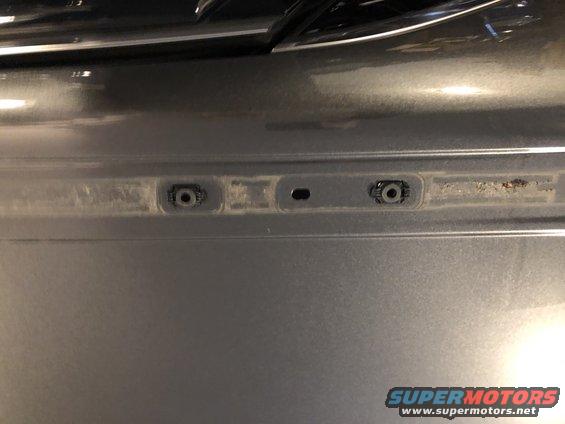
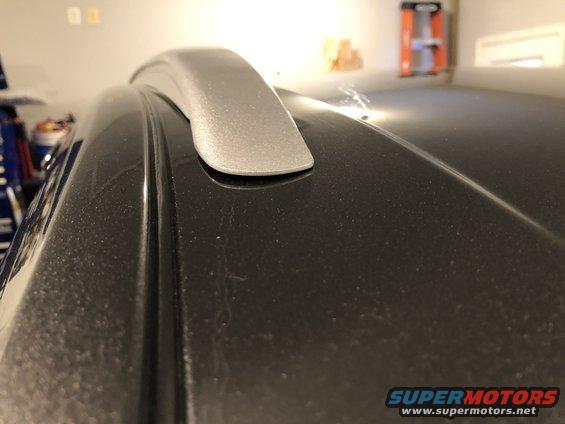
And what it started out looking like.

-
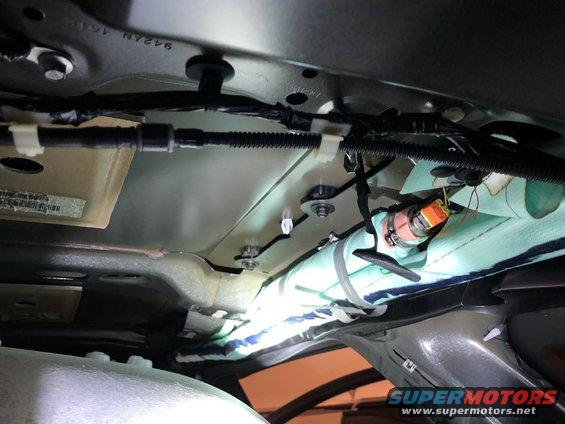
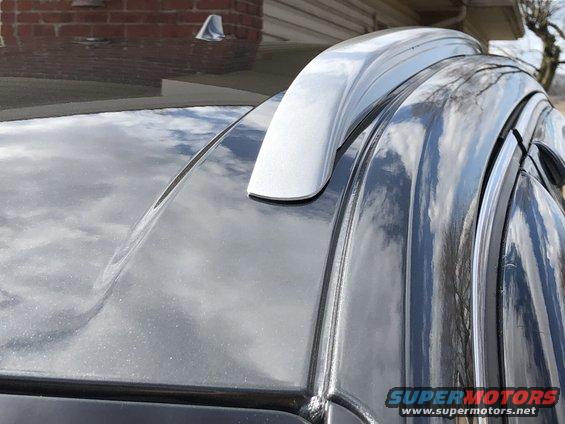
I had some time after work and with some huge help from Haz, I didn’t tear anything up too bad ?
I disassembled the b pillar and some of the a, and took out the grabbars. I was able to get my hand and a small ratchet passed the airbags. The bolts were tight, I gave them a bit more but it didn’t cinch it down any tighter. They take a 10mm socket and each bolt has a large rubber gasket under the bar.I think the roof bar was two pieces and hollow in the middle, water may be getting inside the hollow cavity and traveling down the alignment dowels net to the bolt holes.
(there’s a good picture of the bottom in this eBay ad)
Looks like I’ll be buying a pair of new bars cause if I have to drop the headliner, I’ll do em both.I’ll talk to the dealer but I doubt they be able to help.
There was water spots and some dirt on the inside of the a pillar plastic, it’s traveling right on down the curtain airbags
-
13 hours ago, enigma-2 said:
I'd imagine that once its screwed back tight it will be water proof. But you could always use a small amout of clear silicone around the holes for extra protection.
https://www.amazon.com/dp/B00ID8EDKY/ref=cm_sw_r_apan_glt_i_BHBT4PC24XVHJNT1M0GR
That's first on my list, seeing if the bolts are loose. I can't really push down and compress the seal, so if feels like something may be keeping it from seating correctly.
13 hours ago, SC_ST said:What year and still under warranty? Dealer I say
It's a 2019, but I have almost 53,000 miles on it, so no bumper to bumper left.
4 hours ago, Haz said:Below are PDF download links to relevant sections of the 2019 Edge Workshop Manual.
Please note that related illustrations appear immediately following the numbered action-steps, but occasionally are on the next page in the PDF, due to formatting.
You have certainly owned many nice FOMOCO vehicles.
Good luck!
Roof Rail Removal and Installation - 2019 Edge Workshop Manual.pdf
Headliner Lowering - 2019 Edge Workshop Manual.pdf
A-Pillar Trim Panel Removal and Installation - 2019 Edge Workshop Manual.pdf
B-Pillar Trim Panel Removal and Installation - 2019 Edge Workshop Manual.pdf
C-Pillar Trim Panel Removal and Installation - 2019 Edge Workshop Manual.pdf
Loadspace Trim Panel Removal and Installation - 2019 Edge Workshop Manual.pdf
Holy moly! Thanks man.
This is a huge help.
-
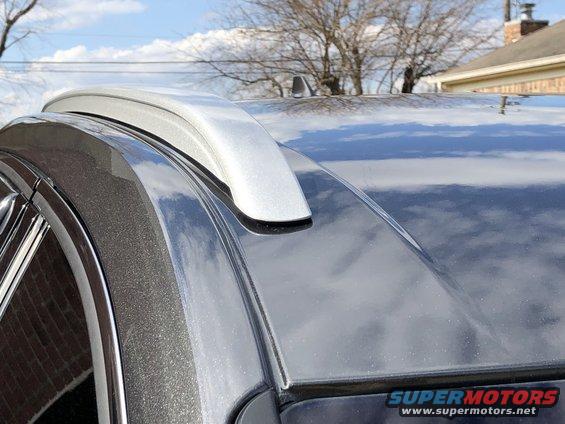
Because I didn’t want a hole in the roof to eventually leak.
I noticed the passenger side roof rack was sitting a little high when I bought my Edge.
Twice now after a very hard rain, I’ve had water on my passenger floormat, so when I washed it this evening, I took the hose and started spraying around the windshield looking for water inside. It wasn’t until I sprayed the passenger roof bar that I got water inside.So I’m guessing I need to partially drop the headliner to get to the fasteners that hold the bar on? Anyone messed with these before?
As usual, there’s not going to be a gasket sold separately...https://www.fairwayfordparts.net/v-2019-ford-edge--titanium--2-0l-l4-gas/body--luggage-carrier
-
I wound up taking a vacation through the mountains a few months ago and discovered that it will hold a lower gear in normal driving mode (D) if you don't hit the accelerator.
So you can downshift to engine brake but once you tap the accelerator, it will resume normal shift patterns. (Side note: the 4 cylinder isn't great at engine braking?)
-
Turn off your lights when backing up, it changes the screen brightness to make things much more visible.
-
1
-
-
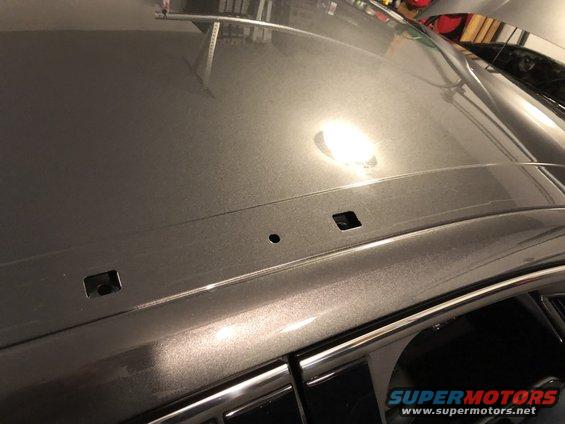
There's an oval shaped recess with holes
-
Is there any way in Forscan to keep a gear locked out in normal driving mode?
I'm used to older Fords with the Overdrive lockout button and newer Fords that allow you to downshift and keep higher gears locked out.
It's infuriating to use the paddle shifter to downshift and then 10 seconds later, it's back to lugging in the gear I just shifted from.
I know there's sport mode, but with the 8 speeds, it's only in the lower gears for a second or two and I have to shift too quickly.
I have a 2019 Edge Titanium with 2.0L AWD

Edge Low Speed Surge/Buck - Transmission
in 2.0L EcoBoost
Posted
It's been about 18 months and 17,000 miles and it's still going great.
I never got any official receipt of what work they performed.
I do have to wonder if with this new low viscosity transmission fluid, if the additives don't go bad after a certain time period and that could be contributing to the shudder too, like the 4R70W in the mid 90s. I do plan to change the fluid every 25 to 30,000 miles from now on.