xbillmh
-
Posts
42 -
Joined
-
Last visited
-
Days Won
1
About xbillmh
Recent Profile Visitors
1,041 profile views

xbillmh's Achievements
")
Newbie (1/14)
-
See this similar thread from today: http://www.fordedgeforum.com/topic/19217-delivery-delay-of-my-2015-edge-titanium/?do=findComment&comment=141388
-

Delivery Delay of my 2015 Edge Titanium
xbillmh replied to Jean Christian's topic in Buying, Leasing & Ordering
This happened to me when I ordered a 2015 Sport back in April. My car was built at the beginning of July, but was on "factory hold" for another 5 weeks before I pulled the plug and cancelled the order. I had no problem getting my deposit back from the dealer, as they were as disgusted with Ford corporate as I was. I could never get any information from Ford corporate regarding the nature of the issue with my vehicle or even a rough estimate of when it would be released from the factory. My dealer could not get any information either. It was a complete fiasco. Bottom line is that you could be waiting forever for a vehicle that has been Frankenstein-ed at the factory. Cancel that order and get something from dealer stock somewhere that has a post-leak build date. -
DIY $8 Aluminum Dead Pedal for Edge Sport
xbillmh replied to xbillmh's topic in Accessories & Modifications
Thanks. Now I just have to figure out some small DIY tweak to the outside of the car. -
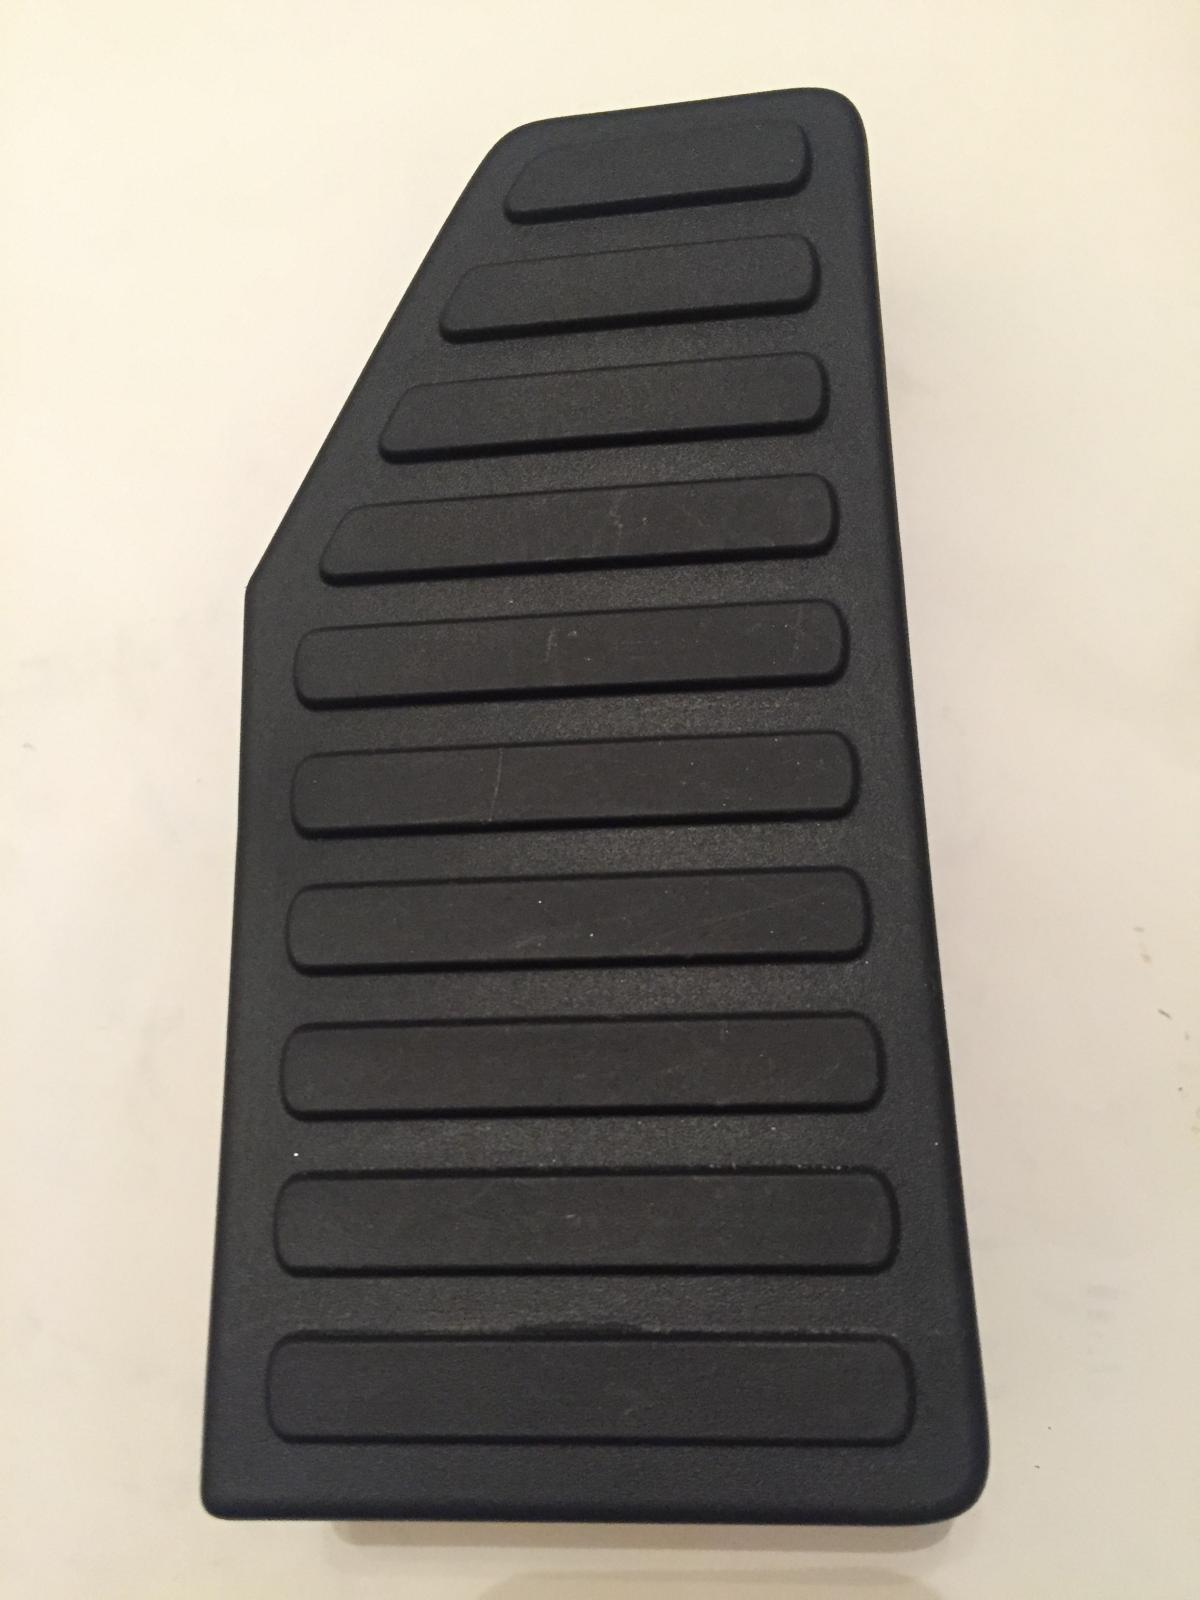
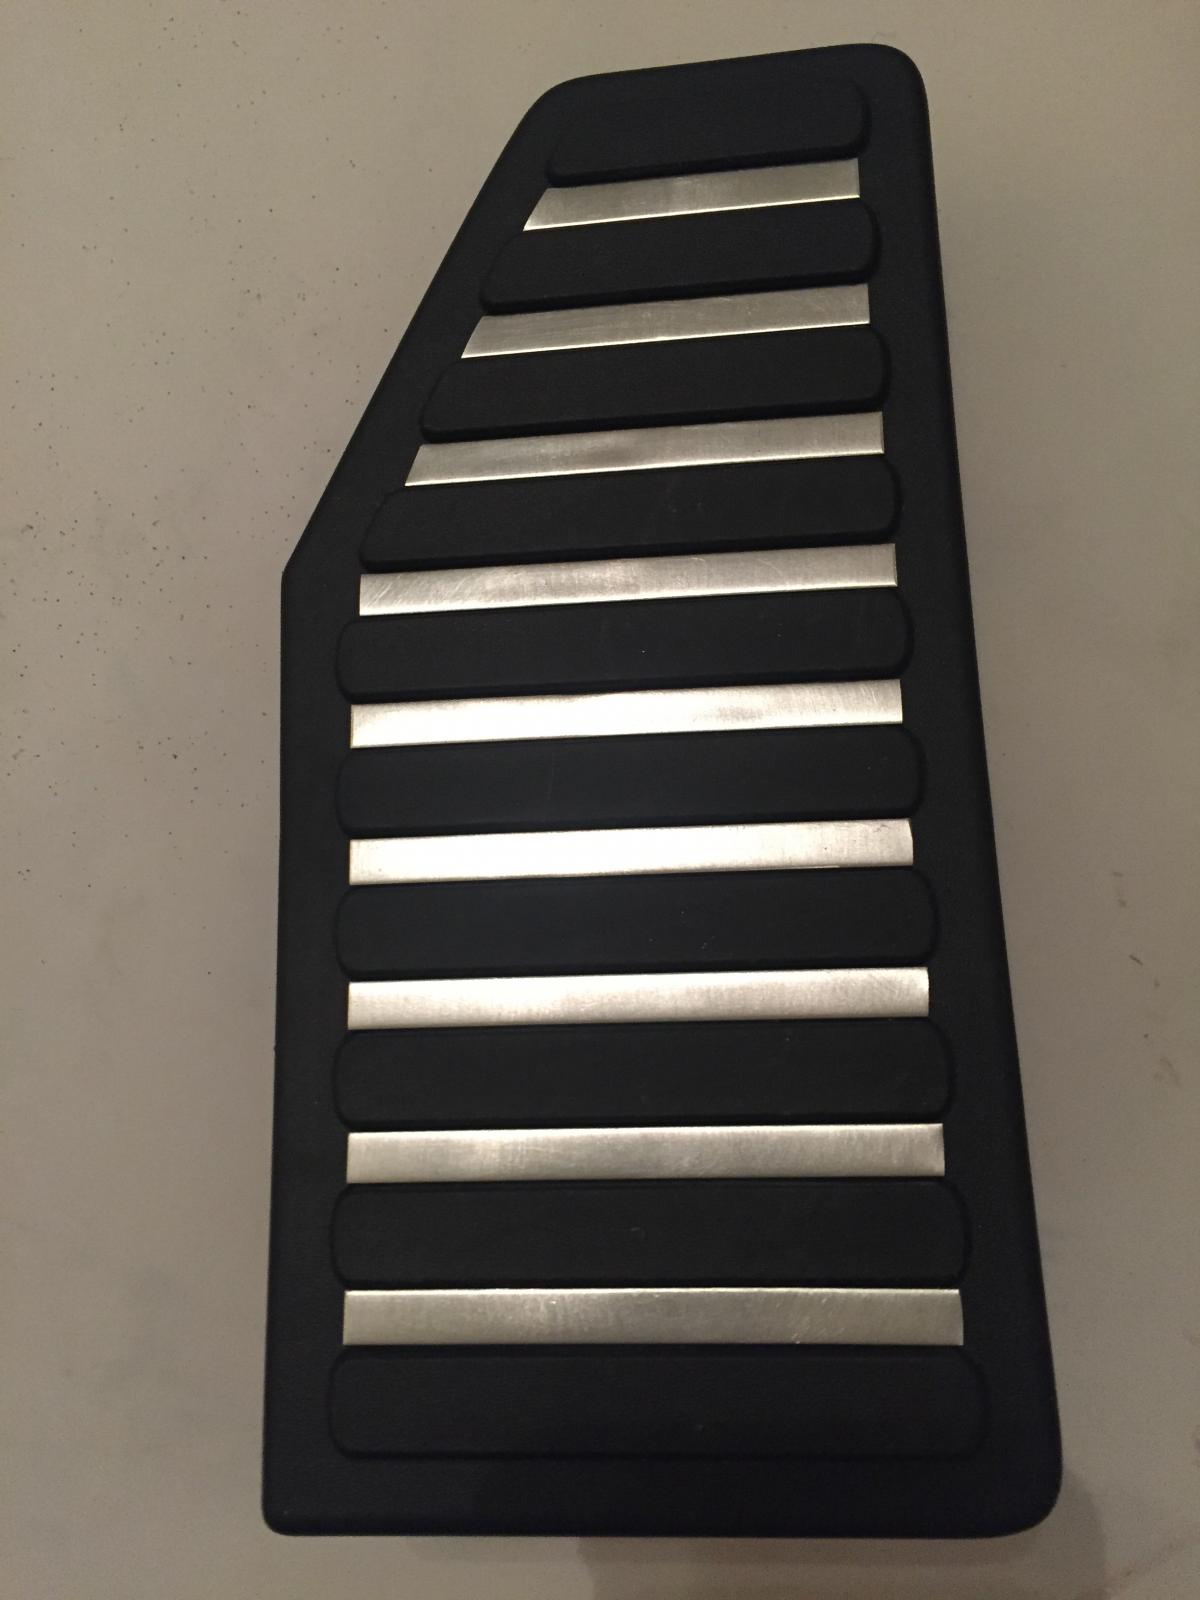
Check out this very easy and very inexpensive (less than $8.00) modification to the cheap-looking plastic dead-pedal foot rest on the 2015 Edge Sport. This makes it match the brake and accelerator pedals. The pedal attaches to the floor-board with 6 plastic dowels or attaching pins of various lengths. The dense foam material that they pass through is not strong enough for sheet metal screws and the large holes that exist in that foam where the original pins pass through would also keep normal metal self-tapping screws from being used, unless they were carefully placed on any replacement pedal. That means that any aftermarket pedal is going to have to be custom-designed for the new Edge. A generic flat metal replacement that screws in is not going to work. Since nobody seems to make a custom-designed item, I thought it would be better to modify the existing OEM pedal with some aluminum strips that match the metal on the OEM accelerator and brake pedals. I ordered 6 strips of aluminum from a craft supplier called www.beaducation.com. The strips are item number Model: AT117 and are ¼ inch wide and six inches long. They are actually blanks for making metal bracelets. Each strip is big enough for two widths of the pedal. Since the pedal has 9 places for the strips to go, I ordered 5 of them. They are only 80 cents each, so $4.00, plus $3.50 or so for tax and shipping! The width fits perfectly between the raised ridges on the pedal and they are thin enough so that their surface sits well below the surface of the raised ridges. I cut each strip in half or shorter for the top of the pedal where it narrows, using metal shears (you could also use a hack-saw). I then carefully sanded off any burs left by the shears with coarse sand paper and also made sure that the bottom strips were all the same length, again using sandpaper to make slight adjustments in the length by sanding the ends of the strips. Be careful to keep the strips flat and don’t let them get bent while working with them. The top 3 strips need a diagonal cut obviously on one end (64/116 degree angles). Once the strips were cut I used fine steel wool to quickly give them a brushed satin finish to match the other OEM pedals. Note that the direction of the tiny “scratches” in the finish of the OEM metal trim is parallel to the long axis of your foot, so brush the strips with the steel wool across their short dimension, not their long dimension. I then roughed up the “valleys” of the pedal a bit with sandpaper (be careful not to scratch the plastic pedal surface on any part that will not be covered by aluminum) and also roughed up the back of the aluminum strips. I also cleaned each surface with rubbing alcohol before gluing. I used epoxy to glue the strips to the pedal since it is so strong and also is not brittle. Due to the raised ridges, your foot is not going to touch the strips and knock them off, but it looks like the pedal can flex slightly if you put a lot of pressure on it, so that is why I chose epoxy. The pedal pulls out from the floorboard easily with no tools just grab it at the edges and gently work out the pins. When done, press the newly trimmed pedal back in and you are done. The pedal looks great installed next to the other OEM items!
-
Frank, thanks for the information. I finally got a chance to go back and try getting the bottom seat cushion off this weekend. It took some wrestling, but I was able to get it off. The trick on my car was to lift the back edge of the seat bench up at the same time that I was pushing the whole seat towards the back of the car. Once I got the seat bench off, I was immediately able to to find the key that had been rattling there!
-
Metal Dead Pedal/Footrest for 2015 Sport?
xbillmh replied to xbillmh's topic in Accessories & Modifications
E-bay shows nothing specifically to fit the 2015 Edge. The OEM dead pedal sits on a raised block of dense styrofoam, with a number of long plastic pins that go through the foam and attached to more plastic below. The one-size-fits all pedals that may be on E-bay have sheet metal screws to attach that won't work in the 2015 Edge. -
Frank, just want to confirm that your experience was with a 2015 model, correct? Also, I have heated seats, so there must be some electrical leads running into the seat bottoms. Did you deal with these connections when you removed the seat bottoms? Thanks.
-
The 2015 Edge Sport comes with nice-looking aluminum pedals for the brake and accelerator, but the dead pedal/footrest is just a cheap piece of black plastic. Has anyone seen a replacement metal dead pedal for the 2015 Edge? I can't seem to find one.
-
Does anyone have the shop manual pages for removing the rear seat bottoms (bench section) on a 2015 Edge? My car has with inflatable seat belts and heated rear seats, if that makes any difference. My daughter dropped a metal house key between the upper and lower rear seat cushions and it fell down somewhere and is rattling a lot. I can hear right where it is by where the right hand side and middle passenger seat belt buckles attach to the floor of the car , but I cannot see it. I have taken the rear cargo bins out of the cargo area in back, but I cannot see it from that side. Folding the seat backs down didn't reveal the key either. I notice that there are two small white plastic tabs under the lower front edge of the rear seat cushion where the bottom edge of the cushion rests on the rear foot-well. When these tabs are pushed to the side, it releases latches on the the bottom edge of the seat, but the seat doesn't seem to lift up freely and the plastic tabs look really flimsy. I didn't want to force the seat bench up. The owner's manual doesn't say anything about these latches. Any help is appreciated. I just need to try to raise the seat bottom up enough to get my hand underneath and feel for the key.
-
Two points on oil in a brand new car: 1. ALWAYS check the oil level before driving off the dealer lot. Don't assume that your new car with 25 miles on the odometer has adequate oil. Don't assume that the dealer checked it in prep. Check it yourself. 2. Check the oil level several times over the first 500 miles. A new engine can burn a half-quart in the first 400-500 miles, before the rings seat, even with modern machining techniques. You are probably going to have to add oil before the first oil change, so if the factory put in magic break-in oil made from unicorn horns, it is going to have to be diluted with regular oil anyway.
-
Thanks for the great information, but I don't see the first steps of the process displayed in the attached images or the .pdf. Specifically, is there a shroud underneath the engine that needs to be removed to access the drain plug? I glanced underneath the car just for a second and didn't see an obvious place to access the plug. It looks like there may be more than one shroud piece underneath and I don't want to waste time taking off and removing covers unnecessarily. Thanks again.
-
Anyone have the pages from the shop manual for an oil change on the 2.7 liter eco-boost for the Edge and/or any related service bulletins? The owner's manual does not contain any instructions for an oil change. Thanks in advance for any help. On a separate note, I saw that an old version of the 2015 Ford Edge owner's manual contain a misprint for the 2.7 liter oil filter specification. The old version incorrectly lists the filter as a FL-500-S, when it is actually an FL-2062 cartridge style filter.
-
All Ford Edges Now on Factory Hold?
xbillmh replied to xbillmh's topic in Buying, Leasing & Ordering
Well, I spoke with Ford Regional CSM and dealer independently and they both had the same vague information, but at least it was consistent. So, your argument is that most dealers lie to their customers by saying nothing? Taking a purely cynical view, it seems like a they would be more likely to lie by saying "the car is going to be here withing two weeks," or something of that ilk, to keep the customer hanging on. At least they didn't do that. My point is that I could never find out what the actual issue was with my car, other than the fact that it was leak-related. Obviously, since I have cancelled the order, nobody owes me an explanation now. But, if I had received better information, I might have been willing to wait it out. -
All Ford Edges Now on Factory Hold?
xbillmh replied to xbillmh's topic in Buying, Leasing & Ordering
Picked up my check today from my dealer for my original deposit on my Edge that was ordered end of April, built July 6 and, as far as I know, still held at the factory for a leak-related issue, per Ford. My dealer still has his own inventory Edge orders held up. I agree that looking at dealer inventory on the Ford web site, there are more recently built cars being delivered. In the abscence of any clear, honest communication from Ford, it is hard to know what is happening. Maybe there was another limited span of production dates for which Ford suspected there was a problem. Maybe some orders were diverted as replacement cars for damaged units or stripped for replacement parts. Who knows? -
Only $1,000, that is the sad thing. For that little money, why make someone mad?