


paker
-
Posts
38 -
Joined
-
Last visited
-
Days Won
1
About paker
paker's Achievements
")
Newbie (1/14)
-
 Rare
Rare
-
 Rare
Rare
-
 Rare
Rare
Recent Badges
-
Ah, lifting both wheels off the ground! I lifted one at a time. I will try again. Thank you.
-
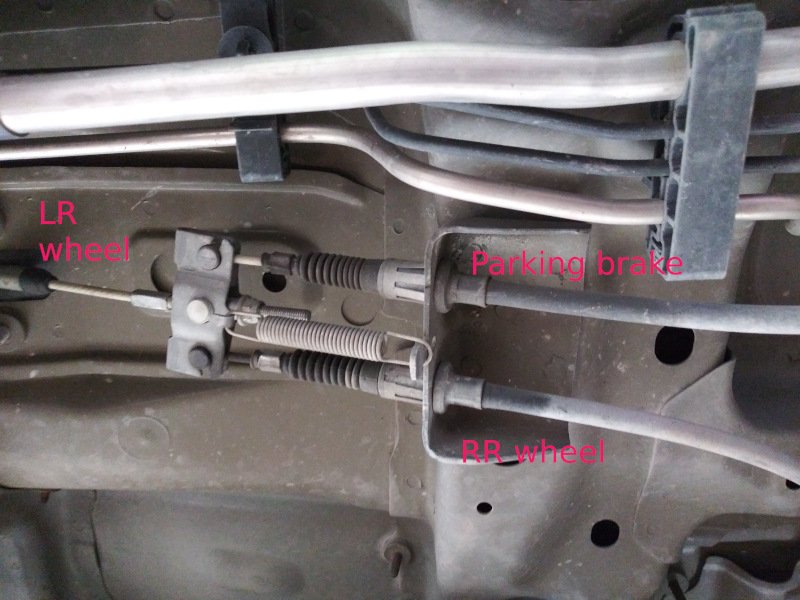
After reading your post, I went out and crawled under the car again. In many cars the pedal cable sits on one side of the adjustment nut and the wheel cable sits on the other. By turning the nut, you pull the cables together. But in Ford Edge, the pedal cable and RR wheel cable are on the same side. This threw me off completely. It took a while to notice the pivoting movement of the equalizer bracket. When the pedal cable pulls, the LR cable gets pulled, which in turn pivots the bracket and pulls the RR cable. In the end, (pedal cable pull force) = (LR cable pull force) + (RR cable pull force). The numbers, 8 mm and 22 mm, seem to be the initial setting when a new cable is installed. I would say it has nothing to do with adjusting a stretched cable like my case. To take care of the slack, the nuts can be turned as much as needed. Adjusting both nuts makes sense because of the pivoting movement of the bracket. If wheel cable is stretched, the pedal cable should also be stretched. But I would say adjusting just one nut doesn't damage anything. Now I have a related question. I would like to turn rear wheels while adjusting the nuts to check brake drag. But the rear wheels don't turn freely. They seem to be engaged in a gear. Is AWD supposed to be so? I tried N, but no difference. Thank you.
-
Thank you for the info. I am too inexperienced with the setup to understand all the procedures. Would you explain in basic terms what needs to be done? In the past with other vehicles I used to shorten the stretched cable by turning a nut. I see the same setup in the equalizer. What puzzles me is why I just cannot turn the nut in the equalizer and call it done.
-
2010 3.5L AWD The parking brake needs adjustment. Crawled under and found an adjustable link that connects 3 brake cables, 2 from the front (one from the parking brake and the other from the passenger side) and 1 to the rear. What is the brake cable to the front passenger side for? Thank you.
-
Can FORSCAN fix LED turn signal hyperflash on 2010 Edge? I searched the forum and found a post on 2nd gen Edge, but not on 1st gen. Thank you.
-
To my great relief after 1 hour wait current dropped to 27-30 mA. I need to get the battery load tested. When disconnected from car after full charge, the battery maintains 12.5 V for days. The Edge used to be my daily driver until a month ago when I bought another vehicle. Thank you HAZ for sending me power distribution diagrams. I just ordered a solar trickle charger, 10 watt. I will need it whether or not I get a new battery. Thank you all.
-
Thank you. I just downloaded the linked documents. I will read them up and follow the procedure. By next weekend I should be able to report back. Thank you again. By the way, I disconnected the negative terminal and the voltage was stable at 12.5 V for a few days. I remember load testing the battery several months ago. No issues.
-
2010 Edge 3.5L Edge is not my daily driver. After a few days of standing in the driveway, battery voltage drops to 12.0 V. Current was measured at 0.2 A in a few minutes. Now I need to pull fuses one by one to pinpoint the culprit circuit. QUESTION 1: I know there are 2 fuse boxes. Are the fuses in the cabin "sub-fuses" to the main fuses in the engine compartment? Or are they indepent? QUESTION 2: Does anyone know when current draw reaches min? If this time is 1 hour, do I have to remain in the cabin for 1 hour with the doors closed? Is there any other way? Thank you. PS: If I am in the wrong forum, please move the question to the right one. Thank you.
-
Aftermarket double din stereo questions
paker replied to paker's topic in Audio, Backup, Navigation & SYNC
According to this forum, 2010 Edge didn't have backup camera option and backup camera cannot be retrofitted to the screen. But I will do internet search. -
I would like to replace my 2010 radio (SYNC and NAV) with an aftermarket double din. I don't have an amp, just a sub. I have 2 questions: 1. Do I lose door chime? Any other essential functions I will lose? 2. If I attach a backup camera and the stereo is off, does REVERSE turn on screen immediately? Or does it go through a lengthy bootup process? Main reason for aftermarket stereo is the backup camera feature. Crutchfield rep recommended against the changeout because of certain dash configuration issue and unspecified electrical issues. So I am seeking help from this forum. Thank you.
-
Both are missing. Bought caps from O'Reily but didn't fit. Went back to O'Reily. They said what they sold me was the only one they carry. Are these caps model specific? Or manufacturer specific? I thought all R134a ports are same in size and shape. I guess not
-
Thank you forum members. I was able to complete the project with your help. Summary notes: 1. Buck Newby had another youtube video. Drawing for the exact hole location is in this other video. 2. I used a T-handle tapping wrench with both hands for the first 2 threads to ensure straight threading. The remaining was done with a socket and a socket wrench. 3. My drain hole is 1/8". I used 1/8" npt tap, 5/16" 12 point socket, 3/8" extension, 3/8" ratchet. Casing was at least 1/2" thick. For 1/8" plug, I tapped about 2/3 of the hole depth. No worries of shavings to enter the gear box. Thank you.
-
Found the drawing I was looking for. It is embedded in this youtube video at 2:40.
-
Odometer read 94k miles. According to this forum, time to replace spark plugs. Bought spark plugs, PCV valve, and plenum gasket set as recommended here. Watched a few youtube videos. Front 3 were easy. Now rear 3. The coils wouldn't come out. Did twisting and pulling alternatingly. No use. Yanked really hard and they came out. Dropped 5/8" socket into the well to remove the plug. No engagement. What the heck is going on? Pulled out a mirror and looked into the well. There is rubber at the bottom! Apparently, the rubber boot was welded to the spark plug ceramic (due to heat and age I suppose). When the coil was pulled up, the bottom portion got torn up and remained in the well. What a mess! Beer time. I need to calm down. I remembered a dental pick set. Relying on the feel, I slowly detached the rubber from the plug post. After 30 miinutes all rubber pieces came out. Old spark plug gaps were between 70 and 80 mils, really worn down from 54. I thank the forum for recommending plug change at 90K miles. Could have been earlier like 70 or 80k miles. My next plug change will be after 70k miles. Lessons learned: 1) Be prepared for boot damage. Apply silicone dielectric grease to the boot to prevent boot-to-spark plug welding. 2) This video was most helpful except for a bolt in the far back (2:45) and an electrical plug (8:00). Both are missing in 2010. The electrical plug is apparently for heated PCV valve. 2010 has a non-heated version.
-
I am looking for the TPU drain drill location photo I have seen before here, but cannot locate it. Does anyone remember where it is? Thank you.

