canucklehead
-
Posts
17 -
Joined
-
Last visited
Content Type
Profiles
Forums
Gallery
Everything posted by canucklehead
-
my 2011 Edge SEL needed the TPMS sensors re-learn as i was swapping my winters mounted on rims. These sensors had already been PROGRAMMED. There is a difference: "PROGRAM" is when the sensor is first-time new to vehicle, sometimes they come pre-programmed to your car. Other times, you need tool to program to your car. Once programmed, you need to "RELEARN" to the vehicle. I have keyless push button start. Youtube videos did not cover mine. Mine is a bit goofy because when you push the start button it first goes to accessory and then you push button again to get to RUN and then a 3rd push is off. All the videos show the cycle as off/on repeat (= 2 button pushes), and nobody had my extra step (=3 button pushes). So let me dummy down what i had to do with mine 1) press hold brake for 3 seconds 2)Push start button 8 times. allow a second or so between each push. after 8 button pushes, dash should be in RUN mode. 3) press and hold brake a second time 4)Push start button 9 times. (could be 8 times on the second go-round)...whether it is 8 or 9, you will hear the horn honk and stop pushing the button when you hear the honk. it is now ready for relearn with the TPMS tool 5) now use your TPMS tool and press relearn button starting at LF tire, then RF, RR and finish on LR. Each time you hold the TPMS tool reset button for a few seconds at valve stem you'll hear a honk to tell you it got it and you can move to next tire. when all done, shut off vehicle. You may have the type of keyless button that immediately goes from OFF to RUN, in which case you will be 5 start button pushes (ending in RUN) , foot on brake, then round 2 of 5-6 more pushes until horn beeps (should end on run again) and then use tool to relearn. I need it dummied down like this to figure it out! Hope it helps someone.
-
replaced injectors on my 2011 Edge. I removed fuel rail and then individually pushed each injector into each hole, then re-mounted fuel rail, re-connected all the electrical plug ins and put fuel rail back on top, then slid on injector retainer clips and then torqued fuel rail to 8 ft lbs. I also replaced all the plugs at same time. I can;t see any mistakes I made. It is running worse and now pops code P0300 multi cylinder misfire. All my wiring disconnected are re-connected, double checked that all my coils were plugged in securely before re-assembly. Wondering if I made a mistake?? How long does fuel pressure take to bleed air out of fuel rail, injectors etc..? Is there a bleed procedure? When I put in new injectors, they wiggle a little with new o-ring not being as flattened as old ones I pulled out , but i can't see any other way to mount them in their holes securely. Are replacement injectors duds right out of the gate? Or have I missed something? thanks for any help.... I am blaming myself yet can't see what I did wrong. i struggle to think the injectors are faulty..but maybe.
-
2011 edge 3.5L intake & fuel rail torque ?
canucklehead replied to canucklehead's topic in Mods & Tech
wow! this link seems awesome to give ALL torque specs. Says the fuel rail is 8 ft lbs and same for intake manifold. but many others here if someone wants to post this in a general help section. https://ford-specs.com/cars/2011/edge3.5/torque-specs_engine.php -
hey all, replaced my injectors and plugs since it was open, and wondering: what are torque specs for fuel rail and intake plenum?
-
my 2011 Edge has code P0304 cylinder 4 misfire again. Previously i tried swapping coil packs and plugs, clearing code and seeing if misfire code moved to the swapped out cylinder. it stayed the same so I assumed it was an injector issue. I dumped in 2 cans of Seafoam and the obvious miss at idle improved and the code went away. It was still running a bit lumpy & rough at idle but was a lot better. I concluded Seafoam cleaned injector. But now code has returned and it is idling rough. I am thinking of replacing the injectors. Since fuel rail gets pulled out to do this I figured I might as well replace all 6. Q: Does brand of injectors matter? Seems like Bosch would be OK.
-
in my case, there was nothing to detect at all to cause the speaker to be on constantly...unless maybe the dud sensor was detecting something right on top of it causing the full-on speaker. Once i replaced the sensors, the system worked as it should. I thought if one of my sensors not working, I would get zero audio. Had also tried the stethescope thing and could hear clicking in all my sensors before I replaced them. Diagnostic tool said speaker not working (I replaced) and driver inner sensor.
-
DIAGNOSTIC UPDATE: SYMPTOMS: My dash would display park aid fault. scan tool said inner parking sensor and speaker. I first replaced speaker and that dash message went away. This makes me wonder if the dash display error message is telling you your speaker isn't working? So with speaker replaced when I put it in R, I get solid steady beep, like a commercial vehicle but again, no dash error message now. I have option to switch off the park aid to stop the annoying solid beep. When I replaced all 4 sensors, all is now good (bumper is off, 4 pack of sensors is cheap, i'd say do them all and save the working ones as spares, toss the broken one.) This makes me wonder if Ford defaults to solid beep to tell you one of your sensors isn't working ??
-
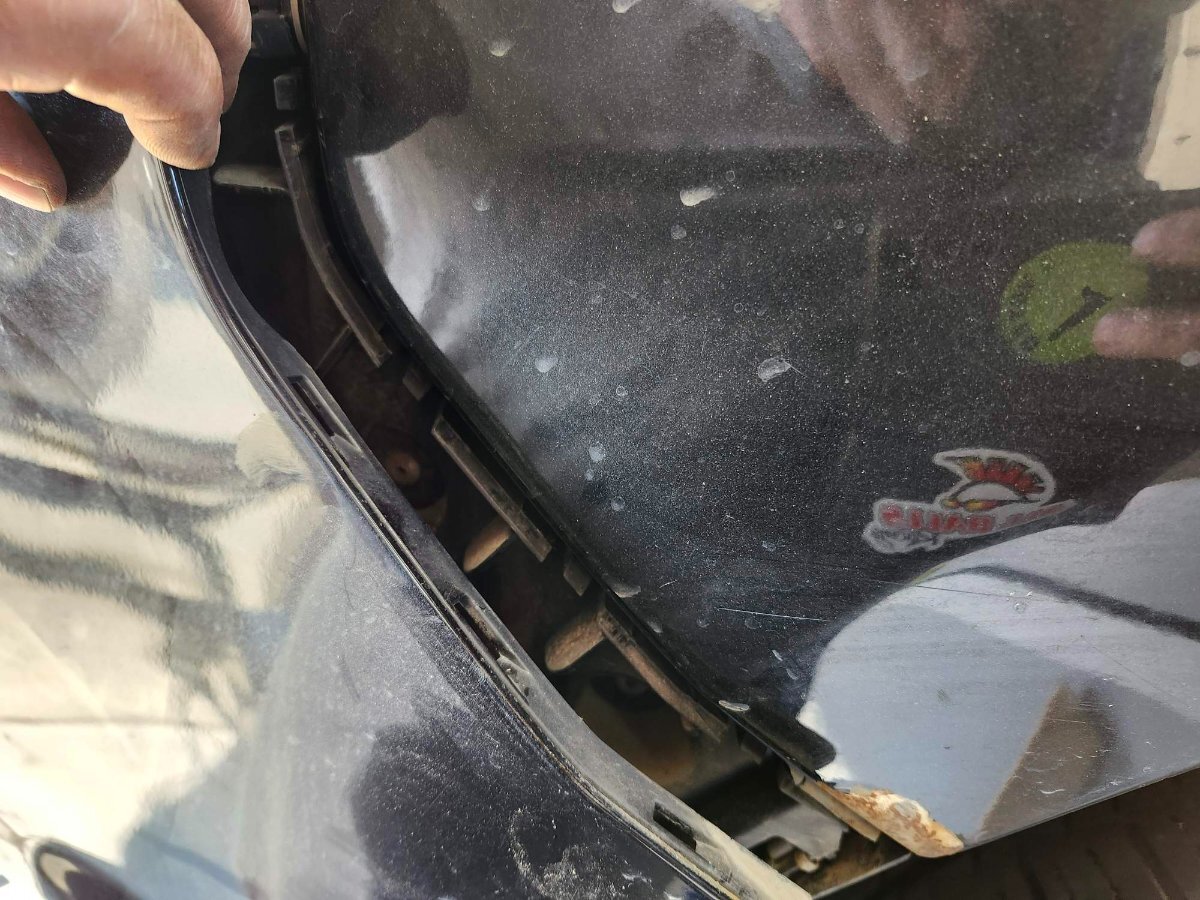
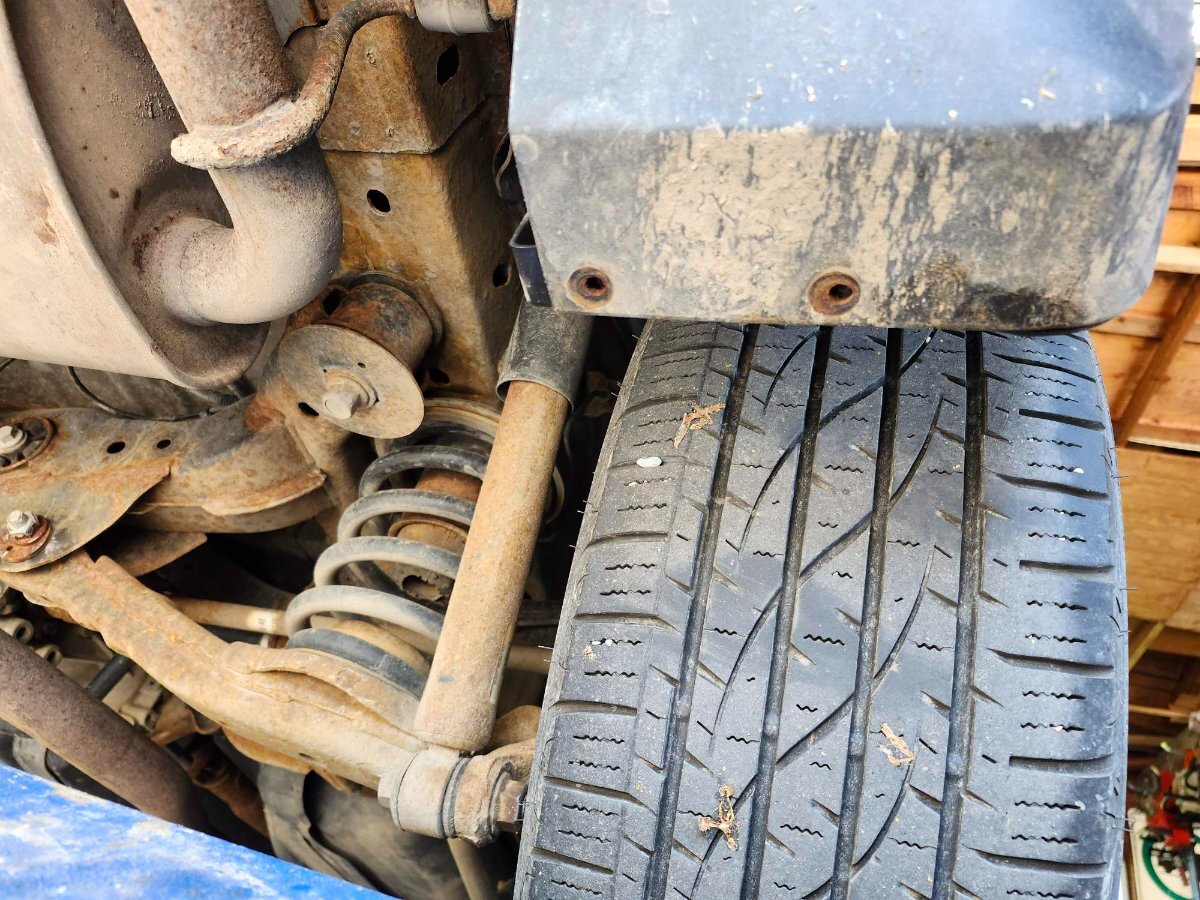
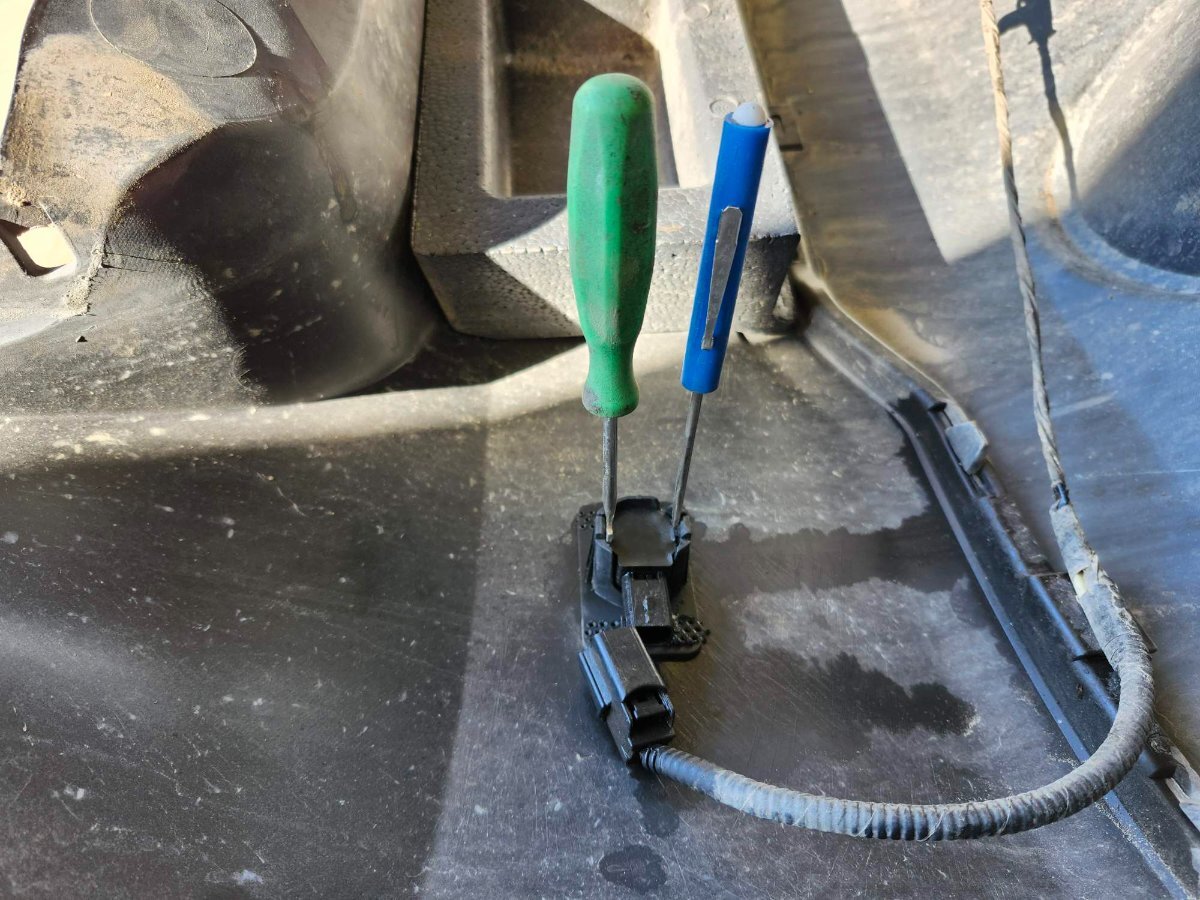
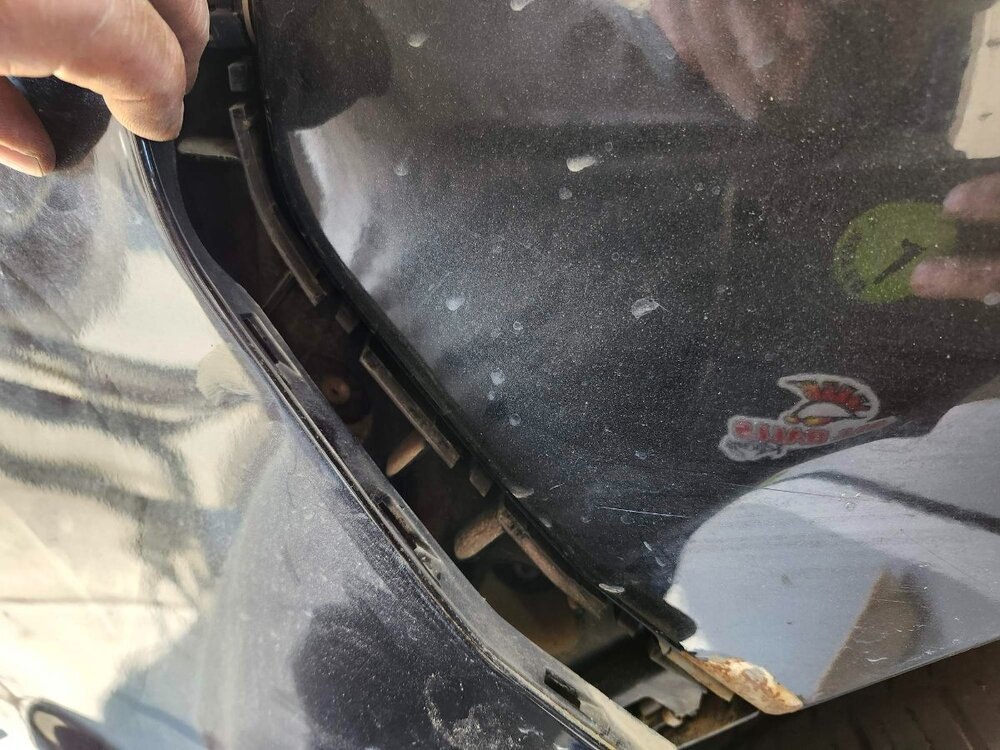
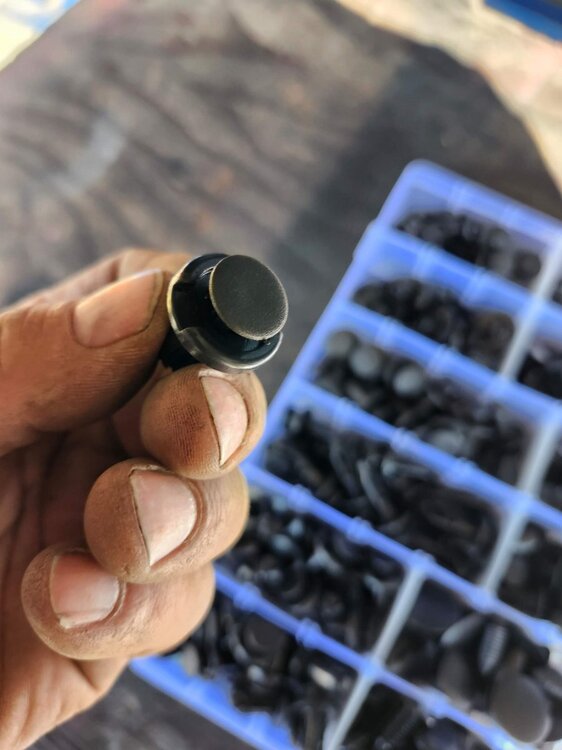
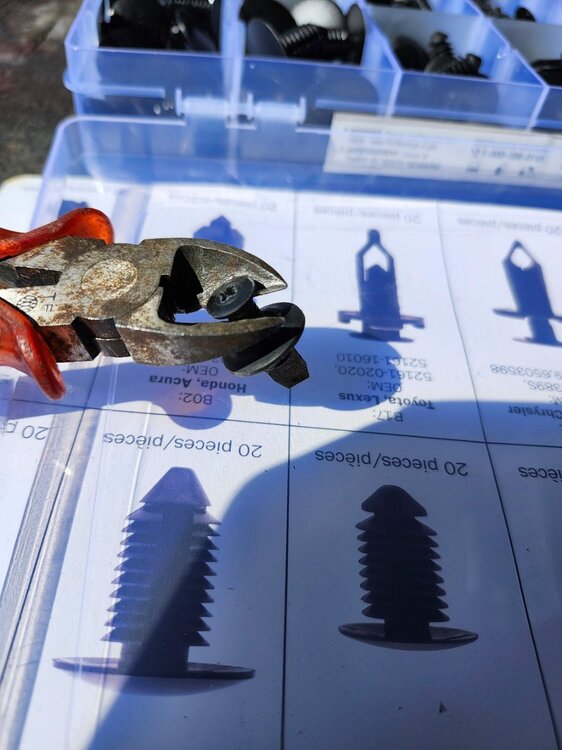
A few tricks here might help, not a tough job but stuff you can break if not careful. Tools: 5.5mm socket, 8 mm socket, side cutters, phillips screwdriver, 2 small flat blade screwdrivers 1) There are a total of 23 fasteners. I sprayed with silicone lube a couple times on the wheel well/mud flap area and the single middle one between tail pipes. Silicone won't eat plastic like other penetrating oils. 2)Remove 8 fasteners under liftgate/along top of bumper. There are 2 x 8mm socket bolts and 6 plastic ones that look like phillips screws but are actually plastic push pin style. 4 along the cargo area and 2 on side near tail lights.I recommend tossing these after and replacing with Honda ATV style push connectors, I believe they are 6 or 8mm size. See pics. My Yamaha ATVs use the screw style and they get tossed and replaced with honda style. You will find the screw part wont come out. I use side cutters to PRY UP NOT CUT OFF. Same side cutters can also pry out other half of the connector. Pics of side cutter, original pins and replacements I recommend. 3) LOOSEN tail lights but no need to remove. Gives you a bit of wiggle room with bumper. 8mm socket as well. 4) There are 7 screws per side on the mud flap/wheel well area. 5 on the inside and 2 underneath. 5.5mm socket. Pic of underside screw location. 5) remove 1 middle bolt between tail pipes. (5.5 mm socket) 6) Have a table or other decent support ready to place bumper on so you don't need to wrestle with big main bumper plug. Or wrestle with plug. Your choice.When removing bumper the 2 outer edges near rear quarter panel/mud flap area are kinda hooked onto a flange/lip. Pull those outward/away before tugging bumper off or you might snap bumper plastic. You can kinda reach in to flap area to do this. I have pic with my hand showing how it snaps on top of flange for re-assembly. 7) Silicone spray all the sensor tabs and electrical connectors, makes removal easier. Push tab on wire connector to pull off. Some are stiff, so I push with thumb and then use small flat blade screwdriver to pry back the connector. You will bust the connectors if you are rough. 8 : Sensor removal: I used 2 small blade screwdrivers to slip between retaining tabs that hold sensor in place. I spread the tabs and lifted at same time and they popped out. The OEM sensor will probably leave behind a squished plastic gasket. need to remove that for the new sensor to snap back into place. 9) re assembly is reverse but make sure you pull out the outside corners to fit over the flange thingy to start. Don't forget to re-tighten tail lights when all done. Replace those crappy useless phillip screw plastic pins with the better Honda style. They are easier to re & re. Hope this helps someone or you get a trick out of it. I found the sensor removal without breaking something a bit of a head scratcher.


-
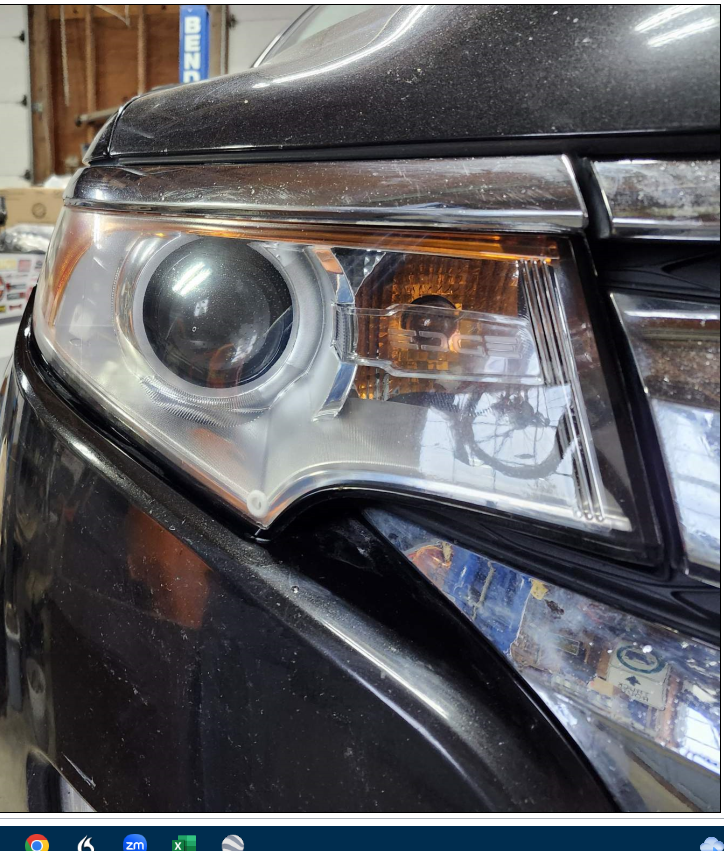
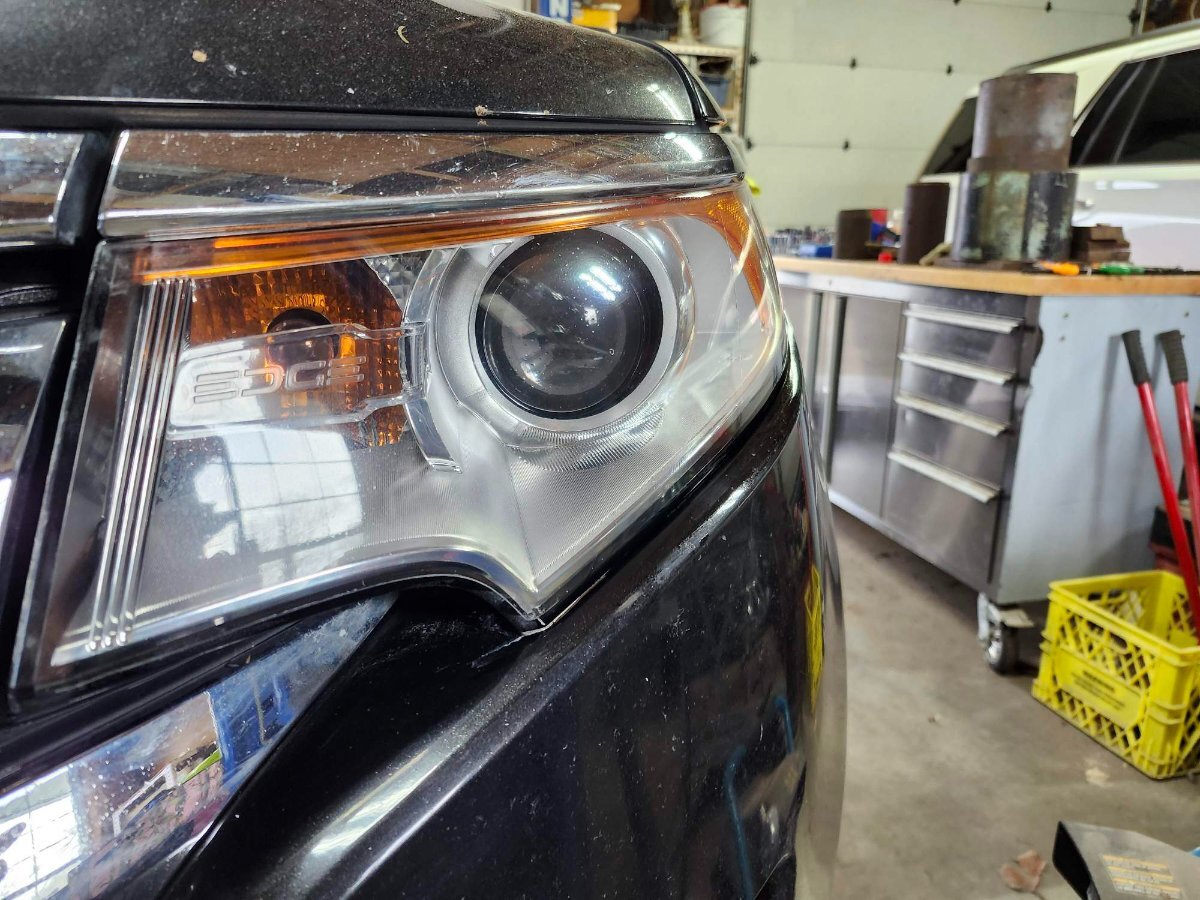
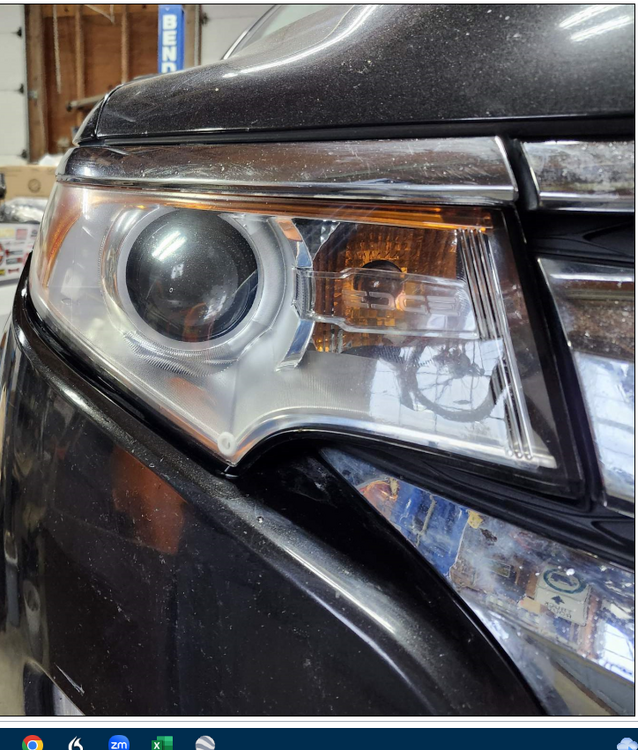
maybe I've been spoiled by newer vehs/LED headlights, but these don't seem all that great. Maybe I need to get aimed or replace internal bulb parts. Seems low beam points a directional beam down right in front of veh to ground and is mediocre. High beam not bad. I'm probably not comparing apples to apples as my other 2 vehicles are newer and LED.
-
I googled the various headlight restoration kits and one guy does a test of about 12 kits. He flies through all of them on FFWD but does them fully as per each maker's instructions, then rates them. In general it seems Ceramix is always near top. This dude on youtube rate Ceramix #2 and Sylvania #1. Sylvania also $10 cheaper so I gave it shot. OMFG! This worked amazing! It took a long time as each step says 5 mins of sanding, buffing etc.. and I assumed that meant per headlight. When you are almost done, you feel like it's a failure and then you wipe on the ceramic coat and POP!! It is amazing, like new. Before this I tried toothpaste and also 400 grit paper and it was a waste of time. Watched another youtube guy try toothpaste and also WD40 and they did nothing. My headlights were horrible beofre these pics, yellow with an ugly haze over. I have been spoiled by LED on my '24 F450 and '18 Escalade so i'll have to see what these are like now but they were brutal prior to this.

-
yeah, Haz ROCKS, he was super helpful and patient with me. My scan showed speaker and one sensor not working that I'm yet to replace. When i replaced speaker and put it in reverse I got solid beeping. I initially thought this was an idiot warning to tell me I'm in reverse, so I choose to shut off park aid. I now wonder if it is on solid to tell me one of my sensors isn't working! I will replace sensor later this week and know for sure.
-
2008 Edge Parking Aid Speaker
canucklehead replied to garycrist's topic in Audio, Backup, Navigation & SYNC
Haz sent me a link to this. It is perfect thread. Like Garycrist, I searched forever getting bad intel and this was perfect. My black seatbelt definitely made this hard to locate. -
thanks again! The speaker is exactly where pictured...it was completely hidden by seatbelt (DOH)! I replaced the speaker and I now have annoying beeping as soon as I put it in reverse and I have the option to shut that feature off. i assume this is sort of like a semi or 5T truck that has a reverse audio warning..well sort of..in the case of the Edge...it tells driver their vehicle is in reverse instead of people outside (just in case driver doesn't realize R means reverse, or stuff moving past them isn't actually moving forward...you are in reverse! 😆). I mock that part but I do like the parking sensors that beep as you get closer to something. I assume these are not optional to shut off. At the moment one of my sensors not working so I will see if that system becomes operable when I replace the dud. 🤞
-
thanks very much Haz! Interesting, the first attachment for diagnostic says the speaker is attached to the module. The Park aid removal & install attachment does not show the speaker attached. When I look for the module on Ebay (pic attached) I do not see any speaker attached. When i search for speaker they show pic below
-
I started with P0304 cylinder 4 misfire code. Swapped coil packs, no change, Swapped spark plugs, no change. Dumped 2 cans of Seafoam into full tank of gas, VOILA! Misfire cleared up in about 100 miles. Guessing crudded up injector. Not saying this is do all-end-all but a cheap attempt to try and fix. Try the coil then plug swap first to see if it triggers code for a different cylinder and that could be your easy answer. Then I got Code P0174 System Too Lean Bank 2. Research says most likely vacuum leak, but other things like MAF can be cause. I checked and the rubber air cleaner hose to throttle body was very loose, clamp not tightened. Tightened clamps and so far seemed to fix. Car still runs a little rough, not 100% sure what is off. Spark plugs have 40K miles on them so they shouldn't need replacing. Air cleaner new. No codes on dash but just not running smooth, exhaust sounds a little frappy. Dumped tranny oil. It holds 5L of Mercon LV. I may do this every oil change since I have a hoist and it is just a drain plug and fill procedure. Glad to see there is actually a dipstick and easy way to check fluid level. 2015 Escape I just sold was not set up this way. Headlights are weathered so i tried toothpaste and 400 grit paper...didn't help. Did some research and dude had great speed-video showing all the H/L restoration products so I am trying the Sylvania one to see if it restores these things. Replaced and re-programmed my TPMS sensors. All these vids saying off/on x3 etc..confusing! Mine has a 2 step off/on process vs other models that are just one off/on. Long story short: mine needs the start button pushed 8 or 9 times to hear honk to get it into TPMS learn mode. Hope this helps someone.
-
Hi ALL! I inherited a 2011 Edge SEL that was neglected badly by my cousin and have been slowly fixing many things. The latest obsession is park aid not working. Buddy scanned it with a good OBDII reader instead of my little POS one 😁 I have one sensor to replace but it also identified speaker issue. I have googled and tried to locate but struggling bad to positively locate. It is NOT in the rear passenger cargo area or C pillar area. On left cargo area i see several modules and there is something that sits beneath taillight area that kind of looks like it may have a speaker snapped into place on the module. This does not look like the replacement speakers I see on ebay/amazon. So if anyone knows actual speaker location it would be greatly appreciated. Sensor replacement looks like I will have to detach bumper cover to angle it back to get access to sensor? I had it on hoist and there is metal rebar, black foam and you can contort your hand to feel isensor but I am doubting you can remove and replace without disconnecting bumper cover. Am i missing some secret trick? Guessing 13 y/o bumper attachment screws in the rear wheel well areas will be a treat to loosen.