
cfo20
Edge Member-
Posts
7 -
Joined
-
Last visited
About cfo20

Recent Profile Visitors
The recent visitors block is disabled and is not being shown to other users.
cfo20's Achievements
Newbie (1/14)
-

Weathertech Mats, Cargo Cover, Trailer Wiring 2011-2014 For Sale
cfo20 posted a topic in Classifieds
Sold my 2011 MKX and have a few items from it to sell. Full set of weathertech floorliners with cargo protector, Curt trailer hitch wiring and OEM cargo cover. OEM cargo cover has velcro stiched to the back so it can attach to the rear seats that way instead of the elastic bands around the headrests. All items are in excellent shape and from a non smoking home. I think these items fit the 2011 -2014 model years of both the MKX and the Edge I am considering the following prices but feel free to make an offer: Weathertech floor mats and cargo protector: $115 shipped Curt trailer hitch wiring: $20 shipped OEM cargo cover (black): $70 shipped Payment via paypal, cash app or zelle. Will ship from the Atlanta, GA area, or we can possibly arrange pickup if you are local to Kennesaw, GA. Click here for pictures of all items -
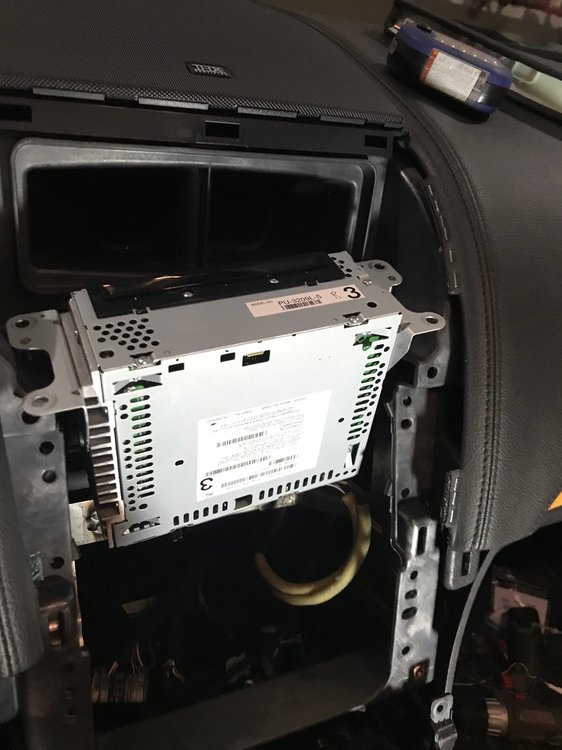
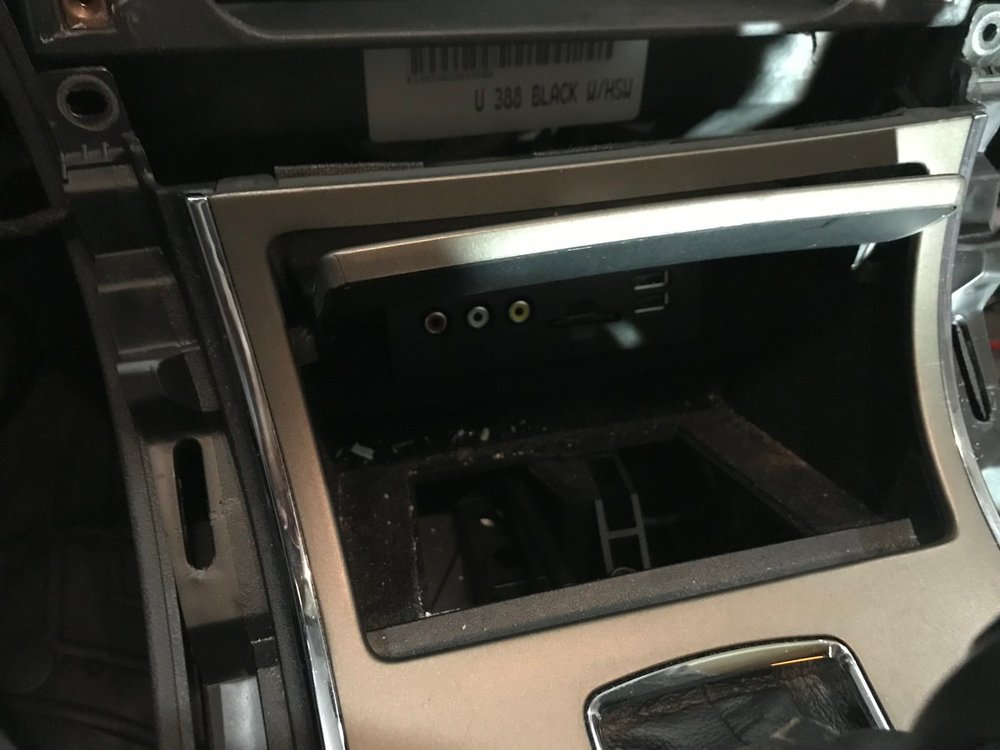
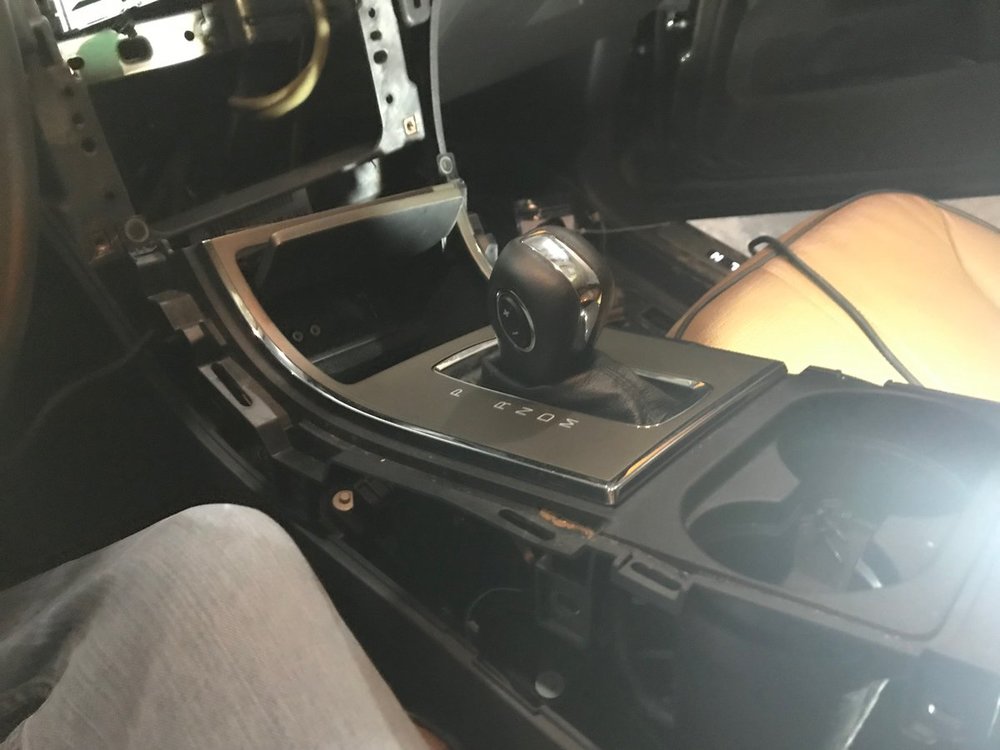
I fixed my shift to park issue (switch) on my 2011 MKX and figured I would share a brief step by step. I am not a mechanic, so if you choose to do this, you are doing it at your own risk. After replacing the entire switch/harness assembly, replacing (soldering in) a new $5 switch from mouser or similar (as noted in other forum posts) would have been easier and cheaper, so consider that method if you are comfortable soldering. I also DID NOT remove the shifter assembly to do this while the switch replacement directions from Ford said to remove the shifter from the vehicle. 1. Order correct part as noted in TSB 17-2219 (14 December 2017). For the 2011 MKX, it was GT4Z-3F988-B. Mine was $33 shipped or $55 at local Ford dealer. 2. Study the directions that come with the part when it arrives. They do help a lot, but again, you DO NOT need to remove the shifter from the vehicle. 3. In the drivers seat, remove the two curved leather covered trim pieces that surround the climate control. Just pull up on each as they are held by clips. 4. Remove the two 7 mm bolts holding in the climate control panel, then remove that entire panel by pulling up as the sides and top are also held by clips. Slide the panel up from behind the two tabs at the bottom where the bolts you just removed were at. Once loose, remove the single wire harness at the bottom and set the climate control panel aside where it will not get damaged. 5. Remove the four 7 mm bolts holding in the touchscreen and APIM unit. Remove the harnesses from the back of the touchscreen/APIM and set it aside where it will not get damaged. 6. Remove the four 7 mm bolts holding in the CD player. Remove the harnesses from the back of the CD player and the two antenna connections if you can get them off. I could not get the two small antenna connections off, so I just tilted the CD player up vertically and wedged it into the area where the touchscreen/APIM was just sitting (see attached pic). 7. Open the center console lid and remove the plastic trim that looks like a large thin “H” from under where the console lid sits. This is also just clipped in. 8. Pull the side panels (start on drivers side) of the center console outward along the top of the console. They are also just clipped in. No need to remove any more clips than just along the top. I think you may have to remove the seat just to get the whole panel off and that isn’t necessary. Repeat on the passenger side. 9. Look inside the now “gapped” side panel and you will see three 7 mm bolts holding in the cupholder assembly. Remove those three bolts, then go back to the drivers side and remove the other three 7 mm bolts there (six bolts total). Now the cupholder assembly will be loose but still not removable. 10. Towards the back of this loose cupholder assembly are two wire harnesses. One two wire (black connector) and one multi-wire (gray connector). Find these connectors and unhook them. The small black one can be rotated to assist. The gray connector is fixed to the back on the rear cupholder under the cupholder assembly. 11. Lift the cupholder assembly up just a bit at the rear and pull towards the rear of the car just a little, enough to reach behind and remove the two harnesses that are plugged into the back of the USB/AV/SD (navigation) card reader inside the hinged door cubby (see attached pic). Once those harnesses are unplugged you can then slide the cupholder assembly back even further and lift it up as high as possible without going over the shifter head (see attached pic). It will stay there elevated so you can now change out the bad park detection switch that was causing the shift to park issue per the directions supplied with the part. Follow those directions carefully, work slowly and you will not have any issues replacing the switch. It isn’t hard, just painstaking. Check the new switch mount just like the directions say to make sure it is seated correctly. It will look like it is until you look from directly over the top to make sure it is seated. 12. Take pics of the wiring configuration with your cell phone before removing the switch so you know how to run the wires once the new switch is installed. Put everything back together and you saved yourself a couple hundred.
-

GPS not working in navigation
cfo20 replied to riche_guy's topic in Audio, Backup, Navigation & SYNC
I would try replacing the antenna first. $50 and change gamble (doing the labor yourself) but it may fix the problem (did for me). -

GPS not working in navigation
cfo20 replied to riche_guy's topic in Audio, Backup, Navigation & SYNC
When you say not working, do you mean the red X over the GPS symbol? If so, could be the OEM GPS antenna. I just replaced my OEM GPS antenna (2011 MKX) and it resolved that issue. -
So I have had the Red X over the GPS symbol on my 2011 MKX for some time now, where it stays on for about 8-12 minutes before the sat signal is recognized. After a few resets and map updates, problem still existed. After researching what it could be, I decided to take a chance on replacing the OEM antenna, which actually resolved the issue. As such, I decided to share a step by step for this should anyone else need to do it. Please note, I removed some parts which may have not required removal as I had to figure it out as I went along. Also, I am not a certified mechanic by any means so you are preforming this procedure at your own risk. I am recalling all the bolts/screws I removed, so please make sure by looking for any. They were all pretty well exposed and not hidden. If in doubt, remove it. 1. Remove the leather covered curved trim pieces surrounding the climate control. They are just clipped in and pop out easily. 2. Remove the two 7 mm screws on each side under the trim pieces you just removed, then pry upwards all around the switch panel and screen surround to pull up all the clips. When you get to the bottom, you must slide the panel upwards to clear the mounting tabs of the switch panel at the bottom. Remove the wire harness at the bottom and then set the panel aside. 3. Pull up on the center channel speaker grill and remove it. It is also only held by clips. 4. Remove the lower drivers side kick panel which has two 10 mm bolts and clips along the perimeter and top. 5. Remove the lower section of the steering column cover by removing three 7 mm screws then prying it away from the upper steering column cover. Inside, the lower section has plastic “hooks” that hook over parts of the upper steering column cover, so be aware of that when prying as they are easy to break. When prying, try to slide the upper cover towards you as this will help dislodge the internal hooks (one on each side). 6. Pry out the switch panel with the headlight switch and seat settings/trunk pop button. It is only held in by clips and can hang by the attached wires. 7. Remove two of the 7 mm screws from bottom of HVAC vent that were concealed by the headlight switch panel you just removed and then remove the HVAC vent itself. 8. Back over to the right side, there is one 7 mm screw just below and to the right of the push button start that was behind the first trim panel you removed. It is a bit recessed so be careful not to drop it. 9. Pry out the drivers side A pillar, but do not remove it. The bottom part can remain attached to the dash cover. 10. Now start to pry up and towards you the drivers side dash cover. It is a separate piece from the passenger side and held in by clips. No need to remove it completely, just pry up and pull towards you. This includes the push button start panel. Pull at the bottom of push button start and disconnect the wire harness behind it once you have the dash panel out enough. 11. Do not remove the large dash panel, but situate it so that you can see the GPS antenna just above the instrument cluster. It sits right under the dash panel you just lifted. 12. Pull the antenna (on the bracket) towards you to remove. The plastic clip will break but that is ok as your new antenna should have come with a new bracket attached. Remove the wire harness from the old antenna once removed. 13. The new antenna I got was a bit smaller, but mounted the same and had the same wire harness connector. 14. Install antenna and put everything back together. Don’t forget the push button start harness! Took my about 35-40 minutes in total. 15. I test drove the vehicle immediately and it took a minute or two to get the signal. After that, it picks up the signal within seconds every time.
-
Hello all. I have a 2011 MKX that I just recently had serviced for the 5k service. First question: What should all be included in the 5k service? Second question: On the center stack below the touchscreen, is the "My Temp" button supposed to glow yellow (amber) when My Temp is activated? When I press the "My Temp" button, the my temp function activates but the button does not glow amber like the rest of the buttons. Thanks! cfo20


