edgesportguy
-
Posts
75 -
Joined
-
Last visited
-
Days Won
4
Content Type
Profiles
Forums
Gallery
Everything posted by edgesportguy
-
 Thanks. Just make sure you measure the ground clearance the right way
 -
Is there a rear toe adjustment on a 2013 Edge FWD?
edgesportguy replied to Olson_jr's topic in Brakes, Chassis & Suspension
Yes, it does have toe adjustment. Setting the toe and camber (if adjustable) for both front and rear is what you're paying for when you get a 4 wheel alighnment. The rear has shocks, not struts, as was said above and would have nothing to do with any rear toe or camber adjustment. Idiots work anywhere, but good mechanics can be hard to find. Lots of guys nowadays are parts changers, not mechanics. -
Happy to report the service advisor credited me back $199 after just a brief discussion and no debate when I called the next day. As was said - they saw an opportunity to charge extra and tried taking advantage of it I can understand charging some extra time for frozen bolts, but not $200 for rear 2 camber (and possiblly the 2 toe adjustment bolts (which is all that is needed for those who don't know what they are talking about). The only "extra work" is loosening the 2 brand new camber bolts to adjust the fronts. I would have probably been ok with an 1 extra hour providing I was called and told about in advance since I already new the 2 bolts were pretty frozen. Going to pick up the vehicle expecting an $89 bill, and getting a $289 bill instead and having smoke blown up my ..... about what the mechanic had to do was totally B.S though. Apparently the service manager agreed once I talked him Installing high quality aftermarket springs with only a moderate drop doesn't "ruin" anything. I've lowered 4 cars and a truck in the past 10 years using Eibach or H&R springs and never been charged more than $89 either. 2 of the cars were brand new and I never had any issues with factory warranty coverage down the road either. A 1.5 inch drop doesn't "screw up" anything, and doesn't create any extra work for the mechanic. Rousch, Saleen, etc would not do it if it did. Installing cheapie coil overs or junk springs, or if you don't know what you're doing, on the other hand can cause serious problems and put a lot of strain on the suspension components like the Honda in the below pic If you have no clue how something is designed to work or don't know what you're talking about - don't comment. Adjusting toe & camber is what you're paying for in a 4 wheel alignment. There is nothing extra that needs to be done because of the H&R springs.

-
Picked up my Edge from the Ford dealer today and got a nasty surprise - a $289 bill just for a 4 wheel alignment! I told the service advisor when I called to make the appointment that I had just lowered it and that front camber kit was installed so everything was going to need to be adjusted. Without any type of prior authorization I got charged 2 extra hours of labor in addition to the $89 I was originally quoted for the alignment. When I questioned the bill I was told that it was because the camber bolts were seized and that the tech had to install a camber kit because there's not enough adjustment in the stock bolts, and that the he had more than 4 hours into it (it only took me 4 1/2 hours to install springs and do brakes) Frozen rear camber bolts I believe, but no one even makes a rear camber kit and there were no new bolts or adjustment washers when I checked it. H&R even verified nothing was needed for the rear. I have never been charged extra labor for "seized bolts" on any repair in 30 years of owning cars. What really pisses me off is that the service advisor didn't even mention anything about additional charges when they called yesterday to let me know it wasn't going to be ready because the tech needed to let penetrating oil soak into some frozen bolts. The tech and manager were gone for the day, so I'm going back to fight with them tomorrow Has anyone else ever been charged extra labor due to frozen bolts?
-
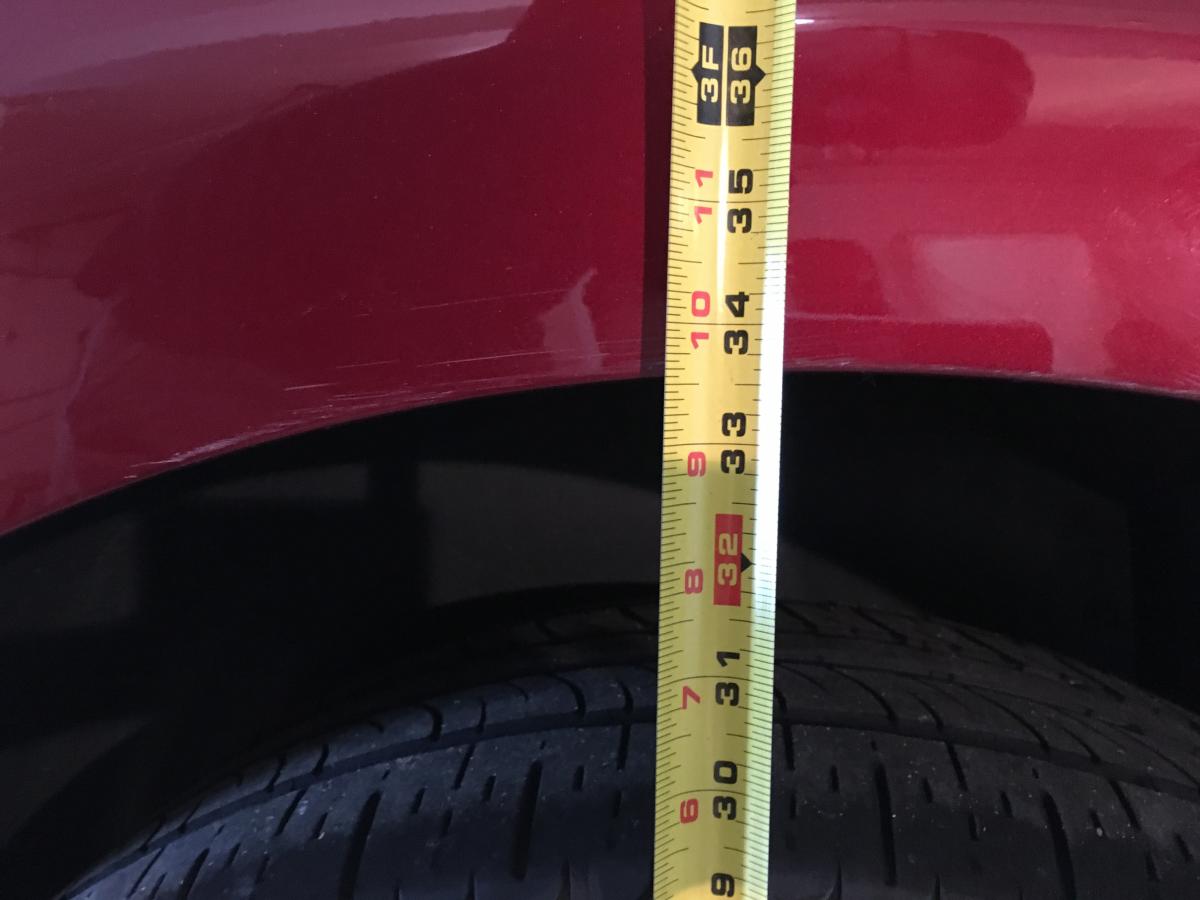
You are correct and thank you for also seeing the intent of me picking a simple obvious measuring point so that any other edge owner can compare to theirs and get an idea of the result. Dropping for the street is a lot about the look of the meaner stance, wheel wells nicely filled with wider lower profile tires, and dropping all 4 corners about equally to lower the center of gravity an 1" or 2" for better handling and traction. No adjustments needed
-
Measuring raising/lower; and setting up suspension for tracking & autocrossing is a bit a guessing game backed with the laws of physics You start off with a level balanced car and adjust from there based on the type of race, track, your individual car, etc, ur preferred set ut, r and is totally opposite of street up in a or truck.. To be continued, I'm too tired to write any more
-
I don't get what difference it makes where you measure - it can be the door handles if you want; or what difference the size of the wheel wells makes. As long as you're measuring the before and after at the same points you will net your amount of drop acheived from your changes. I think you're referring to "ground clearance" too. Then the skirts would make more sense to me. I don't know the exact points manufacturers use for their measuring points, but I believe it's the lowest point of the vehicle's rocker panel. I'm not going off-roading with my Edge or looking to make a low rider. I just have a heavy foot and love driving the twisties so I wanted a stance with lower center of gravity and better spring rate to make a great handling sport SUV, so I don't care about whether I was measuring gc. Mission accomplished on handling! I figured I'd be ok with H&R's advertised 1.5"/1.75" drop and slightly smaller wheels no matter what since my 2010 Corvette Grand Sport has less than 5" of clearance at the radiator support. I picked the really simple point of the top of the wheel well opening so anyone can quickly measure their own and compare. Furthermore, if I'm now 2" lower there, I know I'm also going to be 2" lower at Ford's "ground clearance" point, or the headlight, or the mirror, etc.. The only exception to this being that I have lost a 1/4" of actual "ground clearance" to the lowest point of the lower control arms since the overall diameter of the new wheels is 1/2" smaller
-
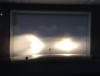
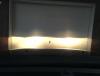
Here's the Morimoto Elite HID kit pattern


-
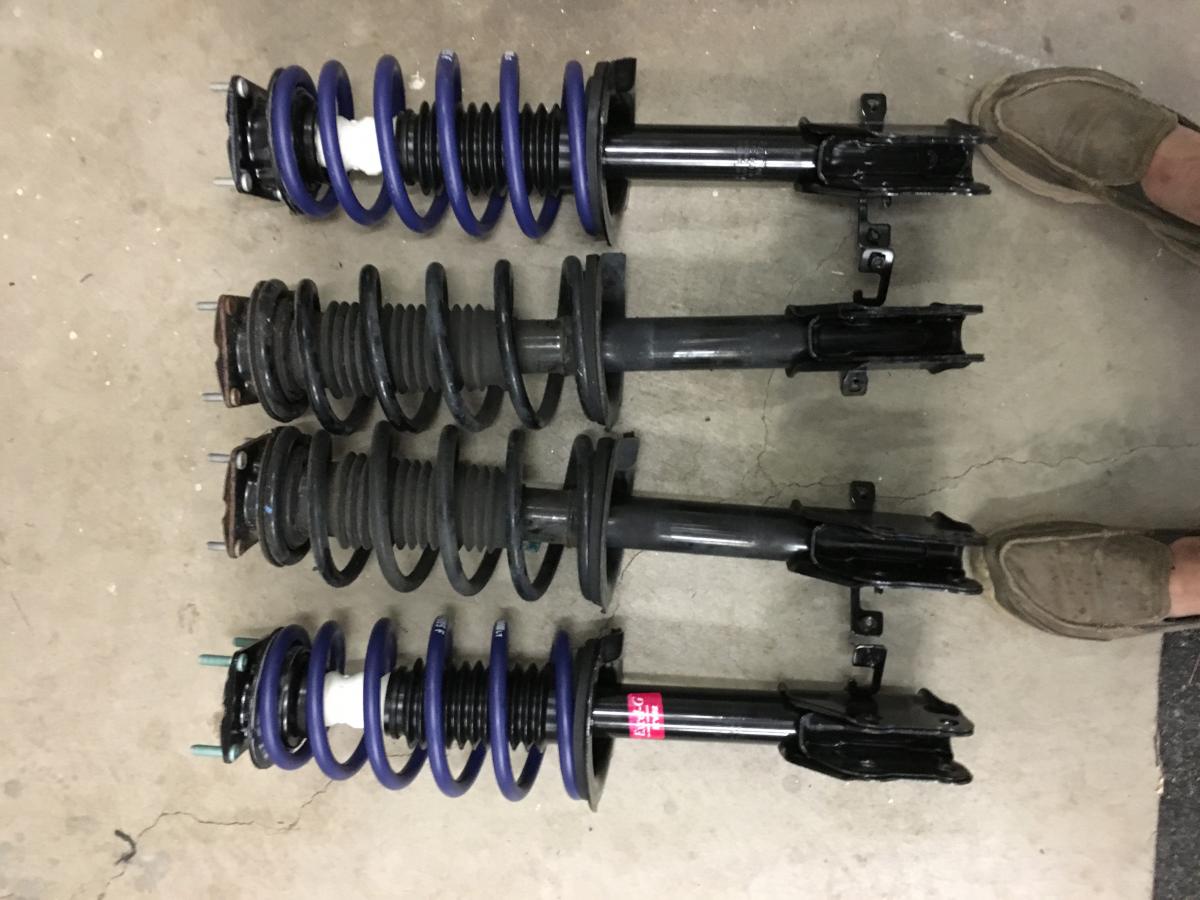
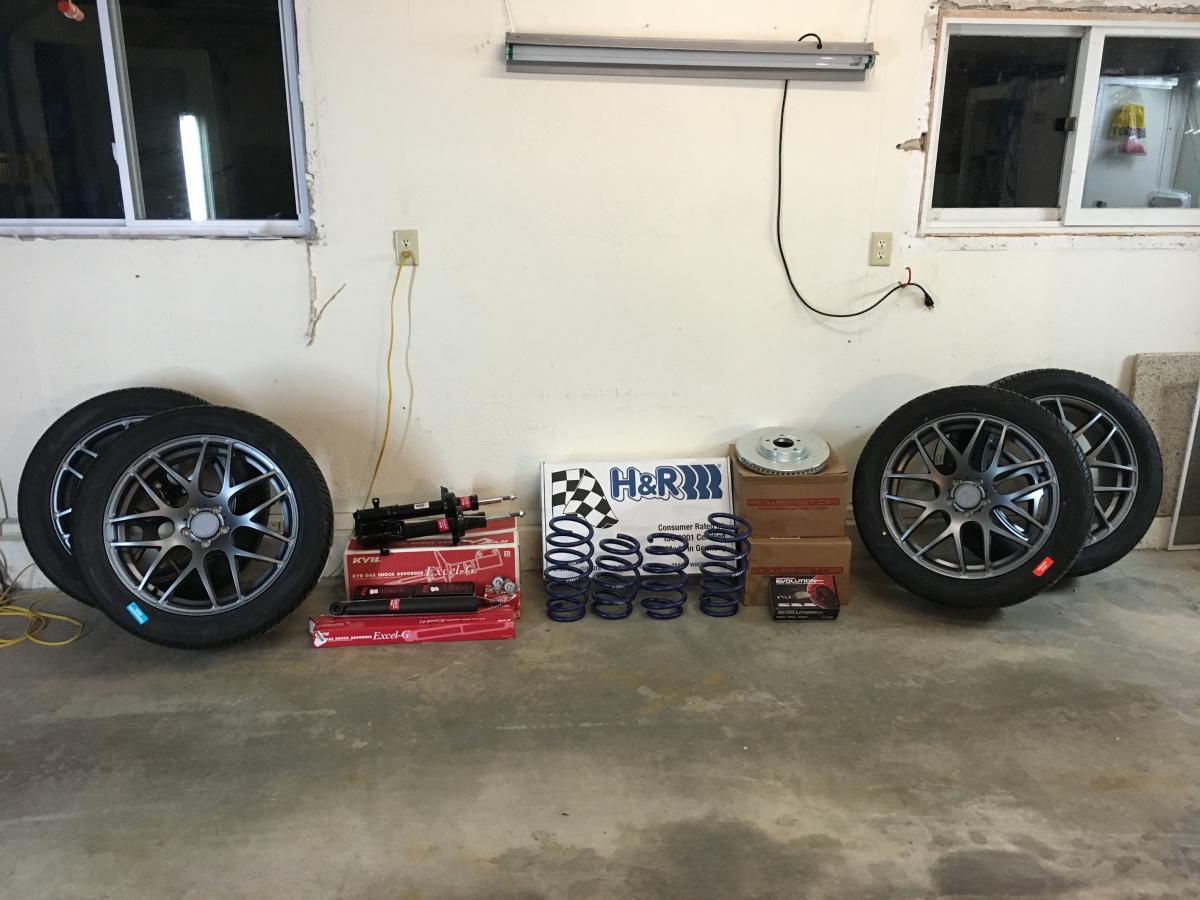
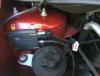
Thanks to air tools, Tire Rack, and beer Worst things of the project: - Putting a hitch on is nightmare! I thought I was never going to get all the backing plates & bolts into the frame rails - Swapping the rear springs (even after 2 days of penetrating oil). - Fronts would have been a breeze if the dealer hadn't given me the wrong top plate for one strut. Ended up installing one strut with wrong plate for that side, and couldn't get the other side in, Both had to come back out and apart. Aaaargh!!! - Getting the lower control arms off the rear spindles was a bear - Wasting an hour scratching my head and then starting to polish up the old stainless steel slides for the front pads because I thought PowerStop gave me the wrong hardware & boots for the calipers. They just put them in the wrong box! Happened to finally check the box of pads for the rears and sure enough the hardware bags were just swapped. - Tearing the outside edge of the piston seal on one rear caliper and having to replace it (they don't sell just the seal!} Thankfully caliper was only $65 at AutoZ and had it the next day - Threading the backing plates and bolts into the rear frame rail's for the hitch almost driving me to the point of losing my mind (what's left of it...) Best things - the end result! It was all worth it. The stance is perfect; the handling is great; Yoko's are sticky and considerably quieter than the Pirelli's; the PowerStop brakes grab like crazy: better acceleration thanks to the 7lb per wheel weight savings and love the ride. Got a total of 2" drop up front & 2.25" in rear with the springs & slightly smaller diameter wheels. Measures 31.5" up front and 31.25" in back at the fender lips now and only a 2% mph difference on the speedo from wheel size. Not the cheapest project, but considering new wheels, tires, tire psi sensors, camber kit, upgraded brakes, H&R springs, struts & shocks and alignment I think $2,800 was pretty reasonable. TireRack definitely had the best prices on everything (even the springs & struts) and their service was great (JC Whit for the brake kit. Got 10% off & free shipping and TR didn't carry them) If not inclined to do this yourself a shop should only charge you about an hour additional labor than doing just the shocks/struts & brakes since the only additional labor is swapping the rear springs. For any one thinking of lowering their Edge - Borrow an impact wrench & compressor from a friend if you don't have them :-) - Have some beers on ice and stereo to listen to - Prepare to make a mess of your garage - Always remember Murphy's Law - You don't need a coil spring compressor providing you buy new struts and the top plates for them and put them in as whole assemblies versus taking the old ones apart. All 4 H&R springs are short enough that they don't need to be compressed to install. - You do need the special tool to screw the rear pistons back into the rear calipers. Good old C-clamp works fine for fronts, but Do Not try & use it on the rears - Spending the $125 for new top plates and rubber isolators for the front struts worth every penny in case you want to go back to stock down the road. Easy swap if you used some anti-seize on everything when putting it back together - If you're not able to get either rear control arm bolt out I found removing the shock, taking the nut off the outer lower control arm at the spindle along with the 2 bolts for the upper link and then loosening the front trailing arm bolts to be the easiest way to get the rear springs out. Spring compressor doesn't make a difference and more of a PIA to try & use it. As A Word of Caution - Do Not forget to put a floor jack with just a hair of tension under the rear control arms before taking the bolts out; and then lower slowly to just let the old springs eventually drop out. - Plumbers torch with a MAP gas canister comes in handy for the spindle nuts if they're really frozen on - but don't overheat and start melting the rubber bushings - Be ready to give the old rotors some good whackings with a heavy hammer to get them off if you're not reusing them - Getting to the driver's side top rear shock nut is a pain but doable without removing the interior panel. Un-clip and remove one end of the powered piston, snap loose the small trim panel surrounding the bottom where it goes into the panel, pull out the panel a bit and then you can snake you're hand in and use a long extension on an impact to get the nuts on & off - Polish off or replace the caliper slide bolts If there is any rust on them - Make sure to do the bedding process for the brakes per the directions to minimize chance of warping - Immediately get a alignment. I used two 8' of pieces of wood trim bungeed to the rotors (and then front wheels); a measuring tape; and a level to set the camber and toe to as close to zero as possible when assembling (I know - redneck; but it's easy and works great 'til you can get real alignment) - Enjoy the results!l
-
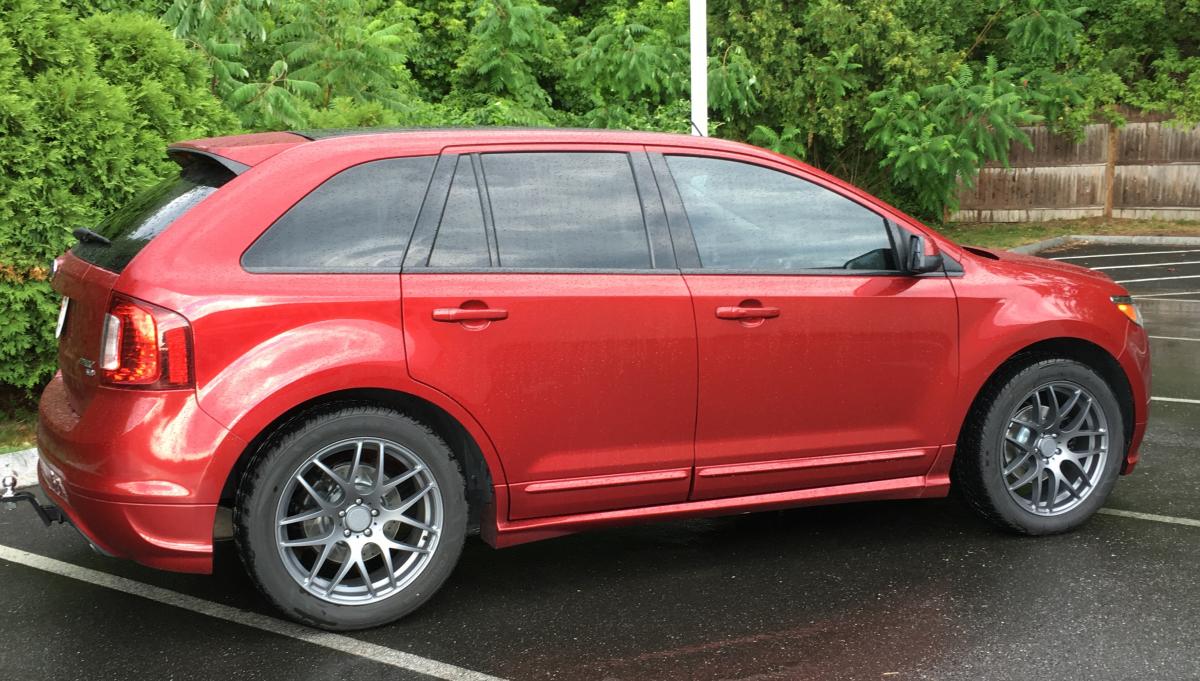
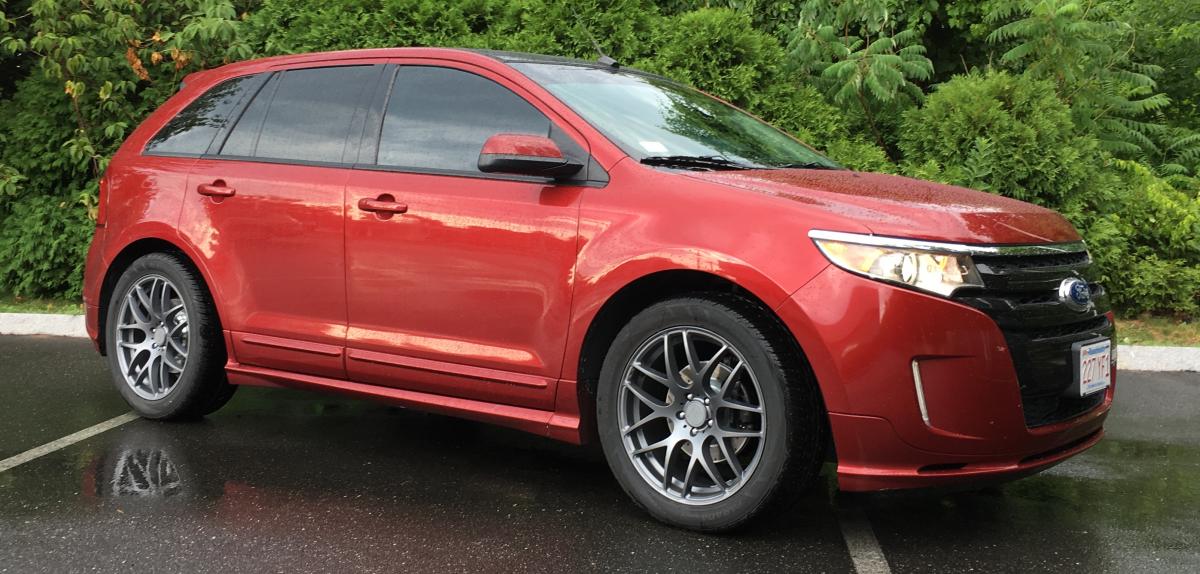
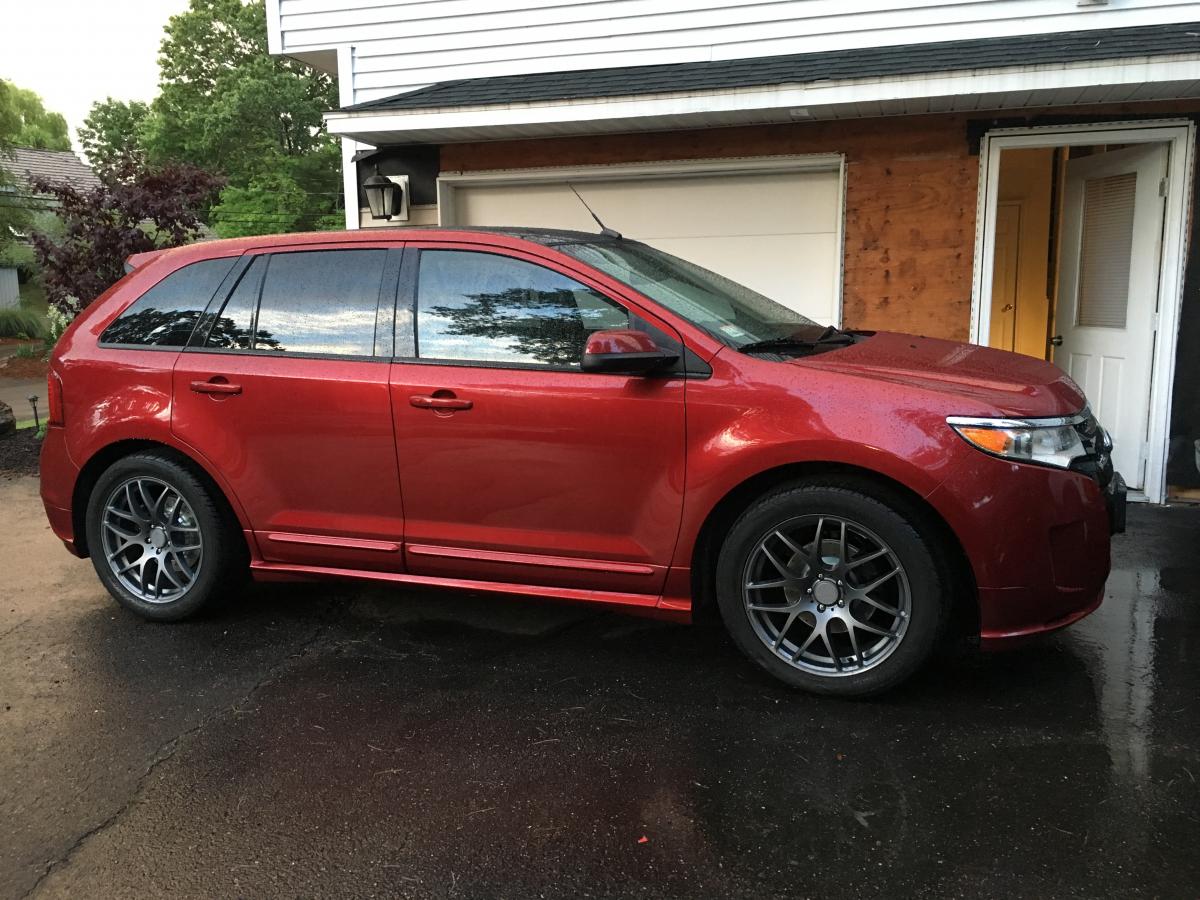
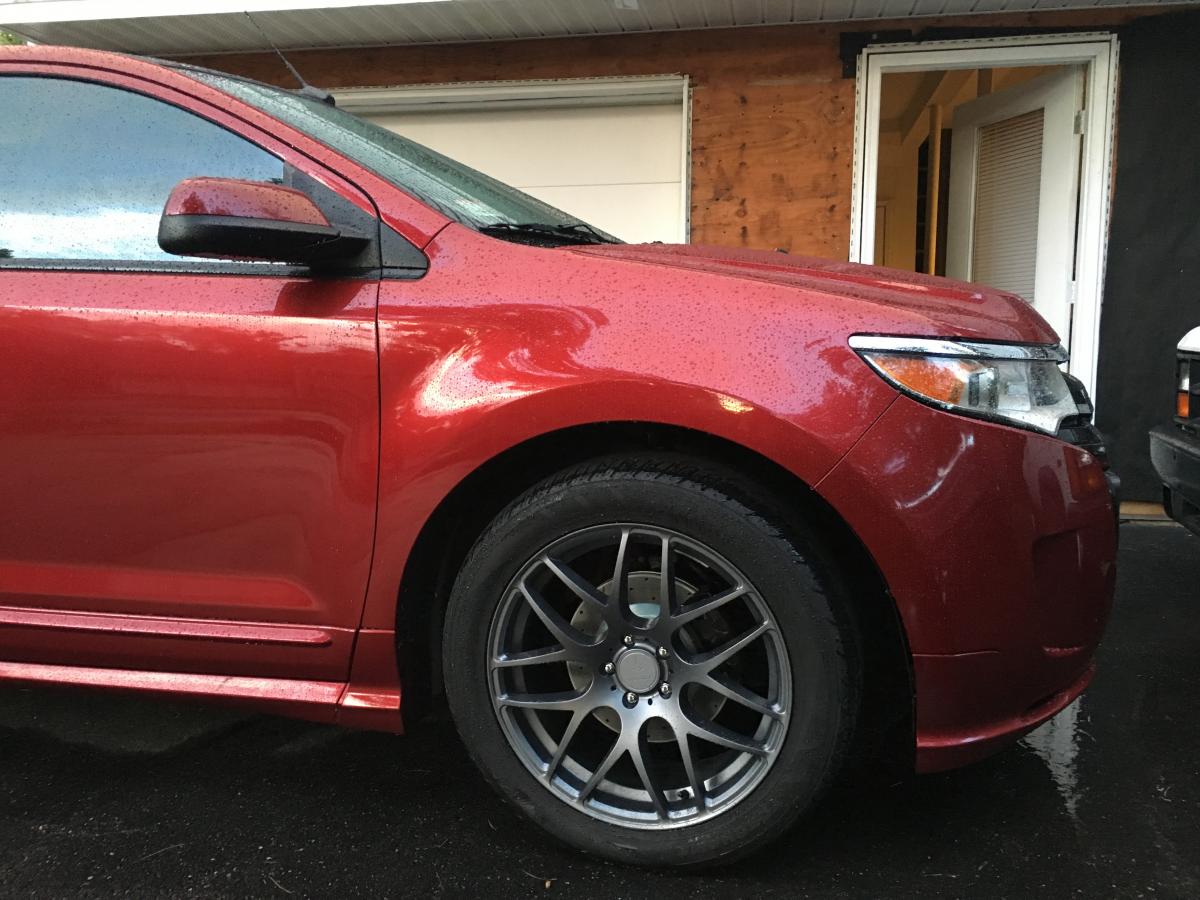
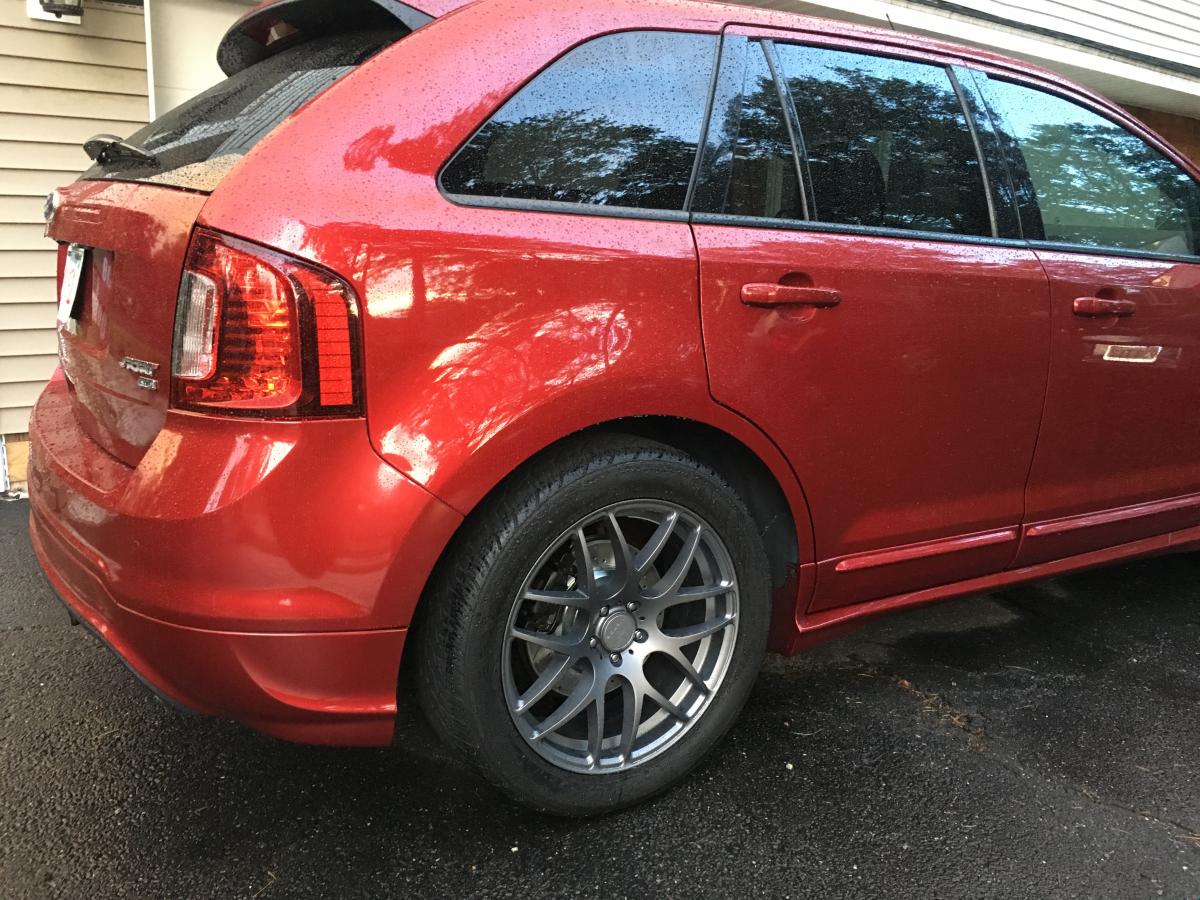
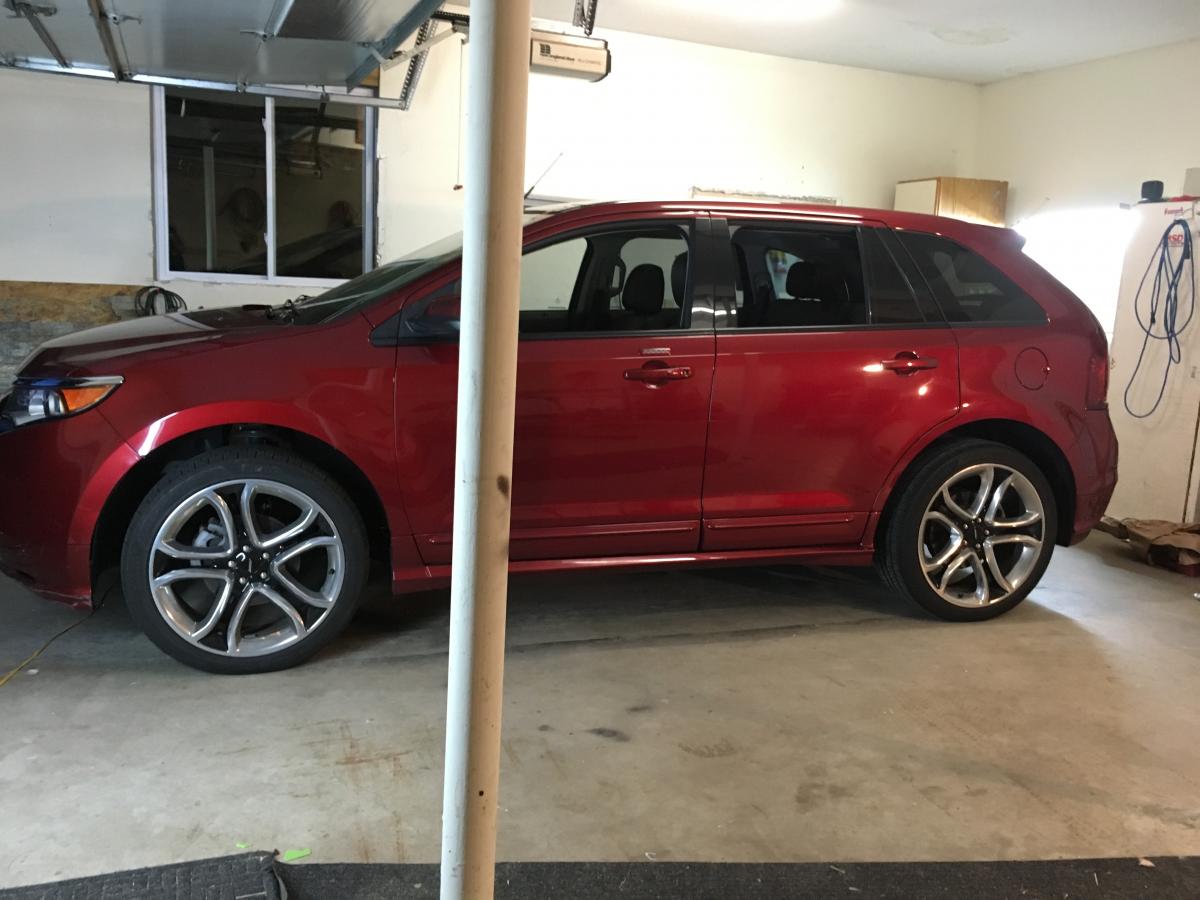
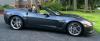
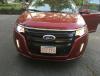
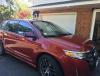
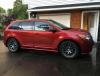
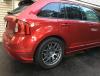
Lovin' the end result of dropping and new brakes & wheels on my Edge. Leased a 2013 Sport back in '12 and loved it so much that I was set on getting another one. Although I almost leased a 2015 I decided that I don't much care for the new generation body & look. Some great new features & fuctions though. I just love that monster black grille on the '10-'13 Sport and got really lucky to find this mint, loaded, low-mileage Sport 2 weeks after totaling my first one back in January. Decided to do some mods besides the stereo since I'm keeping this one. So far: - Morimoto Elite HID kit - LED Reverse light & interior bulbs - Hard-wired BEL RX65 radar detector and as of last weekend... - H&R lowering springs - PowerStop Evolution rotors & pads - 275/45-20 Yokohama Parada Spec-x - 20" Empire Verde wheeljs


-
Hmmm - hadn't thought of going with Ruby Red body color on it, but maybe I do think the tuxedo black metallic is the correct paint used on the SPORT grillles. Can anyone with a black sport confirm the grille color matches the body panels?e ?
-
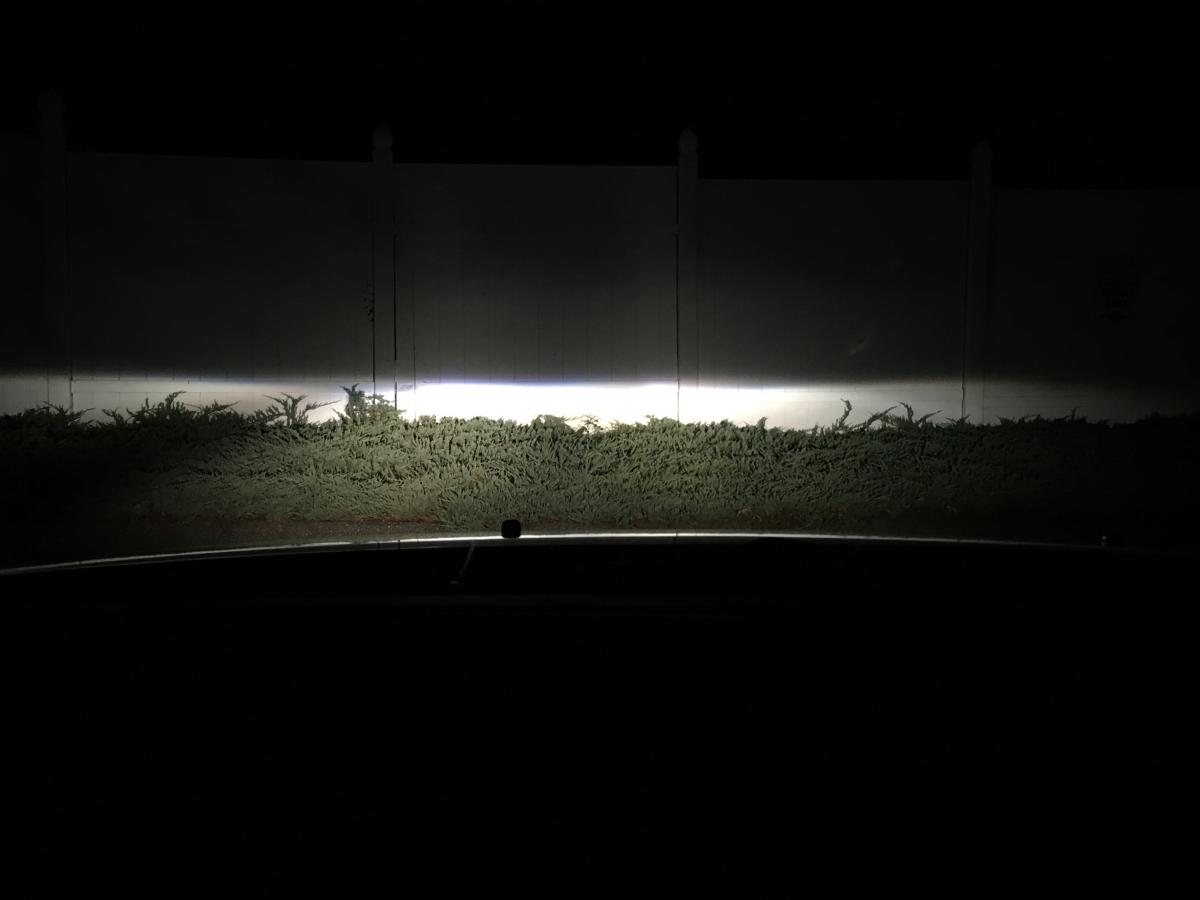
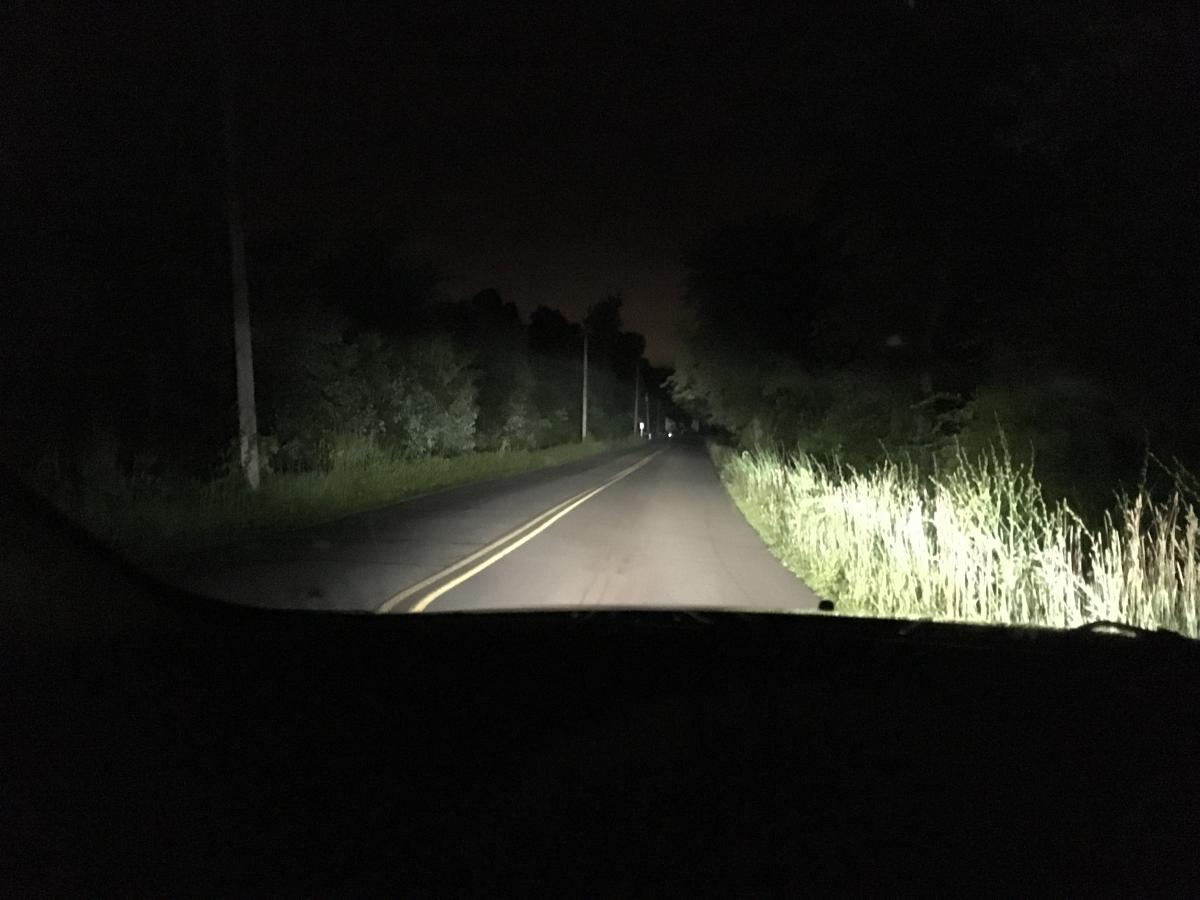
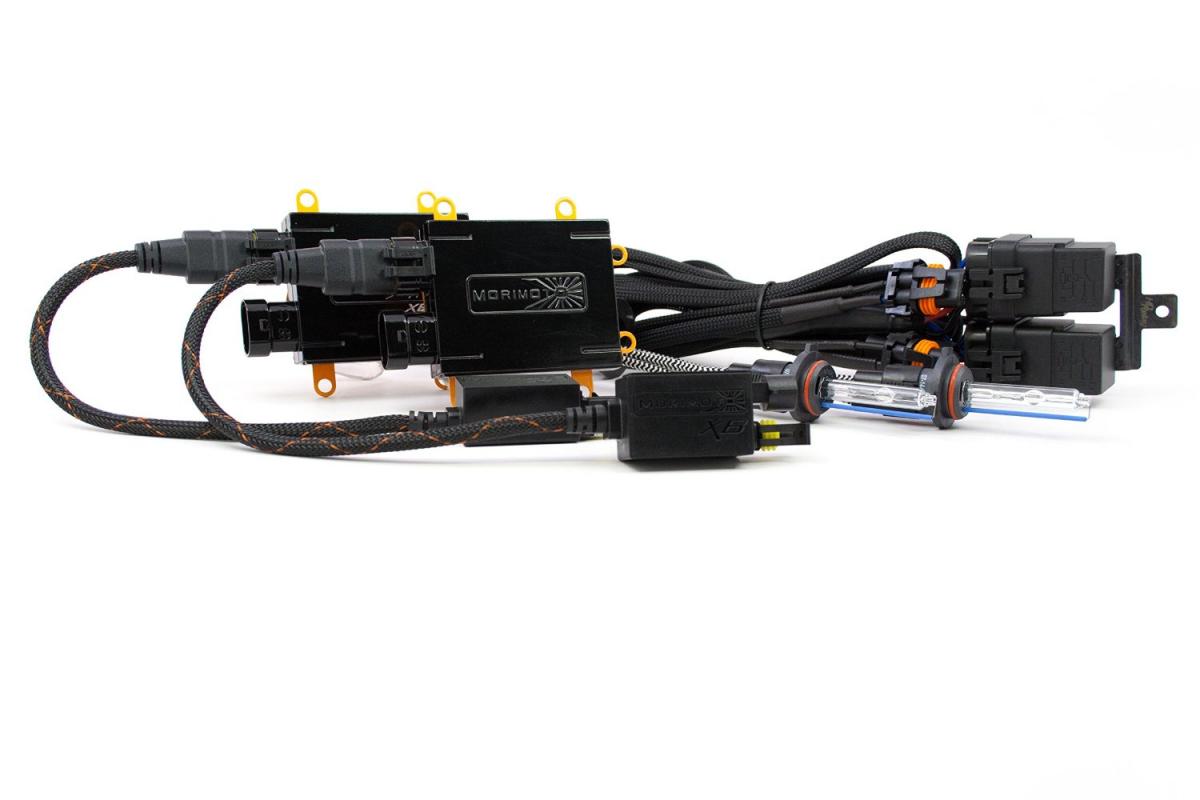
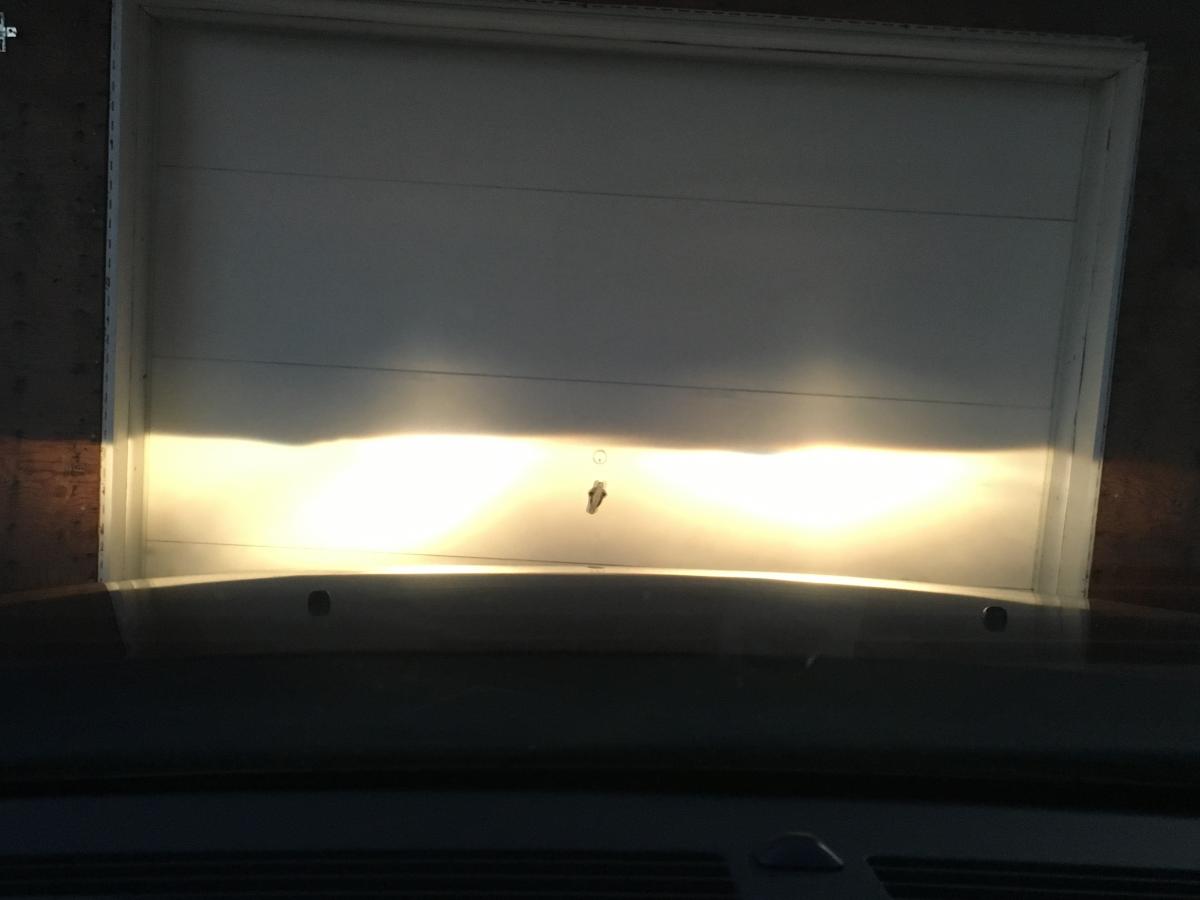
I highly recommend the Morimoto Elite HID kit with XB55 50W ballasts and XB35 4500k bulbs. A bit more expensive then most of the kits but very complete plug & play with of quality components , simple instructions and a 5year warranty. https://www.amazon.com/dp/B00TAPGF0A/ref=pd_lpo_sbs_dp_ss_1?pf_rd_p=1944687722&pf_rd_s=lpo-top-stripe-1&pf_rd_t=201&pf_rd_i=B00TAPD11G&pf_rd_m=ATVPDKIKX0DER&pf_rd_r=PVZR9V2SGT6RPX60B5ET I'll take more pic's of the beam pattern. 1st pattern is OEM halogens, and the next pic has HID on passenger side & halogen drivers side. Kit took me about an hour to install and pattern is perfect. Crisp, clean beam pattern with no dead spots and very straight cut off. Illuminate sides of road great on lows and the highs are absolutely bright as I would ever want. I have crappy night vision but still can't imagine why anyone would need the 55w bulbs. The 4500k color temp is about the same as OEM'mHIDs, but I'm probably going to order 5500k's. Running the 35w's with the headlights Properly Adjusted I have not had one person flash me their brights in the 2 months I've had them in. I tried the Opt7 LED's first but had horrible dark spots in middle of the beam patterns and the more I thought about it, the less I wanted bulbs with active fans


-
Does anyone know the paint code or name of metallic black used on grill of 2010-13 Edge Sport? I want to go to NAPA today to get the paint and spray the only chrome trim on the top edge of the grill so it matches everything else
-
I leased my original 2013 Ford Edge Sport at Family Ford in Enfield, CT - horrible. Salesman didn't know anything about the vehicle and didn't even give as much as a follow up call. First service visit made me vow to never go back. Service advisor didn't say as much as good morning and had as much personality as rock - to the point of rudeness. Went to Sarat Ford on my next service and never looked backed. Service advisors are all friendly and accommodating as heck. On my oil change at 22k I noticed faint lines appearing under the clear coat of the factory 22"s. Mentioned it to the the advisor. Even though 3 wheels had curb rash she snapped some pic's and when she called to let me know it was ready but I'd have to bring it back to put new wheels on it when they came in. Rep authorized with them no question and no charge Unfortunately I totaled it with 3 months left on the least but I liked it so much that I went out and found the red one i bought. I was buying it from a used car dealer at about $5k under market so I wanted it thoroughly checked out by them and find out what the in-service date was for warranty expiration since it only had 30k on it and 2 of the wheels were starting to get the lines. I called Sarat on a Sat morning and found out I had 8 days of the bumper to bumper left. She had me drop it off on Mon morning even though they wouldn't be able to look it over til Weds just to be safe on the warranty. She called me Tues to let me know it was done and checked out perfect except for warped rotors - and that they were going to put 4 new wheels on it! Luckily I haven't had a single repair needed on either Edge so I can't personally vouch for their mechanics, but have heard they do great work and have good reviews. Nice new building with free coffee & wifi too P.S. Central Chevrolet in West Springfield has been just as great except on my Vette except for my last visit to do a new transmission at 18k miles. Took a regional rep over a week just to authorize dropping the transmission (not authorize to fix it, just drop it first) Anyone else find it ironic using a ladder to work on a car that's on a lift?

-
The build begins - lowering & brake upgrade
edgesportguy replied to edgesportguy's topic in Brakes, Chassis & Suspension
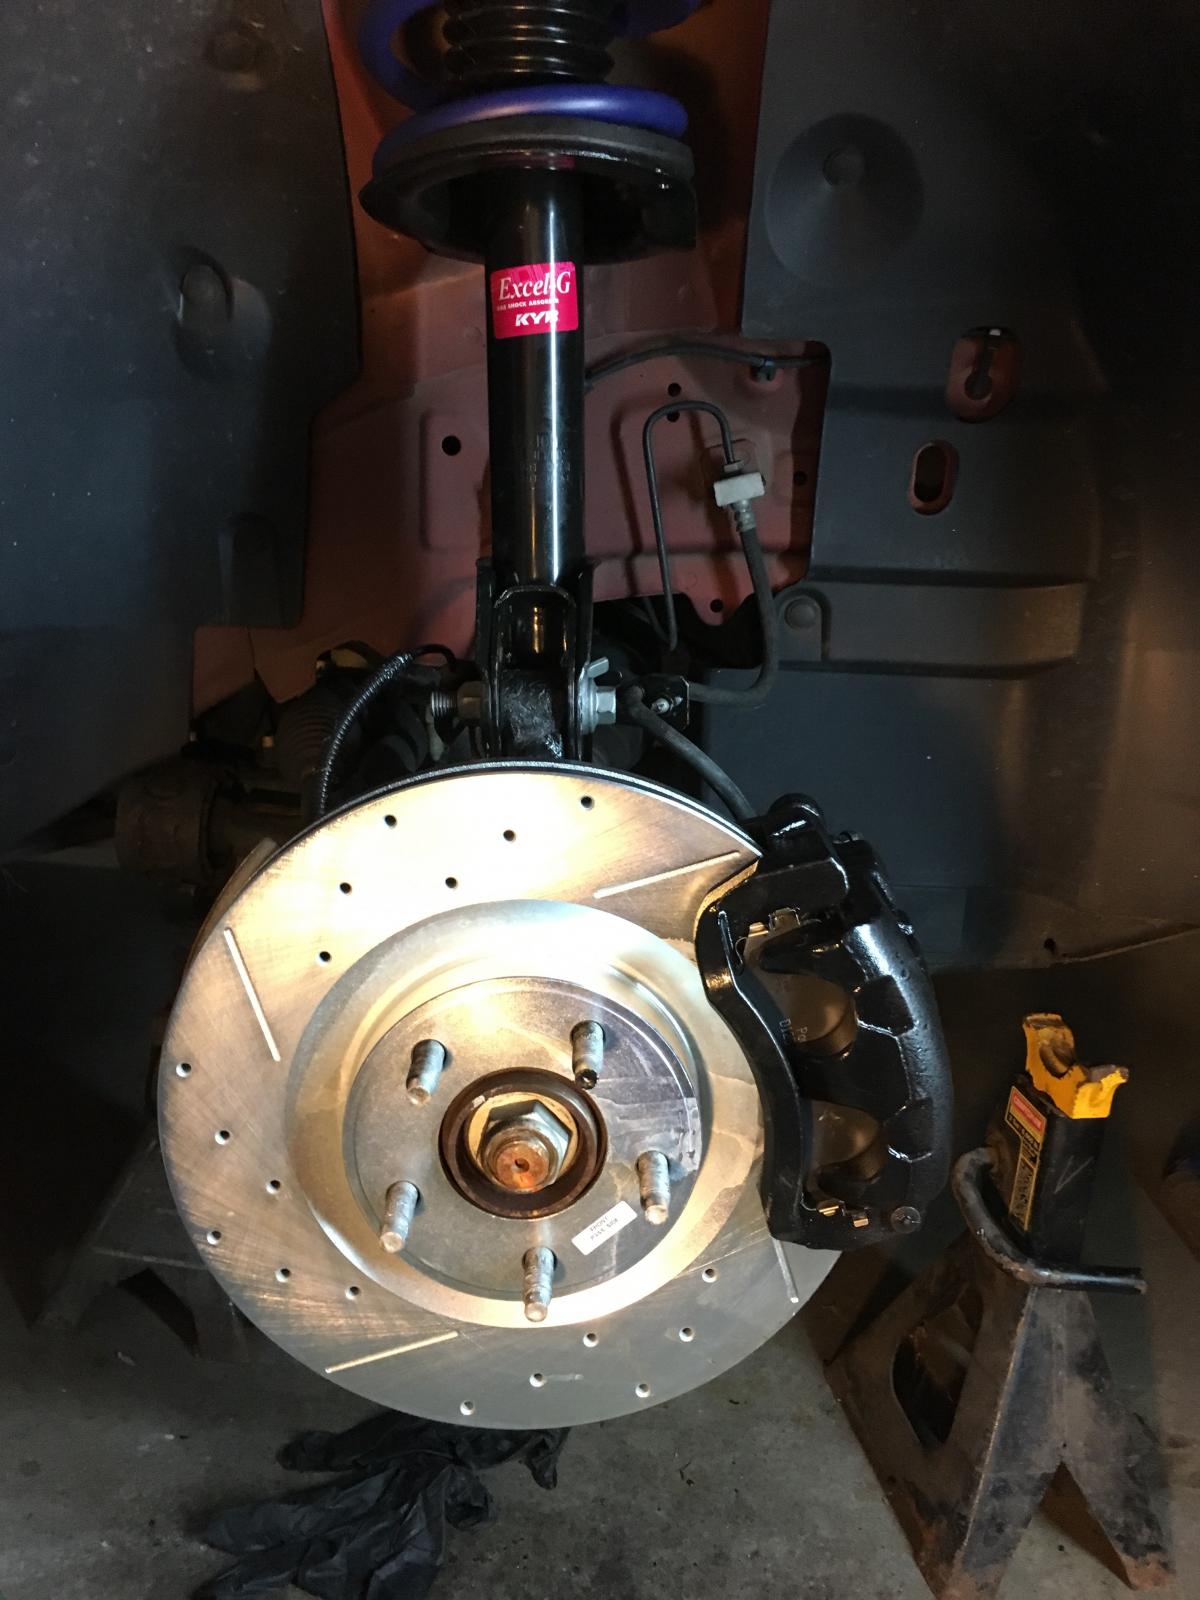
I Thanks. Didn't check thickness but run out on the rotors was minimal and I think it was more from me not doing a thorough job of getting all the surface rust off the hub faces. Very slight pulsation when I first took it out seemed to completely go away after I bedded the brakes and let them cool down The EBC brakes had only slightly better reviews but not enough for me to justify spending $700 on them -
Forgot pics


-
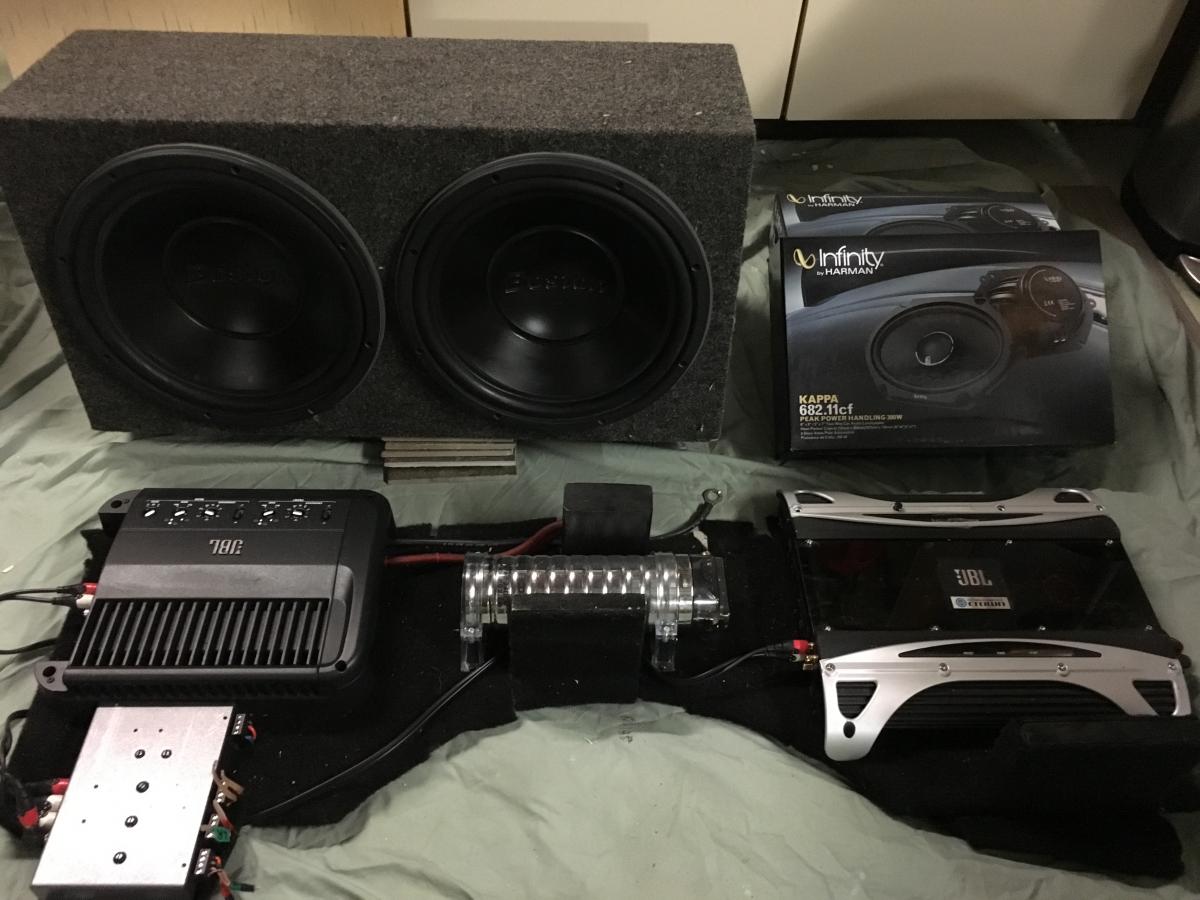
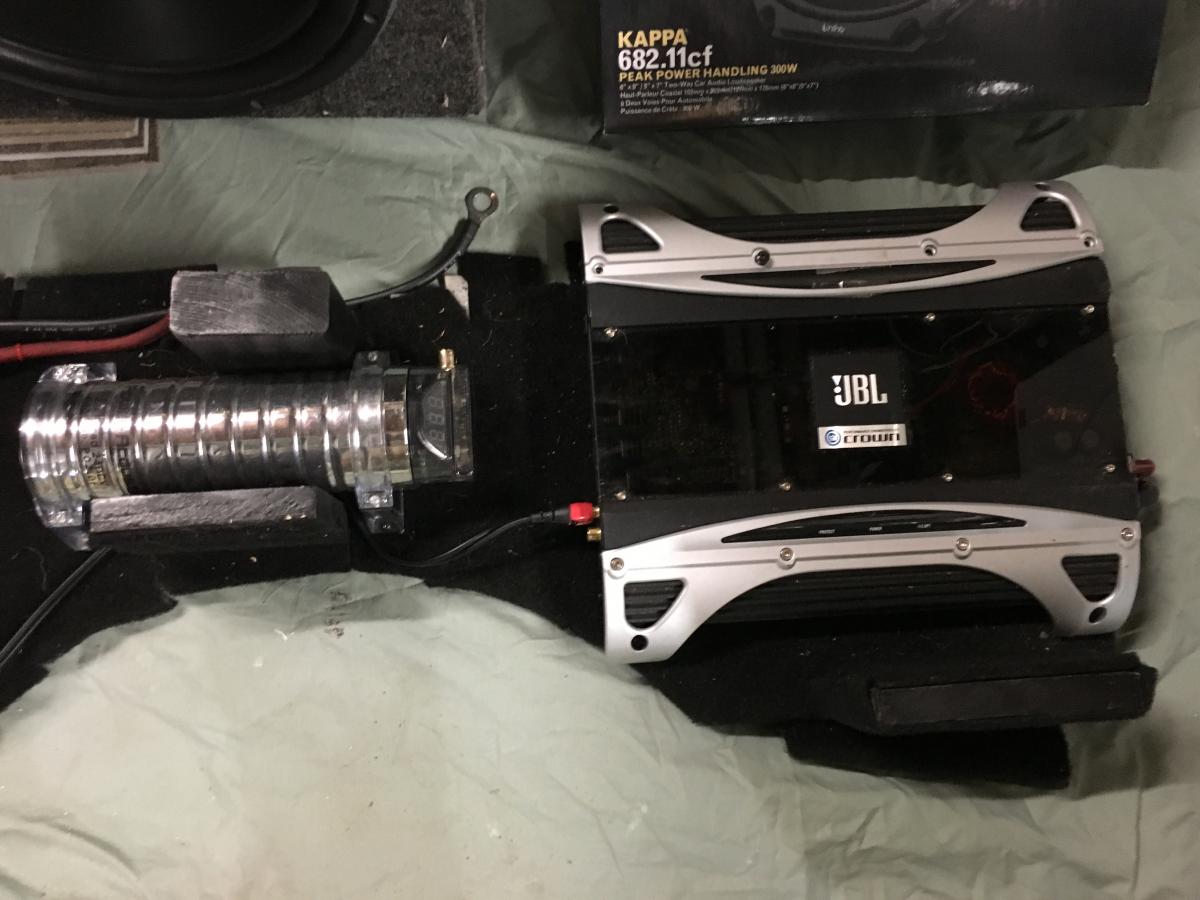
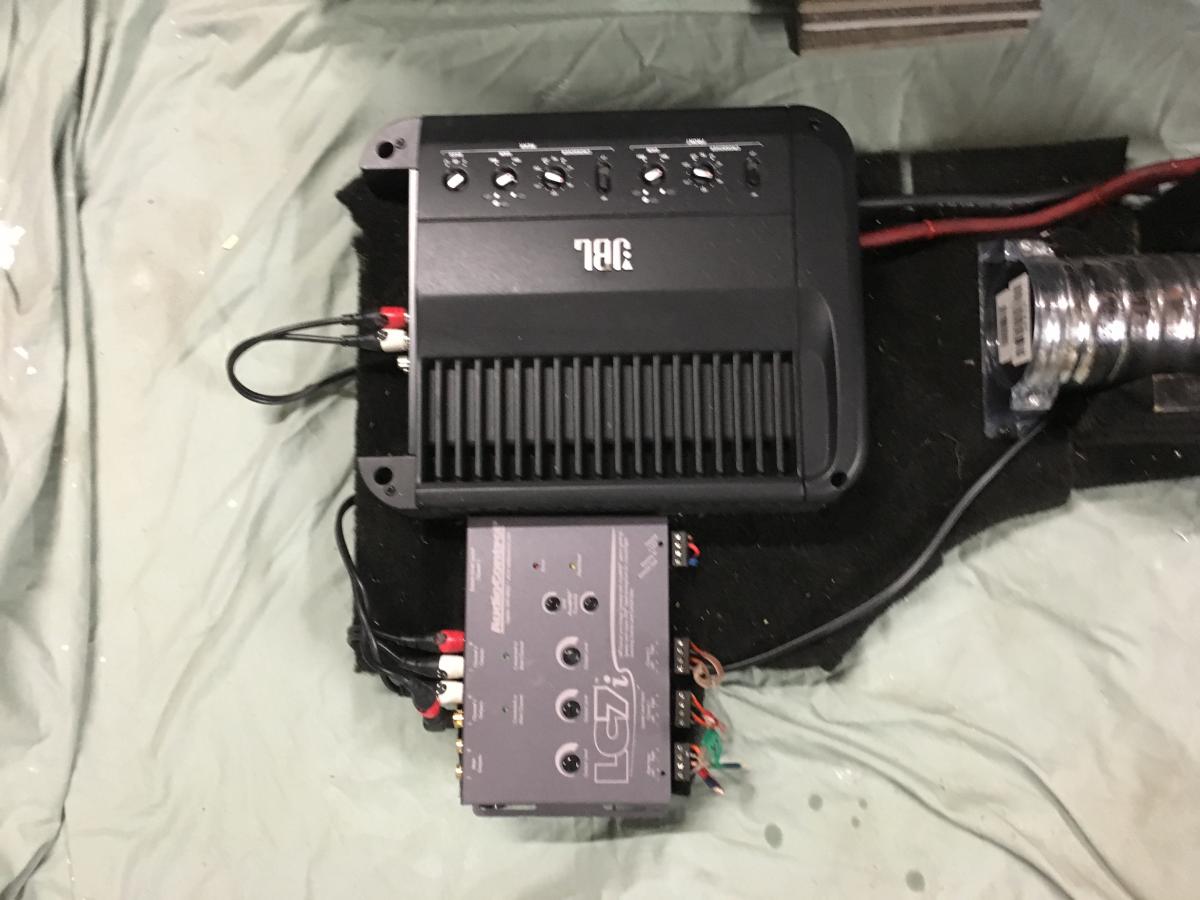
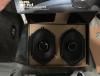
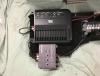
I built this unit to fit in front of the spare tire for my leased 2013 Sport w/o Nav and am getting ready to put it into the one I bought with Nav. A single 5 channel amp would obviously be much easier but I already had the JBL Crown and it's an amazing sub amp. Does any one know if there is wiring difference between 2013 Sony w/ Nav vs non-Nav? I searched and couldn't find anything The dual 12" Boston subs are a bit overkill but I listen to mostly hard rock and absolutely love a hard mid-bass punch (not muddy, distorted, annoy the neighbors type bass). The JBL GTO 4ch puts out about 100rms and JBL Crown amp was driving the subs reviewed at about 630rms so the system sounded clean and pretty amazing, gives you a massage when the bass hits, and makes your hair tingle on the occasions that I regress in maturity and crank it way up. I'm probably going to go with dual 10" Alpine TypeR's this time around, Maybe a dumb question, but has anyone tried a 10" & 12" Sub combination to get a hard, tighter mid-bass punch while keeping the nice lows? The reason I ask is because I have one of each Alpine TypeR, and it seems to make sense in my mind. If I do this I'm going to build a single custom box with subs pointed in slightly different directions since I found the single 10" against the seat aimed straight back but the 12" in the rear most drivers corner pointing slightly forward at a diagonal, Should I run one channel serial or 2 parallel? Both subs are 4ohm and the JBL Crown is 1ohm stable so I can run either set up
-
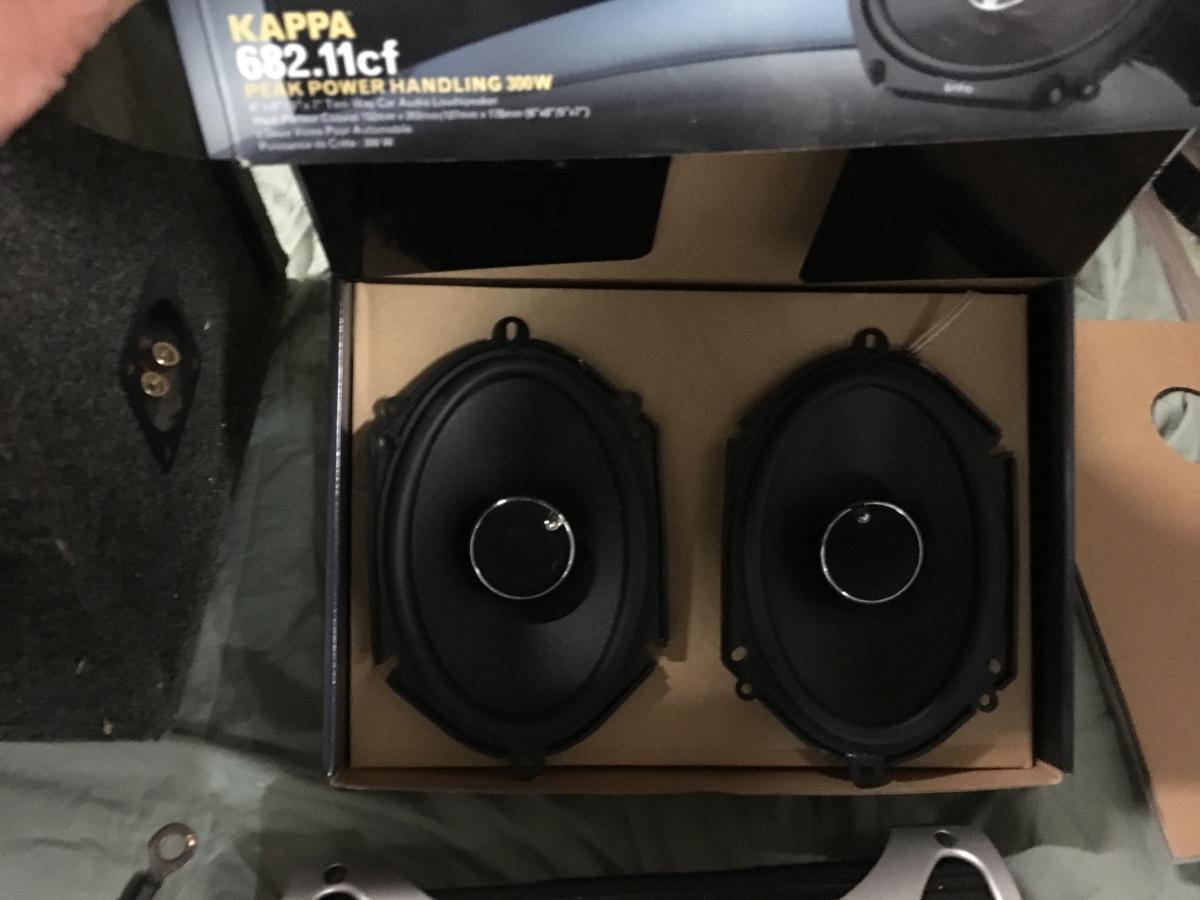
Look familiar? I kept the amp for 2 reasons 1. Maybe I was being dimwitted, but I never could figure out how to tap into CanBus input correctly so I used the speaker level outs on my 2013. I summed the tweet and door channels at the Lc7i to give the Infinity's a full mid to high range signal because the factory Sony cross over spits them if I am not mistaken 2. Personally think there is a noticeable difference keeping the the tweets even with my Kappas. Really rounds out the sound

-
Not being 25 anymore is no excuse...
-
The build begins - lowering & brake upgrade
edgesportguy replied to edgesportguy's topic in Brakes, Chassis & Suspension
P.S. I'll post a thread on the Morimoto HID kit I put in too (Awesome lights) Next project is to install the stereo system I built for my last '13 Edge Sport... did I mention I have a tendency of getting a bit carried away? and lastly - yes there is no siding on part of the garage. Too many projects at once :-(
-
The build begins - lowering & brake upgrade
edgesportguy replied to edgesportguy's topic in Brakes, Chassis & Suspension
Rears & hitch done - finally! Forgot what a PIA doing the rear springs was when there's some rust on the bolts (even after 2 days of penetrating oil). Thank God for air tools & some beers to bolster the patience. Putting a hitch on this thing was a nightmare! I thought I was never going to get all the backing plates & bolts into the frame rails UGH! Worst things of the project. - Fronts would have been a breeze if the dealer hadn't given me the wrong top plate for one strut. Ended up installing one strut with wrong plate for that side, and couldn't get the other side in, Both had to come back out and apart. Aaaargh!!! - Getting the lower control arms off the rear spindles was a bear - Wasting an hour scratching my head and then starting to polish up the old stainless steel slides for the front pads because I thought PowerStop gave me the wrong hardware & boots for the calipers. They just put them in the wrong box! Happened to finally check the box of pads for the rears and sure enough the hardware bags were just swapped. - Tearing the outside edge of the piston seal on one rear caliper and having to replace it (they don't sell just the seal!} Thankfully caliper was only $65 at AutoZ and had it the next day - Threading the backing plates and bolts into the rear frame rail's for the hitch almost driving me to the point of losing my mind (what's left of it...) Best things - the end result! It was all worth it. The stance is perfect; the handling is great; Yoko's are sticky and considerably quieter than the Pirelli's; the PowerStop brakes grab like crazy: better acceleration thanks to the 7lb per wheel weight savings and love the ride. Got a total of 2" drop up front & 2.25" in rear with the springs & slightly smaller diameter wheels. Measures 31.5" up front and 31.25" in back at the fender lips now and only a 2% mph difference on the speedo from wheel size. Not the cheapest project, but considering new wheels, tires, tire psi sensors, camber kit, upgraded brakes, H&R springs, struts & shocks and alignment I think $2,800 was pretty reasonable. TireRack definitely had the best prices on everything (even the springs & struts) and their service was great (JC Whit for the brake kit. Got 10% off & free shipping and TR didn't carry them) A few FYI's for others taking this on - Borrow an impact wrench & compressor from a friend if you don't have them :-) - Have some beers on ice and stereo to listen to - Prepare to make a mess of your garage - Always remember Murphy's Law - You don't need a coil spring compressor providing you buy new struts and the top plates for them and put them in as whole assemblies versus taking the old ones apart. All 4 H&R springs are short enough that they don't need to be compressed to install. - You do need the special tool to screw the rear pistons back into the rear calipers. Good old C-clamp works fine for fronts, but Do Not try & use it on the rears - Spending the $125 for new top plates and rubber isolators for the front struts worth every penny in case you want to go back to stock down the road. Easy swap if you used some anti-seize on everything when putting it back together - If you're not able to get either rear control arm bolt out I found removing the shock, taking the nut off the outer lower control arm at the spindle along with the 2 bolts for the upper link and loosing the front trailing arm bolts to be the easiest way to get the rear springs out. Spring compressor doesn't make a difference and more of a PIA to try & use it. As A Word of Caution - Do Not forget to put a floor jack with just a hair of tension under the rear control arms before taking the bolts out; and then lower slowly to just let the old springs eventually drop out. - Plumbers torch with a MAP gas canister comes in handy for the spindle nuts if they're really frozen on - but don't overheat and start melting the rubber bushings - Be ready to give the old rotors some good whackings with a heavy hammer to get them off if you're not reusing them - Getting to the driver's side top rear shock nut is a pain but doable without removing the interior panel. Un-clip and remove one end of the powered piston, snap loose the small trim panel surrounding the bottom where it goes into the panel, pull out the panel a bit and then you can snake you're hand in and use a long extension on an impact to get the nuts on & off - Polish off ANY rust or replace the caliper slide bolts If there is any - Make sure to do the bedding process for the brakes per the directions to minimize chance of warping - Immediately get a alignment. I used 2 6ft peices of trim bungeed to the front wheels, a measuring tape and a level when assembling to put the camber and toe to as close to zero as possible - If not inclined to do this yourself a shop should only charge you about an hour additional labor than doing just the shocks/struts & brakes. The only additional labor is swapping the rear springs. - Enjoy the results!

-
The build begins - lowering & brake upgrade
edgesportguy replied to edgesportguy's topic in Brakes, Chassis & Suspension
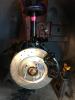
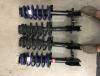
Fronts are done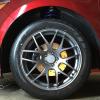

-
The build begins - lowering & brake upgrade
edgesportguy replied to edgesportguy's topic in Brakes, Chassis & Suspension
Before


-
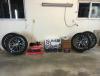
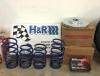
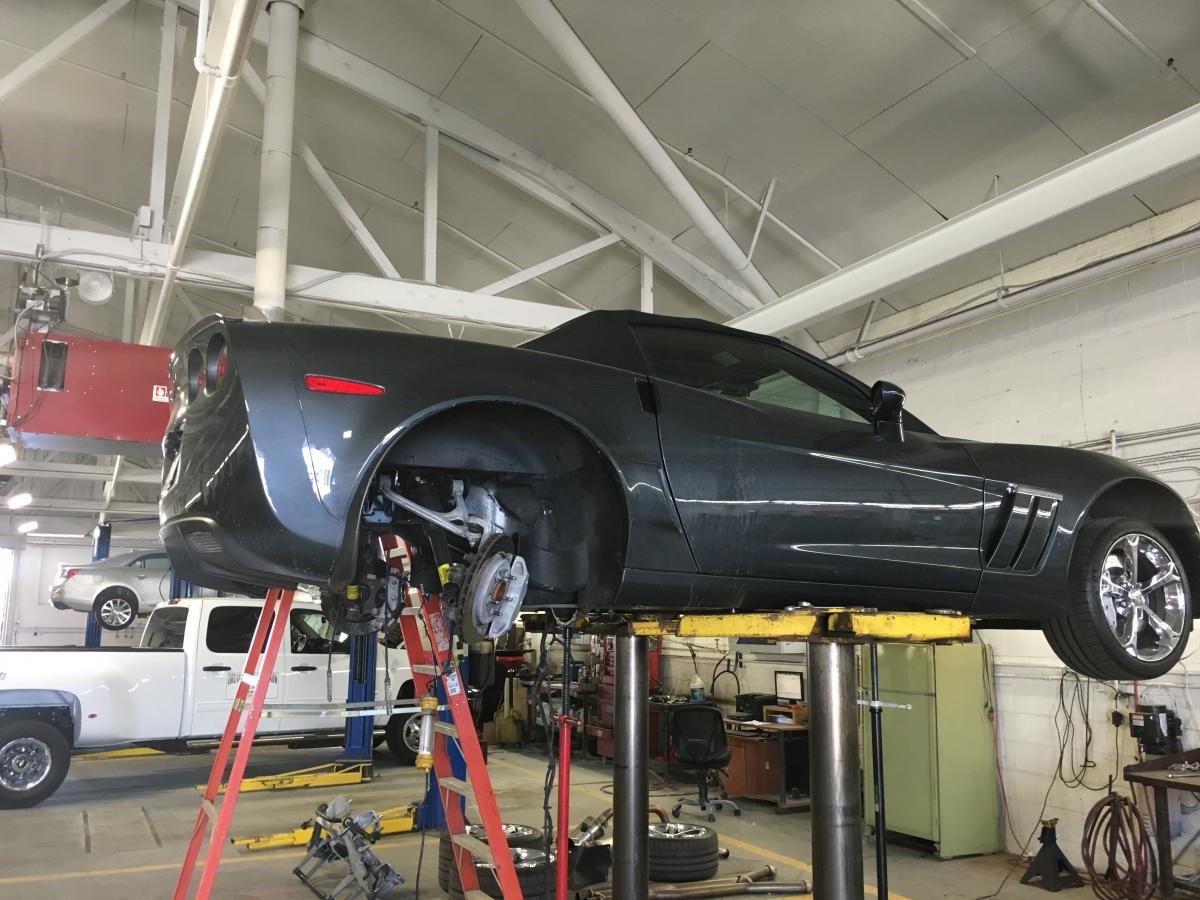
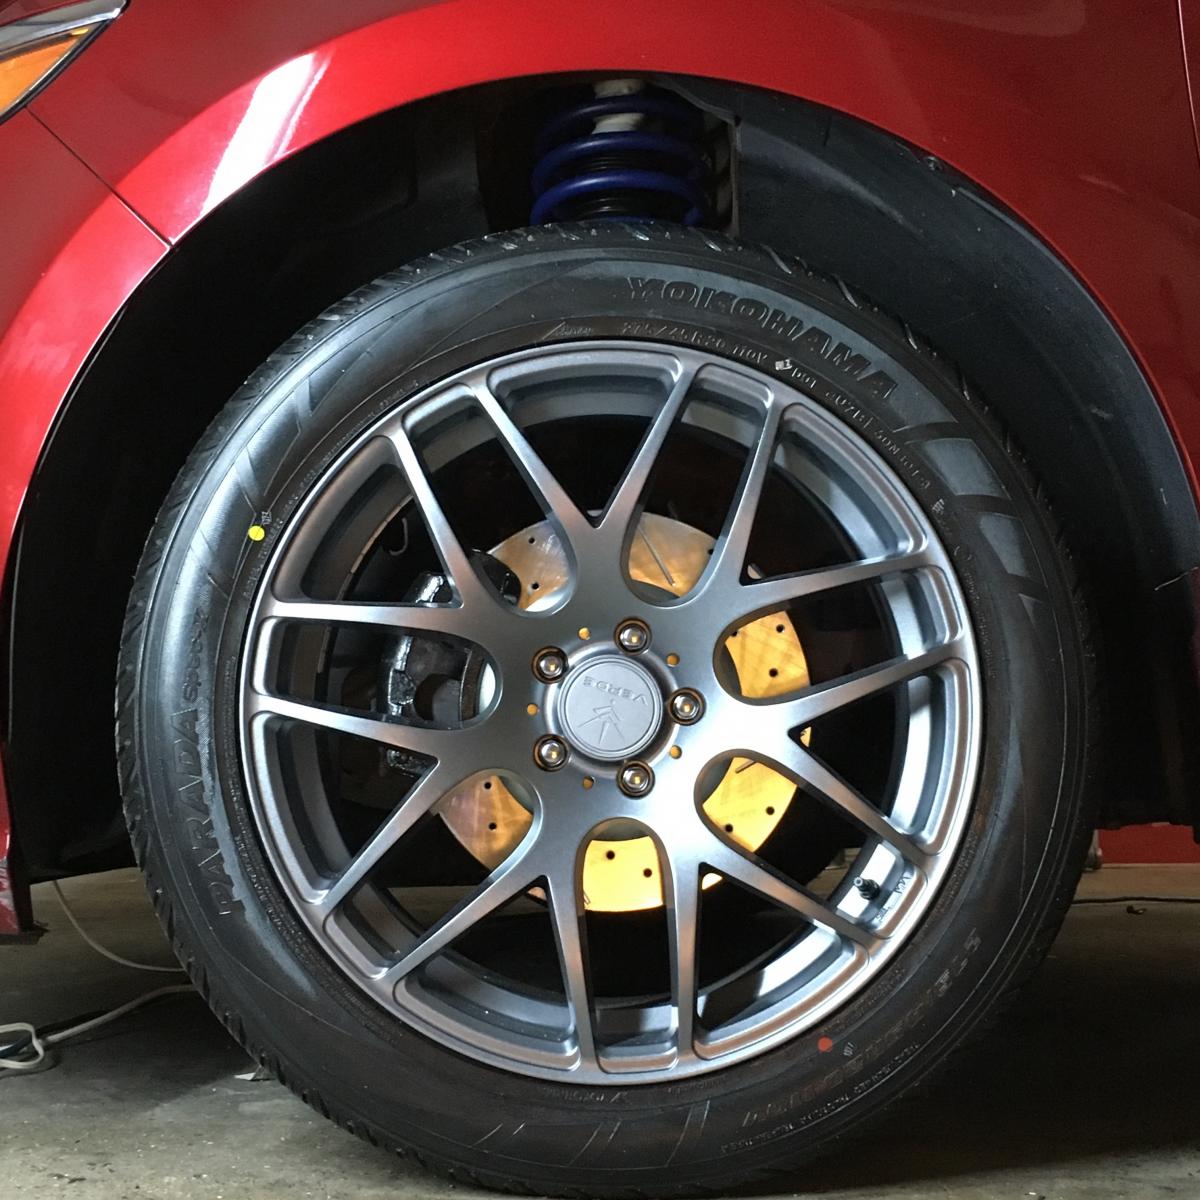
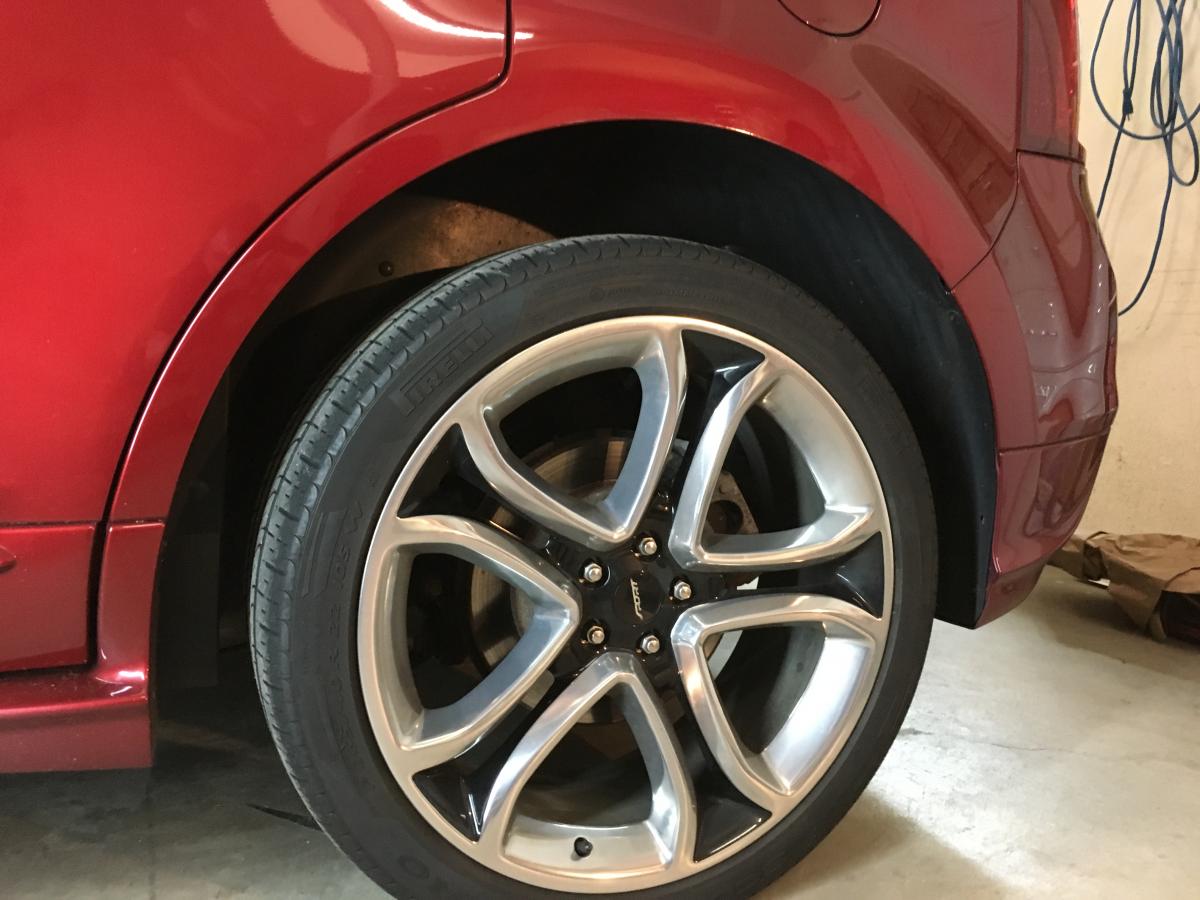
What started out as an upcoming brake job due to warped rotors got a little out of control after I curbed 2 of the wheels. Started installing the PowerStop Evolution brake kit, H&R springs and KYB struts & shocks last night. Finishing it off with 20" Verde Empire wheels and 275/45-20 Yokohama Parada Spec-X tires, Christmas in June at my house