DrEvil
-
Posts
22 -
Joined
-
Last visited
Content Type
Profiles
Forums
Gallery
Everything posted by DrEvil
-
I just tinted the whole thing. :shades:
-
Edge on 22's - Not mine but you can buy it...
DrEvil replied to Bryce's topic in Interior, A.C., Heat, Interior Trim
Just needs a drop -
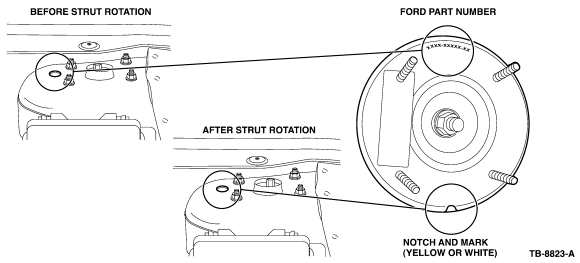
Those parts go along with a 2 page procedure on checking and setting the front end to proper specs. SERVICE PROCEDURE Verify that drift/pull is not being caused by concerns listed in Workshop Manual (WSM), Section 204-00 drift/pull diagnostics. If normal drift/pull WSM diagnostics/procedures do not resolve the concern then refer to the following service steps. NOTE: THIS SERVICE PROCEDURE MAY CAUSE THE FRONT CROSS CAMBER (TOTAL/SPLIT) ALIGNMENT VALUE TO EXCEED THE SERVICE MANUAL SPECIFICATION OF 0.00 ± 0.75 DEGREES. DO NOT EXCEED ± 1.2 DEGREES OF CROSS CAMBER. For a Right Drift/Pull Inspect the left strut upper plate to verify which direction the arrow is pointing. (Figure 1) NOTE: IF THE NOTCH IS VISIBLE IN THE ACCESS HOLE IN THE STRUT TOWER, THE PLATE HAS ALREADY BEEN ROTATED A POSITIVE 0.5 DEGREE. If the arrow is pointing inboard as seen through the access hole in Figure 1, no rotation is necessary (positive 0.5 degree camber already there). Continue with Step 4. If the arrow is pointing outboard, increase positive camber approximately 0.5 degrees on the left front wheel by rotating the upper strut plate 180 degrees. Refer to WSM, Section 204-00, Camber Adjustment - Front. NOTE: DISCONNECT THE FRONT STABILIZER BAR LINK AT THE LOWER CONTROL ARM SO THAT ENOUGH CLEARANCE CAN BE OBTAINED TO ROTATE THE UPPER STRUT MOUNT. REPLACE THE STABILIZER BAR LINK NUT ON REASSEMBLY. NOTE: REPLACE THE FOUR (4) UPPER STRUT MOUNT NUTS. Place vehicle on alignment rack. Remove and replace the two (2) right front shock absorber (strut) to wheel knuckle lower flag bolts and nuts but do not tighten. Refer to WSM, Section 204-01. With full vehicle weight on the wheels allow the right wheel to increase negative camber and tighten both lower flag bolts and nuts to 166 lb-ft (225 N-m). The camber shift may vary between vehicles, but will typically be between a negative 0.2 and negative 0.6 degrees of camber change. Refer to WSM, Section 204-01. Reset front toe adjustment to proper specifications. Refer to WSM, Section 204-00, Toe Adjustment - Front. For a Left Drift/Pull Inspect the right strut upper plate to verify which direction the arrow is pointing. (Figure 1) NOTE: IF THE NOTCH IS VISIBLE IN THE ACCESS HOLE IN THE STRUT TOWER, THE PLATE HAS ALREADY BEEN ROTATED A POSITIVE 0.5 DEGREE. If the arrow is pointing inboard, as seen through the access hole in Figure 1, no rotation is necessary (positive 0.5 degree camber already there). Continue with Step 4. If the arrow is pointing outboard, increase positive camber approximately 0.5 degrees on the right front wheel by rotating the upper strut plate 180 degrees. Refer to WSM, Section 204-00, Camber Adjustment - Front. NOTE: DISCONNECT THE FRONT STABILIZER BAR LINK AT THE LOWER CONTROL ARM SO THAT ENOUGH CLEARANCE CAN BE OBTAINED TO ROTATE THE UPPER STRUT MOUNT. REPLACE THE STABILIZER BAR LINK NUT ON REASSEMBLY. NOTE: REPLACE THE FOUR (4) UPPER STRUT MOUNT NUTS. Place vehicle on alignment rack. Remove and replace the two (2) left front shock absorber (strut) to wheel knuckle lower flag bolts and nuts but do not tighten. Refer to WSM, Section 204-01. With full vehicle weight on the wheels allow the left wheel to increase negative camber and tighten both lower flag bolts and nuts to 166 lb-ft (225 N-m). The camber shift may vary between vehicles, but will typically be between a negative 0.2 and a negative 0.6 degrees of camber change. Refer to WSM, Section 204-01. Reset front toe adjustment to proper specifications. Refer to WSM, Section 204-00, Toe Adjustment - Front. PART NUMBER PART NAME W712555-S439 Flag Bolts (2 Req) W520216-S440 Strut to Knuckle Nut (2 Req) W520212-S440 Upper Strut Mount Nut (4 Req) W520214-S440 Stabilizer Bar Link Nut (1 Req)
-
There is a TSB on transaxles with a build date prior to 1/10/2007, it is 07-5-2.
-
I do not have this problem with mine, but in case you need it the TSB # is 07-7-6, and these are the parts listed for it. PART NUMBER PART NAME W712555-S439 Flag Bolts (2 Req) W520216-S440 Strut to Knuckle Nut (2 Req) W520212-S440 Upper Strut Mount Nut (4 Req) W520214-S440 Stabilizer Bar Link Nut (1 Req)
-
I had the whole windshield tinted with 50% tint, helped alot.
-
I had two spots on the front drivers fender.
-
..Vista roof
DrEvil replied to svofan1's topic in Glass, Lenses, Lighting, Mirrors, Sunroof (BAMR), Wipers
Mine will not one touch completely closed. -
Vent Shades for windows
DrEvil replied to amandashook's topic in Interior, A.C., Heat, Interior Trim
You can get them at your dealer too. -
Bumper Protector - Now with pictures
DrEvil replied to Bryce's topic in Interior, A.C., Heat, Interior Trim
Looks good -
Thanks Houndkeeper, Good Hands truck looks good!
-
There might be a programmer in the next month or so, they are using my truck as a guinea pig now.
-
Are the fog light bulbs the same as the headlights?
-
The rear is 13%, I added another layer to the rears, double 13 on the fronts and 50 on the whole windshield.
-
Added another layer of 13 to the rears, double 13 on the fronts and 50 on the whole windshield. http://i10.photobucket.com/albums/a148/DrE...05/IMG_0052.jpg
-
No pics?
-
Thanks
-
Did you hook that up to your factory nav monitor?
-
..Vista roof
DrEvil replied to svofan1's topic in Glass, Lenses, Lighting, Mirrors, Sunroof (BAMR), Wipers
I agree, and made it one touch (open & close). -
That sounds really good!! How is it while your driving 70-80mph?
-
Can you interface the camera with the factory nav system?
-
Just turned the 3k mark, truck is great with NO issues.