


paker
-
Posts
38 -
Joined
-
Last visited
-
Days Won
1
Content Type
Profiles
Forums
Gallery
Everything posted by paker
-
2010 3.5L My fingers cannot reach the drain plug but a 3/8" ratchet can. So removal wouldn't be an issue. But how do I put it back? I can somehow bring the drain plug to the mouth of the hole, but how do I turn it for initial thread engagement? Is there a special tool or trick you guys have figured out already? Thank you. EDIT: The question was hasty. I was able to access from the rear. By the way, about 1/3 cup came out when sucked with a hand pump but 1 cup went in. Does the system lose that much oil? No leak at the rear shaft, side shaft, or the gasket joint. Not even wet.
-
The link suggests the same, no need to remove the upper radiator hose. I did it 3 times. On the third try, I cracked the radiator. Radiator replacement is a time sink. By all means avoid this by removing the upper radiator hose.
-
2010 3.5 91K miles After rolling the inner curtain off, when I press the button again, I hear a clicking sound from back and that's it. I searched this forum and learned there are 2 motors above the headliner. Has anyone done a similar repair? Any advice is appreciated. Thank you.
-
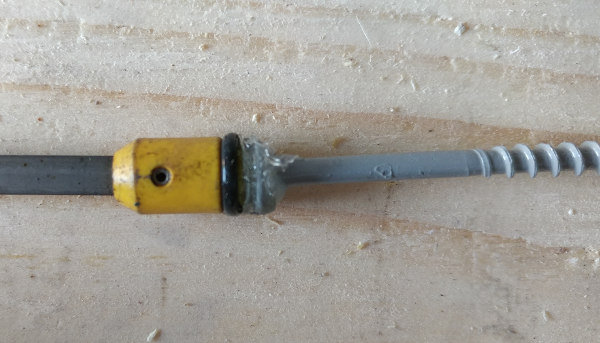
Thank you for the notes. The plastic part was broken off. I epoxy-glued a wood screw to the broken stem and was able to pull out the remaining piece.
-
Evap canister is not considered a wear item. AFAIK most cars go to tomb with OEM canister.
-
I just talked to the owner of this Edge. The first time he smelled antifreeze in the cabin was when the red light came on the dash and steam coming off the engine bay. All this happened because the passenger side fan stopped working. I bet the car was low on antifreeze to begin with. I need to check if the antifreeze smell is consistent before taking on this job. I just bought a manual on ebay. Thank you for the link. I hope the member, zazzy, is still around. By the way, do heater core and evaporator have to come out as one unit? I have a vacuum pump and can handle car AC, but would like to avoid if I can. Yeah, the person who did the write-up must have been mixed up between Edge and another vehicle like F150. At F150 forum we all figured out how to directly access the heater core by cutting through plastic trim.
-
2010 3.5 While doing the cooling system repair, I broke the handle of the dipstick. I should have removed it beforehand. My plan was to drill a small hole, drive a screw in, and pull the screw. To my surprise, the dipstick slipped further into the engine (not completely) and wouldn't let me drill a hole. Does anybody have a suggestion? Will it completely fall into the engine? Or bottom out? Thank you.
-
2010 3.5 91k miles I can smell antifreeze in the cabin, not all the time but when car is started. My suspicion is the heater core has a very small leak. I searched internet and found this for 2008 Edge: QUOTE It's one of the easiest cores to replace that I have encountered. Disconnect heater hoses at firewall. Probably doesn't matter about hose placement, but I always mark them just in case. To remove the fiber cover under dash, take a flat blade screwdriver and pry out the center pin of the expansion clips that hold it in place. There are four 5/16 head screws that hold the bottom/drain tray cover. Core will pull through the firewall and then down. You may have to silicone/glue or replace the foam seal strips on the new core. Before you install the core, check the distance between the inlet and outlet tubes to ensure they match the openings in the firewall. This saves time. It helps if you have someone on the outside to guide you when stabbing the tubes through the firewall. Replace bottom cover. You may have to hold one of the tubes when reinstalling the first hose to the core. Replace any lost coolant and check for leaks prior to reinstalling the fiber cover. If the cover seal is in good condition, any leak should drain through the firewall, otherwise it may leak inside cab. . END QUOTE Honestly, I don't quite understand this write-up. If anyone has done this repair, please advise. Thank you.
-
Thank you for the explanation.
-
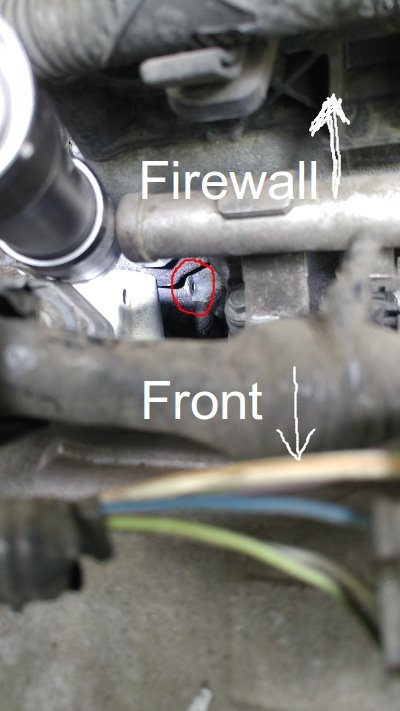
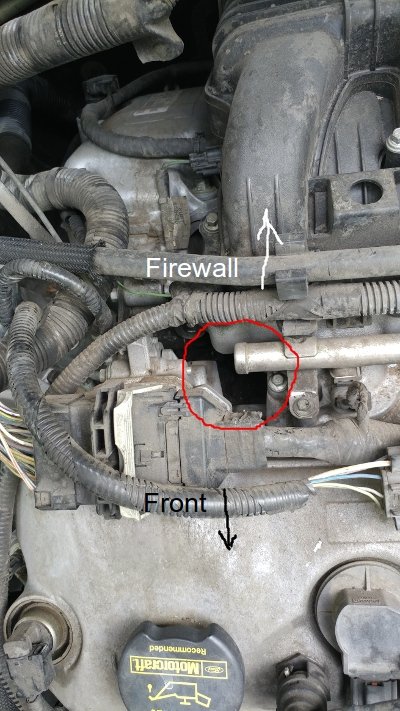
Thank you. Someone posted in this forum that the weep hole is directed to the driver side. I guess the location changes from year to year. What matters to me is that the hole shows no sign of leak.
-
Where is the weep hole exactly? This is what I found on my 2010. Is this the weep hole?
-
2010 3.5L I wonder if there is a special procedure to remove air from the cooling system. I searched the owner's manual and this forum, but found none. Thank you. EDIT: It's been a while since I had to replace the radiator. Coolant level at the degas tank stays same. I wonder if the thin hose from the thermostat housing to the degas bottle does the trick of degassing. Thank you.
-
Passenger side cooling fan stopped working. I searched youtube and found several. Basically, remove the air duct, remove 2 fan mounting bolts, rotate the fan 90 degrees, and pull out. When a new fan arrived, I followed the youtube procedure to remove the old fan and install a new one. The non-Ford (Dorman to be specific) had a tad larger electrical connector (larger diameter) and didn't fit. I removed it and installed my old fan back because the driver side fan still worked. New fan arrived. While removing the old fan, I cracked the radiator. My suggestion. Remove upper radiator hose, not just push aside (like youtube videos). Radiator needs to be partially drained before disconnecting the upper radiator hose. This opens up the passenger side and fan slides out without scraping the radiator. Virtually zero probability to crack the radiator. Definitely worth the trouble. Radiator replacement is no fun. Avoid it by all means. Now radiator removal procedure. Bumper cover has to come off. The metal brackets that hold the condenser and radiator together can only be accessed from the front. This forum has multiple posts for bumper cover removal. Remove top radiator hose and cooling fan. Drain radiator, remove hoses (lower radiator hose and degas bottle hose). Radiator top mount has 2 plastic tabs. You can see the tabs while standing in the front. Lift the tabs and remove the top mounts. Examine the radiator. Notice 2 mounting nuts (sheet metal insert) and 2 Y-shaped setup that hold the fan. The other side looks just the same. 2 mounting nuts and 2 Y-shaped pieces hold the condenser via z-shaped (double 90 degree bends) metal bracket. Tilt the radiator top toward the engine. Standing in the front, you can see 4 metal brackets that hold the condenser and the radiator together. Remove the bolt from each bracket. The bottom brackets can now be lifted up (from the Y-shaped setup of the radiator) and removed. The top brackets are still bolted to the radiator. With the radiator top tilted to engine, you can see the bolts. Remove them. Very limited access. If too difficult, wait while until 2 steps below. The passenger side has 2 AC lines fixed to the radiator with the tree clips. Remove them. Carefully lift the radiator out without scraping the condenser. You have a better access to the upper metal brackets while the radiator is being lifted out. Installation is reverse.
