k_m
-
Posts
109 -
Joined
-
Last visited
-
Days Won
1
About k_m
k_m's Achievements
")
Newbie (1/14)
-
I'm not sure who to blame if theres is even any point in blaming anyone at all. Bottom Line is that the Ford & the Retailers need to improve their lines of communication. I'm sure that auto parts such as Adv Auto, Autozone, Oreilly's, etc... are updated on when new parts are introduced. However, Walmart may not be updated. Lets try to focus on how we can deal with this.... what has worked out well for me is by going to http://www.fordparts.com/Commerce/CatalogResults.aspx?y=2010&m=Ford&mo=Edge#&&/wEXAQUHaGlzdG9yeQUEdHJ1ZbeJQwrDnn1brKWLK+LH7viyyDAr and either typing in oil filter into the search or you can select search by parts number and then you can type in FL500S. This will give you the option to select a dealer near you and you have the option of picking up the filter to avoid any s/h charges. On top of that they usually have the filters at a discounted price. I paid $5.99 after tax for our filter. Hope this helps out
-
DIY DVD Headrest Install with pics!
k_m replied to JeepTwins's topic in Audio, Backup, Navigation & SYNC
Fantastic writeup! :happy feet: One day I am planning on performing this task and you just made my life much easier! :hyper: -
Basically they replaced the seals where the half shaft [axle enters the transmission. the DC Kit-seal is a component of the PTU. So all in all your PTU and its seals were changed. Based on what others are posting.... this may be the last time you have to worry about the issue :happy feet:
-
Then it may have turned out to be the PTU Seals. Hopefully it doesn't take the full 3 weeks. Most place over exaggerate how long it takes just to be on the safe side.
-
Anytime! Glad I could Help
-
Saw a Lincoln MKT tonight at local gas station
k_m replied to saleen89559's topic in Articles, News & Reviews
JUST FYI the SRX 3.0 [non-turbo] takes regular fuel according to tier manufacturer recommended fuel. Also the interior of the SRX IMO top notch over all manufacturers -
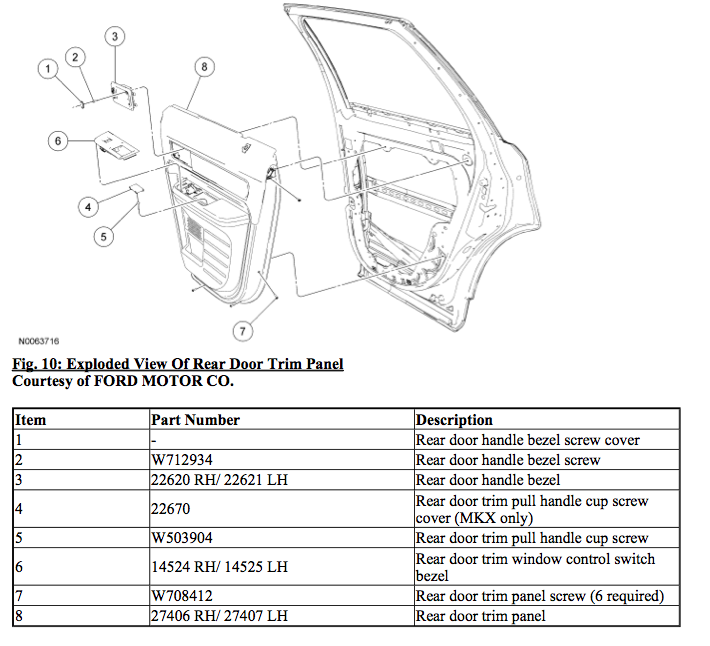
1. To Remove the rear door handle bezel: A. Remove the screw cover. B. Remove the screw. C. Remove the rear door handle bezel. D. Disconnect the electrical connector [if equipped] 2. Remove the screw cover. 3. Remove the screw. 4. Remove the 6 trim panel screws. 5. Disengage the bottom of the door trim panel from the door. A. Pull outward to disengage the push nuts from the retainers. 6. Lift the top of the door trim panel edge upward and out of the beltline molding. 7. Pull the lock rod through the lock rod grommet. 8. Remove the rear door trim panel. A. Disconnect the electrical connectors. 9. To install, reverse the removal procedure. Hope this helps
-
Anytime.. it was nothing... just wanted to help.
-
One more option.... I combined them into a PDF file so that should be printable. See attachment... :stats: Ford Edge PTU & Seals.pdf
-
It could have been b/c I uploaded them as .PNG now they are in a more universal image format .jpg See the attached images Let me know if it works and best of luck

-
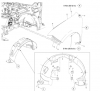
The 2 screws are from the ---> Fender Splash Shield. See the attached photo. [basically the shield inside of the tire well] NOTE: You do not have to remove all 8 screws to the Fender Splash Shield. Just the 2 closest to the bumper in the diagram its labeled #1 that way you can have access to the fog lamp. However, theres nothing wrong with removing all 8 screws from the splash shield in order to have more access/convenient
-
From under the vehicle : 1. Remove the 2 screws and position the fender splash shield aside. 2. Release the tabs and remove the fog lamp bezel. 3. Release the locking tabs and remove the fog lamp. 4. Disconnect the electrical connector. 5. You should be able to remove the Fog light now Hope this helps
-
I totally understand your position in hoping they diagnose it correctly and getting it fixed the first time around. Sometimes the consumer actually knows more than the service department b/c we are always researching and gathering experience from other Edge owners. Sometimes knowledge helps and encourages the Service department to work harder in getting it right the 1st time around. If the leak is minor sometimes you may not see any drips. However if you were to get under the vehicle and look around you may be able to see residual leaks on or around the PTU or wherever its leaking from. Maybe by showing the images on this post or by asking if the leak is such or such color and which side is the leak coming from they can see that you are proactive and that you did your research/homework on the issue. Hope everything works out well for you :wacko:
-
Just to clarify, I am NOT trying to prove its the PTU. I was only explaining where its located and what it looks like while also providing tips on how to diagnose/determine if it could be a PTU issue. It appears that you dealer is an honest one and from what you described they seem to be trying to help out. Plus without looking at a vehicle its difficult to say for certain what exactly your are experiencing, hence, the dealer would have a more accurate understanding of whats going on. Good Luck
-
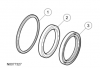
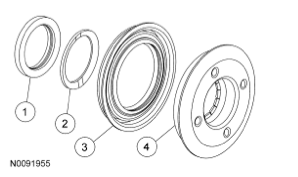
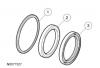
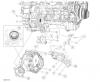
Just some tips to remember. 1) PTU Leaks From the RH Side - If the leak is red automatic transmission fluid, then the PTU intermediate shaft seal needs replacement #1 from the attached diagram labeled "Intermediate & Cover seals Rt Hand Side". This is inside the bore of the PTU shaft behind the deflector - If the leak is brown/black gear lube, then the PTU larger cover seal part needs replacement #3 from the attached diagram labeled "Intermediate & Cover seals Rt Hand Side". This is located on the PTU cover behind the deflector. 2) PTU Leaks From the LH Side - If the leak is the red automatic transmission fluid, the compression seal needs replacement [#13] also see the other attached diagram breaking the compression seal into sections #1 is the PTU-to-transaxle compression seal (part # 7086) & #2&3 are the Transfer case driver gear seal which are included in the compression seal This is between the PTU and transmission. - If the leak is brown/black, the PTU is overfilled and venting fluid from the top of the PTU. Flush and fill the PTU. So I am not sure exactly what was meant by a double seal but the compression seal could technically be considered a double seal since it includes the Transfer case driver seal Hope this helps put things into better perspective. :shades: