

autom8r
-
Posts
319 -
Joined
-
Last visited
-
Days Won
13
Content Type
Profiles
Forums
Gallery
Everything posted by autom8r
-
That's rail dust. It usually comes from a rail yard or some other iron works as others mentioned earlier. Really noticeable on lighter colored finishes. The solution: CLAY BAR simple to use and relatively inexpensive. Tons of video on you tube about it. Happy Trails
-
Coil Spring Binding...New Struts and Strut Mount
autom8r replied to bronxbomerss2's topic in Brakes, Chassis & Suspension
+1 on the bearing mount. Remove the cowl for better access to the nuts on the mount. Not sure what a strut mate is, but the geometry of the spring and strut should exactly match what you removed. I'd compare the old strut and bearing with the new to make sure all the "spring receiving surfaces" are in the same places. Be careful not to distort the strut tower with an improperly fitted bearing mount. There's a lot of force applied there, from both the mounts and the impact from the strut. Seems to me that it's binding and the spring and strut are not turning as a unit. The boing you hear is probably the spring reseating in the mount or strut. Good luck. -
+1 on the clips. Easily installed backwards or upsidedown on the pads. Some manufacturers design the clips to screech in while in reverse alerting you of brake pad thickness and an eminent brake service in your future; installed incorrectly screeching may ensue. I don't recall if the edge is equipped this way. I'd be surprised if this were the original set of pads on the car. The grinding does not make any sense especially after your teardown and inspection of the surfaces. Personally, I buy the ceramic pads. Low noise, low dust. Good luck.
-
I just replaced the dog bone yesterday. It took about 20 minutes. The transmission mount on the driver side I replaced in October. I had the same symptoms you are experiencing. To get to this mount, the airbox and battery must come out. The battery tray itself is bolted to the mount in question. Replacement of that part is a real PITA, especially if you have the towing package. You'll need to jack up the transmission to align the new mount. Ford bolts the mount from the top and from the sides into the frame of the car. After replacement, the rumble was gone. The old mount looked good, but after its removal you could tell it was worn out. I was able to easily pass a screw driver through the mount. I can post pictures if you want to see them. Happy Trails.
-
It's not worth the hassle. I suppose he could thread the post cat O2 sensor into the exhaust spool piece and have partial control of the mixture. That would be better than going open loop on the fuel mixture control loop. Theoretically, the engine is more efficient (and produces the most power) when the O2 sensors (pre and post) are part of the fuel ratio control. The pulse duration of the injectors and the spark plugs are controlled by the input signal received from the O2 sensors. Those sensors detect whether complete combustion is taking place and adjust timing and pulse duration to achieve as complete a burn as possible. Agreed that you may get a smidge more power by running slightly lean, but it raises cylinder head temperature and may cause detonation. The best option is high flow cats as akirby suggests, or maybe a dual exhaust like on the 3.7 sport.
-
Hmmm. There are pre- and post cat O2 sensors. What are you going to tell the PCM? It'll want to go lean, raising combustion temperature. Valves burn, pestilence and wailing and gnashing of teeth ensue. Not worth it.
-
Dealers Recommends Full Synthetic
autom8r replied to davidceder's topic in 2015+ Edge & MKX Generation II
I use 5w30 to minimize the piston slap. With 187,000 miles, I'm sure there are surfaces that are out of tolerance. 30w gives a little more protection on startups. So far no discernible leakage from any seals. I began running the 5w-30 at 120,000. -
Dealers Recommends Full Synthetic
autom8r replied to davidceder's topic in 2015+ Edge & MKX Generation II
+1 every 5k miles, Mobil 1 5w 30 full synthetic with High Mileage additive package. DIY with EZ Oil Drain valve. 187,000 miles. It's worth it. Crankcase sludge is the enemy. -
Transmission side. Likely thermostat housing or manifold leak. All the coolant and heater hoses are concentrated on that side of the engine. Agree it may also be a head gasket. If the engine oil is milky or foamy indicating a head gasket or water pump failure, run, don't walk. There is a tattle tale for the water pump. It's on the passenger side of the engine. The water pump has two seals with the tattle tale weep hole drain between the two seals. If the inside seal breaks, it allows coolant into the space between the two seals and out through the tattle tale. This is your warning to repair the water pump, or find a donor Edge for a used engine. Good luck.
-
Sorry couldn't resist....
-
Changed my windshield wiper blades and found my driver side windshield washer jet is clogged. Is it time for a new X5?
-
184,000 Miles. Virtually no issues. Normal maintenance items, Plugs 2x, Coils 1x, two sets of tires, 1 set of brakes. Engine mount, brake booster, cooling fan assembly, battery 1x (now OPTIMA), a door lock actuator. Full synthetic oil changes every 5k miles, air filter every 15k. Except for the tires, I self performed all these repairs which were easy and straight forward. I installed all the accessories, and they shouldn't be part of the reliability equation, but the accessories, some OEM, most not, are reliable too. Even the HR springs are seasoned now and ride very well. If you look at my signature, I've owned a lot of German cars. My neighbors thought I suffered a stroke when I brought the Ford home, and I bought it USED with 91k on the odometer! I bought it for next to nothing and it was in excellent condition so I couldn't resist. I've driven it over 90k miles now, thought I'd send it to college with my son and get another Autobahn terror; now I'm really curious how long the car will last. I sent him off in his BMW. I love the German hardware, but nothing German I've ever owned has been as reliable as the Edge. The car is a tank, built very well, starts every time and has never, since I've owned it, been in the shop. Parts are readily available everywhere and inexpensive compared to the German parts and any amateur Sunday mechanic can work on it without special tooling or electronics. My 2 cents. I applaud Ford for this one.
-
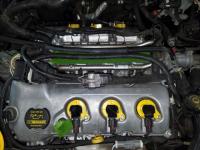
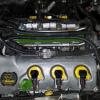
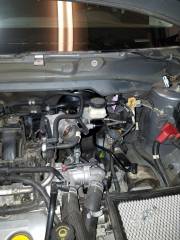
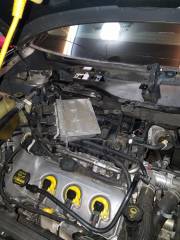
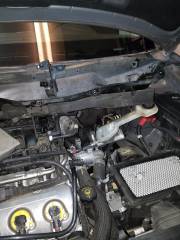
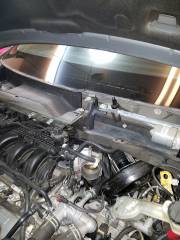
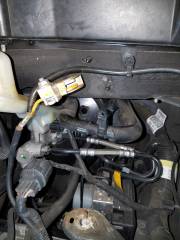
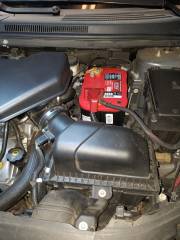
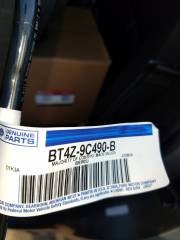
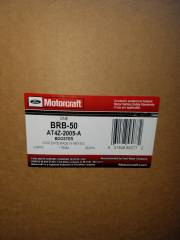
Some pictures of the brake booster R and R. You'll need to take the wipers and the tray under the cowl to remove the booster without disconnecting the brake lines. Personally, I prefer to work on the brake cylinders and not so much the master cylinder if I can avoid it. Part number for a 2008 Edge Part number for the booster vacuum line. Remove the air box, intake tubing and battery. Remove the battery tray. Remove the master cylinder from the booster. Keep it level. Don't let the brake fluid spill out of it. You can try, but you won't be able to wiggle the booster out yet. Remove the cowling, remove the wipers and wiper mechanism. Loosen the tray. You'll only lift it up for a little more wiggle room. The PCM needs to come out of the tray so it'll move a little more. Old brake booster removed. New booster in. Here is the reference PDF I made just for information. No need to remove the master cylinder, but I wanted to know how it looked and interfaced with the booster. Same with the pedal bracket. It is not necessary to remove the pedal bracket assembly. But the four bolts on the booster go through it and it helps to know what that looks like too. The brake switch turns a specific way, push the brake pedal down with one hand and twist the brake switch out of its bracket. Leave it connected, and dangling, it is unnecessary to electrically disconnect it, unless of course you've broken it. It's a puzzle to get the booster out, but it will come out. Good luck! Ford Edge Gen1 BRAKE BOOSTER REPLACE.pdf
-
Pics from a brake booster replacement
-
-
From the album: BRAKE BOOSTER
-

From the album: BRAKE BOOSTER
-
From the album: BRAKE BOOSTER
-
From the album: BRAKE BOOSTER
-
From the album: BRAKE BOOSTER
-
From the album: BRAKE BOOSTER
-

From the album: BRAKE BOOSTER
-
From the album: BRAKE BOOSTER
-
From the album: BRAKE BOOSTER
-
From the album: BRAKE BOOSTER
-
On my edge it was a gradual failure. I heard the tell-tale hissing noise and it progressively became worse over two weeks time. Eventually I was standing on the brake too, and there is no control over the brake pressure, so stops are jittery and not as graceful as with the power assist. My edge is way out of warranty. I bought a new brake booster and installed it without disconnecting the brake lines. I removed the cowl completely and the shelf behind it that supports the PCM and windshield wiper motor and mechanism. The booster came out without much room to spare and the new one went in with some coaxing (nothing bent or dented). Not sure why people are breaking the brake switch, but it needed to be removed, but not unplugged so that the pedal can be disconnected from the booster. I'll upload pictures later if anyone is interested. Long night. 3 hours minimum with power tools. On my way through, I noticed my upper transmission mount was bad. A few days after my brake booster replacement, I took on the transmission mount. That was a struggle, but now smooth as glass. Now to do the dog bone underneath. Happy trails.

