

autom8r
-
Posts
319 -
Joined
-
Last visited
-
Days Won
13
Content Type
Profiles
Forums
Gallery
Everything posted by autom8r
-
Here is a second opinion. Good news, both match! Ford Edge LIFT GATE.pdf
-
Here you go! Ford Edge RADIATOR FAN REPLACEMENT.pdf
-
Jeff: You have a tow package. The tow package controller is different than the non-tow package controller. The tow package controller uses PWM (pulse width modulation) to control the fan speed of each fan. This is why it is difficult to test. Blasting the controller with 55A is bound to blow by the MOSFETs or IGBTs that are in there. Compare the wiring and notice that the controller for the tow package has a connector for each fan as compared to the non-tow package controller that has only one. Notice that the number and sizes of the fuses serving the fan assembly also differ. Please disconnect the fan leads from the controller and test each fan. They should spool up without issue. If they don't spool up, then it is a motor issue. If they spool up, then it is a controller issue. The controller and fans come as an assembly. While the controller is available as a separate part, it does not make sense to buy it as such, since the entire assembly (both fans and controller) is less expensive. Maybe you have access to a PWM generator, I don't know what minimum and maximum PW is to produce 0-100% fan speed, but everything is on the internet. If your EDGE has been sitting for a while, apply power to the fan leads and tap the motor housing with a large box wrench. Astonishingly, this will free up the motor. https://www.youtube.com/watch?v=rDj7EDeyL3k Presently my DORMAN fan set has lasted longer (over 100,000 miles) than the original FMC part. I agree that the connector is a bit sloppy, but a firm squeeze and a tie-wrap fixes that. Everyone knows that DORMAN parts are DOA, I must be lucky with my fan set and two out of four door lock solenoids. I'll just keep cheating fate and buy the right DORMAN part. In your quest to replace the fan assembly, no wiring alterations are required in order to adapt this into your EDGE. Plug and play. Glad you found that elusive bottom screw. I know that you've been there brother. WWWPerfA_ZN0W posted a good link on the subject: http://www.fordedgeforum.com/topic/12731-radiator-fan-assembly-replacement-procedure/ Happy trails. Ford Edge Cooling Fan Wiring.pdf Ford Edge Cooling Fan RandR.pdf
-
No start after radio install?
autom8r replied to SMR2818's topic in Audio, Backup, Navigation & SYNC
Disconnect the I link and the Metra. One or the other and perhaps both may be interfering with the CAN bus. The Edge is mostly fly-by-wire and any third party overlay risks disruption of the signals along the communication path between modules. Diagnosis will typically involve an oscilliscope which is typically outside the range of a Sunday mechanic. Good luck. -
Amp wiring question 2008 Ford edge
autom8r replied to lwalters71203@gmail.com's topic in Audio, Backup, Navigation & SYNC
lwalters, The bare silver wire is most likely a shield (drain) wire. It will be connected (grounded) at one end or another, but never at both ends. Normal wiring practice dictates that it is attached to the case ground of the upstream device. Simply, it shields an audio channel (or any other analog signal) from interference. I've attached the wiring diagrams for the audio systems pertinent to your model year (and mine) for your use. There are many variants. You'll notice the shield wire and where it is connected doesn't always follow convention. It seems that in your situation there may be a loose connection somewhere. Check your shields. Personally, I like solder and heat shrink for audio connections. Happy trails. Ford Edge & Lincoln MKX Rep & Wir 2008 pp4948-4969 Audio.pdf -
More than 85,000 Miles so far on the Dorman. No issues. Make sure you buy the right part.
-
07edge check engine light flashing
autom8r replied to Melissa1015*'s topic in Forum Help & Site Suggestions
Melissa: Your DTC codes point to a defective injector, which can also cause misfiring. My advice is to buy an inexpensive mechanic's stethoscope and check the #2 cylinder injector. The fuel rail is a silver horseshoe shaped tube that has six injectors attached to it. The injectors inject fuel into the intake manifold just upstream of the intake valve. They are little valves that make a "clicking" sound as they open and close. Your DTC points to a lean condition (P0171) on bank one, firewall side. Fuel-Air ratio is not optimal for combustion. But it's not rich = over-fueled. The P0202 code points to a faulty injector, that's why you need to listen to it, because if it's not making that clicking noise or it 's noise isn't the same rhythm as the others, then it's likely to be defective. Granted it may be tough to get the stethoscope to touch the body of the injector. P0302 means that the cylinder is misfiring. It can misfire because there is no fuel in the cylinder to fire. Sometimes the injector is just clogged or dirty. I can be the connector or wiring too. Inspect the wires and look for broken or damaged wire. Worst case it may the PCM. Long shot, maybe run some STP fuel treatment. I recommend that after it's fixed, you put a bottle in your tank every other month. Happy trails. -
An electric build would be cool. Modified 6F tranmission or other gearbox. Batteries where fuel tank is and under backseat. I suppose you could use a powertrain from an old Escape. With some mods you could have a rocket.
-
Oxygen sensor wrench. I recommend disconnecting the wires before turning. Practice on the Bank2 upper HOS connector (top, radiator side) to get a feeling on how to disconnect. It should be the same connector type used on Bank#1 lower HOS. Use a little penetrant to get the old one to unscrew. Put a little dab of anti-seize on the threads of the new one. Wipe off excess. Don't get any on the sensor. Happy trails.
-
Shark 5 6 Bank 1 HOS 2 is located on the firewall side. In the vicinity of the oil pan drain bolt and lower engine mount. Happy trails.
-
+1 on the plugs. The transmission will hunt with a mis-firing engine under load. The power train is pretty stout.
-
AC Suddenly Stopped Blowing Cold Air
autom8r replied to tamugrad2013's topic in Interior, A.C., Heat, Interior Trim
I'm glad it worked out. I suppose that the motors do get tired. -
AC Suddenly Stopped Blowing Cold Air
autom8r replied to tamugrad2013's topic in Interior, A.C., Heat, Interior Trim
Omar: Sorry for my late response. I think that your issue may be more related to the size and ability of the AC condenser to reject heat into a 106F environment. I would check for proper airflow through the condenser, and make sure that it is not plugged. The AC system (R134a) is likely designed to work within a 20F temperature differential between saturated vapor condensing temperature of the refrigerant (160PSI, 115F) and the ambient outdoor temperature (approx. 95F). The higher the ambient temperature, the narrower the range and the more difficult it is to reject heat into the atmosphere. Here's a quick test, with the AC on, soak your AC condenser with water from a garden hose and see if the air leaving the AC vents inside the cabin gets cooler. If it does, then it's a condenser sizing issue. When you soak your condenser with water, the surface of the condenser will approach the wet bulb temperature of the air which is always lower than the dry bulb temperature of the air, especially in the desert. This will simulate a lower ambient condensing temperature. In a nutshell, Ford didn't design the AC systems in our cars to handle high ambient temperatures. Basically, not enough heat transfer is taking place. I'm also under the assumption that the refrigerant charge is at factory level. That is another discussion. The fans will help, but not much. At highway speeds there is enough airflow to "convect" the heat off of the condenser. All things being equal, you don't have the problem at night when it's cooler or during the winter, (at temperatures less than 95F ambient) right? As for your fans, they seem okay to me. Happy trails. -
Seems my memory is failing. My model year is a 2008. The stock plugs for a 3.5L in 2008 are Motorcraft part number AYFS22FM. They come in a box of 6 under the part number Motorcraft SP411. The stock plugs for my model year is an iridium enhanced fine wire platinum. Not entirely iridium. It seems that there is no 100% iridium Motorcraft plug for the Edge. For your model year (2013) Ford went to strictly platinum. A package of 6 is part number Motorcraft SP-520. The iridium plugs that will fit a 2013 model V6 (and probably out perform the platinum plugs) are: NGK Iridium Ix Spark Plug Part No. 6509 Autolite Iridium XP Spark Plug Part No. XP5363 Denso Iridium TT Spark Plug: ITV20TT Part No. 4719 ACDelco Iridium Spark Plug Part No. 41-988 Denso ITV20 Iridium Power Spark Plug Part No. 5339 Link to advance auto parts and iridium plugs. https://shop.advanceautoparts.com/web/PartSearchCmd?storeId=10151&catalogId=10051&pageId=partTypeList&suggestion=&actionSrc=Form&langId=-1&vehicleIdSearch=629089&vehicle_629089=2013+%3A+Ford+%3A+Edge+Limited+%3A+3.5L+3496CC+V6+FI+VIN%3A+C&vehicle_407724=2008+%3A+Ford+%3A+Edge+Limited+%3A+3.5L+213CI+V6+FI+VIN%3A+C&searchTerm=iridium&searchedFrom=header Sorry for the confusion, Good luck.
-
Ford iridium is recommended. Platinum is also available but may not last as long.
-
AC Suddenly Stopped Blowing Cold Air
autom8r replied to tamugrad2013's topic in Interior, A.C., Heat, Interior Trim
Glad it worked out. Happy trails. -
AC Suddenly Stopped Blowing Cold Air
autom8r replied to tamugrad2013's topic in Interior, A.C., Heat, Interior Trim
Tamugrad2013 I assume that you've already looked at your fuses, etc. as mentioned by others on this post. Please check the DTCs also and post them here. We are working with an incomplete set of data. The more info you can post the more accurate our diagnosis and cure can be. DTC codes P0480, P0481, and maybe P0482 indicate fan control module failure. The belt turning the clutch on a compressor may look as if it's spinning. The part that need to spin is in the center of the pulley when the pulley is energized. It is difficult to observe, due to the location of the compressor in the engine bay. Resist the urge to stick your hands in there. The ensuing manicure may not be to your liking. To answer your question: The A/C may blow cold when you first start the engine but as the coolant rises in temperature with the engine, the coolant temperature will eventually overshoot the allowable operating (cylinder head) temperature of the engine (about 210 F). Normally, the PCM will start and modulate or cycle a radiator cooling fan (for the tow package equipped, both for non-tow package equipped) to bring down the temperature of the coolant,. If the PCM sees that no change or a rise in engine coolant temperature persists, the PCM will lock out the A/C compressor (clutch de-energized) from operating, but leave the A/C condenser fan on (1 or both of the radiator fans). Your A/C condenser is installed in front of your radiator. If the PCM cannot control the fan speed on the primary fan at all, then it will prevent you from turning on the A/C and you'll be alerted to a problem by receiving warm, un-refrigerated air. The A/C compressor is intentionally locked out with the fans operating in an effort to prevent the engine from overheating and destroying your wallet. If equipped with a tow-package, The fans operate independently and modulate speed from 0-100%. If malfunctioning, sometimes the operative fan will lock on at 100% speed (annoying), indicating the PCM's inability to control the fan speed, this is an intentional tattle-tale. The other fan is usually unresponsive of the fan module is DOA. Abbreviated testing: With the tow package, start the engine with the A/C disengaged. Open the hood and look at the two fans. When the engine is cold, neither fan will be running. Cycle your A/C on and off, notice which fan follows the A/C request, Your compressor clutch will also lock up. Turn your A/C off and allow your engine to warm up. A radiator fan will eventually start. If it is the same fan as your A/C fan, then your primary fan may have failed. Start the A/C, your compressor may run for a short while and then disengage. If the other fan never starts or cycles, it's time for a new fan assembly (or a fan control module). Without the tow package, start the engine with the A/C disengaged. Open the hood and look at the two fans. When the engine is cold, neither fan will be running. Cycle your A/C on and off, both fans should start simultaneously on the A/C request. Your compressor clutch will also lock up. Turn your A/C off and allow your engine to warm up. Both radiator fans will eventually start. If one fan comes on when the engine is cold (without an A/C request) or either fan does not start and cycle after reaching operating temperature or if one stays on indefinitely, it's time for a new fan assembly (or a fan control module). Test the clutch on the compressor. Unplug the compressor from the wire loom and test the clutch directly. Violet with White stripe is +, black -. It should lock when power is applied and unlock when power is removed. If the clutch isn't working, ignore this post. You have a different problem. It is critical that you identify if your EDGE is equipped with a tow package. The fan control modules vary, be careful when ordering your replacement. Note: I have nearly 200k miles on my EDGE, I use the A/C daily. I've never had an issue with the A/C. A clutch or compressor failure usually happens after some knuclehead adds or bleeds off refrigerant. If you can avoid it, don't open the system. Good luck. -
AC Suddenly Stopped Blowing Cold Air
autom8r replied to tamugrad2013's topic in Interior, A.C., Heat, Interior Trim
Check your radiator fan assembly and fan control module. The PCM has a protective feature that locks out the A/C compressor if the engine begins to overheat. It's a common thread on this forum. Start with this post http://www.fordedgeforum.com/topic/21218-cooling-fan-system-troubleshooting-help/?hl=%2Bradiator+%2Bfans&do=findComment&comment=158313 Good luck. -
AC Suddenly Stopped Blowing Cold Air
autom8r replied to tamugrad2013's topic in Interior, A.C., Heat, Interior Trim
What is the temperature of the engine coolant as you're experiencing the compressor failure (lock out)? WWWPerfA_ZN0W you know where I'm going with this! -
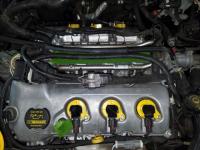
chef: You'll need to remove the upper manifold to get at the rear COPs and plugs. You'll be partially blind removing the rear COPs and plugs. Practice removing the coil wires on the front group of COPs that way you wont break the stupid little red clips. The red clips slide in the direction of the clip, so don't lift or pry. After the red clip is slid out, press the black spring clip and the plug will release from the COP. Remove the retainer bolts after the wires have been disconnected. It's true, the COP is two pieces so technically there is a boot. I kept my old COPs and looked at them last night, pulled the boot (thanks Omar) off the COP and I think it's basically just an adapter. There's a spring in it that presses against the top of the plug and another spring at the top of it that presses against a flat contact at the bottom of the COP. A new set of COPs comes complete with a set of boots as an assembly, ergo my interpretation that there were no boots in the traditional sense. I surmise that some valve covers may be deeper (maybe?) requiring the boot to be longer? That would probably be a different part number. Examine the boots though, if there are cracks, etc. discard and replace. My original COPs lasted 150k miles (no surface defects observed on the boots) and were still working when I swapped them for the ACCEL 140061 coils (and boots). Cosmetically, the yellow dresses up the engine bay. Technically, I don't think that they're any better than stock. With 193k on the odometer, I've never touched the lower manifold gasket. macbwt chime in if you want. Over and out.
-
chef: At 75k your gaskets are still pliable. They're made of silicone, probably the same stuff that your silicone oven mitts are made from. If you still have the Edge at 150k, change them at that time. The only reason that I can think of that would require you to change them is if somehow you damaged them in the removal process. This would be difficult to do. Leave the lower intake manifold gasket alone. A spark plug change out does not require you to remove the entire manifold. Unless of course, you feel the compulsion to do so, that's your prerogative. The plug boots and seals you speak of is really a valve cover gasket issue. A COP is a molded rubber assembly. There are no "boots" as in a typical spark plug boot. The COP is housed in a metal sleeve which creates a knife edge seal with the "boot" (I guess?) of the COP. When the COP is pressed onto the plug, the COP seals itself with the knife edge on the valve cover casting. Outside this sleeve, there is an o-ring that the valve cover interfaces with. It is a clever (COP in sleeve) design that I wish BMW would steal and adopt into their VCG design (since BMW VCGs get crispy and fail frequently). Since the sleeve is continuous, oil can never seep into and fill the sleeve causing the plug to misfire. COP, note inside surface of the top. This is the contact point for the valve cover casting and knife edge seal. Top view, all round simple gaskets. note the protrusion in the casting for the knife edge seals for the COPs. Bottom view (inside, not o-ring seals for spark plug sleeves); Note that even the perimeter gasket is an o-ring. In order to remove and replace the sleeve seals, the valve covers must be removed. A daunting task, especially in the back against the firewall. The tricky part is to release the little red clips without breaking them, after that, twist the COP while pulling on it. It should pop right off. You'll be surprised that there is very little dirt/debris there is in the spark plug sleeve. Use a can of compressed air to blast out anything that's in there before removing the plug from the sleeve. Practice on the front set first. My advice, ditch the boots and seals, whatever those are. Unless there is a leak from the valve cover. Happy trails.
-
My experiences has been about 60k. Ford says 100k, but you'll start misfiring under load and notice strange behavior in transmission shift patterns. These are the early signs. It is best to changeout the plugs before the gap on them becomes so big that it damages the ECU. It is a relatively simple process for a Sunday mechanic and well documented on this forum, Happy trails.
-
Upper intake manifold gasket, there's a lower one too. They are pretty durable. If this is your first change out, you probably don't need to. I changed mine on my second set. Use a torque wrench so you don't overdo it.
-
dre2142: Power steering fluid is what's leaking. Likely from the hoses. There are two. Easy to fix yourself, but messy. Normal wear item. How many miles are on your Edge? Happy trails.
-
As soon as water enters the crankcase, electrolysis begins. Modern engines use a variety of dissimilar metals as bearing surfaces. In oil, galvanic corrosion between these dissimilar metal surfaces is slowed way down or arrested. In water, galvanic corrosion will most likely damage the bearing surfaces of the engine parts where dissimilar metals come into contact with each other, crankshaft to connecting rods, connecting rods to wrist pins, etc. Even the seals and guides may be affected. Regretfully, you are against the clock. As the engine sits, water is beginning its demise. A week, probably recoverable. A month, could be trouble.
