

WWWPerfA_ZN0W
-
Posts
11,144 -
Joined
-
Last visited
-
Days Won
272
Content Type
Profiles
Forums
Gallery
Posts posted by WWWPerfA_ZN0W
-
-
TSB 14-0201
EXHAUST SULFUR ODOR AFTER HARD ACCELERATION – CLIMATE CONTROL IN RECIRCULATION MODE ONLY
Publication Date: October 28, 2014
FORD: 2011-2014 Edge
LINCOLN: 2011-2015 MKX
ISSUE:
Some 2011-2014 Edge and 2011-2015 MKX vehicles may exhibit an exhaust odor in the vehicle while the climate control system is in recirculation mode only. This may be more noticeable after hard acceleration, driving in hilly conditions and/or towing a trailer. Customers may indicate the odor smells like sulfur.
ACTION:
Follow the Service Procedure steps to correct the condition.
SERVICE PROCEDURE
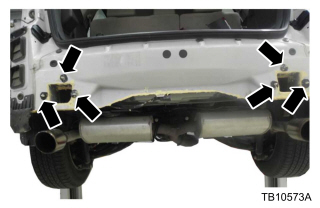
1.Remove the rear bumper. Refer to Workshop Manual (WSM), Section 501-19.
2.Replace the four (4) air extractors.
3.Lower and support the rear section of the exhaust system.
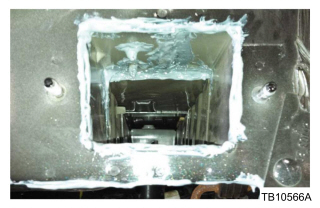
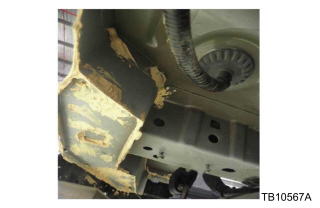
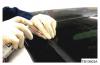
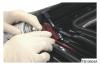
4.Clean the areas on the underside of vehicle where seam sealer and expandable foam will be applied. (Figures 1-6)
5.Cover the exhaust system.
6.Apply a generous amount of Motorcraft® Seam Sealer to the rear horizontal sheet metal lap joints on the left and right sides of the vehicle and the rear sheet metal overlap flange across the rear of the vehicle. (Figures 1-6)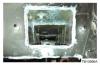
Figure 1 – 14-0201
Figure 2 - 14-0201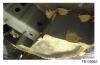
Figure 3 - 14-0201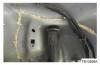
Figure 4 - 14-0201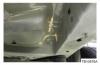
Figure 5 - 14-0201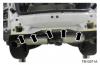
Figure 6 - 14-0201
Figure 7 - 14-0201
7.Fill crush cans with Lord Fusor 130 or 3M 08458 expandable foam. Follow the instructions on the can for application. (Figure 7)
8.Install foam from the Rotunda Squeak and Rattle Repair Kit (164-R4901) around the bumper beam attachment studs. (Figure 8)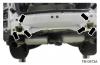
Figure 8 – 14-0201
a.Some vehicle configurations may have unused bumper attachment studs on each side of the vehicle. Apply Motorcraft Seam Sealer around unused studs. (Figure 8)
9.Reinstall the rear exhaust system.
10.Reinstall the rear bumper cover. Refer to WSM, Section 501-19.
11.Reprogram the heating ventilation air conditioning (HVAC) module to the latest calibration using IDS release 92.04 or higher. Make sure you are connected to the internet when entering module programming to obtain the latest updates. Calibration files may also be obtained at www.motorcraftservice.com.
Obtain Locally
Part Number Part Description
130 Lord Corporation Fusor® Rigid Foam (Super Fast)
08458 3M Rigid Pillar Foam
PART NUMBER PART NAME
AL2Z-61280B62-A Grille – Air Inlet
TA-2-B TA-2-B Motorcraft® Seam Sealer
OPERATION DESCRIPTION TIME
140201A 2011-2014 Edge, 2011-2015 MKX: Seal The Body Includes Time To Replace Air Extractors And Reprogram The HVAC Module (Do Not Use With Any Other Labor Operations) 1.8 Hrs.
WARRANTY STATUS
Eligible Under Provisions Of New Vehicle Limited Warranty Coverage.
Warranty/ESP coverage limits/policies/prior approvals are not altered by a TSB. Warranty/ESP coverage limits are determined by the identified causal part and verified using the OASIS part coverage tool.
DEALER CODING
BASIC PART NO. CONDITION CODE
61280B62 34-
 1
1
-
-
Seems like a transmission shift issue, but may actually be an Electronic Throttle Body issue:
Torque Pro or Forscan software can come in mighty handy here!
-
Get the Factory Service Manual on DVD from eBay. Worthwhile investment.
-
Not ... good ... Probably a turbo hose popped. The dealerships should verify those things as soon as they come off the truck.
-
Probably inadequate baffles in the gas tank, could be a faulty unit also. Ford has on occasion replaced the gas tank on other model lines:
-
You could plastidip the Edge bright yellow to get over this misery
 I am sure another idea will come along that will work out better, so keep trying!
 -
Correct, the PTU is an AWD-only thing. If you have a leak in that area, it could be an input shaft seal, or even power steering line. Can you tell what color the fluid is and what it smells like? Check the trans/power steering fluid levels?
-
If it's any consolation, the dealer sites display full part numbers, including LevittownFordSuperCenter.com ....
-
1
-
-
TSB 14-0191
MIL ILLUMINATED – DTC P0442, P0456, P1450, P2196 AND/OR P2198 – BUILT ON 12/1/2013 AND THROUGH 3/8/2014
Publication Date: October 10, 2014
FORD: 2014 Edge
LINCOLN: 2014 MKX
ISSUE:
Some 2014 Edge and MKX vehicles built on 12/1/2013 and through 3/8/2014 and equipped with a 3.5L or 3.7L engine may exhibit an illuminated malfunction indicator lamp (MIL) with diagnostic trouble code (DTC) P0442, P0456, P1450, P2196 and/or P2198. The customer may also have concerns with slow fuel fill and fuel spit-back.
ACTION:
Follow the Service Procedure steps to correct the condition.
SERVICE PROCEDURE
1.Using Integrated Diagnostic System (IDS) or equivalent, check for DTCs. Is DTC P0442, P0456, P1450, P2196 and/or P2198 present?
a.No – this article does not apply. Refer to the Powertrain Control/Emissions Diagnosis (PC/ED) manual for normal diagnosis.
b.Yes – proceed to Step 2.
2.Disconnect the vapor tube to evaporative canister purge valve (CPV). Refer to Workshop Manual (WSM), Section 310-00.
3.Use shop air regulated to 172.4 kPa (25 psi) to blow out the vapor tube to evaporative CPV.
4.Replace the evaporative CPV and the carbon canister. Refer to WSM, Section 303-13.
PART NUMBER PART NAME
7T4Z-9D653-B Fuel Vapor Canister
AU5Z-9C915-B Evaporative Emission Canister Purge Valve
OPERATION DESCRIPTION TIME
140191A 2014 Edge/MKX: 3.5L/3.7L: Retrieve DTCs Replace The CPV And The Carbon Canister Includes Time To Blow Out Vapor Tube And Clear DTCs (Do Not Use With Any Other Labor Operations) 0.8 Hr.
WARRANTY STATUS
Eligible Under Provisions Of New Vehicle Limited Warranty Coverage And Emissions Warranty Coverage.
Warranty/ESP coverage limits/policies/prior approvals are not altered by a TSB. Warranty/ESP coverage limits are determined by the identified causal part and verified using the OASIS part coverage tool.
DEALER CODING
BASIC PART NO. CONDITION CODE
9D653 12 -
TSB 15-0033
ADAPTIVE CRUISE CONTROL – REDUCTION IN SPEED WHEN PASSING A SEMITRAILER TRUCK
Publication Date: March 13, 2015
FORD: 2013-2014 Edge
ISSUE:
Some 2013-2014 Edge vehicles equipped with Adaptive Cruise Control (ACC) may exhibit a concern where the vehicle may reduce speed when the ACC is engaged while passing a semitrailer truck.
ACTION:
Follow the Service Procedure steps to correct the condition.
SERVICE PROCEDURE
Replace the Cruise-Control Module (C-CM). Refer to Workshop Manual (WSM), Section 419-03.
PART NUMBER PART NAME
BA1Z-9E731-C Cruise Control Module
OPERATION DESCRIPTION TIME
150033A 2013-2014 Edge: Replace The C-CM Includes Time To Remove And Install The Bumper Cover And Perform Sensor Calibrations (Do Not Use With Any Other Labor Operations) 1.2 Hrs.
WARRANTY STATUS
Eligible Under Provisions Of New Vehicle Limited Warranty Coverage.
Warranty/ESP coverage limits/policies/prior approvals are not altered by a TSB. Warranty/ESP coverage limits are determined by the identified causal part and verified using the OASIS part coverage tool.
DEALER CODING
BASIC PART NO. CONDITION CODE
9E731 01 -
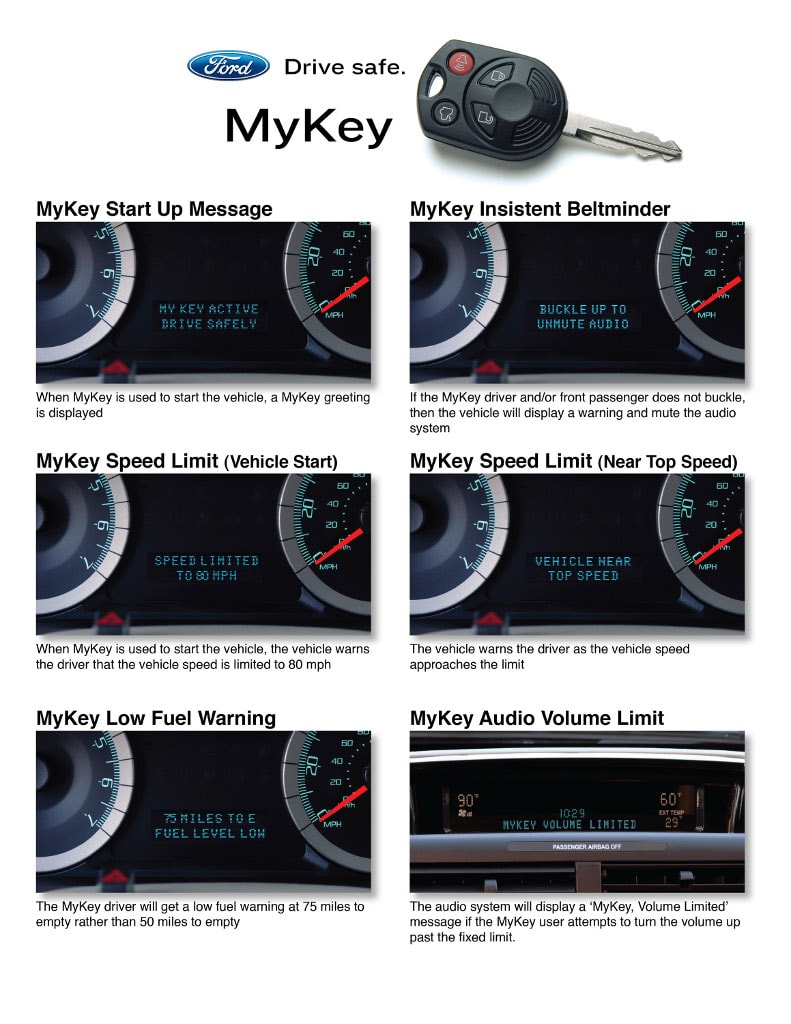
Ya, better get those lift struts taken care of! Do you have the Base Message Center or the Optional Message Center? You checked under the Information Menu to see the MyKey/AdminKey status? Will only show if MyKey is programmed, per the manual.
http://www.mattford.com/blog/how-to-program-the-ford-mykey-system/
-
TSB 14-0132
EASY FUEL CAPLESS – CONCERNS WITH FUEL NOZZLE INSERTION OR REMOVAL
Publication Date: July 22, 2014
FORD: 2009-2014 Escape, Expedition, F-150, Flex; 2010-2014 Fusion, Mustang, Transit Connect; 2011-2014 Edge, Fiesta; 2012-2014 Focus; 2013-2014 C-MAX; 2008-2015 Explorer; 2010-2015 Taurus; 2015 Transit
LINCOLN: 2009-2014 MKS, Navigator; 2010-2014 MKT, MKZ; 2011-2014 MKX
MERCURY: 2008-2010 Mountaineer; 2009-2011 Mariner; 2010-2011 Milan
ISSUE:
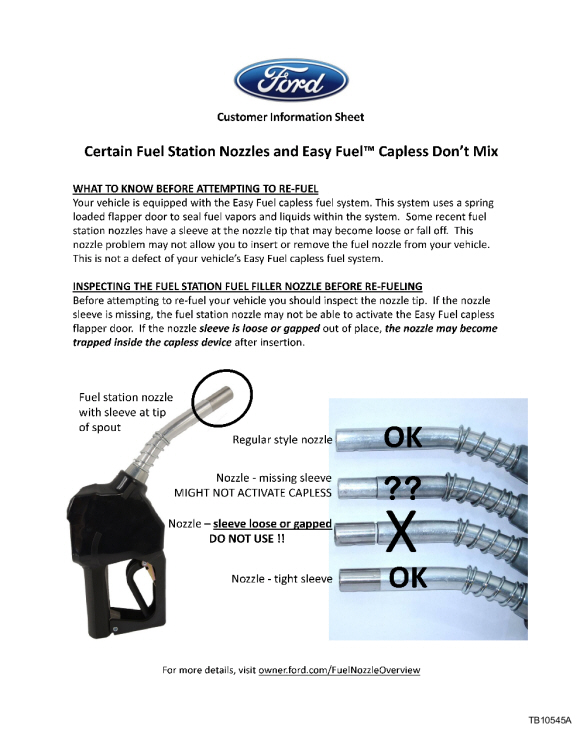
Some vehicles equipped with the Easy Fuel™ Capless Fuel System may exhibit a concern where a fuel nozzle cannot be inserted and/or removed. This concern may be caused by a problem with the fuel station nozzle. The sleeve at the tip of the spout may be missing, not allowing the nozzle to be inserted, or could be loose/gapped not allowing the nozzle to be removed once inserted.
ACTION:
Follow the service procedure steps to correct the condition.
SERVICE PROCEDURE
1.Provide the customer with the customer information sheet. (Figure 2)
2.Identify the customer concern.
a.For fuel nozzle insertion concerns, proceed to Step 3.
b.For fuel nozzle removal concerns, proceed to Step 5.
3.Verify normal system operation by attempting to insert the Easy Fuel™ funnel supplied with the vehicle into the fuel tank filler pipe. a.The funnel is typically located near the spare tire or jacking tools. Refer to the Owner’s Guide for funnel location as required.
4.Does the Easy Fuel funnel insert normally?
a.Yes – the system is operating normally. This article does not apply.
b.No – replace the fuel tank filler pipe. Refer to Workshop Manual (WSM), Section 310-01. Repair is complete.
5.Is the fuel station nozzle still stuck in the fuel tank filler pipe?
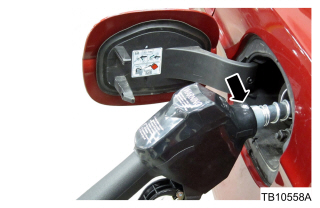
a.Yes – Remove the single hex head set screw at the base of spout near the handle cover. Twist and pull the nozzle handle to separate from the spout. Once the fuel nozzle handle is separated from the spout, the fuel tank filler pipe can be replaced. Refer to WSM, Section 310-01. (Figure 1)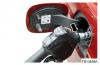
Figure 1 – 14-0132
b.No – inspect the fuel tank filler pipe for physical damage or for the nozzle sleeve remaining inside the capless device.
6.Is the nozzle sleeve visible in the fuel tank filler pipe, or is the fuel filler pipe damaged?
a.Yes – replace the fuel tank filler pipe. Refer to WSM, Section 310-01. Repair is complete.
b.No – the system is operating normally. No further service is required.
PART NUMBER PART NAME
9032 Fuel Filler Neck — See Parts Catalog For Complete Listing (All Focus/ 2013 And Newer Escape Only)
9034 Fuel Filler Neck — See Parts Catalog For Complete Listing (All Vehicles Except Focus/ 2013 And Newer Escape)
OPERATION DESCRIPTION TIME
140132A 2013-2014 Fusion, MKZ, 2011-2014 Fiesta, Edge, MKX: Replace The Fuel Filler Pipe Includes Time To Test Nozzle Insertion Or Remove Fuel Station Nozzle (Do Not Use With Any Other Labor Operations) 0.8 Hr.
140132A 2011-2015 Explorer, 2010 Mustang 4.0L SOHC: Replace The Fuel Filler Pipe Includes Time To Test Nozzle Insertion Or Remove Fuel Station Nozzle (Do Not Use With Any Other Labor Operations) 0.9 Hr.
140132A 2010-2015 Taurus, 2010-2014 Flex, MKT, MKS, 2009-2014 F-150, 2015 Transit, 2009-2014 Expedition, Navigator, 2009-2014 Escape, 2009-2011 Mariner: Replace The Fuel Filler Pipe Includes Time To Test Nozzle Insertion Or Remove Fuel Station Nozzle (Do Not Use With Any Other Labor Operations) 1.0 Hr.
140132A 2010-2014 Mustang, Transit Connect: Replace The Fuel Filler Pipe Includes Time To Test Nozzle Insertion Or Remove Fuel Station Nozzle (Do Not Use With Any Other Labor Operations) 1.1 Hrs.
140132A 2010-2012 Fusion FWD, MKZ FWD, 2010-2011 Milan, 2013-2014 C-MAX: Replace The Fuel Filler Pipe Includes Time To Test Nozzle Insertion Or Remove Fuel Station Nozzle (Do Not Use With Any Other Labor Operations) 1.2 Hrs.
140132A 2008-2010 Explorer, Mountaineer: Replace The Fuel Filler Pipe Includes Time To Test Nozzle Insertion Or Remove Fuel Station Nozzle (Do Not Use With Any Other Labor Operations) 1.6 Hrs.
140132A 2010-2012 Fusion AWD, MKZ AWD, 2010-2011 Milan AWD: Replace The Fuel Filler Pipe Includes Time To Test Nozzle Insertion Or Remove Fuel Station Nozzle (Do Not Use With Any Other Labor Operations) 1.8 Hrs.
WARRANTY STATUS
This is not a repair covered by warranty, but is otherwise eligible Under Special Programs Provisions Requiring Special Claims Coding as listed below: This special program expires on 12/31/2015. No repairs performed after 12/31/2015 are covered.
SPECIAL DEALER CLAIM CODING:
Program Code: R02
BASIC PART NO. CONDITION CODE
9032 (all Focus, 2013 and newer Escape only) or 9034 (all others) 02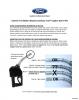
Figure 2 – 14-0132TSB 14-0132_EASY FUEL CAPLESS-CONCERNS WITH FUEL NOZZLE INSERTION OR REMOVAL.pdf
-
1
-
-
Try this site with your VIN to get build date info:
http://www.etis.ford.com/vehicleRegSelector.do
or
http://www.inventory.ford.com/services/inventory/WindowSticker.pdf?vin=
not sure it works with Canadian data, but give it a go ...
-
Cheapest to do a DIY replacement, but definitely a couple of hundred bucks cheaper to buy the Ford part and have a non-Ford service shop replace the booster for you.
-
TSB 14-0098 (supersedes TSB 12-8-10)
HOWL OR GROWL TYPE-NOISE FROM REAR WHEEL AREA
Publication Date: May 3, 2014
FORD: 2007-2010 Edge
LINCOLN: 2007-2010 MKX
This article supersedes TSB 12-8-10 to update the Title, Issue Statement and Service Procedure.
ISSUE:
Some 2007-2010 Edge and MKX vehicles may exhibit a customer concern of a growl or howl type-noise coming from the left or right rear wheel area.
ACTION:
Follow the Service Procedure step to correct the condition.
SERVICE PROCEDURE
Replace the suspect rear wheel hub and bearing assembly with a new service part. Refer to Workshop Manual (WSM), Section 204-02.
PART NUMBER PART NAME
7T4Z-1104-B Hub Assy – FWD (2007-2008)
7T4Z-1104-C Hub Assy – 4WD
9T4Z-1104-A Hub Assy – FWD (2009–2010)
W712435-S439 Wheel Hub Nut – 4WD Inner & Outer (2 Req)
W520215-S440 Nut – Toe Link & Lower Arm Outboard (2 Req)
W500766-S439 Bolt – Toe Link & Lower Arm Outboard (2 Req)
W712459-S439 Bolt – Shock Absorber Lower Flag
W520214-S440 Nut – Shock Absorber Lower
W520414-S441 Nut – Stabilizer Bar Link
W712754-S439 Wheel Hub Bolt (4 Req)
OPERATION DESCRIPTION TIME
140098A 2007-2010 Edge/MKX FWD: Replace One (1) Rear Wheel Hub And Bearing (Do Not Use With Any Other Labor Operations) 0.6 Hr.
140098A 2007-2010 Edge/MKX AWD: Replace One (1) Rear Wheel Hub And Bearing (Do Not Use With Any Other Labor Operations) 1.2 Hrs.
140098B 2007-2010 Edge/MKX FWD: Replace Both (2) Rear Wheel Hub And Bearings (Do Not Use With Any Other Labor Operations) 1.0 Hr.
140098B 2007-2010 Edge/MKX AWD: Replace Both (2) Rear Wheel Hub And Bearings (Do Not Use With Any Other Labor Operations) 2.2 Hrs.
WARRANTY STATUS
Eligible Under Provisions Of New Vehicle Limited Warranty Coverage.
Warranty/ESP coverage limits/policies/prior approvals are not altered by a TSB. Warranty/ESP coverage limits are determined by the identified causal part and verified using the OASIS part coverage tool.
DEALER CODING
BASIC PART NO. CONDITION CODE
1104 d4 -
TSB 14-0088
HEADLINER SAG BY ROOF OPENING PANEL
Publication Date: April 25, 2014
FORD: 2012-2014 Edge
LINCOLN: 2012-2014 MKX
ISSUE:
Some 2012-2014 Edge and MKX vehicles may exhibit a sagging headliner by the roof opening panel.ACTION:
Follow the Service Procedure steps to correct the condition.
SERVICE PROCEDURE
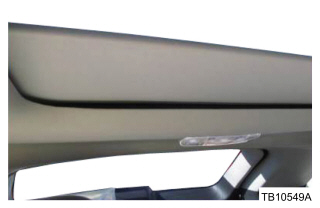
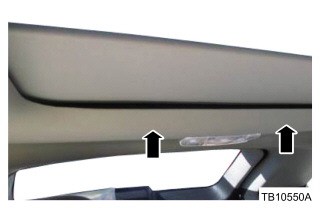
1.Inspect the headliner for sagging at the roof opening panel near the overhead lamp. Is the headliner sagging? (Figure 1)
Figure 1 – 14-0088
a.No – this article does not apply.
b.Yes – proceed to Step 2.
2.Apply upward pressure to the headline for 45 seconds to eliminate the sag condition. Allow the vehicle to sit for 30 minutes. (Figure 2)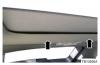
Figure 2 – 14-0088
3.Did the headliner stay in place?
a.Yes – no further action is required. Return the vehicle to the customer.
b.No – replace the headliner. Refer to Workshop Manual (WSM), Section 501-05.
PART NUMBER PART NAME
BT4Z-7851944-DA Headlining – Light Stone, Less SYNC® 2011/2013
DT4Z-7851944-BA Headlining – Light Stone, With SYNC® I With Mobile Navigation 2012/2013/2014
DT4Z-7851944-DA Headlining – Light Stone, Less SYNC® 2013/2014
OPERATION DESCRIPTION TIME
140088A 2012-2014 Edge,MKX: Inspect And Adjust Headliner (Do Not Use With Any Other Labor Operations) 0.2 Hr.
140088B 2012-2014 Edge: Inspect And Adjust Headliner, Replace Headliner (Do Not Use With Any Other Labor Operations) 3.1 Hrs.
140088B 2012-2014 MKX: Inspect And Adjust Headliner, Replace Headliner (Do Not Use With Any Other Labor Operations) 3.2 Hrs.
WARRANTY STATUS
Eligible Under Provisions Of New Vehicle Limited Warranty Coverage.
Warranty/ESP coverage limits/policies/prior approvals are not altered by a TSB. Warranty/ESP coverage limits are determined by the identified causal part and verified using the OASIS part coverage tool.
DEALER CODING
BASIC PART NO. CONDITION CODE
7851944 33 -
TSB 14-0062 (supersedes TSB 14-0048)
GLASS FOGGING OR SLOW TO CLEAR – MANUAL HEATING AND AIR CONDITIONING SYSTEM – BUILT ON OR BEFORE 2/7/2014
Publication Date: March 26, 2014
FORD: 2014 Edge
This article supersedes TSB 14-0048 to update the Action Statement.
ISSUE:
Some 2014 Edge vehicles with a manual heating and air conditioning system and built on or before 2/7/2014 may exhibit glass fogging or slow to clear after the defrost has been engaged.
ACTION:
Reprogram the Heating Ventilation Air Conditioning Module (HVAC)/Remote Climate Control Module (RCCM) to the latest calibration using IDS release 89.03 and higher. Calibration files may also be obtained at www.motorcraftservice.com.
OPERATION DESCRIPTION TIME
140062A 2014 Edge: Reprogram The HVAC/RCCM And Clear DTCs (Do Not Use With Any Other Labor Operations) 0.2 Hr.
WARRANTY STATUS
Eligible Under Provisions Of New Vehicle Limited Warranty Coverage.
Warranty/ESP coverage limits/policies/prior approvals are not altered by a TSB. Warranty/ESP coverage limits are determined by the identified causal part and verified using the OASIS part coverage tool.
DEALER CODING
BASIC PART NO. CONDITION CODE
19980 04
Ford Module Programming (FMP) is a software application that allows subscribers to program electronic modules on Ford, Lincoln and Mercury vehicles. It can be used for:
•Reprogramming emission-related (OBDII) modules on some vehicles manufactured in 1995 and all vehicles manufactured from 1996 to the present
•Reprogramming or reconfiguring non-emission-related modules on many vehicles (UBP and MS-CAN not supported)
In addition, module initialization (PATS) functions such as Keycode Erase/Reprogram and PCM Parameter Reset can be done using this application.
J2534 Device using Ford Module Programming (FMP) can Reprogram and Configure most Modules. -
TSB 14-0059
MIL ON WITH DTCS – P0351, P0352, P0353, P0354, P0355, AND/OR P0356 – BUILT ON OR BEFORE 3/1/2008
Publication Date: March 20, 2014
FORD: 2006-2008 Fusion; 2007-2008 Edge; 2008 Taurus, Taurus X
LINCOLN: 2006 Zephyr; 2007-2008 MKX, MKZ
MERCURY: 2006-2008 Milan; 2008 Sable
This article supersedes TSB 13-4-17 to update the Service Procedure and Part List.
ISSUE:
Some 2006 Zephyr, 2006-2008 Fusion, Milan, 2007-2008 MKZ, Edge, MKX, and 2008 Taurus, Taurus X and Sable vehicles built on or before 3/1/2008 and equipped with a 3.0L or 3.5L engine may exhibit a malfunction indicator lamp (MIL) on with diagnostic trouble codes (DTCs) P0351, P0352, P0353, P0354, P0355 and/or P0356 present in the Powertrain Control Module (PCM) and with one or more damaged ignition coil-on-plug(s).
ACTION:
Follow the Service Procedure steps to correct the condition.
SERVICE PROCEDURE
1.Using the IDS scan tool, retrieve continuous memory DTCs. Are DTCs P035X present in the PCM?
a.No – this article does not apply. Refer to the Powertrain Control/Emissions Diagnosis (PC/ED) manual for normal diagnostics.
b.Yes – proceed to Step 2.
2.Remove only the spark plug(s) and ignition coil-on-plug(s) from the affected cylinder(s). Refer to Workshop Manual (WSM), Section 303-07.
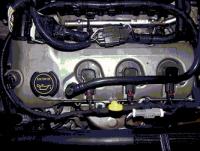
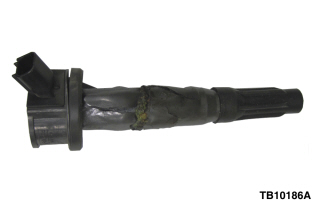
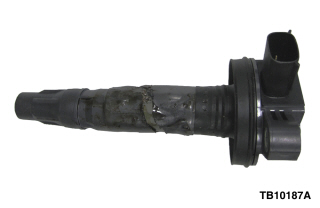
3.Inspect the ignition coil-on-plug(s) that have been removed for cracks and/or signs of heat related damage. Refer to Figures 1-3 at the end of this procedure for examples of damage. Does the ignition coil-on-plug(s) inspected show signs of damage?
a.Yes – proceed to Step 4.
b.No – replace only the spark plug(s) from the cylinders(s) associated with the P035X DTCs and do not continue with this article. Refer to the PC/ED manual for normal diagnostics.
4.Review the Online Automotive Service Information System (OASIS) repair history to determine if a PCM with an RM part number suffix has been installed previously. Has a PCM with an RM part number suffix been installed previously? (e.g. XXXX-12A650-XXRM)
a.No – proceed to step 5.
b.Yes – replace only the ignition coil-on-plug(s) and the spark plug(s) for the affected cylinder(s) and do not continue with this article. Refer to the PC/ED manual for normal diagnostics.
5.Replace the ignition coil-on-plug(s) and the spark plug(s) for the affected cylinder(s). Refer to WSM, Section 303-07.
6.Replace the PCM. Refer to WSM, Section 303-14A.
PART NUMBER PART NAME
AGSF-32W-M 3.0L Spark Plug
AYFS-22F-M 3.5L Spark Plug
6E5Z-12029-BA 3.0L Coil On Plug
7T4Z-12029-E 3.5L Coil On Plug
3F1Z-9H486-AA 3.0L Upper Intake Gasket
7T4Z-9H486-DA 3.5L Upper Intake Gasket
12A650 See Parts Catalog
OPERATION DESCRIPTION TIME
140059A 2007-2008 Edge/MKX: Check DTCs Replace One Spark Plug On The Right Side Of The Engine, Inspect The Ignition Coil (Can Be Claimed With Operations C Or D And E) 0.9 Hr.
140059A 2008 Taurus/Sable/Taurus X: Check DTCs Replace One Spark Plug On The Right Side Of The Engine, Inspect The Ignition Coil (Can Be Claimed With Operations C Or D And E) 0.9 Hr.
140059A 2006 Zephyr 2006-2008 Milan/Fusion: Check DTCs Replace One Spark Plug On The Right Side Of The Engine, Inspect The Ignition Coil (Can Be Claimed With Operations C Or D And E) 1.4 Hrs.
140059A 2007-2008 MKZ: Check DTCs Replace One Spark Plug On The Right Side Of The Engine, Inspect The Ignition Coil (Can Be Claimed With Operations C Or D And E) 0.8 Hr.
140059B 2007-2008 Edge/MKX: Check DTCs Replace Two Or More Spark Plugs On The Right Side Of The Engine, Inspect The Ignition Coils (Can Be Claimed With Operations C Or D And E) 1.1 Hrs.
140059B 2008 Taurus/Sable/Taurus X: Check DTCs Replace Two Or More Spark Plugs On The Right Side Of The Engine, Inspect The Ignition Coils (Can Be Claimed With Operations C Or D And E) 1.1 Hrs.
140059B 2006 Zephyr 2006-2008 Milan/Fusion: Check DTCs Replace Two Or More Spark Plugs On The Right Side Of The Engine, Inspect The Ignition Coils (Can Be Claimed With Operations C Or D And E) 1.6 Hrs.
140059B 2007-2008 MKZ: Check DTCs Replace Two Or More Spark Plugs On The Right Side Of The Engine, Inspect The Ignition Coils (Can Be Claimed With Operations C Or D And E) 1.1 Hrs.
140059C 2007-2008 Edge/MKX: Check DTCs Replace One Spark Plug On The Left Side Of The Engine, Inspect The Ignition Coil (Can Be Claimed With Operations A Or B And E) 0.4 Hr.
140059C 2008 Taurus/Sable/Taurus X: Check DTCs Replace One Spark Plug On The Left Side Of The Engine, Inspect The Ignition Coil (Can Be Claimed With Operations A Or B And E) 0.4 Hr.
140059C 2006 Zephyr 2006-2008 Milan/Fusion: Check DTCs Replace One Spark Plug On The Left Side Of The Engine, Inspect The Ignition Coil (Can Be Claimed With Operations A Or B And E) 0.5 Hr.
140059C 2007-2008 MKZ: Check DTCs Replace One Spark Plug On The Left Side Of The Engine, Inspect The Ignition Coil (Can Be Claimed With Operations A Or B And E) 0.4 Hr.
140059D 2007-2008 Edge/MKX: Check DTCs Replace Two Or More Spark Plugs On The Left Side Of The Engine, Inspect The Ignition Coils (Can Be Claimed With Operations A Or B And E) 0.6 Hr.
140059D 2008 Taurus/Sable/Taurus X: Check DTCs Replace Two Or More Spark Plugs On The Left Side Of The Engine, Inspect The Ignition Coils (Can Be Claimed With Operations A Or B And E) 0.6 Hr.
140059D 2006 Zephyr 2006-2008 Milan/Fusion: Check DTCs Replace Two Or More Spark Plugs On The Left Side Of The Engine, Inspect The Ignition Coils (Can Be Claimed With Operations A Or B And E) 0.7 Hr.
140059D 2007-2008 MKZ: Check DTCs Replace Two Or More Spark Plugs On The Left Side Of The Engine, Inspect The Ignition Coils (Can Be Claimed With Operations A Or B And E) 0.6 Hr.
140059E 2007-2008 Edge/MKX: Additional Time To Replace The PCM And The Ignition Coils As Needed Only If Ignition Coils Were Faulty (Must Be Claimed With Operation A, B, C, Or D) 0.3 Hr.
140059E 2008 Taurus/Sable/Taurus X: Additional Time To Replace The PCM And The Ignition Coils As Needed Only If Ignition Coils Were Faulty (Must Be Claimed With Operation A, B, C, Or D) 0.7 Hr.
140059E 2006 Zephyr 2006-2008 Milan/Fusion 2007-2008 MKZ: Additional Time To Replace The PCM And The Ignition Coils As Needed Only If Ignition Coils Were Faulty (Must Be Claimed With Operation A, B, C, Or D) 0.6 Hr.
WARRANTY STATUS
Eligible Under Provisions Of New Vehicle Limited Warranty Coverage And Emissions Warranty Coverage.
Warranty/ESP coverage limits/policies/prior approvals are not altered by a TSB. Warranty/ESP coverage limits are determined by the identified causal part and verified using the OASIS part coverage tool.
DEALER CODING
BASIC PART NO. CONDITION CODE
12A650 42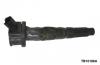
Figure 1 – 14-0059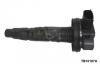
Figure 2 – 14-0059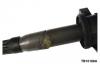
Figure 3 – 14-0059 -
Totally understandable, but sorry to see ya go to a competitor anyways.
-
TSB 14-0057 (supersedes TSB 12-8-12)
ALL WHEEL DRIVE – FLUID LEAK FROM REAR DIFFERENTIAL VENT CAP – TEMPERATURES BELOW 0 DEGREES C (32 DEGREES F)
Publication Date: March 14, 2014
FORD: 2011 Taurus; 2011-2012 Escape, Fusion; 2011-2013 Edge, Flex; 2011-2014 Explorer, Taurus
LINCOLN: 2011-2012 MKZ; 2011-2013 MKT, MKX; 2011-2014 MKS
MERCURY: 2011 Mariner, Milan
This article supersedes TSB 12-8-12 to update the vehicle model years.
ISSUE:
Some 2011 Mariner, Milan, 2011-2014 Taurus, Explorer, MKS, 2011-2013 Edge, MKX, 2011-2012 Fusion, MKZ, 2011-2012 Flex, MKT, 2013 Flex and MKT vehicles equipped with a 3.5L GTDI engine may exhibit an occasional fluid leak coming from the rear differential vent cap in temperatures below 32 degrees Fahrenheit (0 degrees Celsius) under certain conditions.
ACTION:
Follow the Service Procedure steps to correct the condition.
SERVICE PROCEDURE
1.Inspect the rear drive unit for oil leaking from the rear differential vent cap located on the rear cover.
a.If only a light residue is found around the cap, this is normal. This article does not apply.
2.Remove and discard the rear differential vent cap from the rear drive unit cover.
3.Install a new rear differential vent cap.
4.Clean off any remaining residue.
PART NUMBER PART NAME
DB5Z-4022-A Differential Vent Cap
OPERATION DESCRIPTION TIME
140057A 2011 Milan, Mariner, 2011-2012 Escape, MKZ, Fusion, 2011-2014 Taurus, MKS 2011-2013 Edge, MKX: Inspect And Replace The Rear Drive Unit Vent (Do Not Use With Any Other Labor Operations) 0.3 Hr.
140057A 2011-2014 Explorer, 2011-2013 MKT And Flex: Inspect And Replace The Rear Drive Unit Vent (Do Not Use With Any Other Labor Operations) 0.4 Hr.
WARRANTY STATUS
Eligible Under Provisions Of New Vehicle Limited Warranty Coverage.
Warranty/ESP coverage limits/policies/prior approvals are not altered by a TSB. Warranty/ESP coverage limits are determined by the identified causal part and verified using the OASIS part coverage tool.
DEALER CODING
BASIC PART NO. CONDITION CODE
4022 42 -
TSB 14-0050
4.2 INCH DISPLAY RADIO – UP/DOWN ARROW BUTTONS INOPERATIVE
Publication Date: March 10, 2014
FORD: 2013 Edge; 2014 Explorer, Flex, Taurus
ISSUE:
Some 2013 Edge vehicles built on 8/16/2013 and through 9/27/2013, 2014 Explorer vehicles built on 8/23/2013 and through 9/27/2013, Flex vehicles built on 8/29/2013 and through 9/27/2013, and Taurus vehicles built on 8/22/2013 and through 9/27/2013, equipped with the 4.2 inch display radio only may exhibit the up/down keypad arrows being inoperative. This may be due to the Front Control Display Interface Module (FCDIM) software.
ACTION:
Reprogram the FCDIM module to the latest calibration using IDS release 89.04 and higher. Calibration files may also be obtained at www.motorcraftservice.com.
OPERATION DESCRIPTION TIME
140050A Reprogram The FCDIM Includes Time To Clear Codes After Repair (Do Not Use With Any Other Labor Operations) 0.3 Hr.
WARRANTY STATUS
Eligible Under Provisions Of New Vehicle Limited Warranty Coverage.
Warranty/ESP coverage limits/policies/prior approvals are not altered by a TSB. Warranty/ESP coverage limits are determined by the identified causal part and verified using the OASIS part coverage tool.
DEALER CODING
BASIC PART NO. CONDITION CODE
10D885 04
Ford Module Programming (FMP) is a software application that allows subscribers to program electronic modules on Ford, Lincoln and Mercury vehicles. It can be used for:
•Reprogramming emission-related (OBDII) modules on some vehicles manufactured in 1995 and all vehicles manufactured from 1996 to the present
•Reprogramming or reconfiguring non-emission-related modules on many vehicles (UBP and MS-CAN not supported)
In addition, module initialization (PATS) functions such as Keycode Erase/Reprogram and PCM Parameter Reset can be done using this application.
J2534 Device using Ford Module Programming (FMP) can Reprogram and Configure most Modules. -
Latest update for the Mustang Rear Axle Vent Leak (note the friction modifier), worth asking if this could be applied for the Edge if a leak occurs in the RDU:
TSB 14-0046
REAR AXLE VENT – OIL LEAK
Publication Date: March 6, 2014
FORD: 2011-2014 Mustang
This article supersedes TSB 12-8-15 to update the vehicle model years, Service Procedure and Parts List.
ISSUE:
Some 2011-2014 Mustang vehicles equipped with a 3.7L, 5.0L 4V DOHC and 5.0L 4V DOHC SEFI with a rear axle vent located on the left axle tube may exhibit a fluid leak from the rear axle vent.
ACTION:
Follow the Service Procedure steps to correct the condition.
SERVICE PROCEDURE
1.Inspect the rear axle assembly for an oil leak from the rattle cap vent located on the left axle tube of the vehicle. Is there evidence of oil leakage around the rattle cap?
a.Yes – install a new vent kit following the instructions included in the kit.
b.No – this article does not apply. Refer to Workshop Manual (WSM), Section 205-00 for normal diagnosis.
PART NUMBER PART NAME
DR3Z-4022-A Vent Kit
XY-75W140-QL Motorcraft® SAE 75W-140 Synthetic Rear Axle Lubricant
XL-3 Motorcraft® Additive Friction Modifier
PM-4-A Motorcraft® Metal Brake Parts Cleaner
OPERATION DESCRIPTION TIME
140046A 2011-2014 Mustang: Inspect And Install New Vent Kit (Do Not Use With Any Other Labor Operations) 0.4 Hr.
WARRANTY STATUS
Eligible Under Provisions Of New Vehicle Limited Warranty Coverage.
Warranty/ESP coverage limits/policies/prior approvals are not altered by a TSB. Warranty/ESP coverage limits are determined by the identified causal part and verified using the OASIS part coverage tool.
DEALER CODING
BASIC PART NO. CONDITION CODE
4010 42 -
TSB 14-0045
MUSTY OR ORGANIC ODOR FROM FRONT VENTS – AIR CONDITIONING (A/C) IS ACTIVATED – BUILT ON OR AFTER 4/6/2012
Publication Date: March 5, 2014
FORD: 2013 Edge
LINCOLN: 2013 MKX
ISSUE:
Some 2013 Edge and MKX vehicles built on or after 4/6/2012 may exhibit a musty or organic odor coming from the front vents when A/C is activated.
ACTION:
Follow the Service Procedure steps to correct the condition.
SERVICE PROCEDURE
Replace the air conditioning evaporator housing assembly. Refer to Workshop Manual (WSM), Section 412-01.
PART NUMBER PART NAME
CT4Z-19B555-G Complete Asy, Production-Installed Type, Includes Evaporator Core, Thermostatic Expansion Valve (TXV) And Evaporator Temperature Control Sensor, From: 4/3/2012 2013/ ; Humidity Sensor
CT4Z-19B555-H Complete Asy, Production-Installed Type, Includes Evaporator Core, Thermostatic Expansion Valve (TXV) And Evaporator Temperature Control Sensor, From: 4/2/2012 2013/ ; Humidity Sensor
CT4Z-19B555-J Complete Asy, Production-Installed Type, Includes Evaporator Core, Thermostatic Expansion Valve (TXV) And Evaporator Temperature Control Sensor, From: 4/3/2012 2013/ ; Less Humidity Sensor
CT4Z-19B555-K Complete Asy, Production-Installed Type, Includes Evaporator Core, Thermostatic Expansion Valve (TXV) And Evaporator Temperature Control Sensor, From: 4/2/2012 2013/ ; Less Humidity Sensor
9T4Z-19B555-G Complete Asy, Production-Installed Type, Includes Evaporator Core, Thermostatic Expansion Valve (TXV) And Evaporator Temperature Control Sensor, From: 4/3/2009 2013/ ; Less Humidity Sensor
AT4Z-9H486-A Upper Intake Gasket
W714878-S439 Steering Column Shaft-To-Steering Column Pinch Bolt
OPERATION DESCRIPTION TIME
140045A 2013: Edge 2.0L GTDI: Replace The Evaporator Housing Assembly (Do Not Use With Any Other Labor Operations) 4.4 Hrs.
140045A 2013: Edge 3.5L/3.7L: Replace The Evaporator Housing Assembly Includes Time To Remove And Install Upper Intake Manifold (Do Not Use With Any Other Labor Operations) 5.3 Hrs.
140045A 2013: MKX 3.7L: Replace The Evaporator Housing Assembly Includes Time To Remove And Install Upper Intake Manifold (Do Not Use With Any Other Labor Operations) 5.4 Hrs.
WARRANTY STATUS
Eligible Under Provisions Of New Vehicle Limited Warranty Coverage.
Warranty/ESP coverage limits/policies/prior approvals are not altered by a TSB. Warranty/ESP coverage limits are determined by the identified causal part and verified using the OASIS part coverage tool.
DEALER CODING
BASIC PART NO. CONDITION CODE
19B555 42-
2
-
-
TSB 14-0038 (supersedes TSB 13-10-13)
INCONSISTENT CLIMATE CONTROL FUNCTION WHEN USING REMOTE START – BUILT ON OR BEFORE 1/31/2013
Publication Date: February 24, 2014
FORD: 2011-2013 Edge, Explorer
LINCOLN: 2011-2013 MKX
This article supersedes TSB 13-10-13 to update the vehicle model years and IDS version.
ISSUE:
Some 2011-2013 Edge, MKX and Explorer vehicles equipped with factory installed or Ford accessory remote start and built on or before 1/31/2013 may exhibit inconsistent operation of the climate control functions after a remote start event.
ACTION:
Reprogram the heating ventilation air conditioning (HVAC) module to the latest calibration using IDS release 89.02 or higher. Calibration files may also be obtained at www.motorcraftservice.com.
OPERATION DESCRIPTION TIME
140038A 2011-2013 Edge, MKX And Explorer: Reprogram The HVAC Module (Do Not Use With Any Other Labor Operations) 0.2 Hr.
WARRANTY STATUS
Eligible Under Provisions Of New Vehicle Limited Warranty Coverage.
Warranty/ESP coverage limits/policies/prior approvals are not altered by a TSB. Warranty/ESP coverage limits are determined by the identified causal part and verified using the OASIS part coverage tool.
DEALER CODING
BASIC PART NO. CONDITION CODE
19980 04
Ford Module Programming (FMP) is a software application that allows subscribers to program electronic modules on Ford, Lincoln and Mercury vehicles. It can be used for:
•Reprogramming emission-related (OBDII) modules on some vehicles manufactured in 1995 and all vehicles manufactured from 1996 to the present
•Reprogramming or reconfiguring non-emission-related modules on many vehicles (UBP and MS-CAN not supported)
In addition, module initialization (PATS) functions such as Keycode Erase/Reprogram and PCM Parameter Reset can be done using this application.
J2534 Device using Ford Module Programming (FMP) can Reprogram and Configure most Modules.-
1
-


Vista Roof closes in 6.5 seconds!
in Exterior & Body
Posted
This TSB is for the Lincoln MKZ, but shows how Ford is handing the lubrication of the roof opening panel:
TSB 14-0207
PANORAMIC ROOF OPENING PANEL – SHUDDER OR VIBRATION – CLOSING OR OPENING
Publication Date: November 6, 2014
LINCOLN: 2013-2015 MKZ
ISSUE:
Some 2013-2015 Lincoln MKZ vehicles equipped with a panoramic roof opening panel may exhibit a vibration or shudder when opening or closing the panoramic roof opening panel. This condition is mostly noticed in high ambient temperatures.
ACTION:
Follow the Service Procedure steps to correct the condition.
SERVICE PROCEDURE
The cleaning and lubrication procedure is for the panoramic roof opening panel tracks. The door latch lubricant spray specified in this procedure has unique properties that will help it adhere to the sides of the rails and prevent the rubber components from swelling.
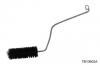
1.Bend the handle of a 38.1 mm (1.5 inch) diameter synthetic bottle brush in a 45 degree angle. (Figure 1)
Figure 1 - 14-0207
2.Close the panoramic roof opening panel. Clean both rear panoramic roof opening panel tracks by inserting the modified bottle brush from step 1 at the center of the driver’s side rear track and slide the brush up and down the full length of the rear track 3 times. Repeat on the passenger side panoramic roof opening panel rear track.
a.Wipe the brush with a shop towel to remove any grease or debris after cleaning each track.
3.Insert an air nozzle into the top of the driver’s side panoramic roof opening panel rear track between the seals and blow out any loose debris while moving the air nozzle down the track. Repeat on the passenger side panoramic roof opening panel rear track.
4.Start at the top of the panoramic roof opening panel on both rear tracks.
a.Insert the spray applicator so it is pointing towards the inner (inside) track. Spray the Door Latch Lubricant to make sure the spray is directed at the inner side portion of the track and not sprayed directly down. Repeat on the other side rear track. (Figure 2)
Figure 2 - 14-0207
b.Insert the spray applicator so it is pointing towards the outer track. Spray the Door Latch Lubricant to make sure the spray is directed toward the out side portion of the track and not sprayed directly down.
c.Spray the Door Latch Lubricant while moving the applicator down the track stopping about 152 mm (6 inches) from the bottom of the back glass. It should take approximately 4 seconds to spray from the top to the bottom of the track.
5.Move the panoramic roof opening panel to the full open position. Cover the opening to protect the vehicle interior from over spray.
6.On both panoramic roof opening panel tracks place a shop towel in the center of the track which is part of the front S curve. The section of the track which pulls the roof down. (Figure 3)
a.If a shop towel is not in place, excess lubricant may seep through the seam in the center of the S curve and drip onto the top of the headliner.
7.On both panoramic roof opening panel tracks start at the front of the track.
a.Position the spray applicator so it is pointing towards the inner side portion of the track and slightly rearward. While moving the applicator rearward down the track, apply the lubricant to within 51 mm (2 inches) of the front lifter arm. (Figure 3)
Figure 3 - 14-0207
b.Position the spray applicator so it is pointing toward the outer side portion of the track, and slightly rearward. While moving the applicator rearward in the track, apply the lubricant to within 51 mm (2 inches) of the front lifter arm.
c.Application should take approximately 3 seconds of spraying time when spraying from the front of the track to the rear.
8.On both panoramic roof opening panel tracks place a shop towel around the end of a plastic trim tool that will fit down in between the tracks. Run it up and down the front track assembly to wipe the excess lubricant from the center of the track that might have drained from both side rails.
9.Remove the shop towels and cycle the panoramic roof opening panel open and closed 3 times.
10.Open the rear decklid and on both sides, wipe the excess lubricant that may have drained from the rear track onto the luggage compartment surrounding trim.
Obtain Locally
Synthetic Bottle Brush – 38.1 mm (1.5 inch) diameter
PART NUMBER PART NAME
5U7Z-19A501-A Door Latch Lubricant
OPERATION DESCRIPTION TIME
140207A 2013-2015 MKZ: Clean And Lubricate Panoramic Roof Opening Panel Rails Following The Service Procedure (Do Not Use With Any Other Labor Operations) 0.4 Hr.
WARRANTY STATUS
Eligible Under Provisions Of New Vehicle Limited Warranty Coverage.
Warranty/ESP coverage limits/policies/prior approvals are not altered by a TSB. Warranty/ESP coverage limits are determined by the identified causal part and verified using the OASIS part coverage tool.
DEALER CODING
BASIC PART NO. CONDITION CODE
54502P68 41