

kc300c
-
Posts
461 -
Joined
-
Last visited
-
Days Won
25
Content Type
Profiles
Forums
Gallery
Posts posted by kc300c
-
-
Here's the video of my install. I didn't want to use the pins either. I never had any luck with them staying in. I didn't solder the connections like you did, but I used snap on quick tap connectors.
-
thank you for the nice write-up on my new LED tail lights Taz. I'm so glad you like them. I couldn't be happier with the way they turned out. they really exceeded my expectations.
-
 1
1
-
-
quote name="Nicoleto" post="103232" timestamp="1380223502"]
Which ones are brighter v1 or v2 DRLs?
Thanks
the new version is as bright as the original version.the new ones also have a significantly wider viewing angle or beam spread. The original versions only had about a 45 degree viewing angle. The new version has close to 160 degrees.
-
we are confident we have solved the moisture issue. We believe a bad plug connection in the back of the DRL was the cause. We have made some changes to the plug and are doing inspections on all DRL kits before they ship. We have also begun water testing by submersion and water spray.
As any one of the customers who had these problems can attest to, we back our products 100 percent and replaced all of the problem kits quickly.
-
welcome to the EDGE family. You're going to love your SPORT.
-
Welcome to the EDGE family. Certain you and your wife will be happy with it.
-
Congrats on the new SPORT. I love mine and sure you will too.
-
Welcome TJB. Your wife will love her new EDGE.
-
You have a shadow on each beam pattern that's caused by the return wire which runs up the side of the bulb. You can see just under the 3 o'clock position. What bulb type did you buy? 9006 or 9012? It may be difficult, but try rotating the bulb so the shadows disappear.
-
Had some time and was surfing the forum. Saw your posts about the moisture in your EDGE-2s. I have had a few customers reporting moisture issues. My manufufacturer and I are troubleshooting it to find the root cause. We are both leaning toward the wire harness plug that is supplied with the kit. If you are having a moisture issue, please let me know. You can be sure that I will take care of you and will get you replacement kits right away. Feel freee to contact me at info@daytimebrightlites.com if you have any questions.
Thanks,
Dan Smith
-
Damon and I spoke this morning. He's going to try using fuse slot 92 or 93. Scratching my head about the blinking issue he's seeing though.
-
I joined the "Curb Rash" club the same way trying to get close to a ticket booth. However, my rash was much deeper and ran about 1/3 of the way around the wheel. I just had the four Perellis replaced and while the tire was off the rim, sanded and polished as much of the gouges out.
The chrome finish layer was actually thicker than I thought it would be and was able to take off most of the finer scratches. My rash was so bad though that the wheel still looked horrible when I reached the limit of the chrome layer. So, knowing I was going to have to replace the wheel, I went ahead and kept sanding until I reached bare aluminum. The rim is now smooth, but there is a noticeable difference in the appearance between the chrome and bare aluminum. I have some ideas on how to reduce the contrast, but I will try them first before posting the one that worked best.
-
Couple of tips if you want to try sanding down the rash.
1) mask off the undamaged areas. All of the way up to the scratch. (including the tire)
- use electrical tape instead of standard masking or blue painters tape. Electrical tape won't pull up when wet sanding.
2) Start with a 600 grit wet sandpaper and work your way up to 2000 grit. Keep it wet.
3) alternate sanding directions 90 degrees when changing grits.
4) Take your time. Be sure to regularly wipe off and check to make sure you do not go sand through the chrome finish. (Wet the area when inspecting. You will be sanding off the clearoat finish that leaves a milky finish when dry. Water will clear it up so you can inspect the chrome.)
5) After the 2000 grit sanding, rinse and lightly apply rubbing compound with a sponge applicator attached to an electric drill. I used the sponge applicator from a 3M headlight restoration kit I had laying around.
6) wash off the wheel and tire with soap and water (keep the electrical tape on).
7) rub in a thin coat of car wax, let dry.
8) using a powered buffer pad, thoroughly polish the area.
9) remove the electrical tape.
10) repeat the wax and buffing step on the entire wheel.
Just take your time and keep an eye on the chrome thickness.
-
I joined the "Curb Rash" club the same way trying to get close to a ticket booth. However, my rash was much deeper and ran about 1/3 of the way around the wheel. I just had the four Perellis replaced and while the tire was off the rim, sanded and polished as much of the gouges out.
The chrome finish layer was actually thicker than I thought it would be and was able to take off most of the finer scratches. My rash was so bad though that the wheel still looked horrible when I reached the limit of the chrome layer. So, knowing I was going to have to replace the wheel, I went ahead and kept sanding until I reached bare aluminum. The rim is now smooth, but there is a noticeable difference in the appearance between the chrome and bare aluminum. I have some ideas on how to reduce the contrast, but I will try them first before posting the one that worked best.
-
Hey Josh, everyone here is very helpful and willing to answer any questions you may have, so ask away. Happy modding.
-
1
-
-
Dingo, aka "The Grinch"I have done no mods. Don't bother me.

-
Hello all. Newbie here that decided to plasti dip my stock wheels for a different look. I really liked the results. I'm thinking of doing the grille too. I also purchased HID's and looking at buying fog lights and the cargo mat. Any opinions on the mats that Ford sells? I've been hearing a lot about the ones from weathertech. Any info is appreciated. Thanks!
Love the look. Really nice!
I originally PD'ed my grille but finally decided to just go with the primed black version (I am not going to paint the grille as the black looks good enough on my car).
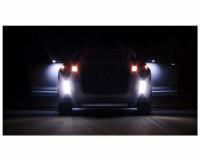
Sweet C!!! Where did you get those vertical LED DRLs in your bumper..;-)
-
The 2008 has no bars, just the regular dual filament bulbs, on both, front and back....
Not sure what you mean when you say "bars". The 50W LED bulbs in my kits are direct replacements for the front and rear turn signal bulbs in all model year EDGEs and have dual function just like the dual filament stock bulb.
-
The quickest and easiest way to resolve and/or prevent hyper flash is to use high power LED bulbs that are at least 30 watts. The higher wattage will not trigger the hyper flash because it's drawing the same amount of current as the stock bulb. So no need for resistors.
I have actually put together an LED bulb pack for the front and rear turn signals and reverse/backup lights. The turns are 50W bulbs that has ten 5W CREE LEDs and the reverse bulb is a 25W using five 5W CREE LEDs. The bulb pack will be owing on sale later this month. Keep an eye out for them.
-
I'm not sure if this is an issue I had before installing the DRL2's because I never used my headlights prior to the installation but now I'm having and issue with one of my headlights "shutter" won't open and allow light through. Anyone else experience this? I did disconnect the DRL2's and the headlight is still performing this way.
Jtuder, I'm not sure how the the DRL installation would have affected the high beam shutter, since the white headlight trigger wire from my DRLs connects to the headlight bulb wire which is totally isolated from the the shutter operation. Can you confirm that the white DRL trigger wire is connected to the correct wire color per the instructions?
Edit: Just read your last post about your dealer fixing the broken shutter. Glad to hear that. I have to think the shutter issue was coincidental to installing the DRLs.
-
Psssst. Over here..........
-
Welcome Carol. You're going to love your new Edge.
-
Love reading about fun mods like this. Very creative!
-
Welcome to the forum and the Edge family. There are a lot of great folks here that are happy to help out. All you have to do is ask. Enjoy your new ride,
Hard waters spots?
in Appearance - Detailing, Wash & Wax
Posted
I never used it on a car, but I used a 50/50 mix of water and white vinegar to remove the hard water spots on the black gel coat on the hull of my boat. works like a charm.