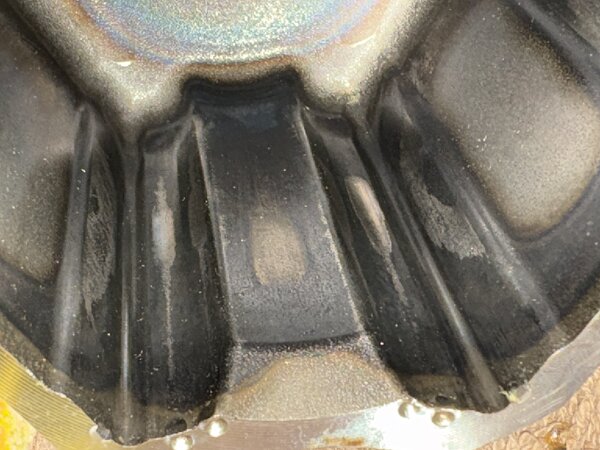
tmarsh Posted October 28, 2018 Report Share Posted October 28, 2018 (edited) So I got around to installing the fog light bezels that I ordered from eBay, and the morimoto XB LED fog lights to go in them. Here are the parts I have- Morimoto XB LED fog lights- https://www.theretrofitsource.com/ford-3-morimoto-xb-led.html?carDisplay=2014+Ford+Fusion&preselect=&preselect_restrict=1 Morimoto relay harness- https://www.theretrofitsource.com/hd-relay-h11.html Bezels- https://www.ebay.com/itm/DRL-For-Ford-Edge-LED-Daytime-Running-Light-Fog-Lamp-W-Signal-2015-2016/283105004314?fits=Year%3A2015%7CModel%3AEdge%7CMake%3AFord&hash=item41ea5f8b1a:g:sE8AAOSw2UVbc84~:rk:23:pf:0 Its a long story. About a month ago I started this. I pulled off the bumper cover and quickly realized this is not an say task. These bezels do not fit the American Edge. They are designed for the European Edge, which has a fog light option. The main difference is the bumper cross member behind the bumper cover. In my testing before mounting everything, I took the signature lights out and put the bumper cover back on to check for clearance. This is what I found. Here is the driver side with the signature light removed, passenger side is the same- As you can see, the bumper bar is right there. And in this picture, you can see the new fog light bezels are a different shape than the factory signature lights- So, these will not fit. Also take a look at the mounting tabs for the new bezel. Notice that the factory bezel does not have these tabs. Red flag. So heres what has to be changed to make the new bezels even fit in the hole. The 'Merican Edge has this bumper (at least my sport does anyway. Can't say for other trims)- The Euro Edge has this bumper- FordPartsGiant.com has the Euro bumper in stock. I chose to go order a new bumper rather than cutting the factory bumper. I didn't have the tools to cut it, and for safety and insurance purposes I didn't feel comfortable cutting it. The Euro bumper is a direct swap. This can be done with basic sockets and wrenches, and a jack to support the radiator/condenser/intercooler. It is time consuming and involved, but follow the service manual for step by step. It will take some finesse to wiggle it out around the AC lines and intercooler piping if you have one, but it is doable. Aside from modifying/replacing the bumper, you also have to modify the bumper cover to fit the bezels in. All modifications to the bumper cover are on the inside for the signature light support, and could be put back if you cut nicely and save the pieces. No cutting has to be done to the face of the bumper cover. These bezels are the same shape as the stock signature lights, just deeper because of the fog light hole. At this time I do not have any pictures, I didn't have a write up in mind when I did this. But I have to finish it up, when I pull the cover off this week I will take more pictures. The wiring for the bezels, the ones I have anyway, have ground, constant 12V+, Ignition + input, parking light + input, Left turn + input, and Right turn + input for the switchback amber function. For ground, +12v, ignition, and parking light input I just tapped the wiring for the signature lights. No reason to go straight to the battery for such a low draw. The kit will come with its own diagram for wire color and function. But here are the diagrams for the Edge side of things- The power, ground, ignition and parking can be tapped here at the signature light plug- Here is passenger side headlight plug pinout if your bezels are switchback and need turn signal input- Here is driver side- The switchback function works, but not completely as it should. Most front turn signals are three wire (marker, turn, ground) with a dual filament bulb. The HID equipped edge(and possibly the halogen but im not sure), uses a two wire (power/ground) and single filament bulb. How does it differentiate between dim and bright? when the parking lights are on, the BCM sends a pulsed 12v to the bulb, which makes it dim. When the turn signal is on, the BCM sends full power to the bulb making it bright. Very weird way to go about a turn signal if you ask me. But because you are connecting the bezel to the turn signal wire, you are also connecting it to the parking light wire technically. So with the parking lights or headlights on, the bezels will be amber. If you choose to not connect the turn signal wires, the bezels will stay white with the headlights on, and will dim like the factory signature lights. I have not found a way around this yet, but I kind of like the amber on with the headlights more than the white triangles. The fog lights, you will need a relay harness to power them, whether you go LED or HID or halogen. The photo above, the pins/wires outlined in blue are options to drive the relay to turn on the fogs. I wired mine to the low beams, so the fog lights are always on with the low beams. At some point I will change this and enable the factory fog lights, but for now this will do. You could also run a switch into the cabin to switch them on and off independent of the rest of the lighting if you choose. Edited October 28, 2018 by tmarsh 6 Quote Link to comment Share on other sites More sharing options...
tmarsh Posted October 28, 2018 Author Report Share Posted October 28, 2018 (edited) Here are pictures of the install so far. I still need to secure and aim the fog lights. Edited October 31, 2018 by tmarsh 7 Quote Link to comment Share on other sites More sharing options...
eng45ine Posted October 29, 2018 Report Share Posted October 29, 2018 Definitely a labor intensive project! Looks good, thanks for sharing! Quote Link to comment Share on other sites More sharing options...
WWWPerfA_ZN0W Posted October 29, 2018 Report Share Posted October 29, 2018 :drool: :drool: Quote Link to comment Share on other sites More sharing options...
tmarsh Posted October 31, 2018 Author Report Share Posted October 31, 2018 (edited) Finished everything up this afternoon. First of all, here are are some pictures of the inside of the bumper cover. In order for the bezels to fit, some of the bumper needs to be trimmed away. Same on the driver side This is also the side I tapped the signature light wires, and mounted the control module for the bezel. Which I siliconed the hell out of because it didn't seem very weather proof. Also in the above two pictures you can see how I held the bezels in place. The two screws in the top, there are three in the bottom, and one in the back. These are screwed into the mounting tabs of the bezel, which don't line up to anything on the bumper cover. My original idea was to notch the bumper cover for these tabs to latch to, but they don't stick out enough. So I did the screw thing, but it seems pretty strong as long as no animals run in front of the car, which would do other damage anyway. Mounting the fog lights, I thought this over, and stared at pictures for awhile. All I could come up with was metal strapping. Which actually worked out pretty well, they are in there solid. The only thing I payed close attention to when securing these was that the rotation was level. I didn't care about left and right alignment, they're fog lights and these bezels aren't perfect. Up and down alignment needs to be somewhat close, but there is an adjustment on most housings for up and down adjustment. Once I got it mounted securely and made sure they were level, I siliconed around the inside to help keep it from vibrating. It's pretty from the front, it's not pretty from the back, but it works. Ive retrofitted headlights in the past, and metal strap was my go to for holding things. Ill report back in a few months hopefully on how its holding up. I also ordered new HID bulbs for the headlights to match the 5500K fog lights a little better. I didn't like the 4300K of the factory HIDs anyway, so Ill post a picture when I get them. Thanks for reading! Let me know what you think. Edited October 31, 2018 by tmarsh 4 Quote Link to comment Share on other sites More sharing options...
Nick Halstead Posted October 31, 2018 Report Share Posted October 31, 2018 nice, I'm not a fan of the ebay bezels at all. way to close to actually observe the output of the fogs tho. Great writeup and build man! Quote Link to comment Share on other sites More sharing options...
mike dexter Posted November 26, 2018 Report Share Posted November 26, 2018 Nice work. That head on shot looks great. The bumper beam with the extra wings on the ends is common for all NA vehicles. NA safety regulations are different from EU's. Quote Link to comment Share on other sites More sharing options...


Recommended Posts
Join the conversation
You can post now and register later. If you have an account, sign in now to post with your account.
Note: Your post will require moderator approval before it will be visible.