tmarsh
-
Posts
85 -
Joined
-
Last visited
-
Days Won
5
Content Type
Profiles
Forums
Gallery
Everything posted by tmarsh
-

Comprehensive List of Possible Forscan Mods?
tmarsh replied to ben senise's topic in Accessories & Modifications
Yes, further up on this page. -
Comprehensive List of Possible Forscan Mods?
tmarsh replied to ben senise's topic in Accessories & Modifications
Update- I checked in forscan from my above post for the FCIM. 7A7-01-02 was correct, xxxx-x2xx-xxxx. Confused, as it wasn’t working and everything else is correct in other modules. I changed the 2 to a 0 which is backwards from what the guy said. And it worked! I now have the menu options back. Tested, set to auto for climate and seats and it is working. For the record, it didn’t matter what I left the heat on when I got out, auto or manual. The seats and climate did not turn on until I pushed the start button when I got in. -
Comprehensive List of Possible Forscan Mods?
tmarsh replied to ben senise's topic in Accessories & Modifications
Ahh yes I do remember a TSB now that you say that. Did some quick digging now that I have time. FCIM 7A7-01-02 xxxx-xXxx-xxxx needs to be changed from 0 to 2. I’ll give it a go later. -
Comprehensive List of Possible Forscan Mods?
tmarsh replied to ben senise's topic in Accessories & Modifications
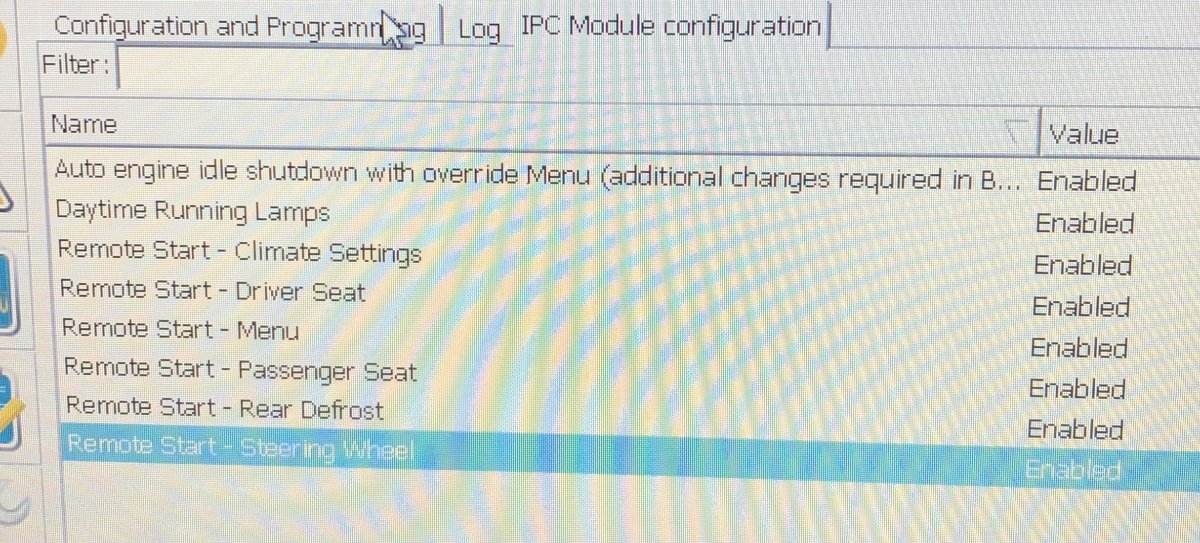
Tried the IPC config. Disabled and enabled all of these and no change.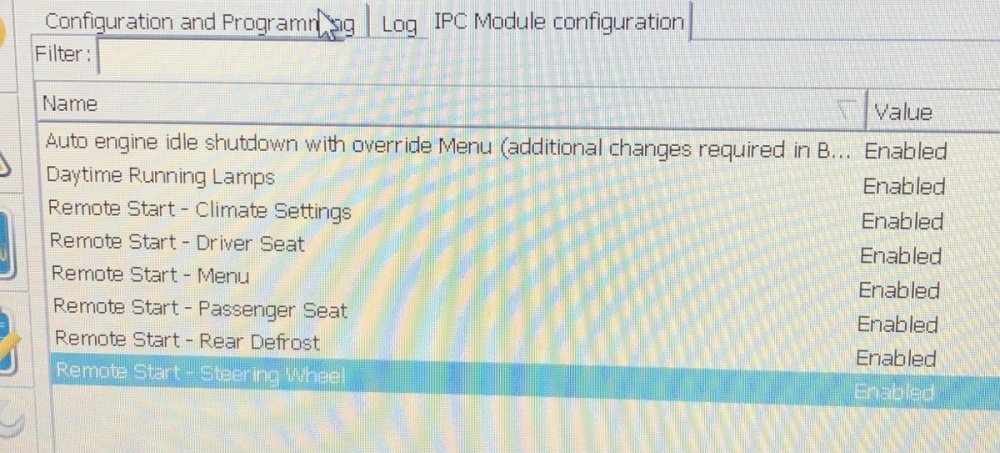
-
Comprehensive List of Possible Forscan Mods?
tmarsh replied to ben senise's topic in Accessories & Modifications
Hey guys. I thought j had asked this somewhere awhile back, but can’t find it if I did. I starting to use the remote start here in MI and remembering a problem I have. When using remote start, the climate control doesn’t run. Heated seats don’t turn on. I can enter the remote start menu and change duration and check system on or off, but climate control and seats are grayed out. And I get nothing but a warm engine, frozen windshield, and cold ass when I get in after 15 minutes. Anyone know the location in forscan?
-
2015 Edge Sport 2.7 Ecoboost - Code P1450 - Purge valve
tmarsh replied to druegeme's topic in 2.7L EcoBoost
Hey guys. I have code P1450 from the PCM on my 2015. “Failure to bleed up fuel tank vacuum”. And very hard to start after filling up with fuel. I used forscan to check that the purge valve on top of the engine is operating, and also the tank vent solenoid in the evap canister. The solenoid is opening and closing. The purge valve, I removed and with no power I cannot blow through it. With 12v applied I can blow through. But, the other piece attached to the purge valve, with that attached I can only blow a very small amount through before the flapper inside shuts. Is there a common fix here? Or something I can check before taking to dealer? -
Heated and Cooled Seats
tmarsh replied to Wedgeamatic's topic in Interior, A.C., Heat, Interior Trim
No info yet. I plugged in and checked the programming and it had been changed back to the original 2015 ABD. So I changed it back to that of the MkX where I know it worked great. Temps lowered some, but still I feel nothing on the seat back. Noticable difference on the bottom though it gets colder quicker, and fan speed is noticeably higher. My next step is to pull up the upholstery and make sure everything is connected going into the seat. I’ve been on vacation so haven’t done much. -
Heated and Cooled Seats
tmarsh replied to Wedgeamatic's topic in Interior, A.C., Heat, Interior Trim
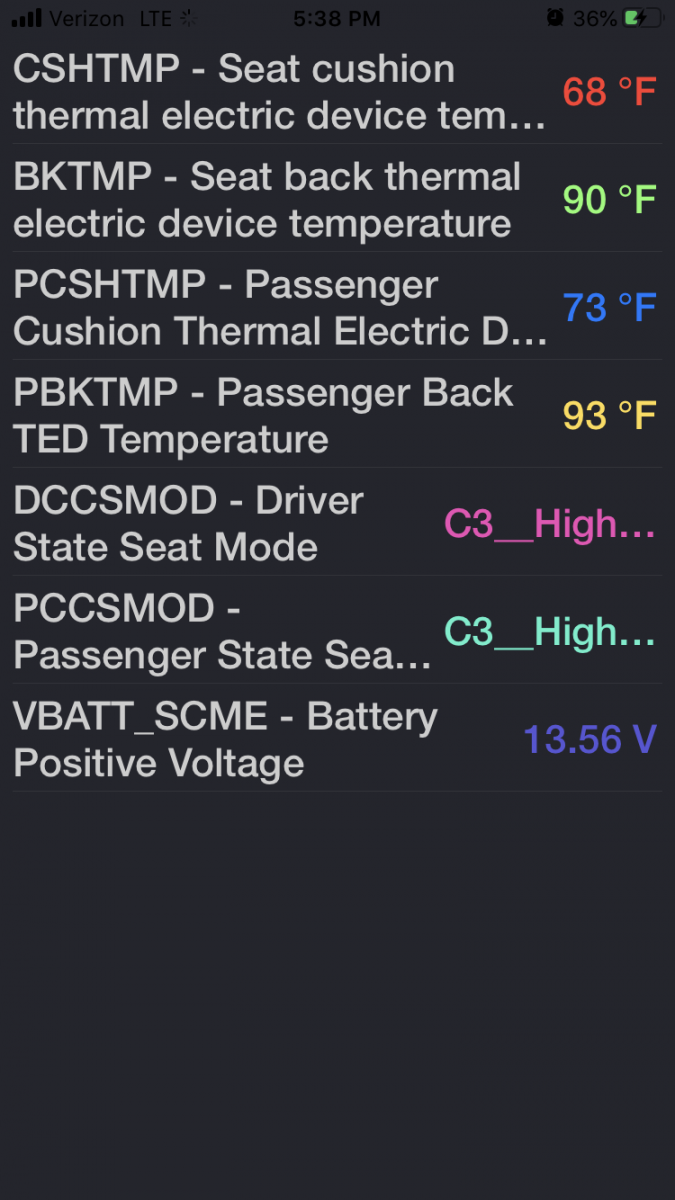
Here is my readings after work yesterday. 92* outside, over 100* in the car for sure after sitting in the direct sun all day. Took screenshot 15min into the drive. I seem to remember last summer my backs were somewhat close to the bottoms. And could actually be felt.
-
Heated and Cooled Seats
tmarsh replied to Wedgeamatic's topic in Interior, A.C., Heat, Interior Trim
Yes! That is what I was looking for! Thank you. I thought we had talked about it, but I thought it was through PM. I’ll read through that again later. I do have a spare assembly for the seat back I had ordered awhile ago off ebay for cheap. It does work. And if I remember right even out of the seat, plugged into the SCME, the temperatures were close to the one in the seat with the ductwork. Off your notes: 1. This isn’t the case. I can feel the intake tube pulling in, and have lukewarm air coming from the exhaust tube(which also tells me the TED isn’t receiving much power. The air Would be warmer if it was). I don’t have kids, so the backs of my seats don’t get kicked or anything. So they shouldn’t be broken! 2. Before reading through our other thread, I believe that’s what I did with a little extra tweaking to some of the data I found elsewhere? I’ll read through it. 3. I took a reading this morning. Not really acccurate as it was 65 outside and the interior was also cool, but still the backs are higher. And the entire passenger seat is hotter which is weird because it was running without an occupant. Here are the numbers from this morning. 90* here today so when I leave work I’ll get another.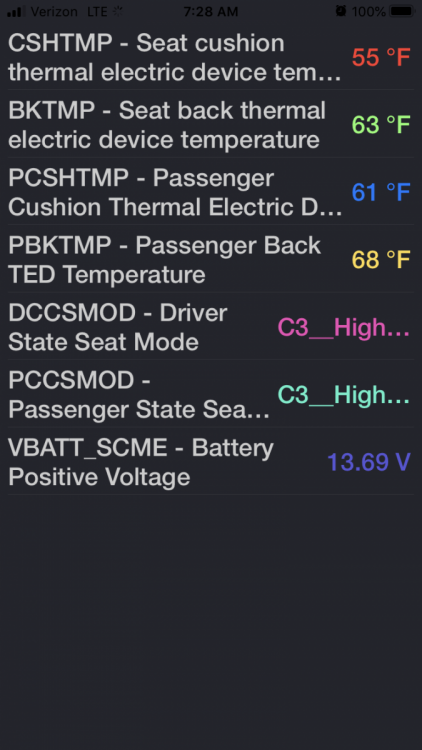
-
Heated and Cooled Seats
tmarsh replied to Wedgeamatic's topic in Interior, A.C., Heat, Interior Trim
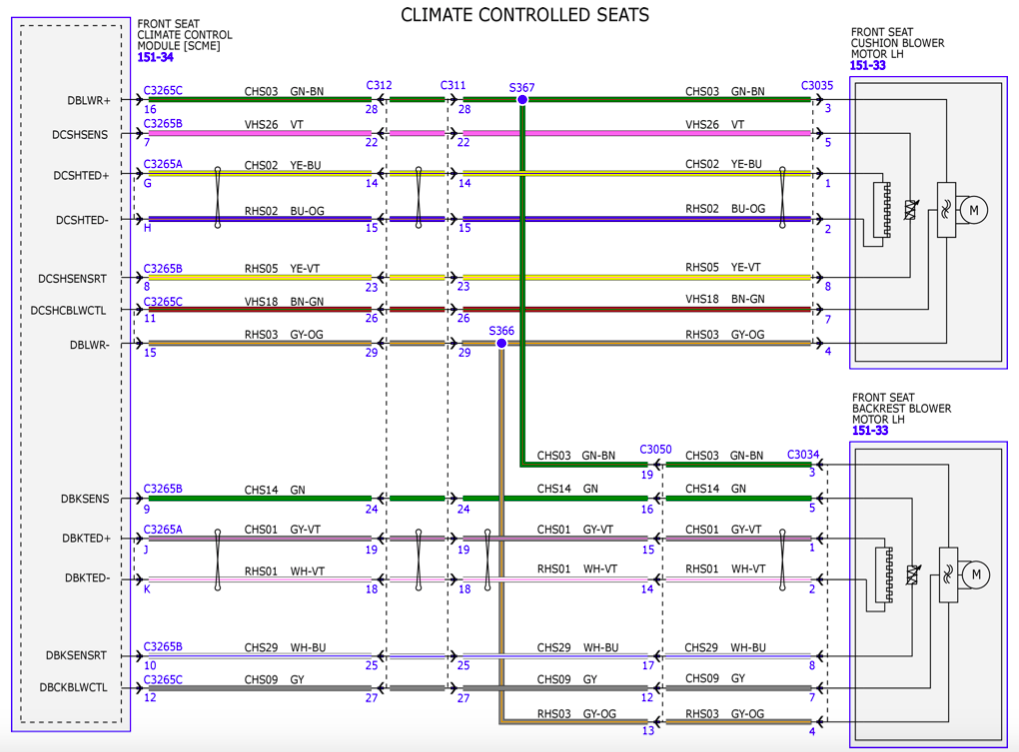
Bringing this back to life here. I noticed the other day my seat backs stopped cooling again. I have the full kit for the intake and exhaust, and had had them cooling almost as good as the seat bottoms. I had made forscan changes to the SCME, which GREATLY improved the cooling of the seat backs to almost the same temperature as the bottoms. With forscan, you can actually choose to read live data from the SCME (seat climate module E) including the fan speed and temperature of the TEDs. My seat bottoms will cool off to around 65*, and before the seat backs would not be far behind at roughly 68*. They worked great. And obviously I never shared that information with you guys, my bad. I should have, because now I need it again myself. I had made forscan changes in other areas recently, jacked it up, and had to reload the ABD back to stock. Which completely killed my seatbacks again. Im noticing now with the forscan app, the seat back TEDs don't get any cooler than 85* almost like they aren't even functioning anymore, like maybe Ford finally gave up on the cooled seats and turned off the setback TED in their latest ABD update?? Calling Omar302, lets figure this out. I had a few ideas I might look into tomorrow. First. Ive been searching like crazy to find the data for the SCME that I changed to raise fan speed and lower the TED temp. It wasn't something I screwed with on my own, I definitely had a spreadsheet in front of me and thought I saved it on my computer but didn't.. I want to say it was in an F-150 or Explorer forum. Ill share when/if I find it. Second. The seat bottom works very well. If i remember right, it's fan and TED are larger than the seat back fan and TED. Meaning its more powerful. I thought about taking the passenger seat bottom and testing it in the driver seat back to see if it improves after finding the SCME programming info. Or, swapping the connectors from back to bottom, and bottom to back. I myself care more about the cold from the seat back than the bottom. And they both work the same on heat mode, so why not? Third. I had thought about pulling the two pins from the seat back TED (GY/VT and WH/VT), and powering it separately from say the 12v outlet, with a PWM knob to control current and temperature, while monitoring temperature with the forscan app. This will most likely throw a DTC for it being disconnected, and also a DTC for out of temperature range if I can get it cooler than normal by supplying more current.. Worth a try under supervision I think. Having messed around with TEDs for other projects, I know they can get much hotter/colder than this. These are being held back quite a bit. On heat mode, forscan shows both TEDS reaching the same temperature (I forget what number, something in the mid 100s) so it can do it. The SCME is not supplying the same current to the back as the bottom in cool mode.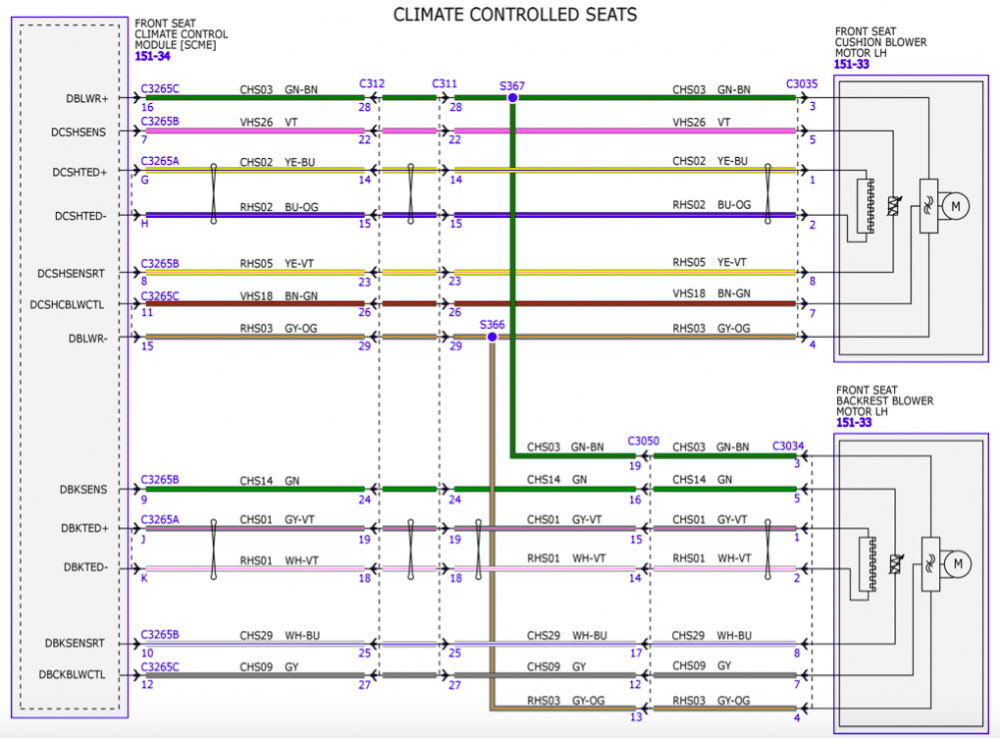
-
Comprehensive List of Possible Forscan Mods?
tmarsh replied to ben senise's topic in Accessories & Modifications
Yes, exactly. I no longer have the ability to tell the climate control and seats what to do during remote start. What is annoying, is now they do nothing. Even with auto as the last setting when I turn off the ignition, when I remote start the climate control doesn't turn on at all. It won't let me load a picture, but its on the left screen in settings>vehicle>remote start> and the options for climate control and seats are greyed out. -
Comprehensive List of Possible Forscan Mods?
tmarsh replied to ben senise's topic in Accessories & Modifications
Question guys. I haven’t done any forscan mods in awhile, but I just noticed this. Yesterday I drove to work with the windows down, so climate control off. Remote started before leaving work to have the AC cool it down. Got in the car and the climate control was off. Now I usually have it set in the IPC menu to have the climate control and climate seats on “auto” rather than “last setting” during remote start. Went to change it back, and it’s greyed out in the menu. Anyone know where to re enable it? -
I thought this too, not the case. The BdyCM controls voltage to the turn signal, there is no inner workings to the headlight assembly. The parking light wire in the headlight connector is only for the side marker. The turn wire goes straight through to the turn signal bulb to supply it with the two voltages for marker and turn.
-
Forscan to enable tow lights
tmarsh replied to mr_jason's topic in Cargo, Hauling, Roof Racks & Towing
I looked into this, but found out that the trailer light module is not there. According to the service manual, the trailer light module is located in the passenger rear quarter panel, above the cargo area light. I looked, all the wiring is there, but not the module. I didn't look into getting one, I had already wired in my own trailer light wiring to the factory plug location so wasn't too concerned about it. But since the rest of it is there, if you plug in the module I don't see why it wouldn't work without any extra programming. -
Comprehensive List of Possible Forscan Mods?
tmarsh replied to ben senise's topic in Accessories & Modifications
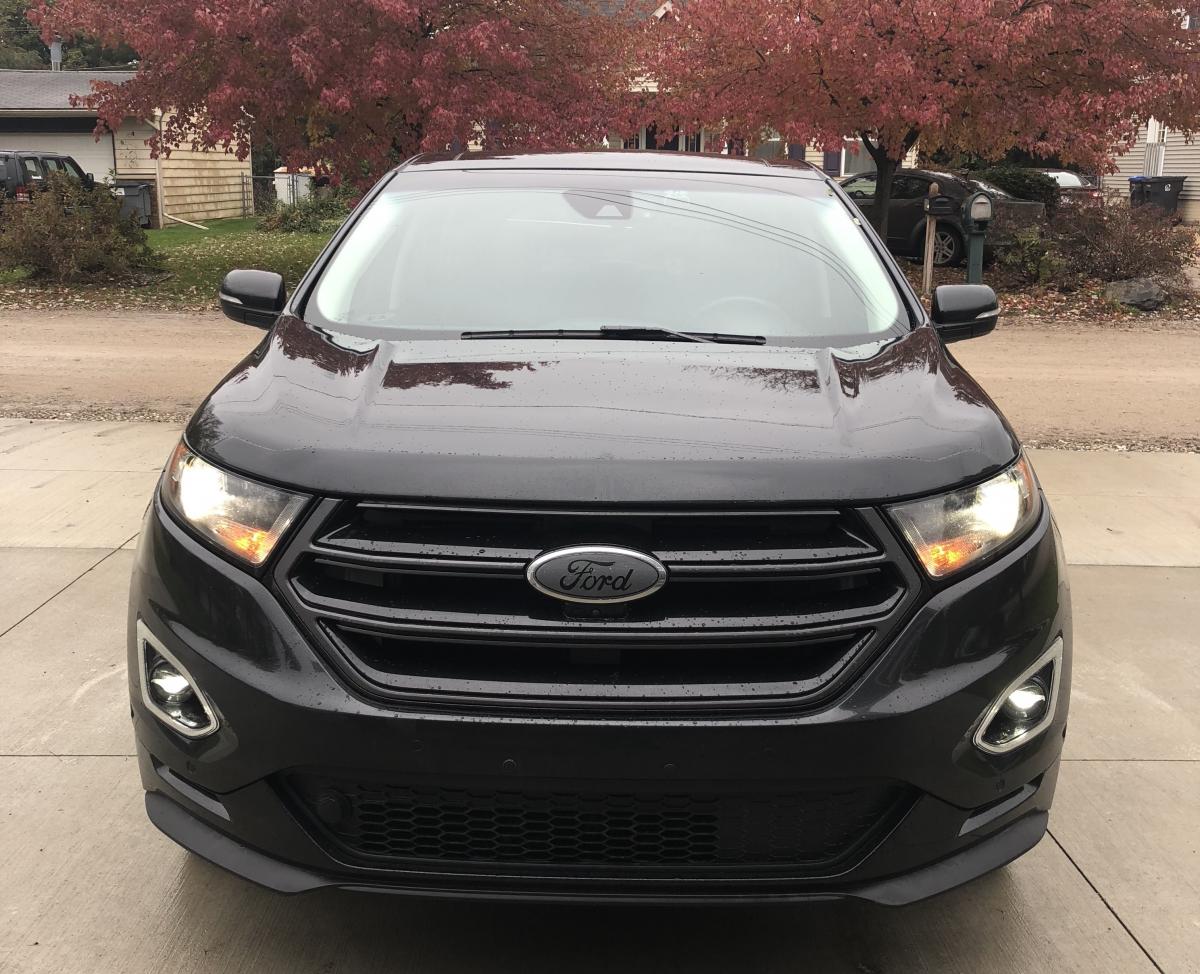
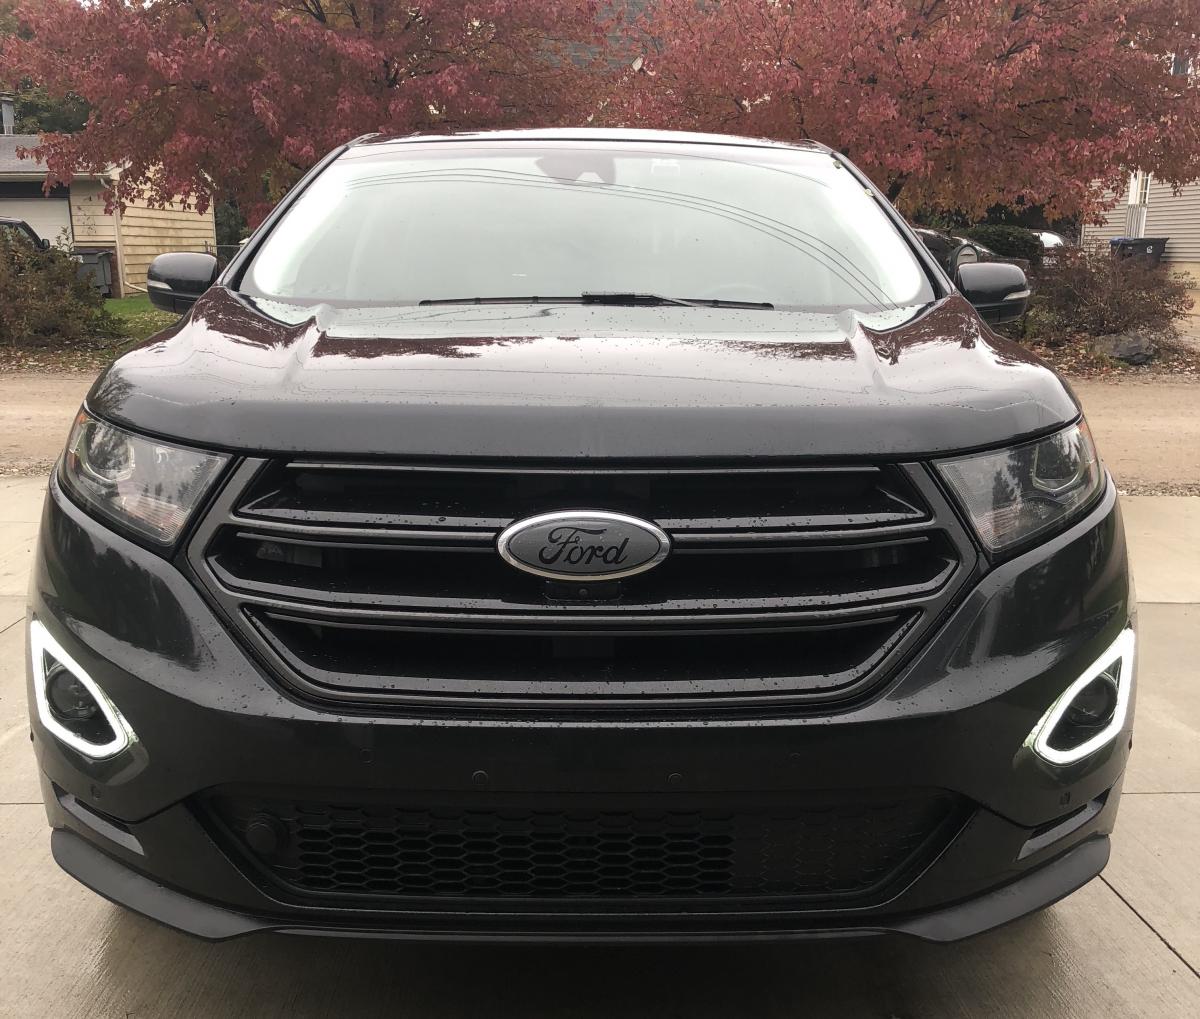
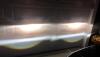
Thanks for that one Omar. Just what I needed for my new switchback signature bezels to work like switchbacks. Because the front turn signals are 2-wire instead of 3-wire, any time that bulb was on (even in marker/dim) it would cause the switchbacks to be amber. ] It also looks better this way with the headlights and my new foglights on, without the turn signal on. Will post pics later. -
15-18 Edge fog light install
tmarsh replied to tmarsh's topic in Glass, Lenses, Lighting, Mirrors, Sunroof (BAMR), Wipers
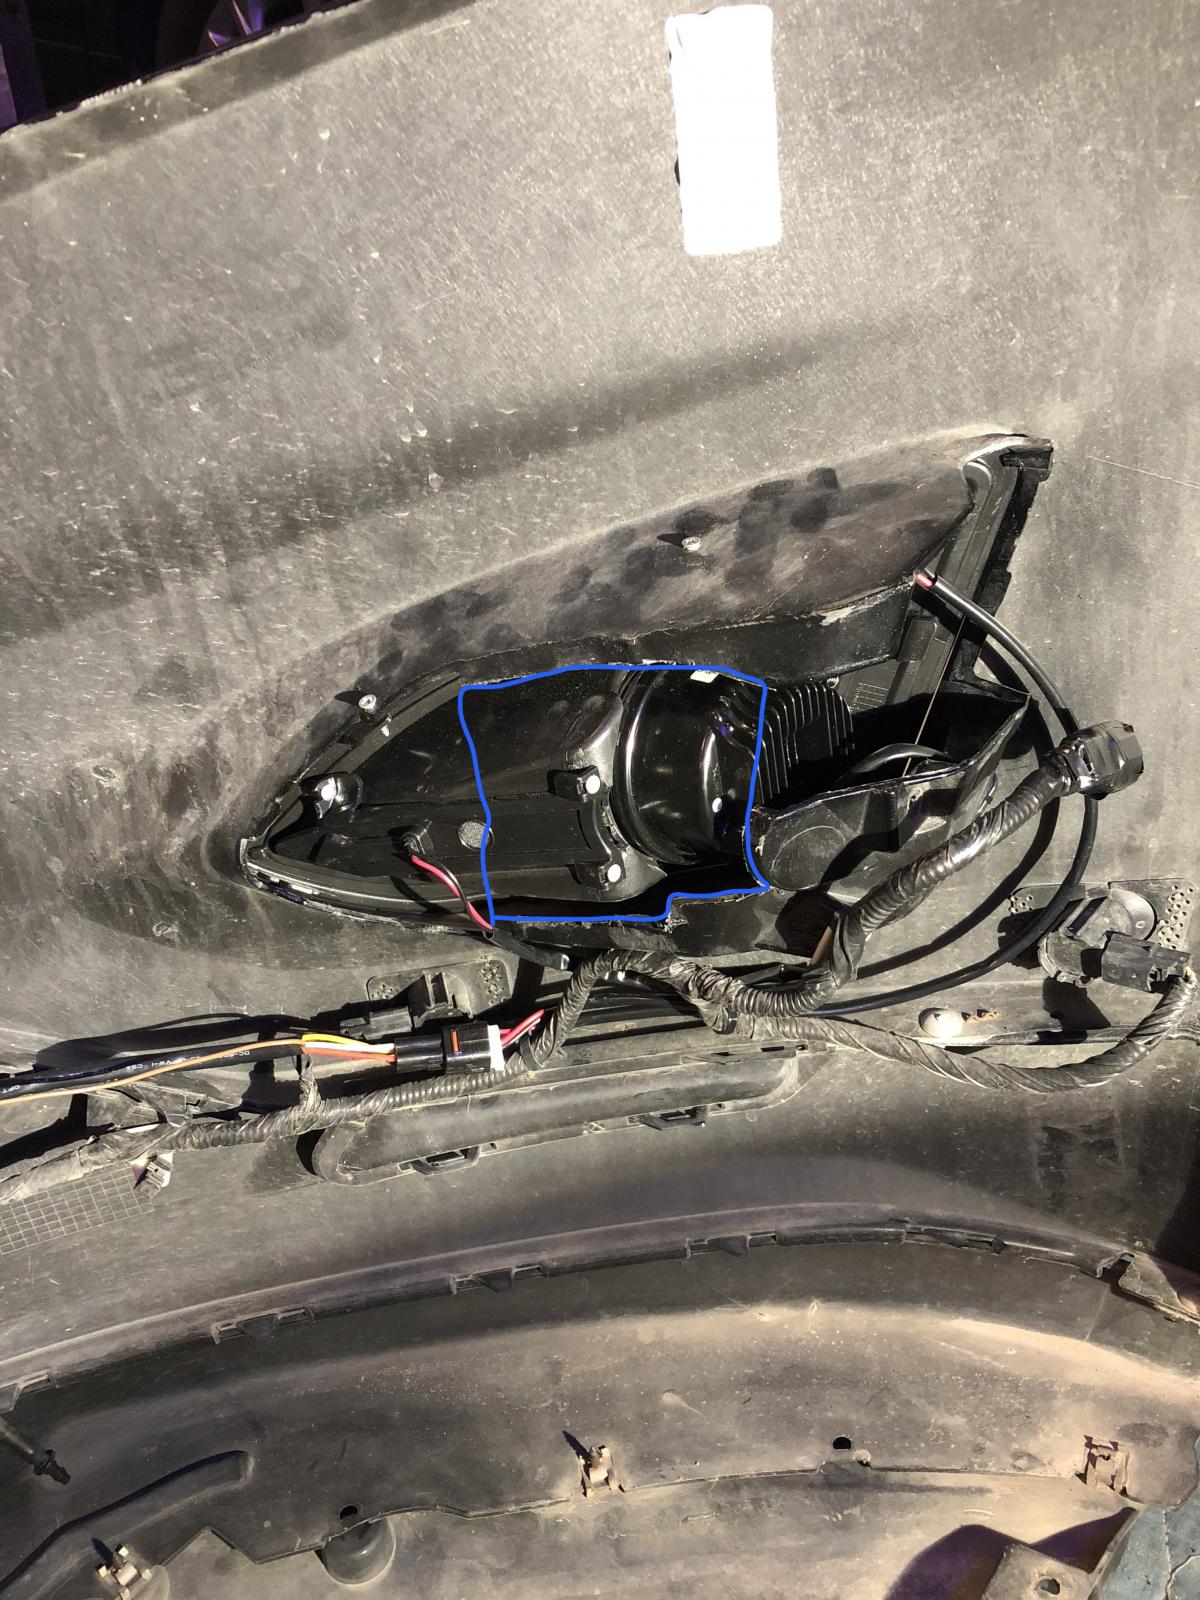
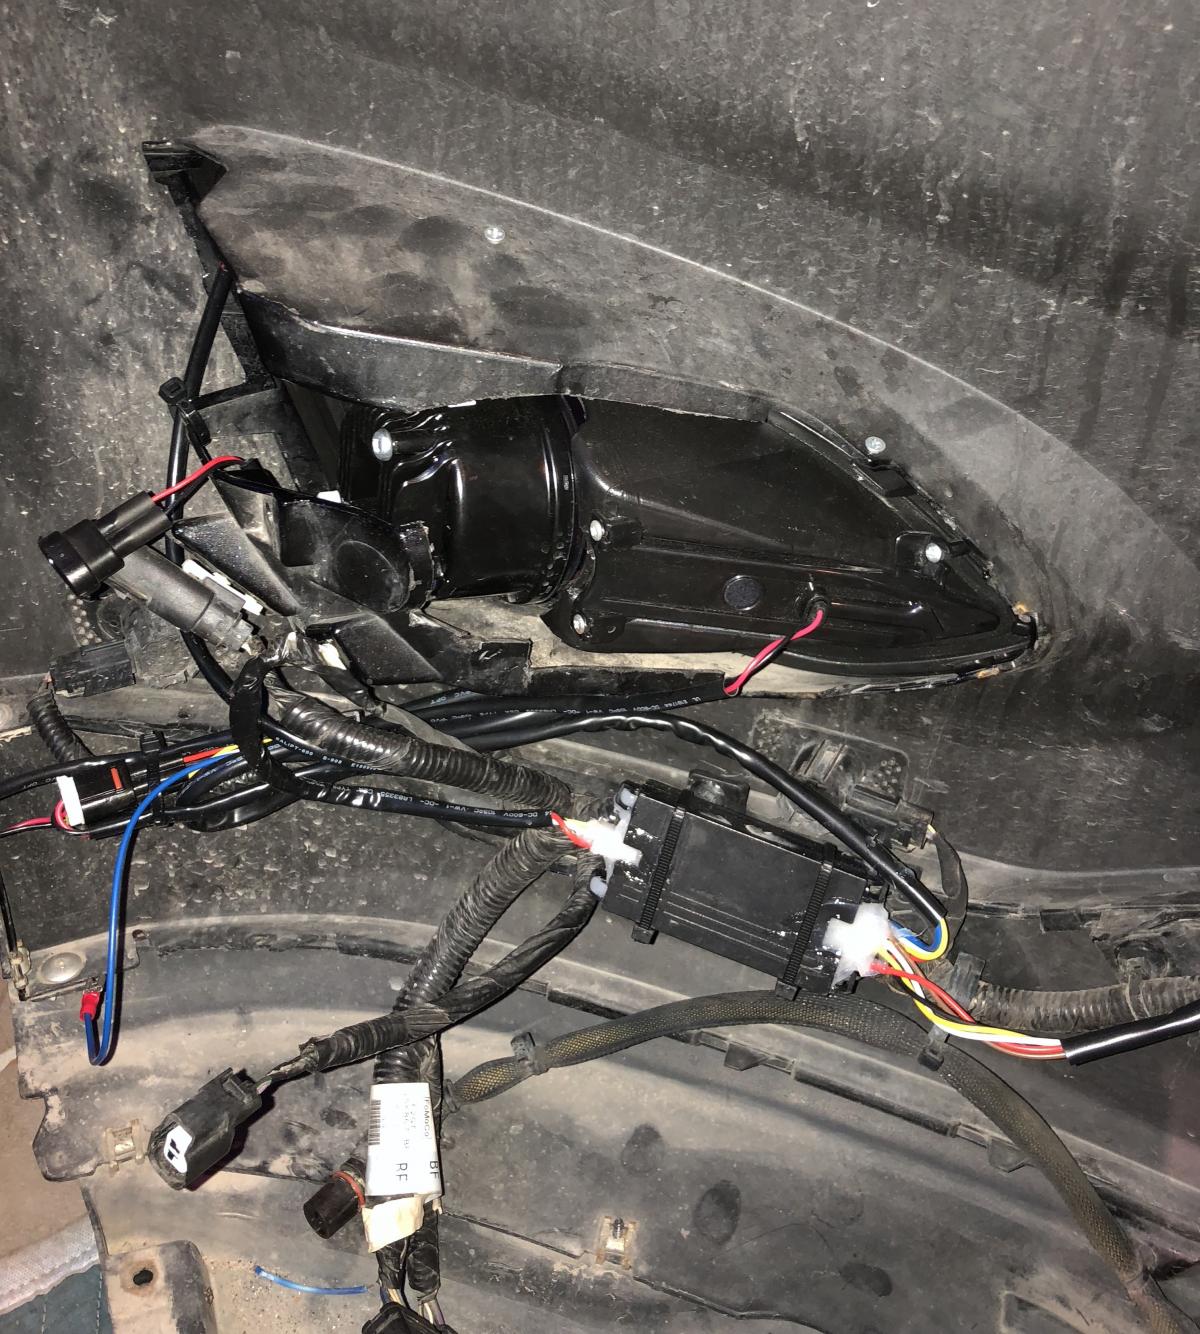
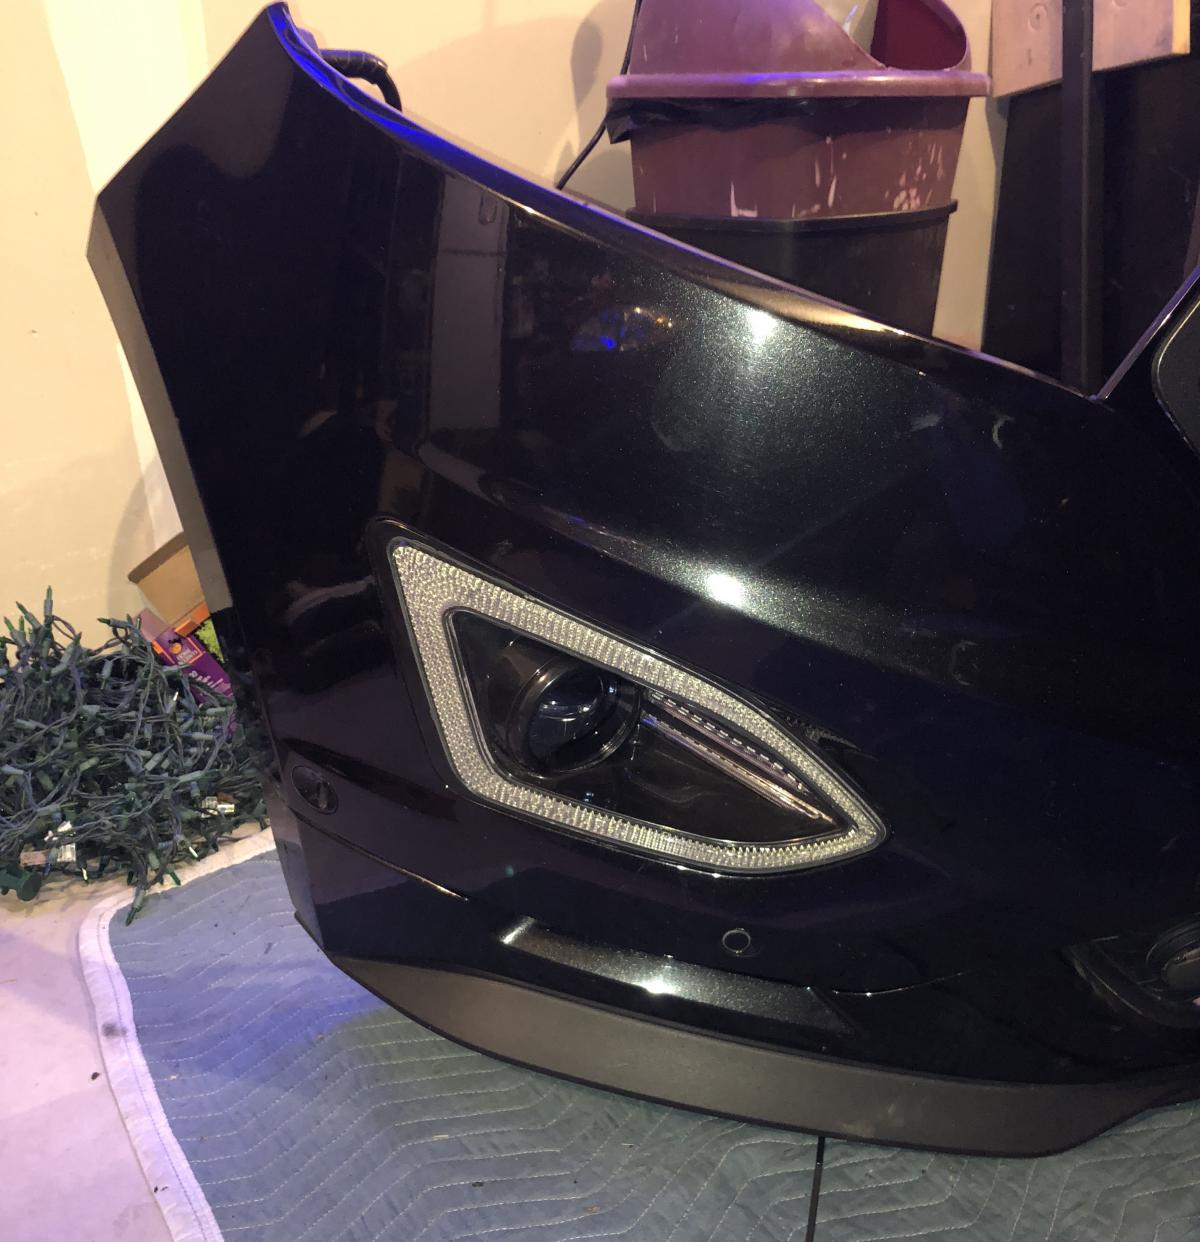
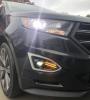
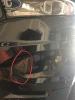
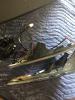
Finished everything up this afternoon. First of all, here are are some pictures of the inside of the bumper cover. In order for the bezels to fit, some of the bumper needs to be trimmed away. Same on the driver side This is also the side I tapped the signature light wires, and mounted the control module for the bezel. Which I siliconed the hell out of because it didn't seem very weather proof. Also in the above two pictures you can see how I held the bezels in place. The two screws in the top, there are three in the bottom, and one in the back. These are screwed into the mounting tabs of the bezel, which don't line up to anything on the bumper cover. My original idea was to notch the bumper cover for these tabs to latch to, but they don't stick out enough. So I did the screw thing, but it seems pretty strong as long as no animals run in front of the car, which would do other damage anyway. Mounting the fog lights, I thought this over, and stared at pictures for awhile. All I could come up with was metal strapping. Which actually worked out pretty well, they are in there solid. The only thing I payed close attention to when securing these was that the rotation was level. I didn't care about left and right alignment, they're fog lights and these bezels aren't perfect. Up and down alignment needs to be somewhat close, but there is an adjustment on most housings for up and down adjustment. Once I got it mounted securely and made sure they were level, I siliconed around the inside to help keep it from vibrating. It's pretty from the front, it's not pretty from the back, but it works. Ive retrofitted headlights in the past, and metal strap was my go to for holding things. Ill report back in a few months hopefully on how its holding up. I also ordered new HID bulbs for the headlights to match the 5500K fog lights a little better. I didn't like the 4300K of the factory HIDs anyway, so Ill post a picture when I get them. Thanks for reading! Let me know what you think.
-
What have you done to/with your Edge/MKX today?
tmarsh replied to WWWPerfA_ZN0W's topic in Accessories & Modifications
Thanks guys! Here is my post explaining the project. http://www.fordedgeforum.com/topic/25853-15-18-edge-fog-light-install/?p=192638 -
15-18 Edge fog light install
tmarsh replied to tmarsh's topic in Glass, Lenses, Lighting, Mirrors, Sunroof (BAMR), Wipers
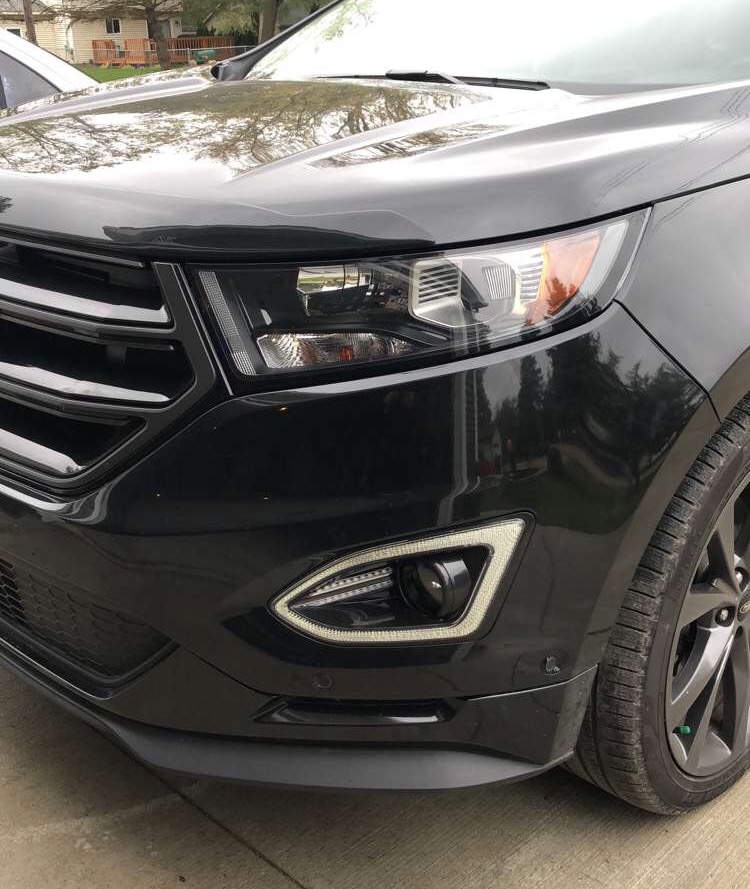
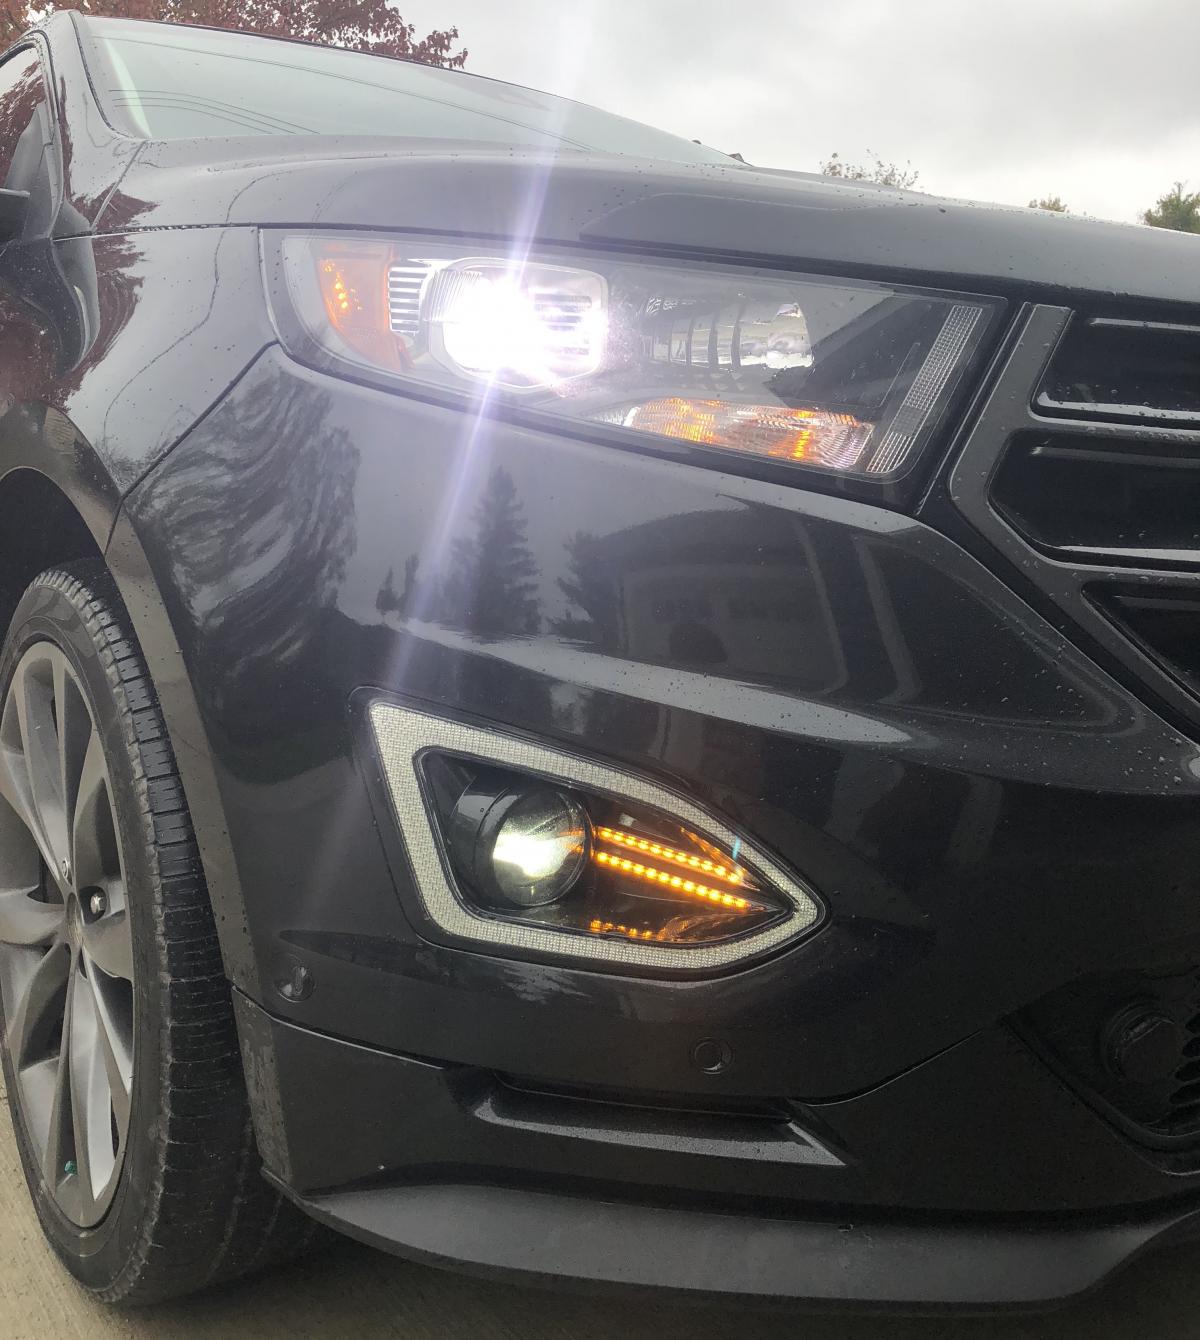
Here are pictures of the install so far. I still need to secure and aim the fog lights.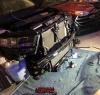


-
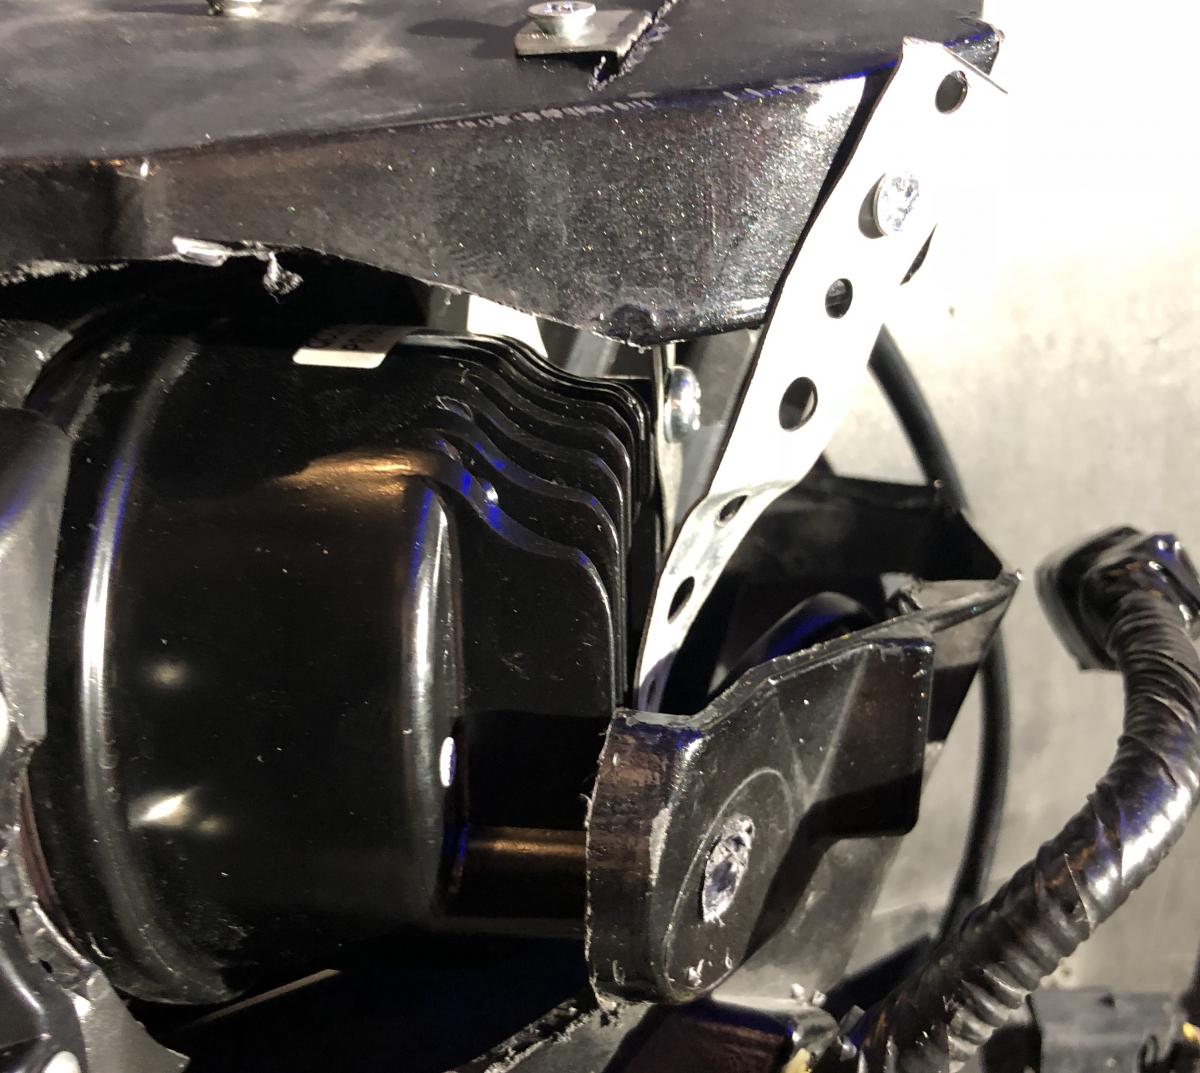
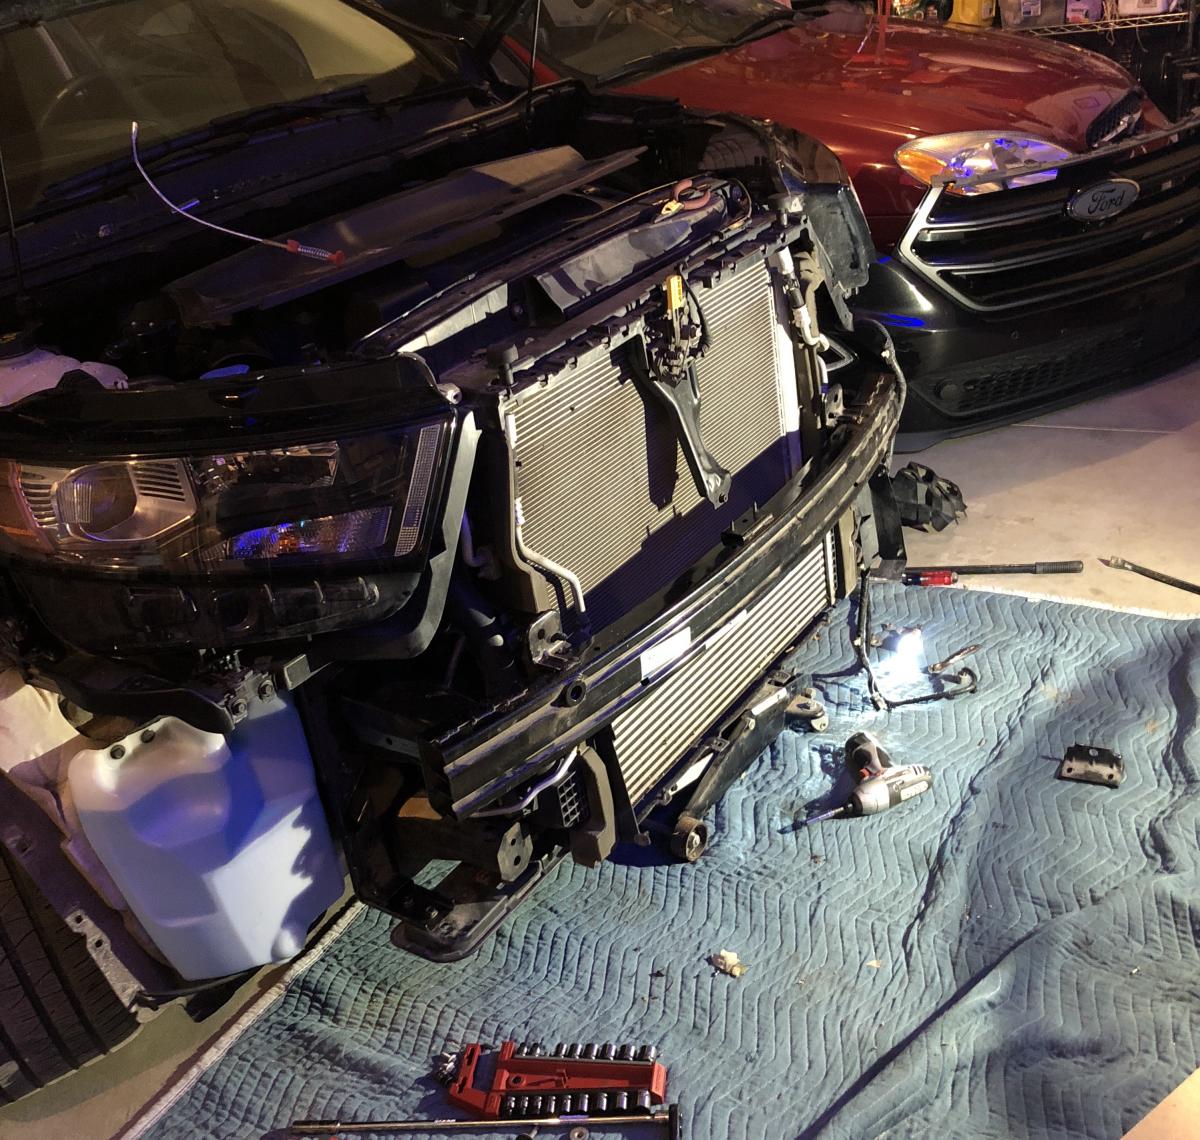
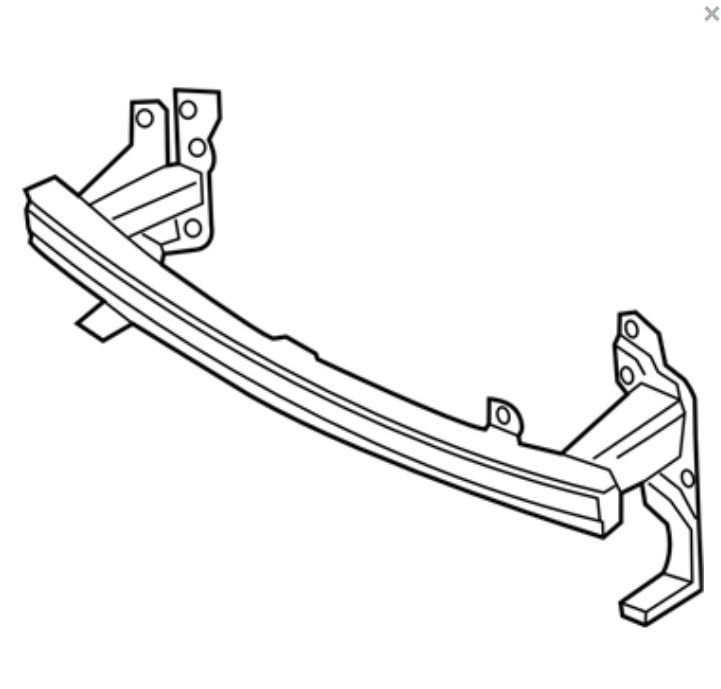
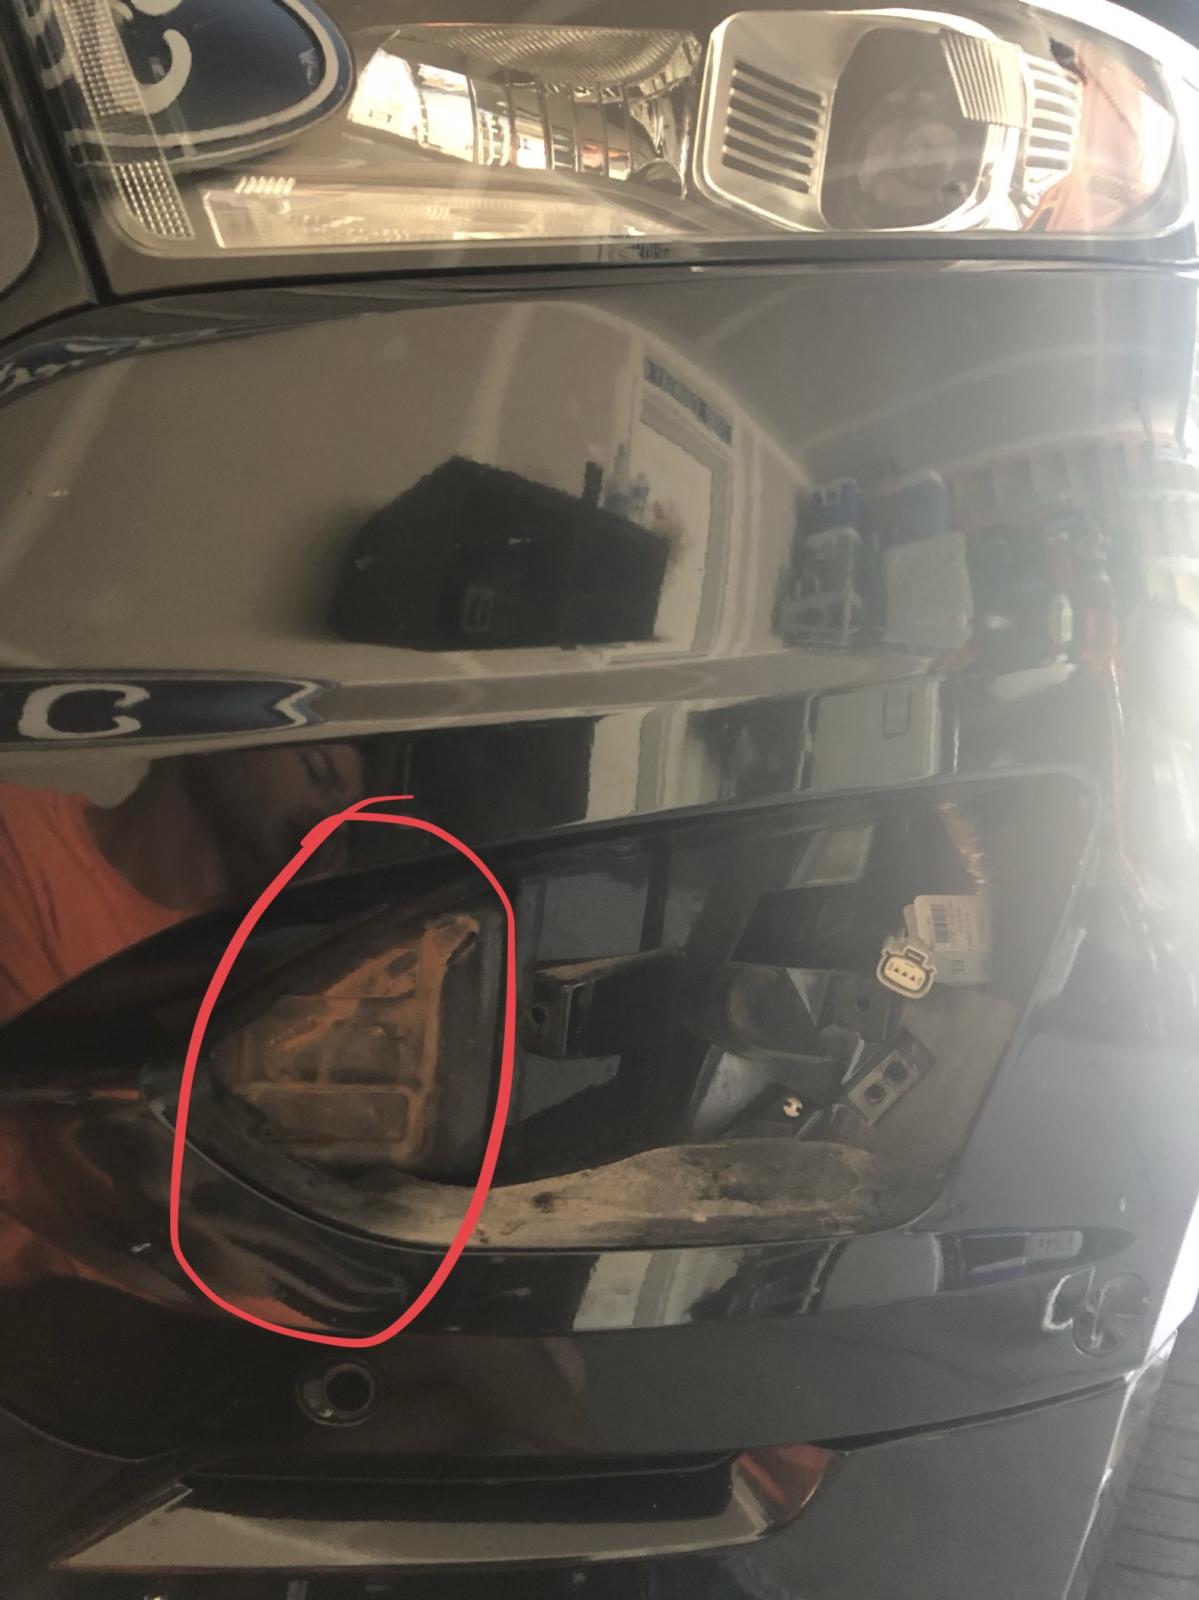
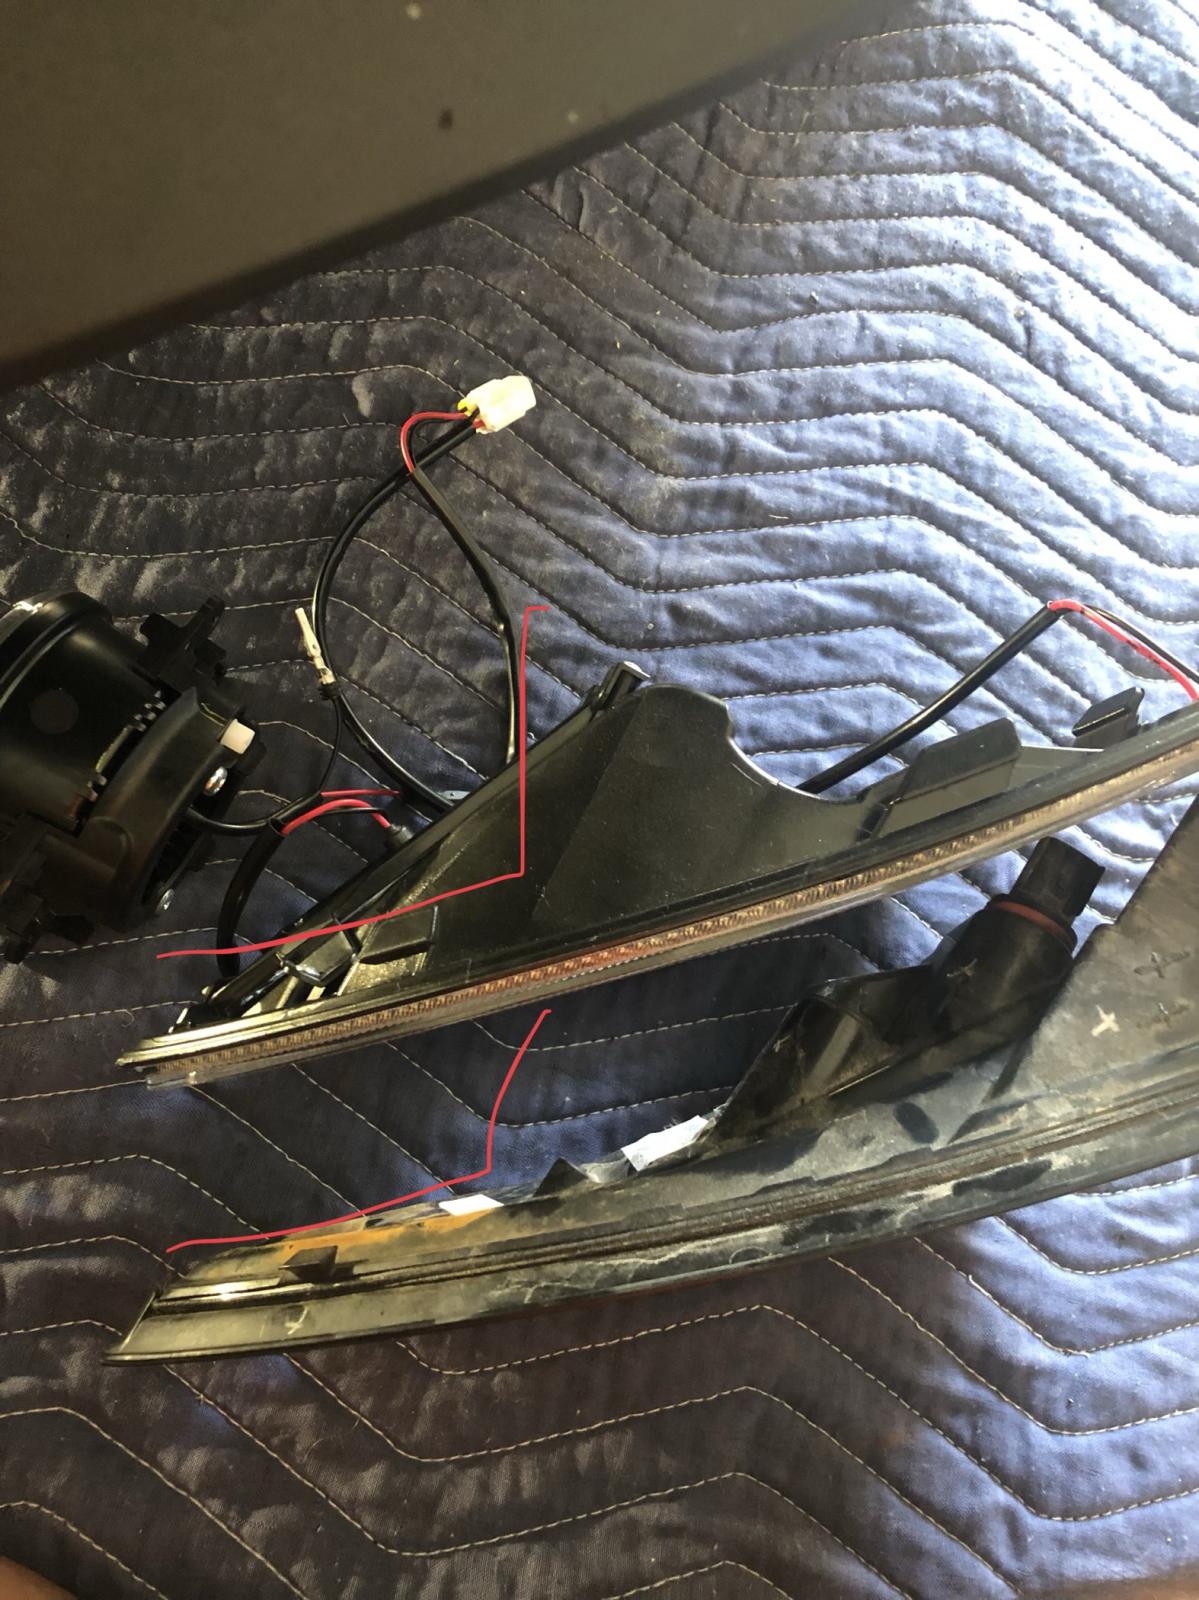
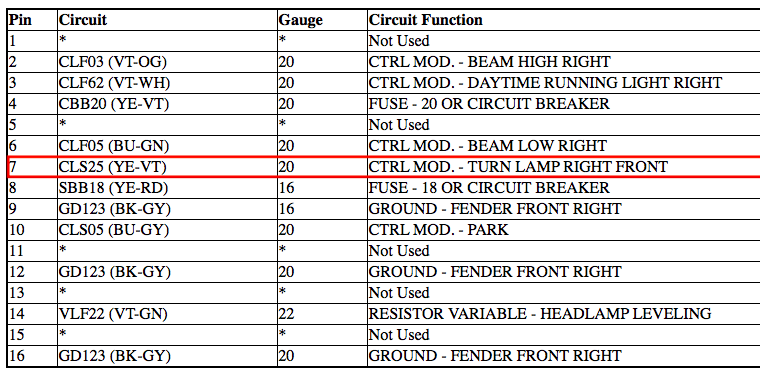
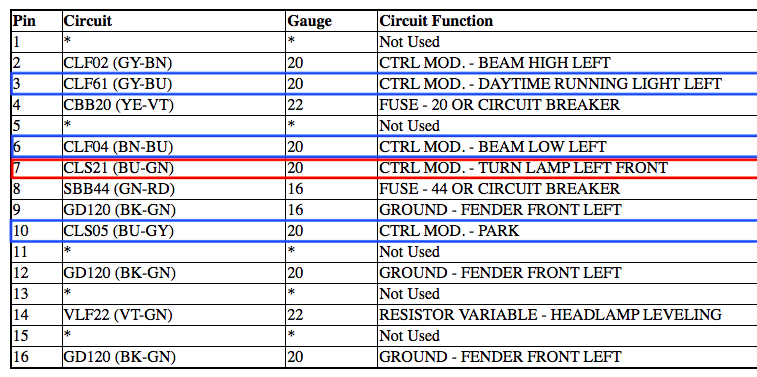
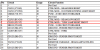
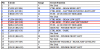
So I got around to installing the fog light bezels that I ordered from eBay, and the morimoto XB LED fog lights to go in them. Here are the parts I have- Morimoto XB LED fog lights- https://www.theretrofitsource.com/ford-3-morimoto-xb-led.html?carDisplay=2014+Ford+Fusion&preselect=&preselect_restrict=1 Morimoto relay harness- https://www.theretrofitsource.com/hd-relay-h11.html Bezels- https://www.ebay.com/itm/DRL-For-Ford-Edge-LED-Daytime-Running-Light-Fog-Lamp-W-Signal-2015-2016/283105004314?fits=Year%3A2015%7CModel%3AEdge%7CMake%3AFord&hash=item41ea5f8b1a:g:sE8AAOSw2UVbc84~:rk:23:pf:0 Its a long story. About a month ago I started this. I pulled off the bumper cover and quickly realized this is not an say task. These bezels do not fit the American Edge. They are designed for the European Edge, which has a fog light option. The main difference is the bumper cross member behind the bumper cover. In my testing before mounting everything, I took the signature lights out and put the bumper cover back on to check for clearance. This is what I found. Here is the driver side with the signature light removed, passenger side is the same- As you can see, the bumper bar is right there. And in this picture, you can see the new fog light bezels are a different shape than the factory signature lights- So, these will not fit. Also take a look at the mounting tabs for the new bezel. Notice that the factory bezel does not have these tabs. Red flag. So heres what has to be changed to make the new bezels even fit in the hole. The 'Merican Edge has this bumper (at least my sport does anyway. Can't say for other trims)- The Euro Edge has this bumper- FordPartsGiant.com has the Euro bumper in stock. I chose to go order a new bumper rather than cutting the factory bumper. I didn't have the tools to cut it, and for safety and insurance purposes I didn't feel comfortable cutting it. The Euro bumper is a direct swap. This can be done with basic sockets and wrenches, and a jack to support the radiator/condenser/intercooler. It is time consuming and involved, but follow the service manual for step by step. It will take some finesse to wiggle it out around the AC lines and intercooler piping if you have one, but it is doable. Aside from modifying/replacing the bumper, you also have to modify the bumper cover to fit the bezels in. All modifications to the bumper cover are on the inside for the signature light support, and could be put back if you cut nicely and save the pieces. No cutting has to be done to the face of the bumper cover. These bezels are the same shape as the stock signature lights, just deeper because of the fog light hole. At this time I do not have any pictures, I didn't have a write up in mind when I did this. But I have to finish it up, when I pull the cover off this week I will take more pictures. The wiring for the bezels, the ones I have anyway, have ground, constant 12V+, Ignition + input, parking light + input, Left turn + input, and Right turn + input for the switchback amber function. For ground, +12v, ignition, and parking light input I just tapped the wiring for the signature lights. No reason to go straight to the battery for such a low draw. The kit will come with its own diagram for wire color and function. But here are the diagrams for the Edge side of things- The power, ground, ignition and parking can be tapped here at the signature light plug- Here is passenger side headlight plug pinout if your bezels are switchback and need turn signal input- Here is driver side- The switchback function works, but not completely as it should. Most front turn signals are three wire (marker, turn, ground) with a dual filament bulb. The HID equipped edge(and possibly the halogen but im not sure), uses a two wire (power/ground) and single filament bulb. How does it differentiate between dim and bright? when the parking lights are on, the BCM sends a pulsed 12v to the bulb, which makes it dim. When the turn signal is on, the BCM sends full power to the bulb making it bright. Very weird way to go about a turn signal if you ask me. But because you are connecting the bezel to the turn signal wire, you are also connecting it to the parking light wire technically. So with the parking lights or headlights on, the bezels will be amber. If you choose to not connect the turn signal wires, the bezels will stay white with the headlights on, and will dim like the factory signature lights. I have not found a way around this yet, but I kind of like the amber on with the headlights more than the white triangles. The fog lights, you will need a relay harness to power them, whether you go LED or HID or halogen. The photo above, the pins/wires outlined in blue are options to drive the relay to turn on the fogs. I wired mine to the low beams, so the fog lights are always on with the low beams. At some point I will change this and enable the factory fog lights, but for now this will do. You could also run a switch into the cabin to switch them on and off independent of the rest of the lighting if you choose.


-
So I got around to installing the fog light bezels that I ordered from eBay, and the morimoto XB LED fog lights to go in them. Here are the parts I have- Morimoto XB LED fog lights- https://www.theretrofitsource.com/ford-3-morimoto-xb-led.html?carDisplay=2014+Ford+Fusion&preselect=&preselect_restrict=1 Morimoto relay harness- https://www.theretrofitsource.com/hd-relay-h11.html Bezels- https://www.ebay.com/itm/DRL-For-Ford-Edge-LED-Daytime-Running-Light-Fog-Lamp-W-Signal-2015-2016/283105004314?fits=Year%3A2015%7CModel%3AEdge%7CMake%3AFord&hash=item41ea5f8b1a:g:sE8AAOSw2UVbc84~:rk:23:pf:0 Its a long story. About a month ago I started this. I pulled off the bumper cover and quickly realized this is not an say task. These bezels do not fit the American Edge. They are designed for the European Edge, which has a fog light option. The main difference is the bumper cross member behind the bumper cover. In my testing before mounting everything, I took the signature lights out and put the bumper cover back on to check for clearance. This is what I found. Here is the driver side with the signature light removed, passenger side is the same- As you can see, the bumper bar is right there. And in this picture, you can see the new fog light bezels are a different shape than the factory signature lights- So, these will not fit. Also take a look at the mounting tabs for the new bezel. Notice that the factory bezel does not have these tabs. Red flag. So heres what has to be changed to make the new bezels even fit in the hole. The 'Merican Edge has this bumper (at least my sport does anyway. Can't say for other trims)- The Euro Edge has this bumper- FordPartsGiant.com has the Euro bumper in stock. I chose to go order a new bumper rather than cutting the factory bumper. I didn't have the tools to cut it, and for safety and insurance purposes I didn't feel comfortable cutting it. The Euro bumper is a direct swap. This can be done with basic sockets and wrenches, and a jack to support the radiator/condenser/intercooler. It is time consuming and involved, but follow the service manual for step by step. It will take some finesse to wiggle it out around the AC lines and intercooler piping if you have one, but it is doable. Aside from modifying/replacing the bumper, you also have to modify the bumper cover to fit the bezels in. All modifications to the bumper cover are on the inside for the signature light support, and could be put back if you cut nicely and save the pieces. No cutting has to be done to the face of the bumper cover. These bezels are the same shape as the stock signature lights, just deeper because of the fog light hole. At this time I do not have any pictures, I didn't have a write up in mind when I did this. But I have to finish it up, when I pull the cover off this week I will take more pictures. The wiring for the bezels, the ones I have anyway, have ground, constant 12V+, Ignition + input, parking light + input, Left turn + input, and Right turn + input for the switchback amber function. For ground, +12v, ignition, and parking light input I just tapped the wiring for the signature lights. No reason to go straight to the battery for such a low draw. The kit will come with its own diagram for wire color and function. But here are the diagrams for the Edge side of things- The power, ground, ignition and parking can be tapped here at the signature light plug- Here is passenger side headlight plug pinout if your bezels are switchback and need turn signal input- Here is driver side- The fog lights, you will need a relay harness to power them, whether you go LED or HID or halogen. The photo above, the pins/wires outlined in blue are options to drive the relay to turn on the fogs. I wired mine to the low beams, so the fog lights are always on with the low beams. At some point I will change this and enable the factory fog lights, but for now this will do.
- 1 reply
-
- 2
-

-
What have you done to/with your Edge/MKX today?
tmarsh replied to WWWPerfA_ZN0W's topic in Accessories & Modifications
What did I do today(and yesterday)? Those ebay signature switchback bezels, and morimoto LED fog lights. Beware before you order these, they do not fit. If you happen to make them fit, they do not latch in. If you happen to secure them, no fog light housing will fit. If you happen to secure a fog light and aim it correctly, you will need to wire everything. If you happen to get that far, welcome to the fog light club! Ill create a post explaining how I did it and post a ink here.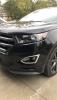

-
Heated and Cooled Seats
tmarsh replied to Wedgeamatic's topic in Interior, A.C., Heat, Interior Trim
Same, mine does not work as well as the bottom still, but it works. Ive also found a sweet spot for mine. To get it to work the best, turn it on high as soon as you get in. Once the cabin cools off, turn the seat to medium setting. My seat backs seem to work the best on medium setting for short trips, or low setting for long trips. The temperature of the TED does not change between high, medium, and low. Only the fan speed changes. For my 15, I also updated my as built data for the TSB. This made a noticeable difference in fan speeds. I also tried plumbing the intake into the HVAC system. I tapped the duct in the center console that goes to the back vents, and had the HVAC on MAX AC, so low cool and highest fan speed, with the back vents shut. Believe it or not, this did not make any noticeable difference in seatback cooling even with the air conditioning being forced into the blower. The TED temperature only dropped two degrees. So it did make a slight difference, but under normal conditions I have my AC on auto at 70-74 degrees. So plumbing the cooled seats into the HVAC system is a bust. -
That is a plug for trailer lights. But, If you don't have the tow package it will not work because you're missing the trailer light module inside the car. I looked into this because I couldn't find a decent aftermarket trailer light controller kit. The wiring is there, if you were to buy the module that goes in the back quarter panel in the trunk, and then the extension loom to go to the hitch reciever, or wire one in yourself, it will work.
-
I dont see how removing the engine cover would help much at all? Even for making the engine louder. I took apart the intake last night looking for baffles of some sort, and didnt see anything anywhere. Makes no sense.
-
It walks the walk with the lms 93 tune, I want it to talk the talk. The engine sounds good under load, but I want to hear the turbos under load. It doesn't sound like an ecoboost engine like the 2.7 in the F150 or a 1.6, 2.0, 3.5. I don't care as much about the blow off sound, more just the hiss, the whine, the whistle. What ever you want to call it, I want to hear it I tried searching but could only find answers for the BOV (which I will get to eventually). Any mods I can do to achieve this? Any silencers in the intake? Doesn't make sense that you can't hear a peep from the turbos, no matter how far the gas peddle sinks into the carpet.