Bosco390
-
Posts
28 -
Joined
-
Last visited
-
Days Won
2
Content Type
Profiles
Forums
Gallery
Everything posted by Bosco390
-
 On our 2010 MKx, the full-width light bar on the rear hatch has started with 2 of the LED's that light it flickering, and often going off. This leaves the light bar only partially lit. Has anyone removed the light bar and looked into replacing the LED's that light it?... I'm sure Lincoln recommends replacing the entire unit (that was the recommendaton on my Mark VIII years ago)... but I'd like to avoid doing that, if I can just replace the individual LED's. Any experience on this?
 -
Just a quick update. We are loving the Navigation upgrade we did. Since the install, we tapped a yellow RCA cable (inside the console) from one of the Cornering Camera connections of the LickPick and mounted permanent video tap inside the lower console compartment, directly next to the Line-In Aux jack. What this allowed was hooking up a digital TV Tuner to watch TV in the car... the video out to the tap we mounted, and the audio out to the Line-In jack with an RCA-to-3.5 mm cable. And with the purchase of an HMDI to Composite converter, we also stream live video from the cell phone during trips. It is working wonderfully.
-
I used this.... http://www.coastaletech.com/synclockpick.htm Works flawlessly.
-
OEM Navigation Radio Installation after purchase
Bosco390 replied to rl07edge's topic in Audio, Backup, Navigation & SYNC
I did this in our 2010 MKX... switched out the standard radio w/ 6 CD, etc for the OEM Nav unit... see my post http://www.fordedgeforum.com/topic/12015-nav-swap-for-2010-mkx/?do=findComment&comment=93822 It was expensive, but most of the cost was the unit itself, and I know I could have bought cheaper... but the vendor i used took care of programming and everything. -
Unlock AV input on FordMy Touch?
Bosco390 replied to wlepse's topic in Audio, Backup, Navigation & SYNC
http://www.coastaletech.com/mytouch2.htm -
Awesome!... and glad what I did may have been helpful.
-
Ok, got the camera in my cell working again...YAY. So here is a video of the unit installed. The LockPick works flawlessly... all functions of the unit work, regardless of speed... so yes, I can watch DVD's while driving (not that I would). I love the start-up screen... the animated logo.. and during the video you can see I got a text message, which the unit handles without a problem. Also, I put it in reverse gear to activate the back-up camera, which also works well. Here is a shot of the rear camera installation. No visible wires... I really don't know how they routed the wires, but all I know is I can't see them. I finally burned some pics to cd and loaded them into the unit, so I changed the pic on the homescreen... the startup is still the animated Lincoln logo, but the homescreen pic can be customized... (in fact since I took this pic, the homescreen has been changed to our puppies... oh well.) I know I spent too much money on this project, but it is exactly what we wanted, so we're very happy with it.
-
Video re: the LockPick we installed.... http://www.coastaletech.com/media/LINCOLN%20MKX%20INSTALLATION.wmv
-
In researching for our new NAV unit, I found this great video showing how really easy it is to remove the console cup holders, ashtray/storage compartment, and center dash bezel surrounding the radio. Hope this helps someone. http://www.coastaletech.com/media/LINCOLN%20MKX%20INSTALLATION.wmv
-
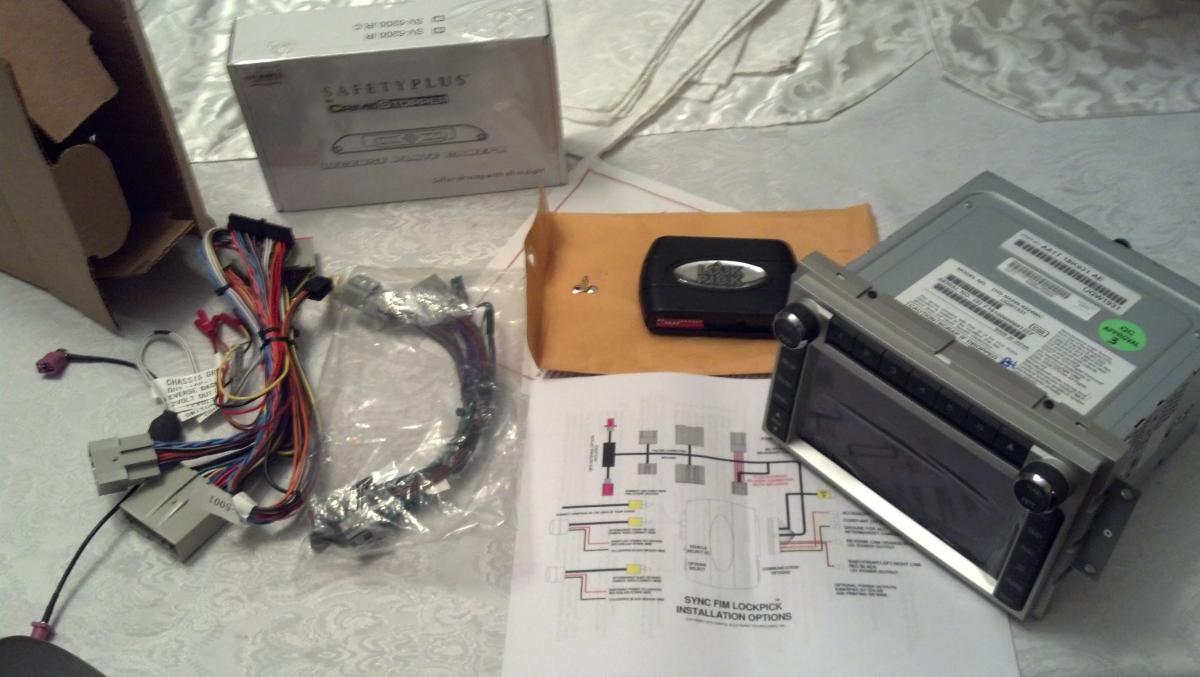
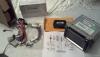
It's done!!! Well, two days ago my cell phone pooped out the camera, so no pics... but the job is done and looks exactly like any other stock OEM Navigation unit installed, so pics would be of limited value I suppose. This unit is wonderful, and performs exactly like stock, and more. Here is a rundown of what we did: Purchased the Navigation Dash Bezel on ebay $180 Purchased from OEM Auto Parts Co. the OEM Navigation Unit $1600 http://www.oemautopartsco.com/factory-oem-navigation-radio-clarion-p-30239.html This also included the BRICK KIT (not shown in attached picture), which is a wiring harness that allows the unit to interface with the vehicle that was originally equipped with the standard radio. BRICK KIT also included new steering wheel buttons specific to NAV, and a required amplifier. We provided OEM our VIN and they programmed the unit for our vehicle (more on that later) Purchased from OEM Auto Parts Co. the LockPick kit (see picture). This may be of interest to someone who has the NAV unit originally. By default, certain features of the unit are Locked out when the car is being driven. Watching DVD's is one of them... entering a NAV destination address... this kit (another maze of wires and harness connections) overrides this lock out, so that all features of the unit are available all the time... so yes, we can watch DVD's while driving. $285 Purchased from OEM Auto Parts Co a back-up camera w/ night vision... wires into the LockPick and comes on screen when the car is put in reverse. $89 Installation at THE RADIO CLINIC, best installers in Chattanooga, TN http://www.theradioclinic.com/contacts.html $470 You would think that was enough, but there was a problem with the programming of the unit initially, and I had to return it to OEM to be reprogrammed... and to expedite things (as my MKX was all torn apart at the installers) I shipped it back to them overnight delivery with $2k of insurance $152 So all tolled, we're in for $2776, which is ridiculous for a radio in the car. But... it's awesome. If we end up doing trips in the car, we may even put in a digital TV tuner... The LockPick kit has several video inputs available... but I dunno... DVD's may be enough. Hope this helps someone who wishes to make the swap.
-
We've purchased the NAV unit (Clarion) along with the "Brick Install Kit" that makes it compatible with the vehicle that originally didn't have Nav... supplier programs the unit with our VIN so that the unit is specifically compatible... also purchased a "LockPick" kit to unlock certain functions while car is in motion and a Rear View Backup Camera... all tolled we're in so far for about $2k. Today is Sunday, next Wednesday we have an appointment to have the Install done. I will update when that's over.
-
Retractable cargo cover for Escape.... gonna try one for my MKX!! http://www.partscheap.com/Ford-Escape-Cargo-Security-Shade-p/9l8z-7845440-ac.htm Youtube video of the cover....
-
http://www.oemautopartsco.com/ford-lincoln-mercury-c-1061.html
-
Add nav to a 2011 with myford touch?
Bosco390 replied to tknice's topic in Audio, Backup, Navigation & SYNC
Wow, Ii am so glad I read your post, and would like to ask your opinion on the following.... I am just short of investing over $2000 to put an OEM Nav unit in our 2010 MKX... supplied from these people... http://www.oemautopartsco.com/factory-oem-navigation-radio-clarion-p-30239.html If indeed I went through all this expense only to find that their claims that it all will work fine... well, I'd be really pissed!!! What do you think?? Does the "Brick Install Kit" they mention solve the issues you name above? Or do you think we should just keep our non-nav unit and learn to be happy with it and save the $2k? Incidentally, we have the older version of Sync... no MFT. -
Also, there's one (used, just the unit, no install package) for sale on the auction site... http://www.ebay.com/itm/2010-Lincolin-MKX-Navigation-Radio-OEM-LKQ-/190797884343?pt=Motors_Car_Truck_Parts_Accessories&hash=item2c6c70abb7&vxp=mtr
-
It is here... http://www.oemautopartsco.com/factory-oem-navigation-radio-clarion-p-30239.html Not cheap, but the units are new, not used. From my research, I learned that this company buys these units out of vehicles that are being shipped overseas and consequently require a different receiver. If you use them, please share that I referred you. I've not ordered yet, as I am shopping for an installer shop... dealer doesn't seem to want to be bothered. With the unit, unlock (so that the passenger can watch DVD's or use otherwise locked features while car is moving), and a digital TV tuner, it will run just short of $2100... the shop I've had preliminary discussion with is estimating $400 to install... so $2500 all tolled. Geez. Plus the new console bezel. But when I get the "I want's"... well, you know how it is.
-
DEALERSHIP OR CAR AUDIO SHOP? Ok, we have FOUND a supplier of the correct NAV unit to replace our non-nav unit, but in reading the "plug & play" instructions, it looks just a bit beyond my comfort level... so my question ... is it better to ask a dealership to do the install, 'cause they know the car so well?... or is a car audio shop the better choice 'cause it is specifically what they do? Thanks for your opinions!!!
-
Droid DNA with Ford SYNC?
Bosco390 replied to KingMike's topic in Interior, A.C., Heat, Interior Trim
My Droid Bionic does great... reads messages, etc. -
I have been reading with interest the posts in this forum re: a Nav swap and am dying to do a swap in our '10 MKX for a Nav unit... I use my Droid for GPS directions, so I am not dying for the Navigation capabilities, but the touchscreen looks so much better. Our non-Nav unit works flawlessly, reads my USB mp3 memory sticks, Sirius reception is great, Sync works fine. What I have learned is this... the units fitting earlier MKX's... 07-09 are incompatible with the '10 MKX...and of course the later unit... 11-13 are incompatible as well... or so I read. I wrote an ebay seller and got the following.... "... Dear oemcaraudio, I have been looking for a while now for a GPS Navigation 6 disc changer with Sync Receiver for our 2010 MKX. It is my understanding that the unit in earlier years are not compatible with the 2010 model, is that correct? Do you have this Navigation Receiver available or am I wrong regarding other years compatibility? Our current unit is the NON-navigation unit, 6 disc changer with USB & Sync, would the TouchScreen Navigation unit be plug & Play interchangable? Thank you so much for your response and I hope you can help us. Dear bosco390, That is correct, the 2010 MKX does not use this navigation system. It uses a different model that we do not have in stock. Installing navigation into a vehicle that never had it can sometimes be very complicated you must keep in mind that sometimes the vehicles without navigation came with a different sound system than a vehicle with navigation. You'll also need to install GPS antenna. In a 2010 MKX the dash panel surrounding your radio is different than the dash panel that would be found in a vehicle with navigation. According to my parts system these are the navigation units that would be found in a 2010 MKX: AA1T-18K931-AA , AA1T-18K931-AB , AA1T-18K931-AC , AA1T-18K931-AD We are not installation experts and do not know which model will be compatible in your vehicle or necessarily what all must be done to complete the installation. But if you do your research and know which part number you need we can probably special order it for you from one of our suppliers. - Ben ....." So my question... has anyone done the swap on a 2010 MKX? Are there "work-arounds" like I have read some have done?... If I buy a unit and GPS antenna, and have it programmed by the dealer, will it hook up with my Sirius module? Yes, I am aware I also have to switch out the bezel, and they're not cheap (at least the ones i've sited). Thanks for any insights.
-
My 2002 Mercedes Benz C230k Coupe parked at work.
-
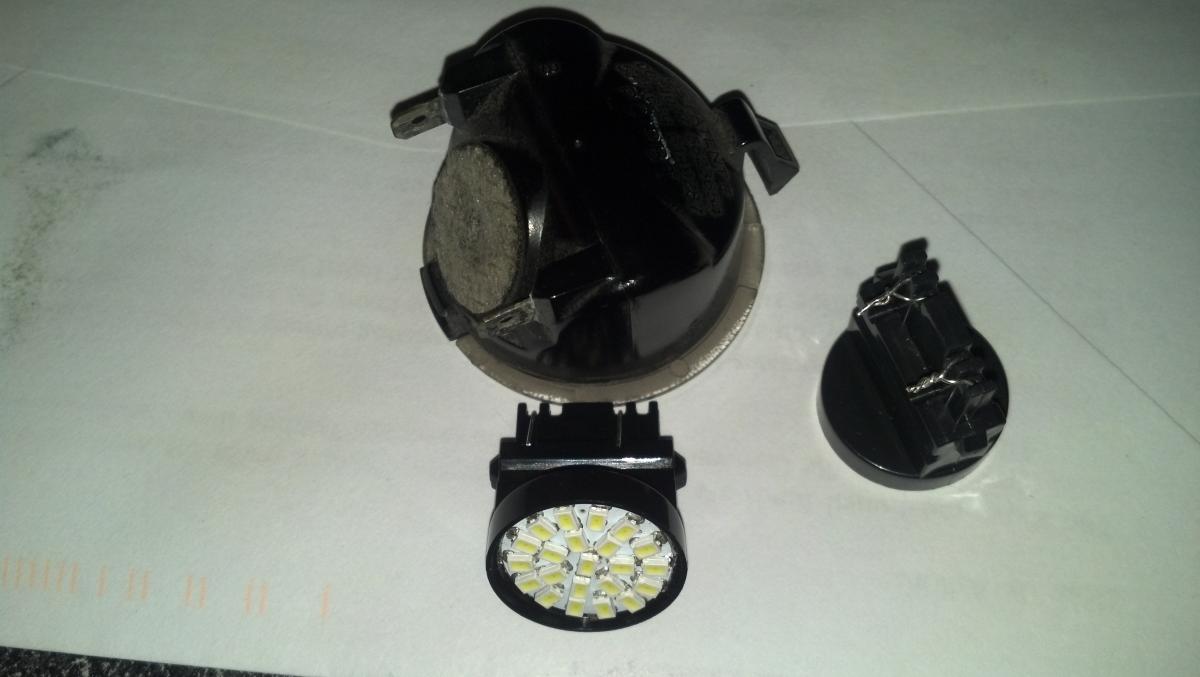
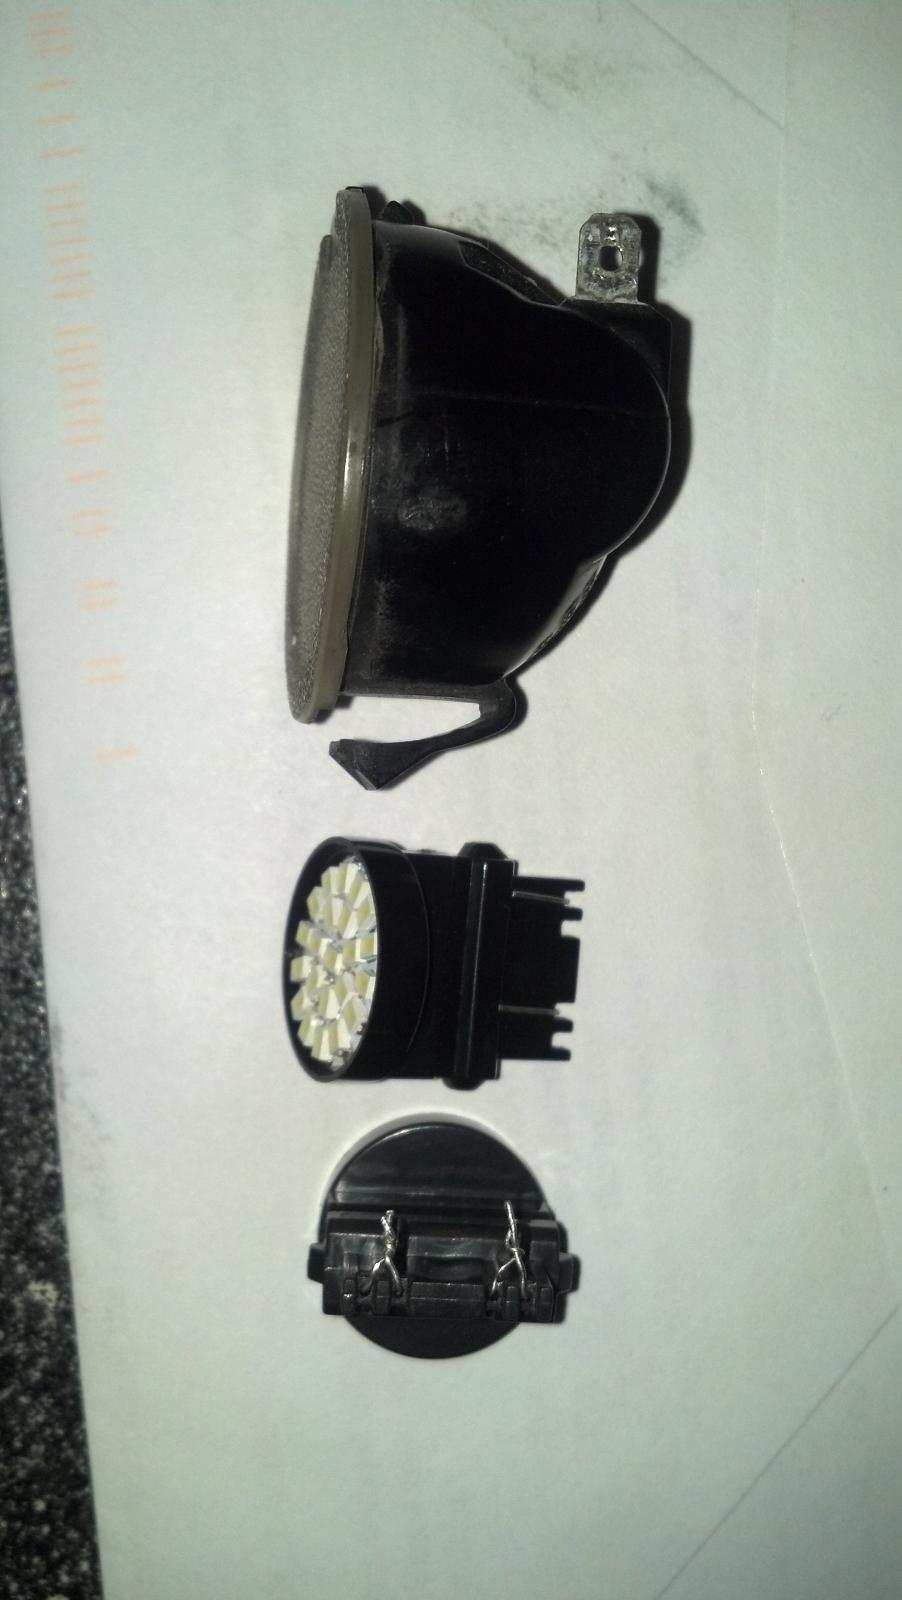
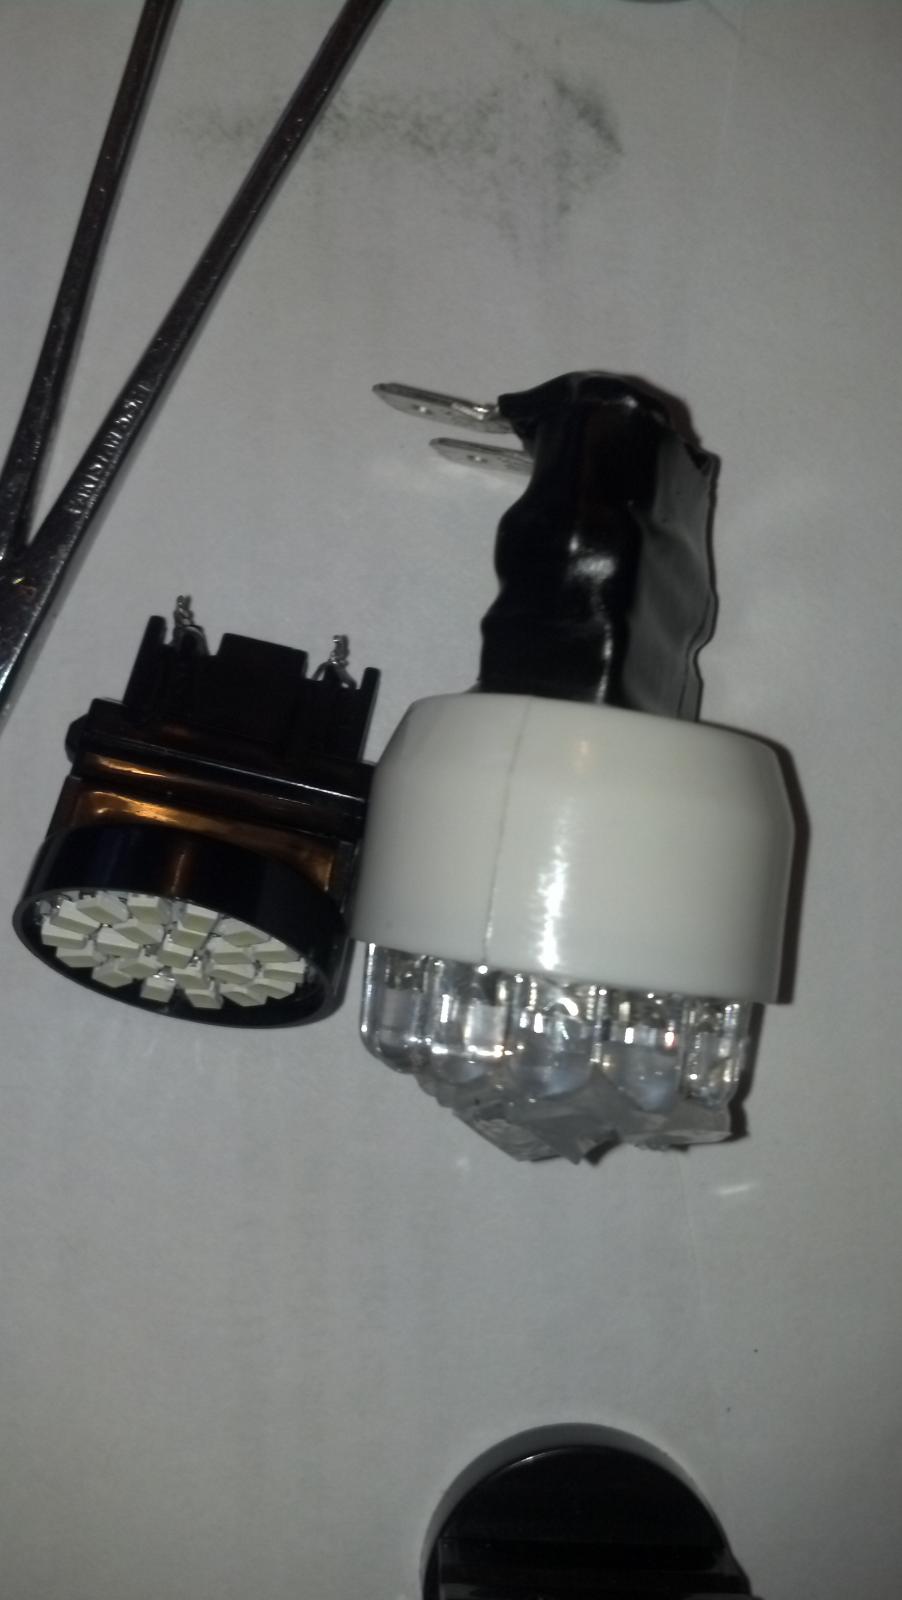
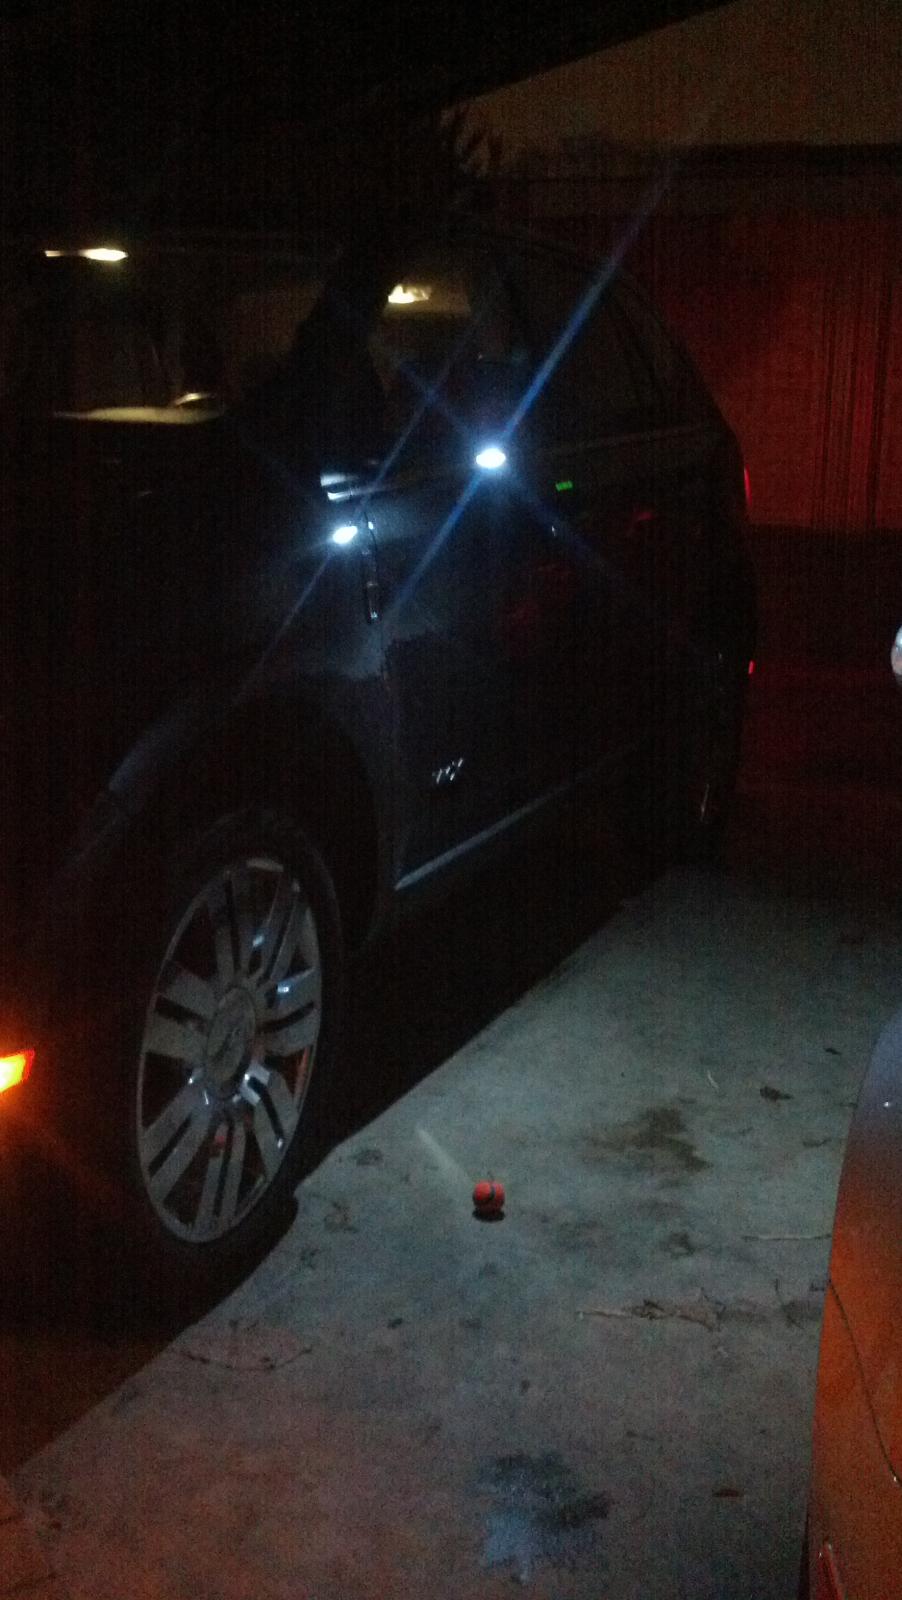
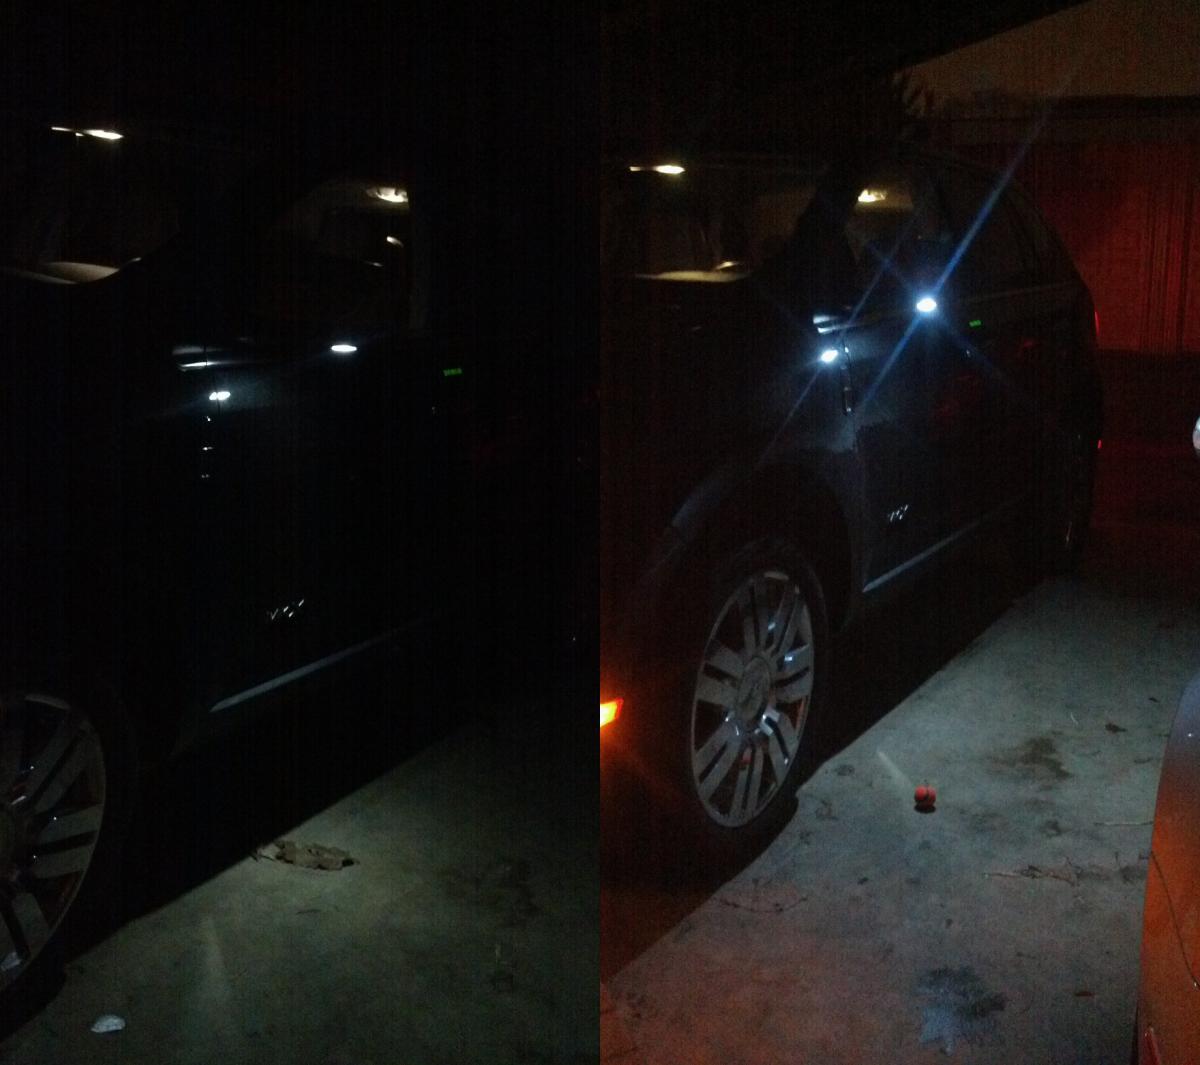
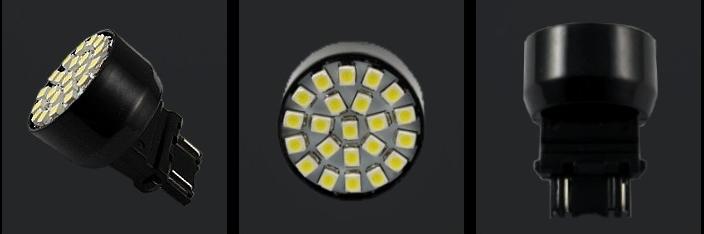
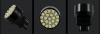
Thanks Apkarian!... here's the update... and I have to say I am really really pleased with how they turned out. The new 22 SMD bulbs arrived today... physically they are SO much smaller than the LED bulbs that I had installed before. They were listed on the auction site as "White 3157 22 SMD LED Upgrade Back Up Reverse Light Bulbs 3057 3155 4114" As you all will recall, I had an issue with the previous LED bulbs being too large... too tall, actually. Here's a shot of the new bulbs sitting next to the stock Puddle lamp... they will fit into the car nicely. Again, as I did with the last upgrade (read above), I twisted the leads together, and subsequently crimped male spade connectors onto the leads (read above). The size of these bulbs is going to be perfect for this application. I removed the last upgrade I did to the driver's door... here is the previous LED bulb alongside the new 22 SMD bulb. I installed the new SMD's with a dab of epoxy, as opposed to using the silicone... to be honest, this was because I didn't want to wait a day for the silicone to set and harden... the epoxy set in 5 minutes. I did NOT cover the SMD chips with epoxy... just dabs to attach the new bulb to the lens that I separated the old upgrade from. Here it is installed in the Driver's door. Since I took the pics under exact same lighting conditions, here is a side-by-side comparison of the first upgrade LED bulb with the new, smaller 22 SMD bulb... significantly brighter. I am really pleased with the result!!! Hope this is helpful to someone who want to upgrade to max brightness of their puddle lamps.


-
Heheheheheh.... Macgyver.... hehe... Thanks, fishx!! Will post when they arrive and are installed.
-
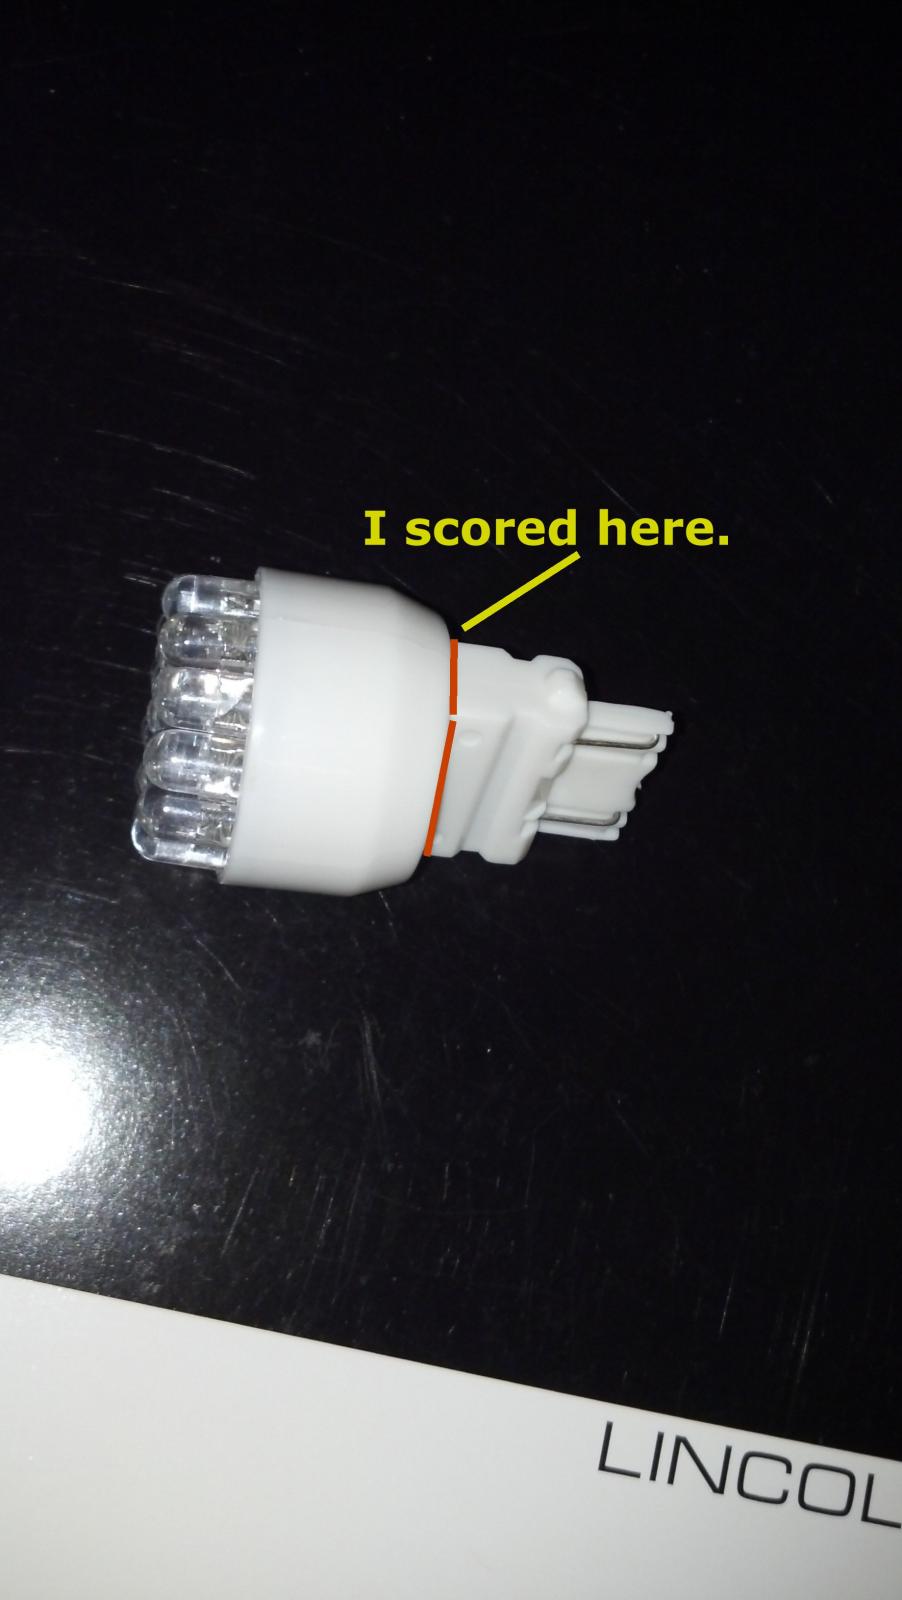
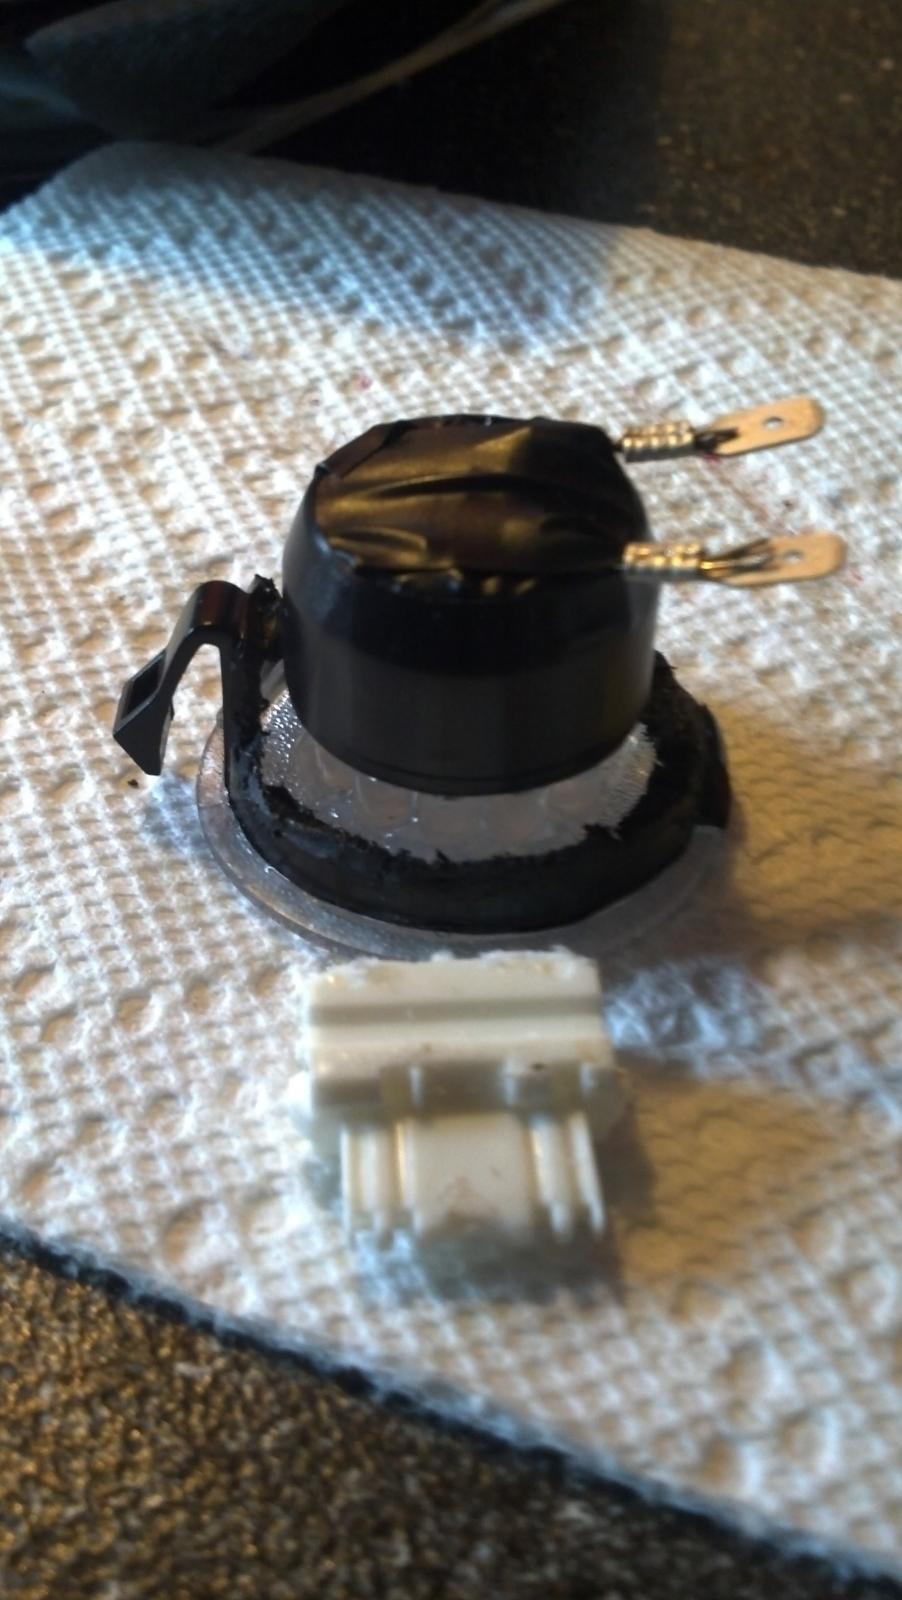
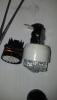
No argument perceived, and I think yes, you've got what I did. I was drawing the distinction because, when I did the first trial with the "usual" procedure using LED festoon bulbs, I used a serrated steak knife to score and eventually remove the clear lens from the black "socket"... whereas here, as you said, I cut the black upper half of the socket in half. The focus was to remove all of the "socket" except for the mounting tabs. By way of follow up to my earlier post, the passenger side is now in... removing the extraneous part of the bulb base was successful in reducing the height of the new assembly to fit with the limited clearance.... All that said and done, I will probably re-do both sides now...hahahah. The talk here of SMD type LED's has me regretting that I did not use that type of bulb... so I have ordered a new set of TAILLIGHT bulbs on that auction site... these are still very similar to what I used above... but have 22 SMD LEDs per bulb... my hope is that they will be even brighter (I have insight into the fact that I can get a bit obsessed). When they arrive and I make the change out, I'll repost. Here's the new bulbs I've ordered.
-
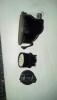
I hope the pics are clear enough on what I used. The others I have read on here used a festoon bulb same size as stock. I used a TAILLIGHT bulb. Festoon LED bulbs have 2 or 4 LED's. These have 19. I had bought a set of lamps, done the festoon bulbs, but was dissatisfied with the brightness. Also, I did not remove the lens, as in the procedure for replacing festoon bulbs... I cut the lamp in half, keeping the lens attached to the mounting tabs.
-
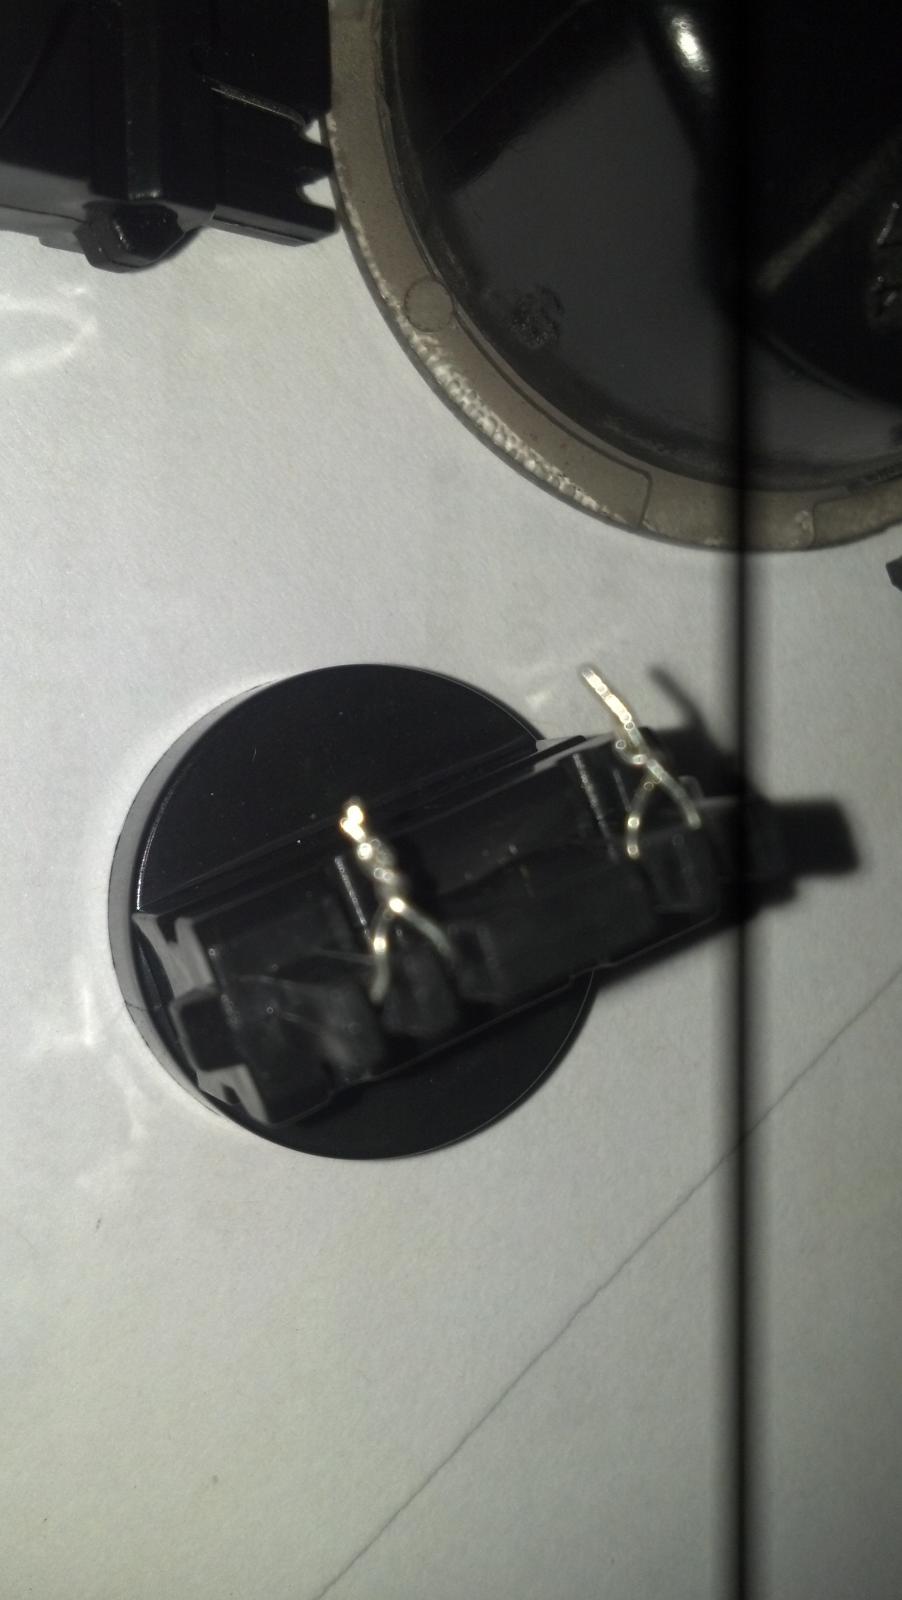
IMPORTANT UPDATE: Ok, my silicone finally set and I went to install the passenger side puddle LED lamp... TOO TALL!!! Apparently, the mechanism inside the mirrors are not mirror arrangements of each other, and there is not enough clearance on the passenger side to accept the assembly. The fix for this was to remove the base of the bulb. I took a chance that the contacts/wires in the bulb base are extensions from the LED electronics which were HOPEFULLY all located in the base of the bulb. So, I took the Dremel tool and scored the base of the bulb and broke it off. I was right, all the electronics are in the bulb part, and the base was just a plastic extension. Here's where I cut. Then I taped over the hole that was left, and crimped on new space connectors.... here's the finished product. I had to re-do the silicone, so I have not fit it into the car yet, but it is significantly shorter, and I believe it will fit... will post tomorrow when I'm sure.