fit1446
-
Posts
343 -
Joined
-
Last visited
-
Days Won
9
Content Type
Profiles
Forums
Gallery
Everything posted by fit1446
-
 Yes And bright AF
 -
No worries, I do still have my edge. Although my audio system has been loooong upgraded and nothing is factory anymore. As far as the signal, you have to pick it up after the factory amp unfortunately. The signal pre amp is useless. I will say I didn’t have the Sony system I had the audiophile system which had an 8” sub under the passenger rear quarter trim. I think the Sony system has like 11 speakers or some shit like that? But I’m going to assume that similar to mine if you are adding an amp which I assume that’s what you are doing. You must get the signal after the factory amp then I would use like an lc7i or some sore of dsp. Then into your amp that your adding. If you need anymore help go over to the Facebook group FEWW. Ford Edge world wide. I don’t come into this forum much and I’ll get more notifications in the group. Absolutely hilarious… I thought this was directed towards me… it’s not even my post??. Sry to whoever asked the question I didn’t even look at who the OP was. I had gotten a notification and assumed it was one of my old audio posts. My bad.
-
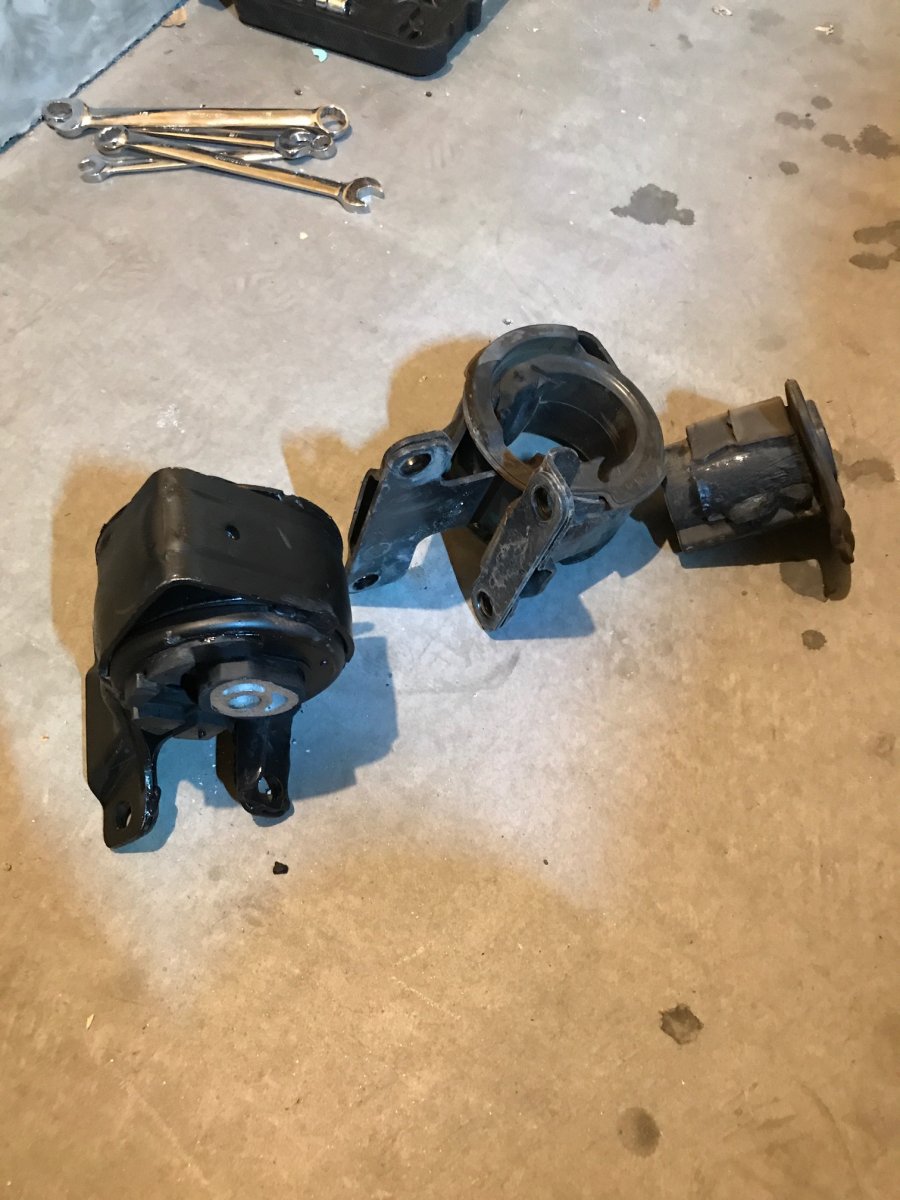
It is def something you can do yourself if you have any basic mechanical skills. Just support the trans using a hack and wood block. While the mount was off I did manipulate the height to access the bolt in the back of mount. It is a tight place on that one bolt but it wasn’t difficult it was just time consuming. That particular mount took me 2.5 hrs and the other 2 mounts were simple took about 1 hr each. I highly recommend getting a 13mm box E.N.D. ratcheting wrench.
-
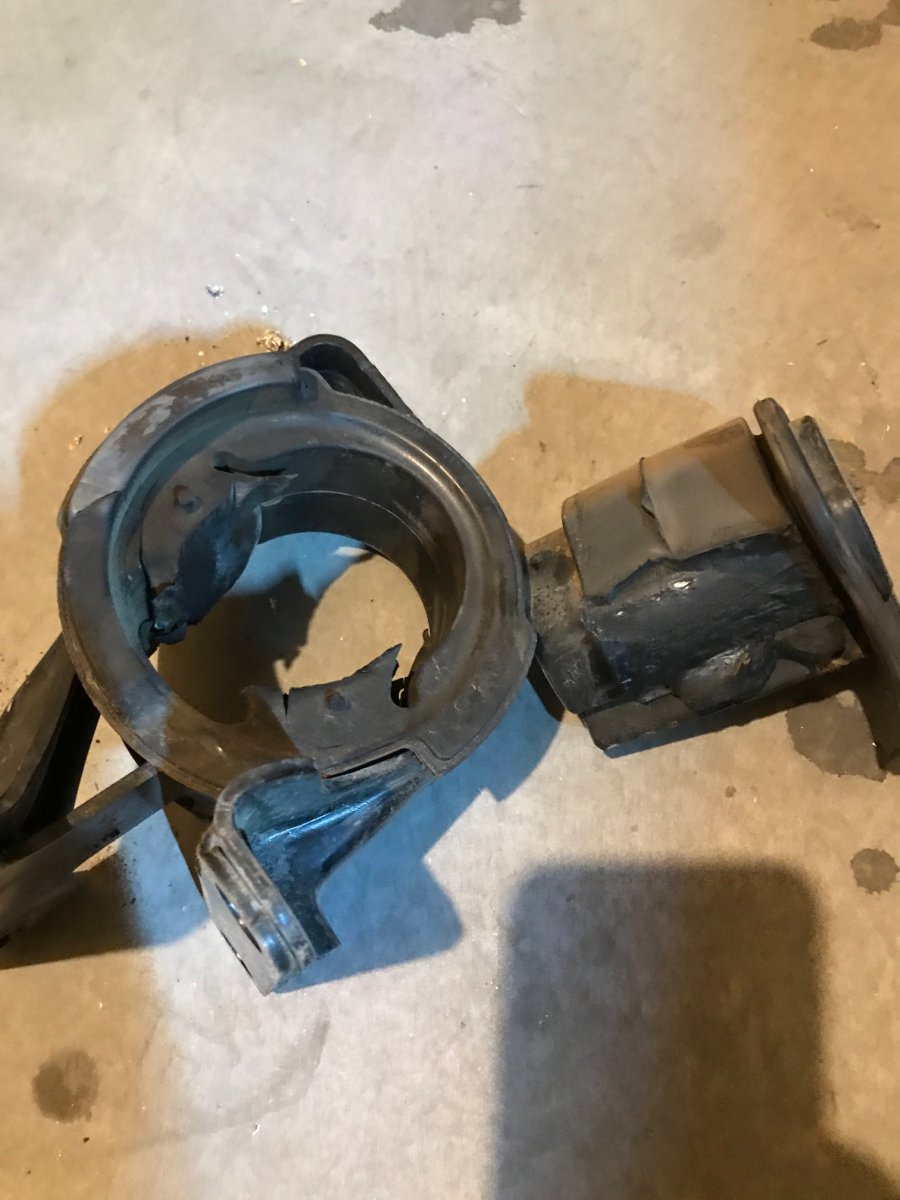
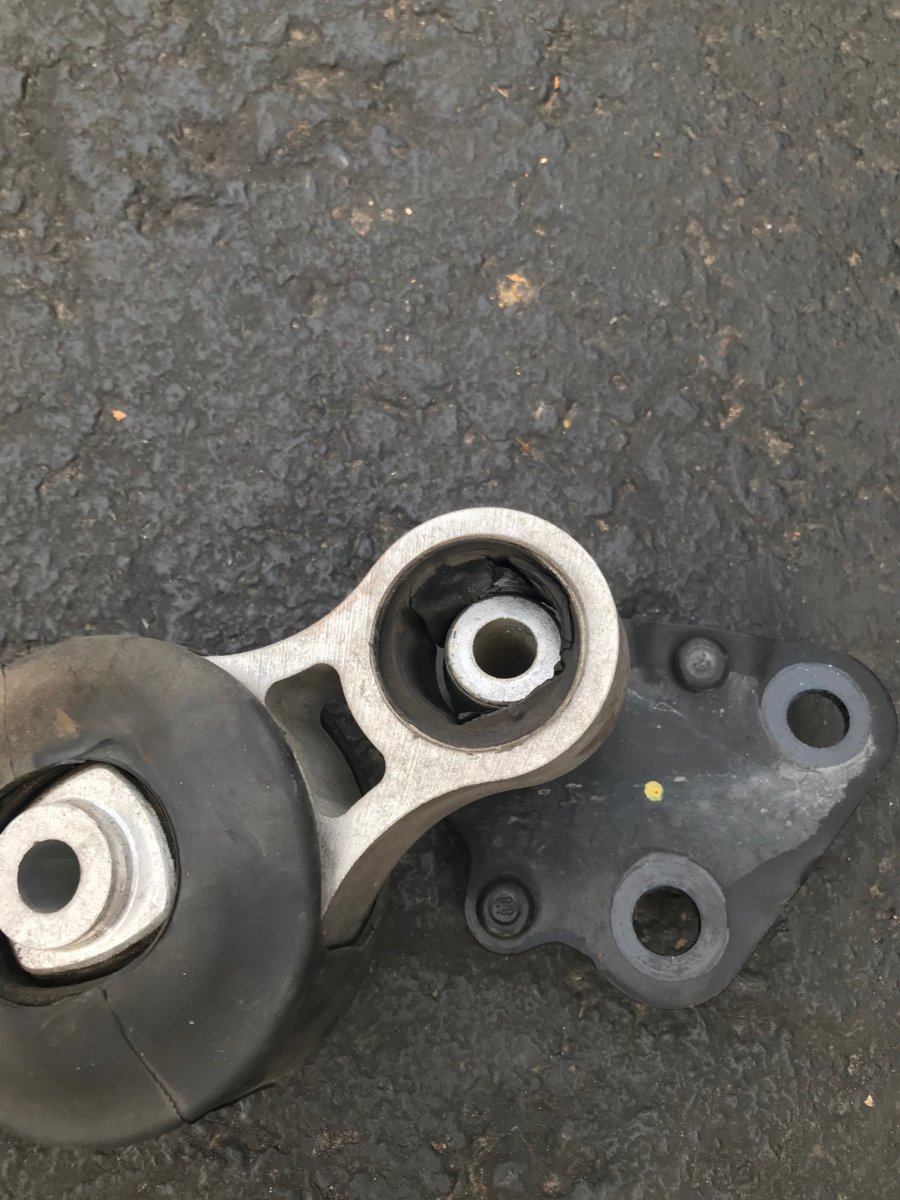
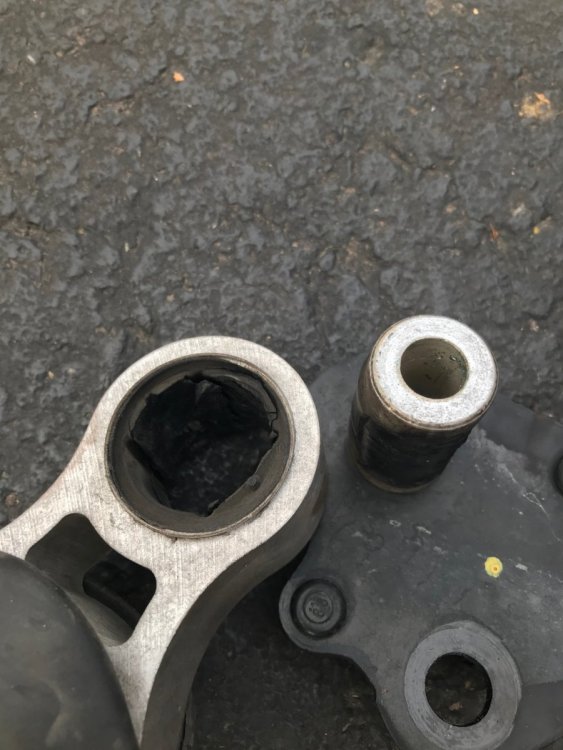
2010 edge. edge runs great and always has. i take care of it and it has treated me very very well. ill admit i have driven my edge hard,at one point i did spray 100 shot of nitrous but only for a short while and then removed the system. i have had this annoying vibration at idle when in gear,to the point i felt like it was going to die at times while stopped at a light. i proceeded to go tghru the basics first..plugs/cleaned throttle body,i do have the ability to monitor computer function thru a couple software programs i have as well as data log with my sct device. i changed the bank one o2 sensor and none of these fixed the issue. i moved to mounts..the gen 1 and 1.5 have 3 mounts. transmission torque mount which is located under the vehicle you could say on the driver side..ive listed the picture of that mount below. it was completely seperated and i felt for sure this was it..i installed the new mount and it did not fix issue.although i could tell a noticable difference when selecting gears and how much movement i could feel in motor/trans. i then went to the motor mount located on the passenger side next to the coolant overflow tank. this mount was pretty worn but nothing extreme. after install nothing changed. very frustrated at this point. there is one more mount which is titled a "transmission mount" located under the battery box on driver side. i hadnt replaced this mount yet because i felt its purpose and location it couldnt be bad after 80,000 miles......well....i posted some pics of this mount below as well... needless to say,this mount was the main cause of the vibration. after installation the vibration is compoletely gone.so if you are dealing with a vibration issue at idle this is my experience. hope this helps a gen 1 or 1.5 owner in the future.. side note..the first 2 mounts were extremely easy to replace. this trans mount is in a tight spot and i highly recommend you get a 13mm box end ratcheting wrench. and have some patience. not hard just awkward and slow considering ford put enough locktight to hold the bolts solid forever.


-
What have you done to/with your Edge/MKX today?
fit1446 replied to WWWPerfA_ZN0W's topic in Accessories & Modifications
yes,yours does have a single fan. if it wasnt running im pretty sure youd know because that thing would be overheating... -
What have you done to/with your Edge/MKX today?
fit1446 replied to WWWPerfA_ZN0W's topic in Accessories & Modifications
the module on the new assembly i purchased was wired differently to the fans. the ford module has 2 seperate harnesses one to each fan..the assembly i purchased has one harness out of the module and it splits to both fans. i however def agree that purchasing a motorcraft assembly is best. i unfortunately had to go the inexpensive route this time as i had multiple things to replace. -
What have you done to/with your Edge/MKX today?
fit1446 replied to WWWPerfA_ZN0W's topic in Accessories & Modifications
wow..... your really good at that shiny paint stuff. are you a painter? -
What have you done to/with your Edge/MKX today?
fit1446 replied to WWWPerfA_ZN0W's topic in Accessories & Modifications
super easy... i removed the air box / there are 2 bolts holding the fan assembly in place ( i beleive 8mm). can reach them both easily.disconnect the plug from the fan module and remove the whole assembly. it is a little tight to get out, and also recommend removing the oil dipstick before you attempt to remove the assembly. i broke mine and have new one ordered. there are a couple youtube videos online. have to lift on the driver side of the fan assembly and kind of slide up and out. its tight but not difficult. when you put the new assembly in make sure it is slid into the tabs at the bottom. i got fan assembly from amazon for 145.00 -
What have you done to/with your Edge/MKX today?
fit1446 replied to WWWPerfA_ZN0W's topic in Accessories & Modifications
Havnt posted in the forum for a while... Been putting off some important maintanance for to long just due to this crazy summer here in Az. its been consistantly over 112 degrees for a couple months. saw a brake in the weather ..it was only 100 today so i thought id tackle some things. my A/C has been overheating when stopped and forscan had a code that the module had failed. replaced fan assembly first this morning. only casualty was the dipstick handle..should have pulled it out before maneuvering assembly out. have had a knock from the passenger side suspension when going over bumps and could feel the noise in the floorboard. replaced lower control arm rather than pressing a balljoint. honestly makes no sense to not just replace the whole control arm..it takes about 30min and the cost of a moog arm is like 100 bucks. driver side cv axel blew apart a few weeks ago and covered the wheel and and suspension parts with grease... replaced that cv axel and suprisingly it was an easy one. all said and done i spent approx 5-6 hrs total which isnt bad considering i didnt have a lift and i used hand tools. feeling accomplished for sure. -
Another Edge with soft pedal after replacing booster
fit1446 replied to fit1446's topic in Brakes, Chassis & Suspension
probably the abs module...it is down below the master cylinder.requires access to abs bleed option with a diagnostic tool. i can get into it with forscan but it would be a task to do it by myself. i have a strong feeling that there is a valve stuck open in that module. -
Well,looks like im another Edge owner left to throw parts at the braking system to try and figure out why i have no pedal.2010 edge. pedal was super hard so replaced booster. of course the brake switch plunger didnt come back up so had to replace that too. but now i have the INFAMOUS.... "brake pedal is soft and continues to the floor" could it actually be the master cylinder? or am i destined to throw money at the obvious causes of a soft pedal only to find out it may be an abs issue... wheel speed sensor,caliper not functioning properly, air stuck in the abs module...i took it out yesterday onto a gravel road to engage abs several times. didnt change anything. i have been reading threads now for an hour and watching a couple youtube videos...i have forscan so i have the ability to do an abs bleed,although im contemplating letting the dealer do it just because i know its a huge pita to do it by myself. pretty sketchy driving with a shit brake pedal. anyone want to be the pedal pumper?
-
I no longer have this in my edge. I built a custom fiberglass enclosure that fits in factory location. It holds a 10W6V2. The enclosure I modified was sold to a member of Ford Edge world wide. But to answer your question on sound.. when I modified the plastic enclosure I was using an LC7I and cant remember what amp? Its been a while and Im old? it sounded good not great. 100 times better than the factory set up.
-
Cold air intake or just K&N for better fuel economy?
fit1446 replied to rltrbill's topic in 2010 Edge & MKX
So your saying that through your experience you calculated a 3mpg increase. All be it realistic or not.. this was your "experience" correct? -
Nick, this has to be the same guy...
-
Poof... he has disappeared
-
Making hp is the easy part. Open your wallet to get it to the ground reliably.
-
Can you give us a list of the mods you plan on doing when you start the build?
-
Nice
-
Cool
-
I am not positive but you may be able to change through forscan in the module. if not you def have the option of turning easy entry off
-
Any Ford Techs ? SASM code knowledge needed.
fit1446 replied to fit1446's topic in Brakes, Chassis & Suspension
Got it figured out. Ty to the thousands of members for the help. :-) -
Any Ford Techs ? SASM code knowledge needed.
fit1446 replied to fit1446's topic in Brakes, Chassis & Suspension
bump -
Forced 08 Edge Vista roof closed uhoh!
fit1446 replied to Dutchharleygirl67's topic in Forum Help & Site Suggestions
you need to open the glass back all the way,clean and lube tracks.i personally at this point would remove the glass.i have done this personally several times on my gen 1.if you need help..bill trammel has a fb group called mactforedge. he has made several videos on youtube one of which is on removing the vista glass and cleaning all parts and lubing. then u need to re initialize to set correctly in track. -
I have a dtc that sets upon movement of about 3-5 feet. Doesn't matter direction forward /reverse. Abs module and sasm both store DTC's that are not present at time of connection to forscan but store in modules. Hoping someone can advise on further troubleshooting to confirm module replacement or speed sensor failure. Ty in advance for any help. I have more specific symptoms I can give if it will help