Edgingage
-
Posts
229 -
Joined
-
Last visited
-
Days Won
1
Content Type
Profiles
Forums
Gallery
Everything posted by Edgingage
-
Hi folks, 2011 SEL here: We all know that, during daytime, with lights knob selected to automatic, the headlights AND signature/vertical/"fog" lights dim while driving. I've heard/read some comments stating the signature "fog" lights go to 50% and other comments stating they go to 70%, but it's not always clear to me if they're referring to luminosity or actual voltage. Does anyone know what's the actual voltage these lights dim at? In other words, and specifically, I would like to know what's the minimum operating voltage the signature/vertical/"fog" lights get when operating in dimmed mode. Your info is very welcome and greatly appreciated in advance.
-
Help finding side window deflectors
Edgingage replied to Gregertech's topic in Accessories & Modifications
I took a shot at this car (sorry for my quick crappy picture). Vent visors WITH chrome accent! I had never seen them before. Had anybody?.thumb.jpg.9be66b2528c7efb6c05df463fb9c492f.jpg)
-
2011 - 2014 Ford Edge Light Bar
Edgingage replied to dfreeman332's topic in Accessories & Modifications
DFreeman (and all), I'm VERY interested in your above statement regarding the so-called DRLs (a.k.a. signature lights, "fog" lights, vertical lights, and the like). You say your kit LEDs's "intensity increases when the headlights are on;" I have read several threads/posts here and my understanding is the other way around: DRLs are full intensity during daytime (when headlights are automatically off), but once the dusk hits and the headlights automatically turn on the DRL bars intensity decreases about 30%. From what I've read, Ford made that function intentionally to avoid those vertical DRL bars blinding the incoming traffic. Now, my question, where I need your (and maybe others's) help is because I'm buying a set of true fog lights (low lumen, wide horizontal angle, narrow vertical angle) with the intention to replace those vertical OEM DRLs. Basically, I want to unplug the vertical DRLs and use that powered connector to power the true fog light horizontal bars I'll be installing. But, if they will dim when the headlights are on, then the fog light purpose is defeated. That's why I'll appreciate it if you (and/or anybody else) could please explain how to connect/wire the vertical DRLs to increase (or maintain) luminosity when the headlights are on. I need to be able to achieve the same result on my fog light bars. Thank you all in advance. -
I found them on eBay, ...ready to ship Thank you all.
-
Yes, Prairieedge, please post. I'm particularly interested in the interior lights as there are three-four different measurements (lengths). Thanks in advance.
-
Uff... I already had a set of Diode Dynamic ones in the cart when I found out they do NOT ship to Canada!!! Uff... Disappointed .
-
Enigma, oh boy lol, that one looks even closer to what I want... Just two-three things I need to find/figure out about the Diode Dynamics ones (they don't have posted all dimensions, picture of the back side, neither illustration/instructions of the mounting). I'll browse around both brands. Thank you both for your infos!
-
Ho ho, Perblue, thank you! Very close to what I was thinking about. I already browsed several other of their products and wow, that looks like fun to decide... The only thing with those Stackerz (in my mind) is the depth: I had been looking at some with 2.4" depth; now I have to reconfigure ...my head around lol. But they also have some flush mounted ones... A few to look, think and choose around. Thanks a lot!
-
Hi folks: I like "old" fashion lol. I've spent hours and days intermittently searching the net for actually real amber color LED fog light bars or pods, preferably 5" long max. What I've found is that even the ad tittle calls them amber in reality they are yellow, yellowish, even greenish led light bars, not only when you look at the customer's pictures but also thus reported by some customers themselves. I also know there is an important difference between fog lights and flood lights: the beam pattern. But I'm not going to get too picky... If any of you could please point me in the right direction for real amber color led light bars or pods, I'll greatly appreciated. Real dark yellow or orange color would do the trick as well; the closer to the side/parking markers color the better. Thanks in advance.
-
Onedge, I think those are the switchback type (built-in turn signal) and I think they have some kind of different wiring... I'm looking for some kind of simple stock straight replacement but much brighter and plug & play type, without different wiring, just basically a brighter replacement. Just checking with you folks IF someone has seen something like that in the market... Thanks anyways, appreciated.
-
Hi folks: For a 2011 SEL: I searched the forum for DRL and came back empty (weird). I'm pretty sure this subject may have been almost exhausted... I'm wondering if anyone knows of brighter, much brighter, much much brighter LED lights straight replacement (plug and play) for the "signature" bumper lights? I know there're some switch backs around but I'm just looking for brighter DRL LED lights there, without extra wiring complications, again, just plug and play. Please let me know if anyone knows. Thanks in advance.
-
Aftermarket headlights
Edgingage replied to samxander's topic in Glass, Lenses, Lighting, Mirrors, Sunroof (BAMR), Wipers
Found it! Thanks. -
Aftermarket headlights
Edgingage replied to samxander's topic in Glass, Lenses, Lighting, Mirrors, Sunroof (BAMR), Wipers
Enigma, according to EMassive website those assemblies are Certified DOT SAE Compliant. See picture attached. Samxander, did you get them? Please post your experience with them if so. Znow, could you please tell me where to find owner's feedback on those light assemblies? I don't see any feedback in OEMassive website. I'm interested on them, but I need to know how/if they really work well. For instance, I wonder if the auto-dimming function is lost or still captured as I don't see the photocells in that casing. Bulb types seem to be different from originals but which types this assembly takes? Anyway, lots of interest from my part, but lots of questions to get answers first. 100% Legal Reflector: Highly Reflective Amber Reflectors provide a safety feature giving the vehicle a OEM style presence and are compliant with DOT and SAE standards.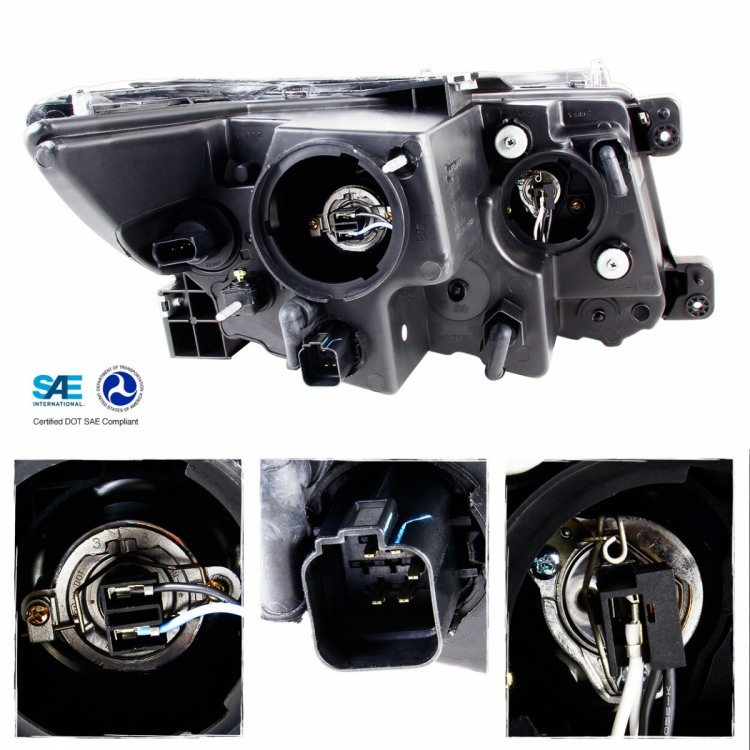
-
Problem fixed quick and easy (after watching the video ). Latch was originally set at its lowest point, there's about 1" vertical range, I found a sweet spot in between and then fine adjusted it with the rubber bumpers. Nice to be able to gently push the hood down now (no more slamming!) and still remains nicely tighty. Thank you all.
-
I found this video (link below), it's the reverse problem (hood a little too loose) but it's very similar to what I want to do. I'm going to give it shot. Thank you all.
-
Hi Enigma: Latch is fully lubricated, I do it twice a year. If I adjust the bumpers any lower then the hood gets misaligned with the edges, it goes too low... I guess this could be considered a genuine factory defect then, I'd say... It's too bad, too late. Thanks Enigma. Edit: I just screwed the side rubber bumpers all the way in as far as they can go and still I can't close the hood by pushing it down. There're two rubber bumpers at front but they're not adjustable. Do you (or anyone else) know what bad thing can happen if I loosen those two bolts holding the latch? Please let me know your guess. Thanks again.
-
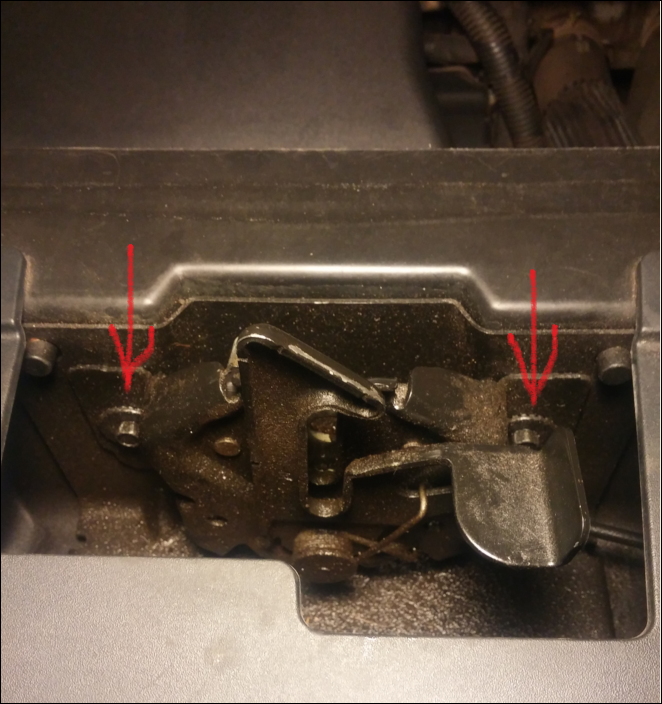
Hello folks: I need your advise on this issue: hood not closing shut unless letting it go from higher up. First I should mention it's not a new issue, it was happening since I bought my car (used). But I now noticed it's been slowly and increasingly bugging me, and I would like to fix it, IF possible. Here's the thing: I cannot close the hood shut by letting it lay down and then push it down, it will not close, no matter how much force to put on top, it won't close (period). So, the only way to close it shut is lifting it up (I'd say to about 2 feet) and then suddenly let it go so that the speed by the gravity weight will make enough force to shut it down. I have adjusted the rubber bumpers; that doesn't make any difference. Please see attached picture as a reference for what I want to ask if it's possible to do: I think I'll have to adjust the actual latching mechanism, but if so I'll really need your help or advise. Taking a look at it, I see three springs there. I assume that I least one of them (if not all) is under high tension. I also see a couple of bolts back there and those are what I hope are adjustable, but I'm not sure as I can't see from behind (it's closed) and I'm not sure if there are vertical openings behind those bolts (or just circular openings). IF there are vertical openings behind the latch I think I should be able to raise the latch. Right now, the (first) safety latch engages properly, no issues there, but the second latch below doesn't engage unless with significant gravity force. If I'm able to raise the latch mechanism high enough I hope that the second latch will then engage with the simple gentle push of the hood down. Am I correct? Please let me know if I could safely loose the latch mechanism to raise it up. Any advise on the side is greatly appreciated in advance as I don't want to mess around with something I don't really know how it works. Thank you all.
-
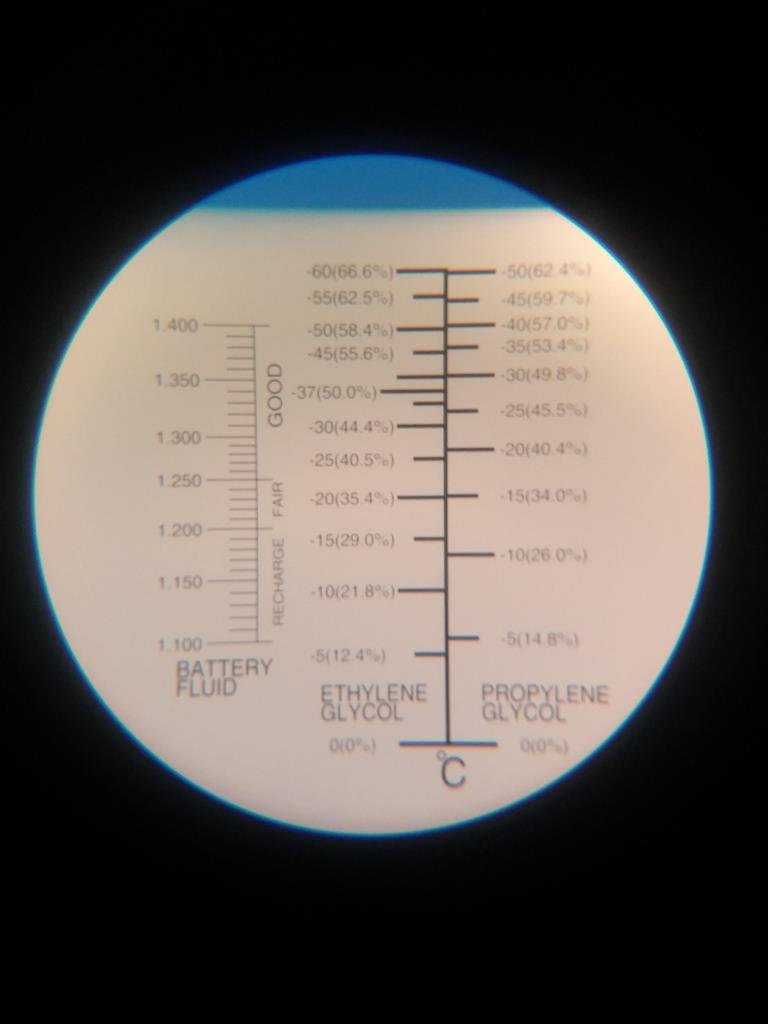
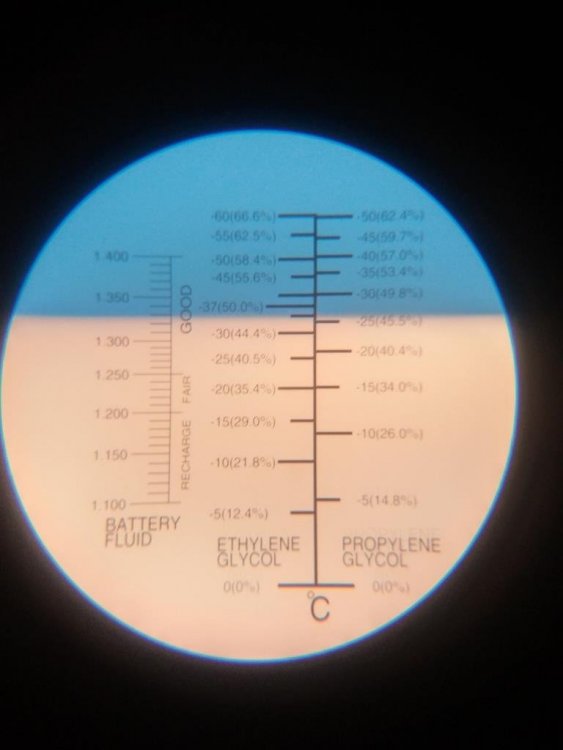
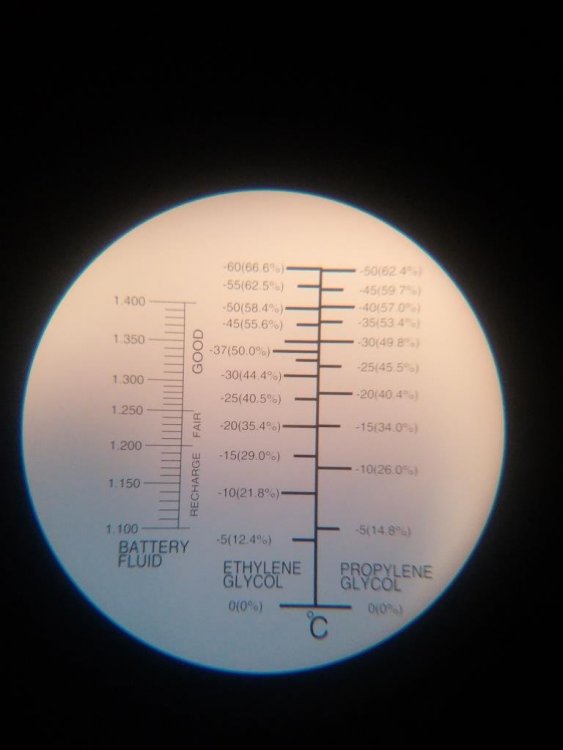
Enigma, just for all to be on the same page: the new coolant "official" color is not green but yellow, even thought it does look green, and even though the designated letter at the end is "G", I know . Also, my dealer refused to do a chemical flush on mine, even after they admitted refilling the system with the wrong VC-5 coolant in. As I reported before, they told me not to do a real flush "...because some old engines have had some hick ups after that..." I also asked them what "treatment" then they will do/did and they also refused to tell me... All I got was the invoice for the use of three gallons of factory-diluted VC-DL13-G free of charge, that's it. Now, even though this appears to be a "local" issue, I just want to share my "investigation" with you all, and I encourage you to share your opinions or conclusions, whatever you think it happened, feel free to comment, please. To help you interpret the below results correctly: the blueish optical field represents water content; the whitish optical field represents non-water content (coolant as ethylene glycol in these cases); the horizontal line dividing the two optical fields is the actual reading (result): 1.- Picture # 1 shows the water content of a sample of just pure water (pun intended). This sample is important for checking the instrument calibration before you take any further samples. It must read 0 (0%). The first number is the sample freezing point in degrees Celsius. The second number (between brackets) is the percentage of coolant (ethylene glycol %) in the sample. 2.- Picture # 2 shows the water content and percentage of the wrong VC-5 coolant "mixture" the dealer put in the system. I'd really like you all to pay close attention and analyze this picture: I took this sample just before I drove the car back to the dealer (yap, like forensic science, my favorite TV genre ). Please keep in mind that when the dealer put the wrong VC-5 coolant in I got invoiced for only one (1) gallon of concentrated VC-5 (plus labor and taxes). The dealer told me they diluted it with tap water 50/50 and the invoice also shows they checked the mixture good for up to -40 degrees (Celsius). 3.- Picture # 3 shows the water content and percentage of the 50/50 factory-diluted VC-DL13-G coolant. I took this sample right after they replaced the wrong coolant and I drove the car back home. 4.- Picture # 4 shows the water content and percentage of the concentrated VC-13-G. I went back to the dealer a few days after and bought a gallon of concentrated VC-13-G, just to complete my "investigation" I'll never forget the phrase the service person told me to make me aware that the new coolant color is similar to the wrong coolant color: "... because I know you're going to look under the hood..." Consumers BE AWARE: please look under the hood Thank you. Picture # 1 - pure water Picture # 2 - wrong VC-5 coolant dealer-diluted w/ tap water 50/50 (?): Picture # 3 - correct VC-DL13-G coolant factory-diluted w/ distilled water 50/50 (!): Picture # 4 - concentrated VC-13-G coolant:
.thumb.jpg.5dc20a84f64df22ee5f4f2a8e7769219.jpg)

-
Prairieedge (and everybody), please report back when you get good turn signal switchbacks properly working without resistors. I've been looking for them for a couple of months already; even the expensive ones are calling for resistors, which I resist to use lol. Please let us know. Thanks in advance.
-
That has happened to me while trying to open other PDF docs and I had to download and install the Adobe Reader standalone in my device (computer and/or phone) to solve that problem. Try that. Edit: and once installed make sure to check it as default to open PDF docs. There's a fierce competition out there lol.
-
Ford Canada agreed to replace the wrong coolant; town Ford Dealer didn't agree to use other than tap water. I even offered to bring destiled water in at my own expense; denied. The point (I think) is who/how that gets enforced, checked, audit by? 2011-2014 Edge water pumps are notorious for failure. Ford engineers get the blame;. I wonder who are really to be blamed for poor, inadequate, substandard maintenance practices which could actually very well provoke the pump failures, not it's design and build. And I don't know how it is where you folks live, but here Ford and Lincoln is the same dealer/owner. So, I'll expect no different treatments/procedures if I go to Lincoln Canada... You don't even want to know how much the Lincoln Serv Rep knows about Lincoln vehicles here, don't get me there... That person has been working as Serv Rep for more than 20 years, but when I made a comment about the newly redesigned Aviator that person had no clue it had existed before... Anyway, I'll continue sticking with you folks here for me to continue learning how to do things in my vehicle by my own, at least the ones I'll dare to tackle. Million thanks to all in advance.
-
Aftermarket headlights
Edgingage replied to samxander's topic in Glass, Lenses, Lighting, Mirrors, Sunroof (BAMR), Wipers
I just would love to see/learn the DRL wiring AND FUNCTIONALITY for those headlamps. And also as importantly to know if those headlights really produce much better visibility than the not-that-good OEM projector type. Would the high beam also activate through a shutter up and down to produce longer (upper) visibility but not really brighter visibility? And last, in the oemassive website I don't see clarification if the price is for only one unit or for the kit of two units. It doesn't say right or left unit so, I'd assume the price of the kit... They look good, they're tenting...; but would they actually work (illuminate) better than the stock? -
From 856 CCA to 826 CCA in 10 days - brand new battery
Edgingage replied to Edgingage's topic in 2011 Edge & MKX
Sorry Ron, I checked the battery voltage and it was reading 12.46V, I thought it was fully charged, I didn't know there is a difference between fully charged by the car or by a charger.... I also knew that the ambient temp was about the same both days... I'm learning; now I know better. Thank you and others, sincerely. -
From 856 CCA to 826 CCA in 10 days - brand new battery
Edgingage replied to Edgingage's topic in 2011 Edge & MKX
Hello WWWPerfA_ZN0W and all: I started your experiment (charging the battery first time with the ignition on), but I interrupted it (I got too chicken lol). Two-three things happened during the first 4-5 minutes that I wasn't expecting or I just don't know enough, adding to a couple of other things that I didn't get clarification before hand, and therefore I didn't know what to expect: - Firstly, I don't know if all the accessories (climate, radio, lights, etc) needed to be on or off with the ignition on. The dash panel was lighted with the check engine light on, and the console panel was also lighted with climate, radio, gps and phone searching on. Headlights were also on (automatic). So, I just don't know if they all needed to be on as well, or all off. So, I switched everything off but with the ignition still on. And with the ignition on I couldn't lock up the doors (I pressed the door bottom down but after 1-2 seconds all doors unlocked again). I tried a couple of times with the same result. So, no, with the ignition on the doors can't be locked up. - Secondly, there was a constant high-pitch sound coming from the engine compartment, I guess it's the computer either waiting for the car to start or ...I don't know. It's the same high-pitch sound you get when you press the start bottom but don't start the car. The difference is that when you press the start button but don't start the car that high-pitch sound eventually goes away after about 1 minute. It didn't go away during the 4-5 minutes your experiment lasted. lol. - Thirdly, as that high-pitch (computer?) sound didn't go away, I was afraid that the computer may fry. I switched the ignition off, sorry (the noise went away). Now, during all that time (about 4-5 minutes) the charger progression bars were not increasing as an indication that the battery was actually getting progressively charged. In other words: with the ignition on, apparently the battery was not maintaining/increasing enough charge, it looks like the ignition was draining about the same current the battery was getting from the charger. The reason I think so it's because as soon as I switched the ignition off, the charger progression bars started to increase, indicating that the battery was increasing its charge. I had the charger selection at 7A/12V. I initially (by mistake) almost put it on the recondition mode at 14.4V!!!; everything would have gotten fried, I believe :( I also want to tell you that, before I initiated this experiment, I checked again the battery CCA and it's reading 856 again. So, I think you and others were right regarding the way I was taking the measurements. Probably I didn't have the clamps/clips well positioned when I got the lower reading, and therefore I DO sincerely apologize about that (that was the main reason for this tread). I should have done what I learned some time ago: measure TWICE! (cut once lol). Now, if you could please clarify about the accessories and headlights (on or off), and also about the high-pitch sound/noise cause, and you think I should still retry to recharge the battery with the ignition on, just let me know, although you also told me I should do it the very first time I'll charge the battery so, probably I shouldn't try any more. Just let me know what you think when you can. I thank you and everyone very much. -
Never mind my comment; deleted. Thank you.
.jpg.2cfb4f22d81b3de726ec3aa6102cd721.jpg)


.jpg.e47cd436eac8ef7adf60a075c5876465.jpg)