Edgingage
-
Posts
229 -
Joined
-
Last visited
-
Days Won
1
Content Type
Profiles
Forums
Gallery
Everything posted by Edgingage
-
Hi folks: I have the same model: 2011 SEL (3.5L V6) just around 122K miles, and I'm sorry (and of course worried) about what happened to PrinzII, ...twice! I wonder: Is there any preventive/preventative maintenance that can/should be done on the A/C compressor? I'm noticing when mine is on cycling, it engages a little bit longer every cycle, I can see (measure) the voltage going down with every cycle (idling, of course), "eating" up the battery voltage. I spent quite some time observing the compressor going on and off, and I got the impression that it has to work harder, longer, drawing more current on every cycle coming on. I tried to lubricate/dress the belt going around (outside) the compressor, but I couldn't find an open spot to get to it (I did lubricate the main engine belt, with belt dressing). Any thoughts, suggestions, advise to help prevent the compressor to going out, or even to run smoother? Thanks in advance.
-
*Click* Noise when accelerating from stop
Edgingage replied to FordSELEdge's topic in 2011 Edge & MKX
Update, (...and "new" click?): - Front brakes were serviced: new pads and calipers/sliders/pins greased up. After this work was done the the sharp sidewise rapid oscillations on the steering wheel went away; no noticeable side pulling anymore either. It may have been caused by a front caliper getting stuck... Now, some other "click" apparently new, or at least I didn't notice it before (and I pay attention to my car's "music tones"), but the fact I'm noticing it now makes me believe it's a new click: - When I'm parked (on flat, not inclined surface, car not freely rolling/moving in neutral, no pressure on the gear, engine on) and I pressed the brake pedal I can hear a clear distinctive mildly loud "click" (rather grave/low pitch "clock" sound) coming from the console under the shift handle, every single time I press the break pedal, even if it's just a soft touch to the pedal. I know there is a safety mechanism there to lock the shift when in park, but I don't recall having heard that click every time I pressed the brake pedal but only when I went to disengage, release the shift from park. Is that normal? I didn't want to start a new tread just for this new "click", but probably I should. Please feel free to let me know. Thank you all. -
Fuel consumption - L/100Km or the equivalent MPG
Edgingage replied to Edgingage's topic in 2011 Edge & MKX
Update: fuel consumption is back up worse now, up to 15.4L/100 KM (15.3 MPG)... ? WWWPerfA: just to refresh my previous answers, and detail a bit more: - no oil consumption issues at all. I changed it in May and it's now due up, and I just checked the level and it's in between the two holes in the oil stick (at 45% life showing in the instrument cluster panel). I'll change it soon anyway. - I've attempted twice (in different occasions) to get to the throttle plate to check for oil residue there but I get stuck at front, at the beginning of the procedure: I can't find a way to release/disconnect the clip attaching the sensor to the plastic air intake casing coming out of the air filter box to connect to the throttle plate, and for that reason I can't remove the whole plastic air intake casing to uncover the throttle plate... ?. I'll try harder this weekend. - plugs were replaced on Oct 18, 2016 at 154K km (~96K miles). It's now at 195K km (~122K miles), plugs have only 41K km (~26K miles) on 4 years now. There is no hesitation or lost of power at any time. I'm trying to avoid replacing the plugs again if I don't know they're the culprit... - engine coolant replaced (drained and refilled twice) on Oct 02, 2017 at 163K km (~102K miles). I just got an appointment to replace it this coming Tuesday, Nov 24 again, but I'm not really sure if it's needed again so soon as it has only 32K km (~20K miles) on it... Should I? I wonder. - trans fluid replaced on Oct 12, 2017 at 163K km (~102K miles), only 32K km (~20K miles) on it now. I was thinking to also replace it again but ...shifting is REALLY SMOOTH and responsive all the way up and down (love it). I don't think it's needed again yet so soon... Do you think? - standard variables are all ok: driving mostly empty all the time (just my 180lb added lol), tire pressured checked monthly always ok at 35 psi, fuel quality very good (I've actually being feeding it with 89 octanes now that the price went down lol), driving conditions have been always the same: special operation. But those have always been the same special operation driving conditions since I bought it three years ago, but then it was doing around 13L/100 km (~18 MPG), ...and I was very happy with it lol. - all four brakes are now serviced: new pads, and caliper slider pins and boots all greased up. Same stock rim and tire size: 245/60R18. I need to find the proper way to disconnect that sensor without breaking it, to be able to remove the whole air intake casing to uncover the throttle plate. The problem may remain there, as you said. ...But the fact that it's hardly consuming any oil makes me hope that's not the problem. I'll try again. ...And I have seen a couple of YT videos on how to remove the air intake to get to the throttle plate; I just don't seem to be able to release that sensor connector to get everything out of the way... I'll try again this weekend. Thank you all in advance for your opinions, suggestions and advice. -
Hello folks: I have a somehow similar issue: very sporadic gas smell inside my 2011 FWD getting to the 200K (125K miles) mark. Now, "my 2012 edge" if you don't mind to clarify, please: in your very first (original) post you said that you "...already changed the ... front valve cover..." but you were still smelling gasoline in your cabin. But in your very last post you said that the smell went away since you "changed the valve cover" (the same thing?). I just want to know if you changed something else other than the valve cover when the smell went finally away, please. Thanks.
-
Tire sizes and Actual tire surface contact patch width?
Edgingage replied to Edgingage's topic in Wheels & Tires
Hello Waldo: Very interesting subject, and very helpful the link you provided; thank you. I'll have some more homework to do on the side for my own knowledge. Thanks again to all constructive and instructive comments, opinions and suggestions. -
Mobil 1 no longer meeting Ford spec WSS-M2C930-A?!
Edgingage replied to Edgingage's topic in 2011 Edge & MKX
Thank you WWWPerfA for the links provided; really helpful! Thank you all. -
Hi folks: I was browsing around several other fora, and also did some search to see where it was more appropriate to post this info/question. I decided to post it here because I'm more familiar with this forum, but I'm afraid that many other year model owners with the same interest may be left out. Moderators please feel free to move this post/thread to a more suitable forum if you believe so. Have you folks been aware/noticed that Mobil 1 is no longer meeting Ford specification WSS-M2C930-A? I noticed they changed the Mobil 1 engine filter packaging to a smaller filter size (ok?). I also noticed they changed the motor oil container to a bigger size (that's a better size!). But then I noticed that the same motor oil I've always bought to change it in my 2011 Edge SEL (Mobil 1 5W-20 Advanced Synthetic Motor Oil) was no longer listed among the approved oils in my local store. So, I checked the new 4.73L oil package label and, fair enough, Ford spec WSS-M2C930-A is not listed in the new package label of the same motor oil as "Meets or exceeds the requirements of: -Ford WSS-M2C9XX-X." I double checked my 2011 Edge Owner's Guide: Maintenance and Specifications, page 329 reads: "...or equivalent SAE 5W-20 oil meeting Ford specification WSS-M2C930-A". It was listed as meeting specs in the previous 4.4L package label... My questions to you folks: - Is anybody aware of this change, Mobil 1 no longer meeting Ford spec WSS-M2C930-A? - If anyone knew, out of my curiosity, can I know why? (did Ford miss the deadline to submit the required paperwork, did the specs for the 2011 Edge change, did Mobil 1 change oil formulation and Ford didn't accept it...?) - Most importantly: can somebody pitch in his opinion regarding if it's still safe for us to continue using this oil in our vehicles despite no longer meeting Ford specs for our vehicles? Aloud thoughts and comments are all welcome and always very appreciated in advance.
-
Will 2015 Explorer Sport rims fit 2011 Edge SEL?
Edgingage replied to Edgingage's topic in Wheels & Tires
Thanks Omar for sharing your experience. My situation was different because I'd have to buy them. But then if they don't fit I'm not sure I'm going to get my money back when I resale them. I'll pass. Thanks again. -
Tire sizes and Actual tire surface contact patch width?
Edgingage replied to Edgingage's topic in Wheels & Tires
Todd, Snoking, thanks for your comments; we all know studs and chains provide better traction than bare tires. I'm making another edit in my previous comments to clarify I'm talking about studdless and chainless tires. Sorry for getting you confused. Akirby, I honestly don't know where you took that I obviously know more than you folks do... I have shown in all my comments that I do NOT know about this matter, I have clearly explained my thoughts, and I have even said or written SORRY after realizing I have drawn wrong conclusions. I think I've been modest and honest... As a matter of fact, I wouldn't asked questions if I would have known better than you. But you are a moderator, so, you have all rights to insult a person who is making genuine questions, or even banning me for no real reasons if you like. Waldo, thank YOU VERY much for your time, understanding of my questions, for your VERY thorough explanation of the matter, and your constructive comments. I've understood perfectly and learned something else tonight and I now know better, thanks again. Your suggestion about lowering the tire pressure is a great one (I never thought about that before). My car is calling for 35 psi; I'll probably lower the pressure to 32 psi. Hopefully that'll improve a little bit the ice traction without wearing out too prematurely the outside patch edges, and hopefully that lower pressure won't be enough to trigger the TPMS warning either. I'm backing out of my search for wider tires as there'll be no gain for my purpose. Thanks again. If I could steal a little bit more of your time and knowledge, I would like to ask you a related question, although a little bit off the main topic (Akirby you can move this post to a more appropriate thread, or delete it all together if you find it out of context). Waldo: thinking back, I think that part of the reason I tent to believe that wider tires have better traction may have come from seeing some sport cars and actual racing cars having wider tires on the driving wheels (engine driven wheels). As Snoking mentioned it above, Camaros came to mind, also Corvettes, and obviously real racing cars. Up to date, I thought the reason they have wider tires was to increase the traction and have a faster take off (in 0-20 mph, or something like that), and I thought that will also serve for a faster braking/stopping. So, if wider tires not necessarily provide better traction, why some of those cars have wider engine/transmission-driven wheels? Again, I can start a new thread on this subject if this post is not appropriate, or PM you directly, or you can PM your answer. I want to thank everyone for your instructive and constructive comments. -
Are TPMS stems/valves removed when replacing tires on rims?
Edgingage replied to Edgingage's topic in Wheels & Tires
Yes, something similar in my case, the price has gone up a little bit ($3 ea). Again, it's not so much about the little money but about charging for a service not provided or not done, even though after I mentioned. He refuses to remove that charge... Guess he's not taking my business. -
Will 2015 Explorer Sport rims fit 2011 Edge SEL?
Edgingage replied to Edgingage's topic in Wheels & Tires
Hello Omar: Thanks for your clarification. I went to the dealer and they couldn't tell either. It's very hard to know. I don't know how you tried it before but it seems to be a "try and error" thing. My problem is that I don't want to take the risk of buying those wheels to find out they don't fit properly. Thanks again. -
Tire sizes and Actual tire surface contact patch width?
Edgingage replied to Edgingage's topic in Wheels & Tires
Hi folks: I think you all are either missing my point or I may have missed expressing myself correctly. I'll try to write it simpler: Firstly, Snoking, I'm talking about winter tires only; the Camaro's example might be out of context; sorry. Secondly, Akirby, that's exactly what I'm saying (or have been trying to say): I'm talking about winter tires only (I am referring to ice performance). So, you and I are talking about the same thing, therefore I'm correct: winter (ice) tires. Thirdly, Todd, with all my respect to you too, if on my same vehicle with the exact same winter tire brand and type Continental VikingContact 7 the size 255/60R18 (wider) does not provide a slight better performance on ice than a size 245/60R18 (narrower), ...physics are... I don't know. Again, with all my respect to all, I thought you folks realized I have to be talking about the exact same tire brand and tire type on the same vehicle for comparison, otherwise it'd have been like comparing apples and oranges. Sorry if I didn't express correctly myself, or if I wasn't so specific explaining that (from the mechanical point of view, I'm not a mechanic) I am looking for the wider winter tire that could fit my own vehicle. I know my stock is 245/60R18, but I do NOT know how much wider, the maximum width I can mount tires on my 18" stock rim without compromising safety (without rubbing any steering components inside the wheel well of my vehicle, etc). I knew (again sorry for having not been so specific), that I was logically referring to the exact same winter tire brand and type. Absolutely everything is the same: vehicle, tire brand, tire type, tire ratio (60R), tire rim (18"), the absolutely only difference is the tire width (255mm vs 245mm). If 255mm width does not provide more ice grip, friction, resistance than 245mm width, ...I may have to go back to engineering school then. Hope you all now understand the reason of my question, and also my rationale. So, from my two-week research (including websites provided by members here, thank you all again), I think I can safely go in my vehicle stock/OEM rims up to 265/60R18, but that size is very difficult to find (probably not made). Therefore, looking for a slight improvement on ice performance (using the same tire brand and type), I'm thinking to go with 255/60R18, which is commonly available. I believe those 10mm wider will provide a slight increase in contact surface, and therefore a slight increase in friction and resistance on ice-covered pavement. I DO appreciate all your time, and also DO thank you all for your thoughts. I'm still open for more comments if mine didn't clarify enough, ...or if you still think I'm wrong. EDIT: I reread ALL your comments above (thanks again) and rethought myself. I think I got it now: 10mm wider in tire size not necessarily translates in wider contact patch because, if I understand correctly, that size refers to wall-to-wall width (not specifically to contact patch width). Based on all I explained above in this post, and also based on manufacturer descriptions, independent scores, specialized reports and consumer reviews I've now narrowed my search to two studdless winter tire brands and types: Continental VikingContact 7 and/or Bridgestone Blizzak DM V2. I now have to find out if the size width difference actually translates in different contact patch width as well, or not. I will try to find out that info, but meanwhile I'll greatly appreciate it if somebody could send me in the right direction to find that out. In summary (all studdless tires, please): Contact patches for: - Continental VikingContact 7: 245/60R18 and 255/60R18 - Bridgestone Blizzak DM V2: 245/60R18 and 255/60R18 Again, any info source is greatly appreciated before hand. Thank you all. -
Tire sizes and Actual tire surface contact patch width?
Edgingage replied to Edgingage's topic in Wheels & Tires
Waldo: first of all THANK YOU very much for your thoughtful comments in your previous reply. I forgot to thank you before; sorry (somehow I missed your reply). Secondly, lol, ...I have a short answer to give you lol. ...Nooo, just kidding. Seriously: I don't know which country, state, province, city or general area you live in, and how familiar you are driving on snow and/or ice, but I'll give you the long answer. Please bear with me: I live in the city. When the snow falls (usually for a few hours), the city plows take good care of the snow right after it falls; therefore, I hardly ever really drive on snow, very seldom, and when so, I consider myself a good snow driver as, so far, I've been able to control my vehicle on snow 99% of the time (no concerns for me driving on snow). ❄️ However, as the city plows don't remove 100% of the fallen snow from the asphalt, the remaining snow gets compacted eventually becoming ice, and usually stays on the payment for several days, along with the cycling process of thawing during sunny days and freezing up to black ice once the sun is gone. Therefore, I much more often drive on ice-covered asphalt than on snow-covered asphalt. On ice, ...there is never 100% control of your vehicle. Ice is ice. I guess you now know where I'm going... Generally, the wider the tires, the more contact patch (contact area), more resistance and more friction I'll have. Therefore, lesser chances to slide, skit on the ice, and if so, it should be for a shorter time (compared with narrower tires of the same kind). ⛸️ ...And wider looks better (to me ) This is my rationale. I know the rationale of "narrower tires for snow" has been out there for a long while ?️. I'm not totally convinced..., but I won't argue. Again, snow is not my concern; ice is. Hope having answered your question. -
Are TPMS stems/valves removed when replacing tires on rims?
Edgingage replied to Edgingage's topic in Wheels & Tires
I guess this supplier doesn't know well what/how is doing. Below is his response: "The valve stem service is a required part of our tire changeover and installation package. It is not optional and (charges) cannot be removed." (the brackets are mine). I think I'm going back to my previous service supplier. I don't think they charged me for that before, but I'm going to double check this time. Thanks everybody. -
Are TPMS stems/valves removed when replacing tires on rims?
Edgingage replied to Edgingage's topic in Wheels & Tires
Hello folks: Thanks for making my question not an stupid one. That's what I thought as well. I remember replacing the tires before when I first got the Edge and I knew nothing about TPMSs (first car with TPMS for me), and I requested the shop to use short-stem valves when replacing the tires (as they normally put new valve stems when replacing regular tires). They say "OK" (without looking at my wheels, just complacent with my request), but later they came out of the shop and asked me if I REALLY wanted the valve stems replaced because... they have TPMSs. I said "Of course not!" lol The reason for my question now in this thread it's because I'm ordering a new set of winter tires (from different service provider). The guy giving me the estimate included a charge for "Passenger Valve Stem Service", as well as "Performance Passenger Road Hazard Warranty", among other charges. I kindly asked him to take off the valve stem charges because my tires have TPMS (...I learned that lol) and I'm not going to replace them yet. Here is his response: "Valve stem service is required since we need to remove the valve stem and TPMS sensor from your wheel to change the tires. It covers any shop materials used (new stems, covers, or gaskets) along with the additional labour of moving your TPMS units." I'm confused... He said they "...need to remove the valve stem and TPMS sensor..." This is an ISO-Certified tire dealer in the region (not a guy in the backyard...). Could you folks please clarify for me if he's right? Or I should keep arguing..? I know there's not a lot of money to be charged for that service..., but I just don't like to pay for services not needed or not received. Thanks in advance for your thoughts and suggestions. -
Will 2015 Explorer Sport rims fit 2011 Edge SEL?
Edgingage replied to Edgingage's topic in Wheels & Tires
Hi Omar: Thanks for your comment (always very appreciated). I assume when you say "rubbing" means a significant rubbing that will not go away soon with wear and tear. So basically, not an easy way to make it fit, I assume. Too bad Thanks again. -
Hello folks: This may be kind of stupid question for many of you, but I don't know and need to ask: When replacing the tires (like putting a new set of tires) on the rims, are the TPMS valves removed as part of the procedure? I said it's kind of stupid question because for comparison I know the valve stems have to be lose and removed when changing the inner tubs in bicycle wheels lol, but the cars no longer used inner tubes (tires are now tubeless ;), do the TPMS valves/stems still need to be removed anyways when replacing the tires on the rims? Sorry if my question is too stupid... I just don't really know, ...and would really want to know for sure. Thank you.
-
Hello folks: I need your help to determine if I pull the trigger on this sale to fit my 2011 Edge SEL (FWD): A set of 2015 Explorer Sport wheels & tires with TPS sensors is up for sale. Bolt pattern is (5 x 4.5 ) or (5x 114.3) from what I understand on google will fit 2012 to current 2021 Explorers, and I believe it's the same bolt pattern for the 2011 Edge. I assume the offset is different but I don't know if it's still safely acceptable... Tire size is 255/50R20 which I now know will fit the 2011 Edge (thanks to Xtra and other folks for links provided in another thread). Do you folks know if this set will fit the 2011 Edge SEL? Please let me know. Thanks in advance. Photo "borrowed" from the sale ad:

-
Tire sizes and Actual tire surface contact patch width?
Edgingage replied to Edgingage's topic in Wheels & Tires
Hello Xtra and all: Xtra thank you, thank you very much! The links you gave me have definitively helped A LOT! I was almost settled for 255/60R18 (I'm negotiating a set of Nokian Hakka R3), but a sale just came up in Kijiji which made me post a different question in this forum. Again, I REALLY thank you, very helpful all those links.- 25 replies
-
- 1
-

-
- contact patch
- tire width
- (and 1 more)
-
*Click* Noise when accelerating from stop
Edgingage replied to FordSELEdge's topic in 2011 Edge & MKX
Hello WWWPerfA and all: WWWPerfA, thanks for your opinion and suggestion. I agree that once you put a new part starts to pull the old ones off lol. I'll list the main repair history for the last year. Maybe that'll help you make me understand what/why was done, and also help you to answer one more question I'll have at the end: - Sep 2019: dealer replaced right front ball joint and control arm assembly - (4-W align - cambers set toes had to boost to put out) - $639.62 Very shortly after the above repair, the steering mechanism was making some noise when steering left or right. - Dealer's diagnosis: will need a left front axle and lower control arm. - Nov 2019: dealer replaced left front axle / SHAFT-front axle / arm assembly - front suspension / left front lower arm - (sway bar link nuts had to be heated, had to also go into the frame due to one nut spinning inside frame, with use of welder and torch was able to remove bolt) - $1173.75 - Aug 2020: dealer found faulty, and replaced, both outer tie rods - $622.85 After this last repair, just coming out of the shop, the steering wheel has some short and sharp oscillations (side wise motion, NOT vibrations) when driving on any minor irregular surfaces (rough asphalt, small batches or small bumps), and also some side pulling (hard to keep the vehicle going straight free hands; just for test driving! ) And the click noise described above (coming out of the shop as well). Do you see anything wrong in that repair history, or something that can pinpoint the cause for the short and sharp oscillations on the steering wheel? Very annoying, ...and worrisome, of course. Thank you all in advance for your time, thoughts and suggestions. -
Tire sizes and Actual tire surface contact patch width?
Edgingage replied to Edgingage's topic in Wheels & Tires
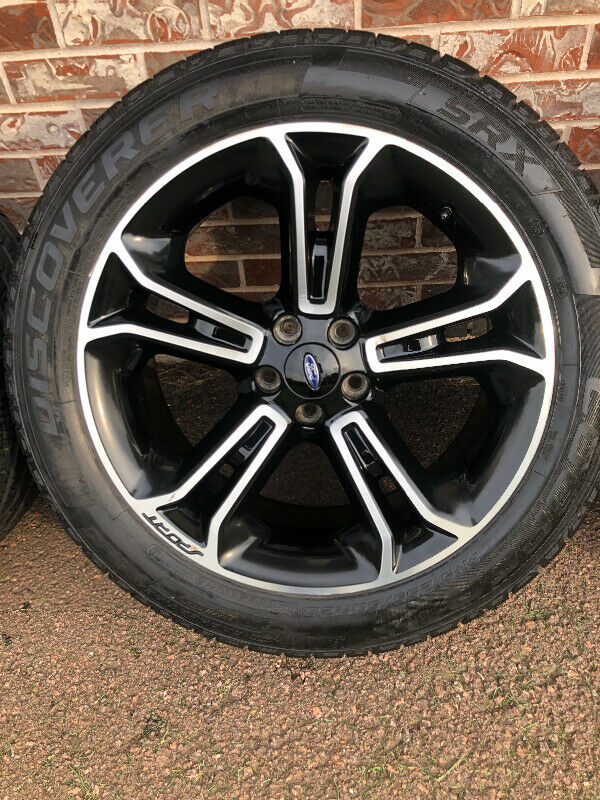
Hello all: We know that different tire sizes have different width, but the tire width is generally described as the linear distance from one outside wall to the other wall outside. However, what I would like to know is the width of the actual contact surface, in other words, the width of the part of the tire which is actually in contact with the asphalt surface. The reason of my inquiry is because I believe having heard or read somewhere in the past that many tire brands even though they have a wider tire (side wall to side wall) from one tire size to the next one up, the actual contact patch remains the same from one tire size to the next one up. Is there any way for me to know the actual contact patch width in tires of different sizes? I really would like to find that out. I want to buy the widest size I can fit in my 2011 Edge stock rim (8" x 18"), not for the look but for the actual widest contact patch in the tires. Any help trowing me in the right direction is greatly appreciated in advance. -
*Click* Noise when accelerating from stop
Edgingage replied to FordSELEdge's topic in 2011 Edge & MKX
Hello WWWPerfA and all: Thanks for your time, comments and suggestions. My vehicle doesn't have chrome clads, unfortunately (I wish; I'm looking for chrome rims!). It has the regular OEM/stock rims, aluminum, I think. My concern, or rather frustration is because the noise appeared right after they replaced both outer tie rods which I hadn't noticed absolutely any problem with them while driving. All the problems (clicking and steering vibration, pulling) came up right after they "fixed" the tie rods. Yes, I requested the alignment report (please see attachment; they charged me $99.95 for the alignment only; $541.61 in total). The red ink marks are my own trying to compare and learn what they mean. The greatest part of my frustration is because they told me they'll "look" at it. I'm sure they'll "hear" nothing wrong as the problem started after their "fix". I know my car had a super smooth and noiseless ride before their tie rods "fix". Now it doesn't... But WWWPerfA, the *click* noise now in my car matches the description in the TSB you posted (although it's not listed there). Do you think it might be a different cause? I'm sure something is not quite tight as before around there after the dealer "fixed" both outer tie rods. Anyway... Thank you all for your time, comments and suggestions. 2020-08-17-Alignment.PDF This is NOT my vehicle (photo "borrowed" from the net) but those are my same stock rims: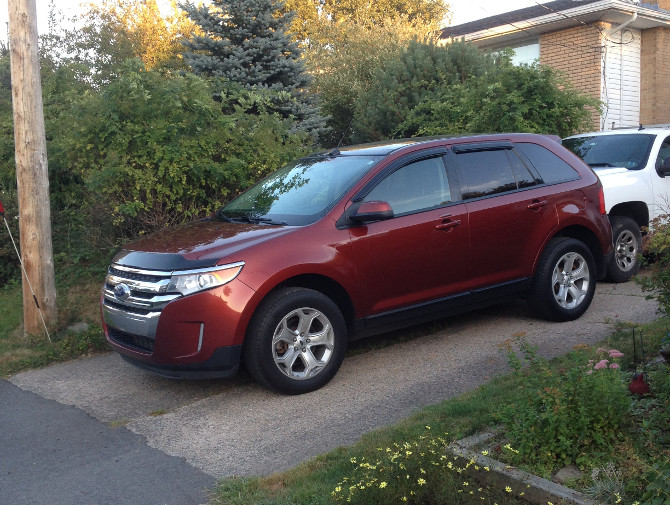
-
Tire sizes and Actual tire surface contact patch width?
Edgingage replied to Edgingage's topic in Wheels & Tires
Snoking, Xtra, thank you very much for your comments and info. That's what I was looking for. Greatly appreciated. I want to go as wider as safely possible with the same profile: I would like to go to 265/60R18. Does anyone know if it's safe to do so? Meaning, would the tires rub the well or a suspension component on full turns of the wheels? Please let me know your thoughts or experiences. Thanks in advance. -
Tire sizes and Actual tire surface contact patch width?
Edgingage replied to Edgingage's topic in Wheels & Tires
Hello folks: Can someone please give me some inside on this? I really need to know how wide I can go in my 2011 Edge without compromising safety. Basically, is it safe to put 255/60R18 keeping the same ration from stock 245/60R18, or I need to lower to the ratio to 255/55R18 if I want to go wider. Any website where I can visualize the changes in tire ratio (similar to what TireRack used to have) will be greatly appreciated. Any directions greatly appreciated. Thanks in advance. -
Fuel consumption - L/100Km or the equivalent MPG
Edgingage replied to Edgingage's topic in 2011 Edge & MKX
Live n Misery, thanks for your reply, and sorry for my late one. I may consider to spend on a cold air intake if it can get over other more critical issues first. Thanks anyways. WWWPerfA, thank you VERY much for your last suggestion to check. Here is the dealer's report: "Driver rear side had a stuck slider pin which caused the inner pad to wear out. Heated it up and got it free. Cleaned out and applied silicone grease. Cleaned slider and now it's free." Fuel consumption immediately improved from 14.2L/100 KM (16.6 MPG) to 13.2L/100 KM (17.8 MPG). I still have a long way to achieve Live n Misery's..., but one step at a time Thank you again.