dr.edge
-
Posts
194 -
Joined
-
Last visited
-
Days Won
6
Content Type
Profiles
Forums
Gallery
Everything posted by dr.edge
-
It wasn't a very precise cut, just enough to allow the LED bars to shine through and still be supported by the original lamp assembly - 6" would probably be close enough but there's room for a slightly longer assembly if you're thinking of using something different.
-
They aren't so much rivets as locating pins that are then heated and mushroomed into place when the piece was originally assembled. Here's a picture of them after I ground down the tops. I just used some CA glue to reattach the diffusers back into place when I was putting everything back together.
-
I have to say that I'd have a hard time putting one of those cow catchers on the front of my car. Most of us that can, have already gotten rid of the front license plate frame and the rest of us probably would, if we could. Good concept, just a butt ugly design.
-
All 12V accessory sockets are built to the same standard specifications however they sometimes suffer from poor contact stability. A plug that works in one socket may not work in another or you might have to push it in a bit or sometimes rotate it. Either way, they really are all the same as they comply with SAE standard J563 12-volt cigar lighter receptacle and plug, size A Receptacle inside diameter: 20.93 - 21.01 mm (median 20.97 mm) Plug body diameter: 20.73 - 20.88 mm (median 20.805 mm)
-
First detailing of 2011 Edge SEL
dr.edge replied to rogersmj's topic in Appearance - Detailing, Wash & Wax
Nice job, it looks great. -
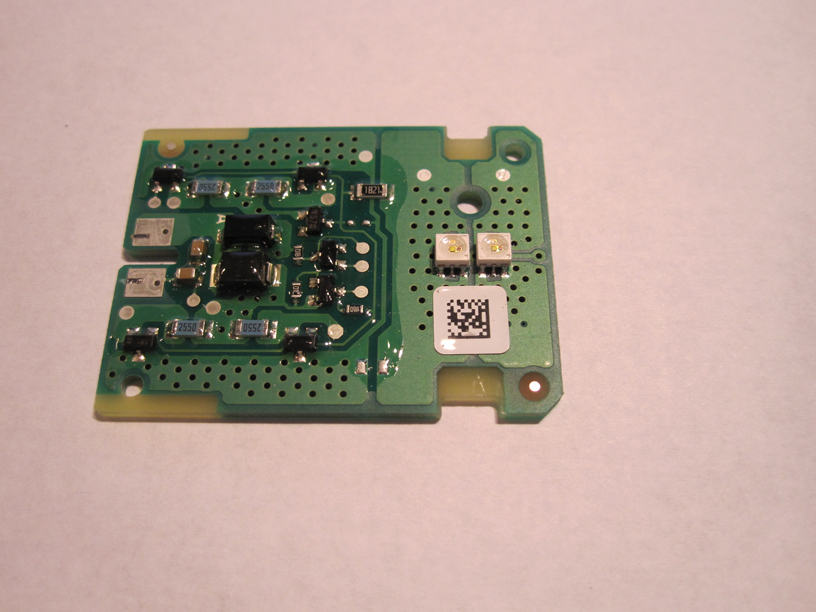
After following the great post by frybel, here's how I did mine just a bit differently and kept the original diffuser bars intact. Removing the front bumper cover and getting the lights off went a lot easier than I thought it would. The hardest part was figuring out which way to pull on the bumper cover to get it to detach. Once you've removed all the bolts ( I leave a couple still in place on the top so it doesn't fall to the floor) you have to pull the rear part of the bumper cover out from the body, in a direction perpendicular to the side body panel. Once you figure that out, the rest is easy. With the lights off the car, I split them apart to temporarily remove the diffuser, remove enough material for the new LED bar to shine through, etc. In order to remove the front lens, you need to bake the light in a preheated 265 degree oven for 7 minutes. If you're going to try this, make sure you set a timer and stick to the 7 minutes as any longer will make the plastic too soft and you'll end up with a melted mess. (Thanks to the guys over at HidPlanet for that tip!) At the end of 7 minutes, I removed the light and started prying the pieces apart using a wide bladed screwdriver. It takes some effort, so keep at it and they will eventually separate. Once they are apart, I used blue painter's tape to mask offthe aluminized area and to define where I was going to cut. The diffusers come off easily by grinding away a couple of plasticrivets and then I drilled a couple of 3/8" holes at each end of where the slot was going to be. Inner material removed and ready to start putting everything back together. LED bars glued in place. I used JB Weld KwikPlastic to really hold them as I wasn't sure that just silicone would do the job. All glued up, waiting for the epoxy to cure. I let everything cure overnight and then installed them back into the car. When they are in place, you can't tell that anything's been modified and the original lights work the way they always have. When the new LED bars are switched on, they're a better color match for my 6000K HIDs, are extremely bright, and shine right through the diffuser bar. The only issue that I ran into when I was wiring them up was that the control box wouldn't work (it would turn on for about 30 seconds and then turn off). As far as I can tell, it's expecting a higher battery voltage when the car is running than is being provided (I measured my battery at 13.8V when running and I think the circuitry needs a slightly higher voltage to trigger). I contacted iJDMToy and they're sending out a replacement but I'm doubtful that it will fix the issue. I tried hooking up the LED bars directly to the battery and controlling when they turned on myself but at only 13.8V, the light output is actually pretty low - just a bit brighter than the stock lamps. I measured the control box output when it did work and it's putting out 15.5V so if the replacement control box doesn't work, 'Plan B' is to buy a DC - DC converter something like this and wire it in to provide the necessary voltage. Once everything is working correctly I'll post some pictures with the lamps in operation and how I wired them in to make them work.
-
I've just finished modifying my lights with the same LED DRL kit from iJDMToy while keeping the diffuser bar intact and will post a more detailed write-up on that later but here's a picture of the original LED circuit board.
-
Wind buffeting from rear window
dr.edge replied to Doug-J's topic in Interior, A.C., Heat, Interior Trim
Almost every car will exhibit the same behavior to some degree. By opening up a single window you create a sealed, resonant cavity that creates the pressure pulses that can cause real discomfort (as you found out). If you crack open a window on the other side, the resonant cavity is eliminated and the sound goes away. -
Great post. I've been thinking about trying to do something similar but was holding off due to having to take the bumper cover off. Now I think I may get a set of LED's on order and give it a try. I've already switched to 6000K HIDs so I'll be interested in seeing how closely they match.
-
Automatic lift gate / trunk hatch - can I drive with it partially open?
dr.edge replied to Dreamss's topic in 2011 Edge & MKX
Shouldn't be any cause for concern as you can just pull the hatch down into position and then secure it. The motor driven lift and lowering is strictly a convenience - you can raise and lower the hatch manually all you want. Be aware that driving with the hatch partially open may allow exhaust fumes to be drawn into the car so keep a window or two open while you're driving down the road. -
Ask A Professional Detailer?
dr.edge replied to CanuckG35's topic in Appearance - Detailing, Wash & Wax
Clean with your regular car wash mixture (Poorboy's Super Slick and Suds) using a separate bucket and a dedicated wash mitt (you don't want any of that brake dust/road crud getting back on your paint). You can use a brush on the tires but keep it away from the rims - they're painted and almost any kind of brush will end up leaving swirl marks. Once they're clean and dry, I use Poorboy's Bold and Bright for the tires. Spray on, let sit for a few minutes and then wipe off any excess. If they get really dirty with a lot of brake dust, I use something like P21S Gel Wheel Cleaner. Check out any of the detailing sites like http://www.detailedimage.com or http://www.adamspolishes.com for lots of other great tips and ideas. -
Squeeze them down a bit more to 800 x 375 and they should work.
-
Currently it's only available for the new Focus models (maybe one other) but due to be released for the Edge sometime in the summer.
-
Ah, I see someone else listens to TNT. And based on the outside temperature on th edisplay, that must have been today (it was 102F here in Minneapolis)
-
Try this - http://www.fordedgeforum.com/index.php?/topic/7556-browsing-sirius-channels/ - it should fix the issue.
-
The update is out there on SyncMyRide, you just have to hunt for it. Go to the Community tab and you should see it under Sync Announcements. I installed it earlier today and it at least fixed the "browsing forever" issue. I would expect that it fixes the channel lineup issue as well.
-
Picked up my Tuxedo Black 2011 Sport a couple of weeks ago and couldn't be happier with it. I'd been reading the forums for a while and was starting to have second thoughts about my purchase but as someone else pointed out, it's easy to get "forum-itis" hearing about problems that others are having. In my case, other than having to pull fuse 29 once, MFT 2.8 has been working without any major glitches. Sure it's laggy sometimes, but overall, it's what I'd expect from a first generation technology. Give it a couple of years and it should be great. Ford needs to rachet back their marketing hype, but that's another issue. It looks great, handles like it's on rails and with the 3.7L engine, makes as much power as I need. Mods - 50% tint on front windows - Gorilla black chrome locks - 6000K HID kit from Retro-Solutions - Polk MM571 5x7 speakers (front and rear) - Escort 9500ix (hardwired) Will post pics later.
-
An update was posted on the SyncMyRide site that appears to address this. Check in the "Owner to Owner" section for a Sirius Channel Name Patch. Better yet, the process of applying a patch using a USB flash drive actually works! (at least with v2.8) Note that this patches your current version so if you upgrade to v2.8 in the future, you'll need to reapply the patch. Whether or not this is incorporated into v2.10 remains to be seen.