Gadgetjq
-
Posts
608 -
Joined
-
Last visited
-
Days Won
58
Content Type
Profiles
Forums
Gallery
Everything posted by Gadgetjq
-
Really? ? Ok, yes. Install UBlock Origin (works in Firefox as an add on). Click on the Element Zapper icon then on the orange stripe. Gone! Cheers!
-
That's a tricky question and it appears the only sure way to know is to get under the car and look! According to the maintenance manual (downloaded from MacT's web page) you 'might' have a secondary filter and you 'might' not. Here's a copy paste of the 2015MY "fuel system overview". Note bullet point #5. The fuel system consists of: a closed loop pressure control (CLPC) fuel system. fuel and vapor lines in an integrated bundle assembly. an AWD saddletype tank or FWD LShaped fuel tank. quick connect fuel and vapor tube couplings. if equipped, a replaceable external inline fuel filter. a fuel tank filler pipe assembly, which cannot be modified in any way, that also contains a misfuel inhibitor device to permit only unleaded fuel to be pumped into the tank. has an Easy Fuel™ (capless) fuel tank filler pipe assembly, which cannot be modified in any way and is serviced only by the installation of a new fuel tank filler pipe assembly. has a supplemental refueling adapter located in the luggage compartment. a Fuel Pump Control Module (FPCM) located under the vehicle above the LH side of the rear subframe. a Fuel Pump (FP) module containing: the electric FP module which provides pressurized fuel to the fuel rail. the fuel level sender. a check valve which maintains system pressure after the pump is shut off. a pressure relief for overpressure protection in the event of restricted fluid flow. a lifetime fuel filter providing filtration to protect the fuel injectors from foreign material.
-
1. No, but the terrain is pretty flat where I live. If you live/work/play in a hilly area then it'd be a good idea. 2. No, an electric motor is clamping the brake pads down on the rotor 3. No, as long as you don't try driving with the brake engaged. Cheers!
-
Watch the first 3:30 of this video. Cheers!
-
It looks like the dashboard side is still the same (see pic below) so if you 'want' the drawer find an earlier Edge at a local recycle yard or check eBay. dash side 'with' drawer
-

What have you done to/with your Edge/MKX today?
Gadgetjq replied to WWWPerfA_ZN0W's topic in Accessories & Modifications
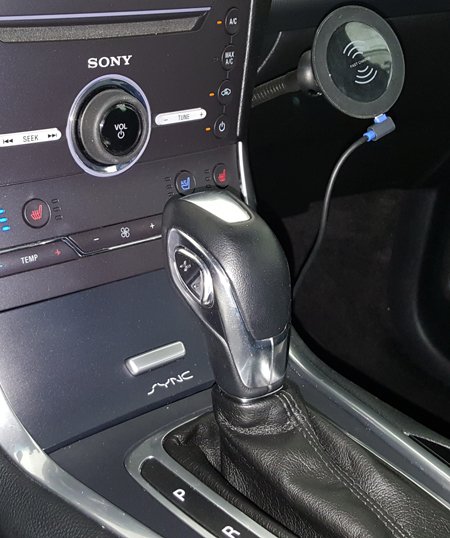
Swapped out the OEM shift knob for one from a Ford Focus to allow manual shifting from the lever in addition to paddles. Here's a link: -
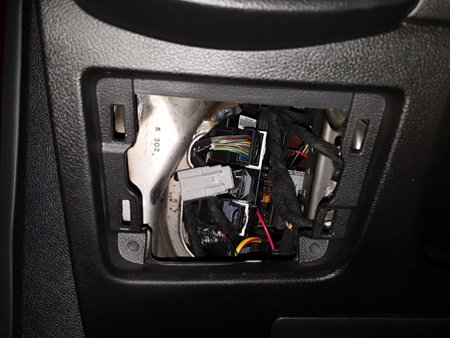
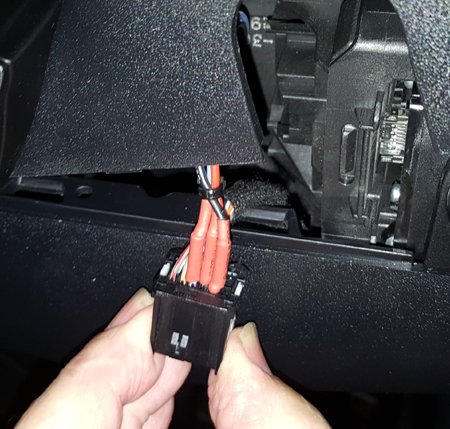
Many many thanks to TMarsh for posting this mod. I used his excellent instructions to swap out gearshift knobs today and it's working great. The photo above shows a Ford Focus (2012-2014) part installed in the '16 Edge. It was $27 on eBay. Note the two push button switches. I'm going to add a couple of items that might answer questions others might have when doing this. 1. Watch the first part of this video first. It'll help with removing some of the center console parts. Don't worry, everything just snaps out no muss, no fuss. You can stop 3:30 into the video with all the info you'll need. 2. Check out this Selector Lever Knob.pdf for help actually removing the old shift knob. Once the cup holder assembly is removed (video link above) you can pry up the black square from the shift assembly. There are four keepers. Pull (gently) and the leather trim will turn inside out. Now you can cut the zip tie holding the trim to the shifter. There are two Phillips head screws holding the shift knob to the post. Remove them and the knob will pull right off. 3. I reversed TMs instructions for connections in the steering column so my top button upshifts and the bottom button downshifts. Totally up to you, just check the button continuity to identify which color wire does what before installing. 4. A little counter intuitive is removal of the steering column cover. You'll be using a T20 Torx driver and a 7mm socket on the bottom of the column. When those two fasteners are removed you can lift the 'top' of the column cover partway off. It'll stay attached by a strip of leather so don't get crazy pulling on it. 5. I used this multi-conductor cable for the wire run. You only need three of the four wires so can pull off the extra and you'll have a whole bunch left over. This photo shows the connector with my homemade back probes installed. Note: If you don't want to make your own probes they can be purchased from MirrorTap. You have to call them 888-497-8388 and order a set of MTX-TAPS. I don't know the cost. Another option is to cut or strip (good luck, it's 26 gauge) the three wires and splice yours in. And this one shows the OEM plug back in place. Button everything back up and go for a ride. Now you have the option of up/down shifting with your hand on the shift lever or using the paddles. This works in both Drive and Sport mode except in Sport mode the transmission will wait for your button push or paddle pull. In Drive you can up/downshift on your own but the transmission can override your commands. Finally, tattling on myself: 1. I lost the two screws holding the shift knob to the stalk. I 'knew' exactly where I'd placed them but when it was time to put everything back together couldn't find them anywhere. I searched 45 minutes with my son helping. Suddenly I heard "uh, dad." He was holding my led flashlight, the one I'd been using most of this time to find the screws.....the one with the strong magnet on the base. Yep, at some point I'd placed the flashlight near the screws and it collected them. I'd essentially had them in my hand the whole time I searched. DOH! 2. When connecting the wires to the steering post plug my hatch popped open. Gads, do I have the wrong connectors? How could this happen? I went back and closed the hatch. A few minutes later it happened again! What? Turns out when working with the wires I was touching the hatch button on the dash. Again....DOH! Cheers!
-
Open the drawer, insert your hand palm up. Curl your fingers a little so the tips are against the top of the assembly. Pull. You'll hear four clicks as the keepers release. Done! It's a little scary the first time thinking you might break something but it does pop right out with with a little tug. Cheers!
-
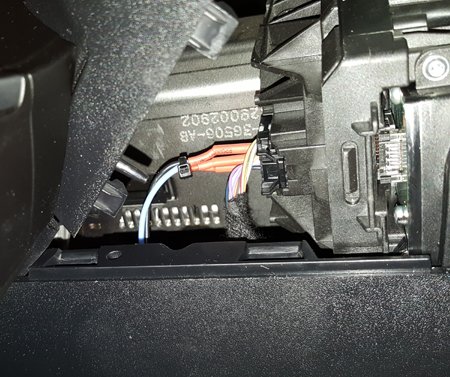
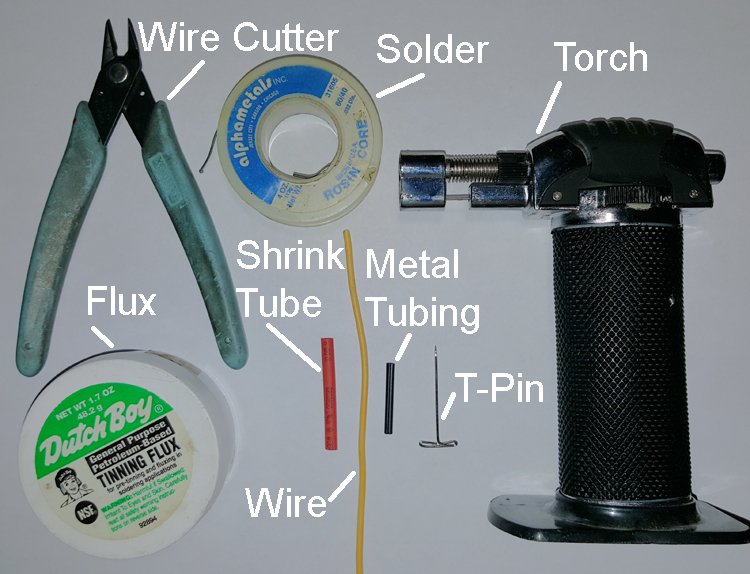
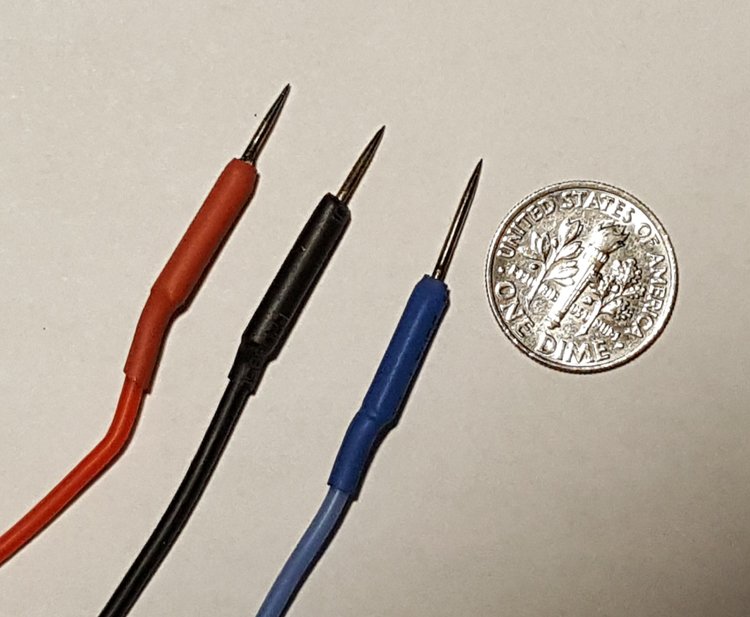
Hey Modders, If you've done any aftermarket electrical work on your Edge you've probably noticed Ford uses some really tiny wire these days. A lot of it is 26 gauge which is impossible to get a T-tap on and nearly impossible to splice. So, the easy way to make connections is to borrow an idea from the Mirror Tap folks. You've probably seen their tiny pins that slip into the back of the mirror connector, the other end has an accessory appropriate plug. Those puppies are pricey so, I thought to myself...."self, you can probably make your own". That's exactly what I did for an upcoming project. Here's how to make your own back probe to power an accessory or just use with a test light or multimeter. What You'll Need 1. package of pins or any small needle from the household sewing kit 2. a length of metal tubing with an appropriate inner diameter for the size wire you use. Use steel or brass, it won't matter but you'll want the wire to fit inside fairly tight. 3. shrink tubing 4. wire 5. solder & flux 6. Torch to heat tubing and draw solder into the tube How To: Strip one end of your wire (length depends on your project) and dip it in flux then slip bare wire into metal tube Cut your pin to whatever length you'll need as a probe (generally about 1/2") plus the length of your tube then press it, pointy end first, into the tube with the wire. Place the tube/wire/pin combo in a vice or hold with pliers. Apply heat from the torch to the tube then, when hot, add solder. The molten solder 'should' be drawn down into the tube (you did use flux right?). When cool, slip a length of shrink tubing over the metal tube and some of the insulated wire and add heat to shrink the tubing. Done! What you do with the other end of the wire is up to your need and imagination. Attach it to an alligator clip which can be attached to your test light or multi tester or to whatever accessory you're adding. Cheers!
-
The fuse box does look like a spine twister until you realize....ta daaaaa...you can remove the change (or whatever you put in there) drawer. Pull that out and you're looking right at the fuse panel. At that point it's pretty simple just to reach up under the dash while you're looking through that opening to insert/remove fuses/fuse taps. I figured the hard part for your installer was getting the delay box installed in your glove box and routing cable to it from power/camera. Cheers!
-
Yes. My dashcam (Thinkware) has a built in battery sensor that can be set via software. After playing with FOREscan awhile or fiddling with Sync I frequently hear the camera announce "shutting down due to low battery." That just means I've dropped to a 12v threshold before the preset 3 hour automatic camera shutdown happens. The Edge always fires up, no problem so don't let it worry you. Your installer did a really nice job! Cheers!
-
I know, question was asked 7 months ago but there was never an answer soooooo.... You can use the FORScan program (freebie) and a decent OBDII code reader to modify the (computer perceived) diameter of your tire. It's an easy 5 minute task that your dealer would charge an hour of shop time for. Before doing that though, I'd check the Edge's speedometer reading against a gps to see how far off you are. If it's only a couple of percent then it's not really worth bothering with.
-
Outstanding Field Service Actions 12M02 (APIM)
Gadgetjq replied to sblasl's topic in Audio, Backup, Navigation & SYNC
Are you sure that was a recall? Checking the NHTSA database for your year there were just three recalls, two for the body control module and one for the liftgate lock. In addition to NHTSA you can log into ford.com and check for outstanding recalls based on your VIN #. That field service action may just be a simple module update not related to vehicle safety. If that's the case then fixes are generally for a limited time. Cheers! -
Last nights shaker (epicenter near Ridgecrest, 125 miles from L.A.) was felt over a huge area. My home is just outside Phoenix, about 350 miles from the epicenter. Two grandfather clocks in the house completely stopped three minutes after the quake hit Ridgecrest. Water in the pool sloshed and wall decorations rattled. My two Pekingese dogs began running around barking at something unseen but certainly felt. Still, this wasn't 'The Big One' that's long overdue. If/when a 7.1 quake is centered in L.A. the damage will be on a massive scale. California native, escaped 11 years ago
-
It's just attached with double sided tape. Use a hair dryer to soften the adhesive then either pry it off with a plastic panel tool or pull some dental floss between the badge and light. Clean any remaining adhesive with some WD40 sprayed on a rag. Cheers!
-
Living here in the "Valley of the Sun" I feel your pain in the optic nerve. Polarized sunglasses go a long way toward reducing glare but can also make phones and other displays harder to read. A dash cover (fancy carpet) 'might' help. Or you could try something like 303 Aerospace Protectant. You spray it on like Armorall and many of the other UV protectors BUT it isn't shiny like so many of those others. Applied per the directions, 303 Aerospace puts down a matte finish that's a lot less reflective than the shiny stuff. Another upside, you can use it on all of your plastic/rubber parts including door/hatch gaskets and everything under the hood. It's not the least expensive stuff by a long shot but it works really well and it 'should' reduce (but not eliminate) that reflection. Cheers!
-
A heads up to those who'd never ever (well hardly ever) purchase parts or services from their Ford dealership, they might actually have the best pricing around. A few weeks ago I purchased a gallon of Motorcraft Orange coolant/antifreeze concentrate on Amazon for about $28. I'd checked pricing at local auto stores and found the best price online. Like so many (especially those of my vintage) I figured the highest price would be at the dealership and didn't even ask them. Today I was there anyway so ventured over to the parts counter to ask..."what's your price for a gallon of Motorcraft Orange Coolant Concentrate with the friends and family discount?" He looked at his computer and announced...."$17.88". "What?" said I" "too much?" said he. "I'll take a gallon" I announced before he could realize his error. But yes, really, the dealer price for the 'real' Motorcraft product is about the same price as DexCool and some of the other orange impersonators on store shelves so why not go with Ford's stuff! Bottom line (and my point) before dismissing your dealership check their pricing on items. You might be surprised. Cheers!
-
Unless there are tabs that should be pointing 'down' from the top panel and slotting into those rectangular slots it looks like you're missing at least 3 pins or clips that connect the two pieces. Look at a parts catalog online or visit your dealer to see what you need. Cheers!
-
I understand the concern but that's why you have that nice thick gasket all the way around the engine compartment. It's supposed to prevent any water intrusion. Just for grins & giggles next time you wash your Edge try spraying the front with the garden hose at every angle you can manage then check under the hood. If you use a car wash take a look under the hood right after. It should be nice and dry behind the gasket.
-
Adding Photos / Media to a Post
Gadgetjq replied to Edge Guide's topic in Forum Help & Site Suggestions
How do I create thumbnails? I've noticed some users use thumbnails that are clickable links which take users to a full size photo. That's especially helpful when there are several project photos being posted. So, what's the secret? Cheers! -
What have you done to/with your Edge/MKX today?
Gadgetjq replied to WWWPerfA_ZN0W's topic in Accessories & Modifications
With two weeks left under warranty I dropped the buggy off at my Ford dealership this morning for some tweaks. Several modules (antilock brakes, front controls interface and rear hatch) needed updating per the Etis page. They're taking a look at the back of the driver and passenger seats which aren't cooling properly. Everything else, including the BAMR, is working great but I'm sure they'll have some 'recommended services' when I go to collect it. One nice spiff, the dealership contracts with LYFT to give customers rides home and pick them up again. No more riding all over town with a van full of customers to be dropped off. ? -
Good catch! I hadn't noticed they have different pictures for the same item. Weird. The Micro2 that I included in my post is the correct one. I've actually ordered two sets of them from that same page having used a couple inside the car and two more in the under-hood fuse box. Obviously I have spares for future projects Cheers!
-
Sunroof
Gadgetjq replied to Anthony A's topic in Glass, Lenses, Lighting, Mirrors, Sunroof (BAMR), Wipers
Guessing you meant to ask a question and that question would be......how do I fix this? Take a look at this YouTube video. I did 'most' of what's shown (didn't actually remove the glass) and it worked out well. Cheers! -
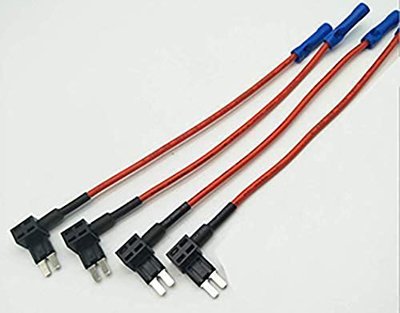
The '15 and later Edge uses Micro2 fuses. Here's the fuse tap you'd need.
-
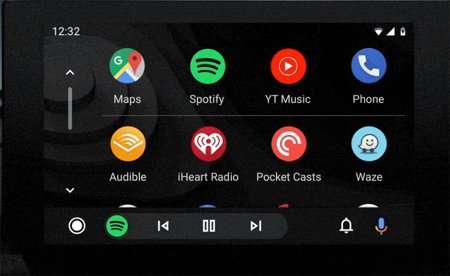
Android Auto fans may be happy to hear the much talked about 'new' version of that app is finally rolling out. Android Authority reports the updated version has just started appearing, apparently without notice (it's a server side update so no new app download necessary). Here's a link to the article. Sadly a lot of favorite apps like Torque and Car Home Ultra (which would look awesome on the nav screen) still won't work with AA because they encourage user interaction (swiping from screen to screen) which is, apparently, a Google mandated no-no for apps in cars. Cheers!