Gadgetjq
-
Posts
608 -
Joined
-
Last visited
-
Days Won
58
Content Type
Profiles
Forums
Gallery
Everything posted by Gadgetjq
-
 You appear to be well within the warranty period, take it to your Ford dealer for a troubleshoot. There could be something wrong in the trailer module (behind the passenger side cargo panel) or ???? The dealer will have the tools to find the issue.
 -
Hi Zach, Take a look at this video through roughly the 4 minute mark (you won't need all the tools shown at the beginning, just a pry tool. It's for the earlier Gen2 with shift lever but the concept is going to be the same. Remove the two side pieces, pull up on the cup holder section and voila! You're in. Good luck!
-
Hey SU, Nice catch on that variety pack. I've modified that section with separate links to low profile and Micro2 fuses. I could only find one variety pack that included both but it had two other blade types as well so pretty wasteful. The section did mention the two fuse types needed complete with pics. Below is a copy/paste. Again, good catch the feedback is really appreciated. 1. Add-a-Fuse is the best way to add any powered accessory if you'll be getting power from a fuse box. The Add-a-Fuse is designed to protect the original circuit using the OEM fuse plus an additional fused circuit that you're adding. Note, the Gen2 Edge uses two different styles of fuse. In the cabin a low profile fuse is used while the under hood box uses a Micro2. See the difference? It means you'll need two styles of Add-a-Fuse depending on which box you're using. Fortunately both are available on Amazon. Here's a link to the low profile style used in the cabin. Here's a link to the Micro2 style used in the engine compartment. Note: Those are both just examples. There are many other vendors offering similar or identical products including assortment packs. Also check eBay.
-
Just a shot in the dark here. Pull the inside panels off the hatch and see if you can tell where the water is coming from. The topmost panel is the easiest to get off. All you need is a panel removal (plastic) tool or padded flat blade screwdriver. It's held on by clips and comes off easily. Just use the tool to pry it off all around the edge. The bottom panel is also simple to pull but you need to remove the cover(s) from the handle then remove a couple of small bolts first. With the handle off the panels can be removed the same way as the top one. If you can't spot the source right away (check the window washer hose as Omar suggested) have someone get in the back with a flashlight while you douse the hatch with a water hose.
-
Ambient lighting is easy to add thanks to dozens of LED, fiberoptic, EL and even laser projector options (check eBay for "interior car lighting." Many will let you change colors with a remote and some even pulse to the beat from your sound system. All you need is your choice of product (or mix and match depending on placement) a 12v power source and a bit of patience. If you get dimmable LEDs and place them up under the dash and under the seats you can add a simple potentiometer or rheostat ( https://amzn.to/2VeiEXJ ) to control lighting level. I did this in my previous car and detailed the installation here: https://www.gadgetjq.net/Add_Mood_Lighting.html
-
I purchased from two places: Amazon.... https://amzn.to/39WcNvx eBay.... https://www.ebay.com/itm/FORD-OEM-Headlight-Headlamp-Bulb-Cap-Cover-4S4Z13N019AA/201359535751?fits=Make%3AFord&epid=1011170901&hash=item2ee1f6ae87:g:3tsAAOSw8Sta3wfG
-
I'm approaching the one-year anniversary of buying my '16 Edge (used) so figured it was about time to collect most of my mods in one spot. I've put together a very basic web page at https://www.gadgetjq.net/edge/ There are no advertisements, no cookies, no trackers, no memberships, no sign in or registration necessary. It's just there for you to enjoy. Cheers!
-
Hi Ruben, I believe you installed the wrong type of switchback harness. As Omar pointed out the voltage drop is causing part of your problem, the lack of a proper resistor is causing another. The style you 'need' looks like the one in this link (it's installed in my '16 with no issues for nearly a year) https://amzn.to/2V47Qv6 Notice there's an extra wire. It's there to power the white (parking/drl) lights when turn signals aren't operating. It's plugged into a switched circuit in the engine compartment fuse box using an Add-a-Fuse. With this setup the white leds are getting full power all the time. About the hyperflash, there are two ways to fix it. Either use 6 ohm resistors as shown in the link or, if you have and know how to use FORScan simply turn off hyperflash. With that done you don't need the resistors. It 'might' (no guarantees) even work in your situation. Here's the code change needed via FORScan: Toggle Hyperflash On/Off Front (Bulbs) 16-19MY BCM 726-27-01 x*xx xxxx xxzz 0=Disabled, 1=Enabled (Default) — Rear (Bulbs) 16-19MY BCM 726-27-02 xxxx xxxx x*zz 0=Disabled, 1=Enabled (Default)
-
Switched 12V engine compartment ??
Gadgetjq replied to Nicolas's topic in Accessories & Modifications
Hi Nicolas, Take a look at this photo. It shows three accessory connections I've made using an Add-a-Fuse for each. Two are switched, one is unswitched. Either one of those switched circuits should work for you. This is a '16 Edge so the same as yours.
-
Altus, My '16 Titanium with 3.5L engine isn't noisy at all. I know Ford deleted the foam engine cover and hood insulation beginning with the '19 models. Take a look under the hood and see if those items are missing on yours. If they are both can be ordered from your dealership or online.
-
Here's How To Add An Aftermarket Front Camera
Gadgetjq replied to Gadgetjq's topic in Accessories & Modifications
This module does not. The front camera comes on for 10 seconds after moving the shifter from Reverse to any other position. So, backing out of the driveway I have the normal rear camera then putting the transmission in Drive I'm getting front camera for a few seconds. It's a little wonky and some aftermarket modules 'do' turn the front camera off around 10 mph. -
Here's How To Add An Aftermarket Front Camera
Gadgetjq posted a topic in Accessories & Modifications
This mod has been posted (with a few updates) to my website at http://gadgetjq.net/Edge/front_camera.html You'll be able to click thumbnails to see full size images on that page. Gen2 Edge Front Camera Add Play It Forward With An Aftermarket Front Camera Have you ever wished you'd gotten that front camera option with your Gen2 Edge? Good news, you can add your own with a few carefully chosen parts and just a bit of effort. Follow along with my installation for a complete 'how to' and a few tips that'll save you some aggravation...guaranteed. What You'll Need , 1. A camera. There are dozens available that give you a choice of view (from narrow to very wide) whether or not to have guidelines, night vision and much more. For this install I used a camera designed specifically for the 2015-2016 Edge and purchased it from Ali Express in China. You might be able to find the same product on eBay but it's still likely to come from China. Plan on at least three weeks for delivery. 2. A Module. As with cameras there are quite a few options. You'll definitely want one that works with Sync3. Beyond that some modules will only add a single (front) camera while others can add cameras for every side of your Edge (additional cameras install under the rear view mirrors). Prices range from roughly $150 to crazy. Just do an online search for "Ford Edge Front Camera" and wade through all the options and prices. I opted (again) for a product found on Ali Express. These seem to go on sale quite often. The module arrived in less than a week. This unit will handle multiple cameras if wanted but focuses on the front. There's a button supplied with the module that lets you turn the camera on at any time. 3. A Few Tools. Nothing fancy needed. Note in the photo (right) is all you'll need (unless you decide to solder the power wires). They include: 1. A soft towel to protect your APIM as you remove it from the dash and for laying it on a work bench/table to connect cables 2. Plastic panel removal tools. Yes, a padded screwdriver will work but these sets are less than $5 and you might find them handy for lots of things. 3. A small flat blade screwdriver or two to help remove connectors 4. A nut driver or small socket wrench and extension 5. Two sockets, 7/32 and 7mm. Yes, I know what kind of crazy is that. Ford is caught in a land between SAE and Metric. 6. A wire stripper (whatever you normally use) 7. A wire cutter 8. An Add-a-Fuse (for camera power) and a connector for the ground lug. 9. A couple of feet of fairly stiff wire to help feed the video cable through the firewall 10. A magnet on a stick to pick up the screws you're going to drop into hidden places 11. Not necessary but a magnetic tray to keep all your fasteners in one place is a handy addition to your tool cabinet. 12. A flashlight Optional: Someone with skinny arms and small hands that you can draft to help in tight areas (behind the glove box for example) Not so optional: While you're waiting for your parts to arrive watch This YouTube Video. It will make accessing your APIM so much easier if you're not guessing what to remove in what order and how. It's very detailed and will take a lot of the apprehension out of doing the job. If you follow the instructions in this video (remembering patience and finesse trump anger and brawn) you won't break anything. How To Do It (2 Parts, Camera Install/Module Install) The Camera 1. I'd suggest not permanently mounting your camera just yet. You don't know how you'll want to aim it or whether it needs to be flipped (mine was manufactured with the camera upside down). Just tuck it in the grille or (if your camera has a quick disconnect plug) just set it aside for right now. 2. Sort The Wiring. You're going to have a red and a black wire that will run to a switched source in the right side fuse box (or any other switched wire). Using an Add-a-Fuse connect the red wire to any circuit you want. I chose the one pictured just because I've already used two others for earlier projects. Cut the excess wire from the harness, connect to the Add-a-Fuse and plug it in. Now run the black (you might have to splice in a little extra) ground wire back to the grounding post on the firewall. It's just to the right of the battery. 3. The Other Side of the harness will include a yellow RCA type video plug and a red (trigger) wire. That's going to go the 'other' direction, over to the passenger side and through the same grommet Ford uses to pass its own harness through. There are multiple ways you can get that connector from under the hood into the cabin. The 'easy' way is to pull on the grommet until you've got it away from the firewall a little bit. The PROPER method is to (carefully) cut a hole in the grommet using your wire nippers or other tool. The perfect spot is the area near the top of the grommet where you'll see a circle. That area is clear of other wiring behind the grommet (always check to be sure though). With your path decided, run a piece of thick (16 or 18 gauge) wire through the opening. Inside the car you'll lower the glove box all the way (disconnect the soft drop arm on the right then push 'in' on the tabs up top of the opening. The lid will drop out of your way. With a helper, push that fish wire into the cabin until the helper can get a (small) arm around the back of the heater assembly and pull a foot or two out. Tape the wire to your video cable and pull it into the cabin. Pull enough to reach the center of the car. 4. Your Camera Is (mostly) ready to go. Time to start working on the other side. The Module 1. When You Receive Your Module you'll also get several pages of instructions. Some suppliers might provide really great, insightful instructions, others you might have to...uh...do a little interpreting. Here's a link to view and download the instructions that came with my module choice. Notice none of it is difficult, you just have to pay attention. 2. Get comfortable and let's do this! Follow the video instructions to remove, unplug and reorient center console parts so you can remove the APIM. With that out, head for a workbench or table (with towel for padding) and begin removing connections from the back. Don't force anything! Every connector in my '16 Edge came part easily with just a little bit of wiggling. Use a small screwdriver if you need to to press latches. 3. Identify your connections go ahead and plug in the giant cable that connects the APIM to the original big cable in the car. Also go ahead and connect the video cable (two plugs will probably connect to your APIM. A single plug on the other end of the cable will connect to the 'one' plug you removed from the back of the APIM but don't connect it yet. The rest of the connections you might want to test fit but don't lock anything in just yet. You'll find out why in the next step. 4. Carry your APIM and Module to the car. Here's a HUGE tip that'll save you a bunch of time and head scratching. That module and all those cables will NOT ever, not never, no way no how fit into the space you have behind the APIM. Take a look at the photo (right). I tried. I folded, I bundled and I stuffed but as you might have heard, two objects can not occupy the same space at the same time. So it is with this. Good news, there's PLENTY of space just to the right of the passenger side air vent. 5. Take a look at the area above the glove box and to the right of the passenger side air vent. There's a nice metal brace there that makes a perfect shelf for the module. With your APIM connected to the large cable and the video cable run the additional harness wiring through the opening to the right of where the APIM nestles and into the empty space above the glove box. Now start connecting things (photo right) with an eye toward threading the module up into the space (everything connected). 6. With Everything Still Loose it's time for a test. If you haven't already done so, connect your camera to the harness under the hood. Press your Start button once. Your APIM should start just as it normally does. Now, if your module came with a button to activate the front camera press it. If yours uses a different function (some use the radio on/off button, others use one of the steering wheel buttons) press it. If everything is connected properly you should have a picture from your front camera. Don't worry if it's not aimed correctly or even upside down. You can fix that later. If it worked it's time to tidy up. First, move the module up into its final resting place (pic right) held in place by a couple of long Zip ties. 7. Replace your APIM carefully tucking in that big cable and any other wiring from your interface. DO NOT force anything. With the module over above the glove box there's now plenty of room. With the APIM in place (no screws yet) do another test just to be sure everything functions as expected (again, don't worry about the camera aiming). 8. Button Everything Up re-assembling your console in the reverse order you removed everything. If you can do this without dropping one of those 7/32 screws into the dark unknown of the console you're doing better than me. 9. If necessary start working on the camera to get it right where you want it. Again, how you do this will be dictated by the camera you chose. If the video was upside down you just have to turn the lens 180 degrees with some cameras. Others you might have to take apart and flip (aren't you glad you didn't tighten everything down a the beginning? Lock the camera down when you're happy with what you're seeing. Zip tie everything, cover wiring with some loom to make it look pretty. 10. You're Done! _ -
You'll find a fill plug on the outboard (passenger) side of the PTU. Remove that and add fluid until it begins overflowing that opening. At that point the fill is exactly where it should be.
-
A search of this forum brought up this thread (second message includes instructions):
-
release cable Rear seat won't release
Gadgetjq replied to Brady's topic in Interior, A.C., Heat, Interior Trim
Try lubricating the latch with a spritz of silicone lubricant spray. -
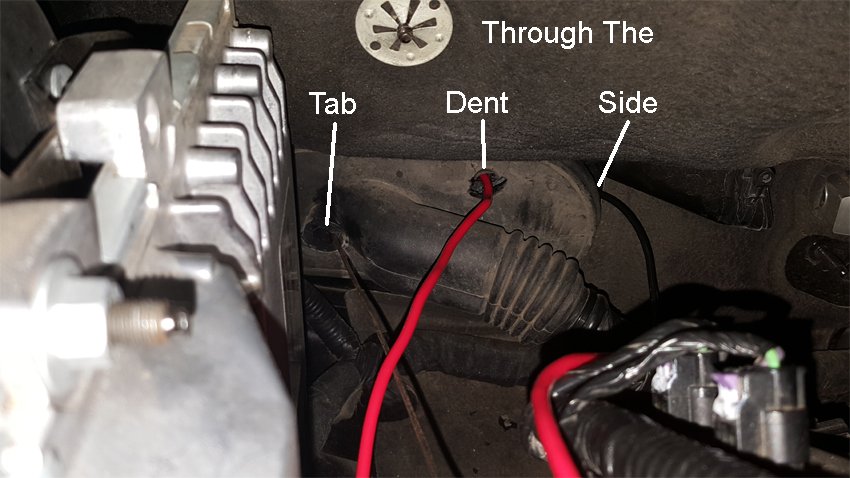
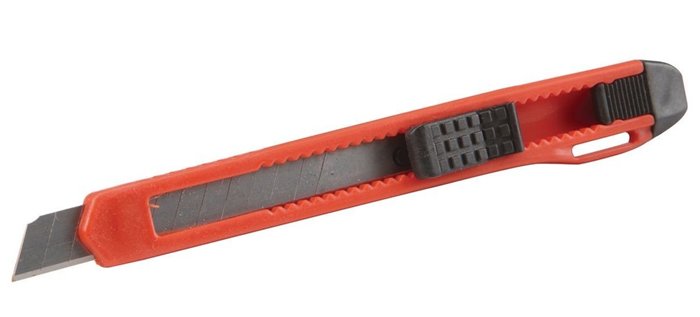
Thanks for the video! Your tips are going to be very helpful to others with wiring plans for their cars. All due respect (and I respect the hell out of anyone who dives in to do their own work) I have one suggestion. The video shows penetration of the firewall around the 'edge' of the grommet. While it's certainly the easiest (and maybe most realistic) way to pull 12 feet of heavy cable through it also seems to be asking for trouble with the wire insulation squeezed between a sharp metal edge on one side and the grommet edge on the other. Maybe a thin metal collar around the wire would help protect it. I just had to do this for a different sort of project (adding a front camera) and spent quite a bit of time working with that grommet. There are actually three ways through. For each you'll pull the grommet away from the body so you can reach behind it and make sure no vehicle wiring is in your path. 1. Around the edge as shown in the video. This is definitely the easiest. You should wrap extra tape or put something like a piece of metal tubing around your wire to protect it from the sharp metal body. 2. Cut off the rubber teat (there's probably a technical term) that protrudes from the grommet then, using a small but very sharp knife carefully cut out that section of the grommet. 3. As you look at the grommet you'll notice an indentation or circled area. That's actually the best way through. The grommet is a little thinner in that spot and there's no vehicle wiring directly behind the area. It's very easy to use a sharp knife or snap blade (shown below) to very carefully carve a circle in whatever size you need for your wire. I'd suggest not caving to the urge to use an electric drill. To route wiring through the opening I suggest you use a piece of stiff wire (16 gauge works well) shoving at least a foot through the grommet. That will give you enough slack to find behind the heater box (reaching through the glove box opening) to find that fishing wire. Attach your power or other wire to that and (best with a helper) pull it all through. Now you have a well protected power wire with no worries it'll ever short against the body of the car and create the dastardly magic smoke. The photo below shows the three ways through the firewall. At the far left is a piece of stiff wire pushed through the area where the tab/teat was removed (kind of hard to see), in the center is the 'dent' penetration and at right is wire routed through the side between the grommet and body. Cheers!
-
Key FOB AND manual key won't work
Gadgetjq replied to brahmabull's topic in Alarms, Keyless Entry, Locks & Remote Start
Carol, Did you try the keypad on the driver's door? Enter your personal or the factory code. Once you're in the Edge if it still won't start put the fob in the tray at the bottom of the center console 'then' try the Start button again. If the Edge starts now you can be pretty certain the batteries in both of your fobs are goners. If those batteries have never been replaced it's probably about time anyway. -
I 'might' have stumbled over a solution to this problem! While messing around with FORScan recently I decided to do a reset of the ABS module. I don't know if this will be a long term fix but now my brakes are predictable from a normal stop and that low speed grabbiness is gone. I can now brake without getting the 'furry eyeball' from my frequent passenger and chief navigation specialist in the right seat. I'll update this if the obnoxious braking returns but for now the fix seems to be in.

-
Using "Unread" view & going to first unread posts.
Gadgetjq replied to omar302's topic in Forum Help & Site Suggestions
Great post Omar! One addition, depending on your screen setting you may or may not see that 'Unread Content' text at the top right. If you're zoomed in that text disappears and is replaced by a box icon (see pic below) that does the same thing. It can get a little confusing if you're zoomed in at, say, 150% to make text larger.
- 1 reply
-
- 1
-

-
Moving from Texas TO California? That's certainly bucking the trend but at least renting a UHaul will be really cheap. I'm in Arizona (another alternative for the flood of fleeing Golden Staters). A truck from here to Southern California rents for $100 but coming this way is $1000. To answer your question, just spend a lot of time reading through this section of the forum to get ideas. Pay special attention to the 'What Have You Done To Your Edge Lately?' thread. If you're on Facebook look for the MacT Ford Edge group. Every group has its own personality. While many seem focused on changing wheels and comparing paint, that group gets serious about mods and maintenance.
-
Using FORScan change: Double Honk Leaving Car When Engine Running On/Off BdyCM 726-41-02 0001 0000 0071 (Double Honk Enabled, Default) 0000 0000 0070 (Double Honk Disabled) # 4th/12th digit number is 1: double honk enabled ****** # 4th/12th digit number is 0: double honk disabled ******
-
Same issue, same fix.
-
Here's the first link that pops up in an online search. It's the NTSB posting of TSB-19-2205 https://static.nhtsa.gov/odi/tsbs/2019/MC-10164470-0001.pdf
-
OBDLink Announces New Wired OBDII Reader
Gadgetjq replied to Gadgetjq's topic in Accessories & Modifications
Hey Bill, Thanks for posting the follow up. I received pretty much the same message. All is well in OBDLink land. -
Hi Terry, If you find a pad that works be sure to let everyone know. Edge owners have complained for years about this and pad replacements (to ceraminc) are sometimes suggested but I've never seen anyone say they 'fixed' it with a specific pad.