


Gadgetjq
-
Posts
608 -
Joined
-
Last visited
-
Days Won
58
Content Type
Profiles
Forums
Gallery
Everything posted by Gadgetjq
-
 I'd try local auto salvage first (looking for a '15-'18 Edge) and if that doesn't work out hit the online vendors like https://www.car-part.com/ As already discussed the drawer looks like the photo (below) and just snaps right into the area your panel occupies. Use a coin holder (also discussed earlier with links) to hold your small change.
 -
If you're using Android Auto in your Edge you should check out this Android Central article. There may be some tricks you've missed: https://www.androidcentral.com/how-use-new-android-auto?utm_source=feedburner&utm_medium=feed&utm_campaign=Feed%3A+androidcentral+(Android+Central)&utm_content=FeedBurner
-
LED brake lights delayed turn off
Gadgetjq replied to TheFloppyWeasel's topic in Accessories & Modifications
This probably has nothing to do with the LED bulbs which actually react 'more' quickly than incandescent bulbs. Find your brake light switch near the brake pedal. It's probably gotten a little sticky over the years. Give it a quick squirt of silicone lube then work the pedal a few times. Fixed? -
What have you done to/with your Edge/MKX today?
Gadgetjq replied to WWWPerfA_ZN0W's topic in Accessories & Modifications
What year? -
Tons! You need to identify what you need then start searching for it. eBay is a good place to start but there are so many specialty sites (Pinterest, Etsy, Instructables etc) now where people are selling lots of creative items. If all else fails create your own solution. Do the console mod! That should work just as well for the 1st gen Edge. Check out a few of these pages: https://www.pinterest.com/organizingmoms/car-organization/ https://www.goodhousekeeping.com/home/organizing/g2414/car-organizing-ideas/ https://www.happychappybrands.com/car-organization-hacks/
-
Reading the owner's manual for your year there's no mention of a shock alarm, only unauthorized entry. That's the same as other edges with the OEM system. If you're certain nobody has ever installed an aftermarket shock sensor I'd suspect a faulty hood or other door switch. Just for grins n' giggles lock your Edge then try slapping the front of the hood. If that doesn't do anything try each door. That'll help when you take the car to the dealership to have it repaired.
-
Aftermarket amp dash wiring 2018 edge
Gadgetjq replied to Sledwrecker's topic in Audio, Backup, Navigation & SYNC
Hi Sledwrecker, Nice job describing your project! This is going to be helpful to anyone else planning to upgrade their Gen2 Sony system. A request. Can you post a photo of the behind the glovebox location of the pac? I've mounted a front camera module in that same area (cross brace above the glove box) but suspect your solution is a better one. Thanks! -
See how smart you are? I live in the Desert Southwest so umbrellas aren't exactly top of mind items until monsoon season arrives. That's when I'm usually asking the bride if she remembers where 'I' put the umbrella last summer
-
I've added a couple of storage tips (solutions?) to the Gadget Console Mod page posted earlier: https://www.gadgetjq.net/edge/console/console.html#more More Storage Tips If your co-pilot is always looking for a spot to place their phone or you need a spot to keep small things take a look at this! It's a drop in 'cup' that turns your front door handle into a storage space. Double sided tape is pre-installed on the bottom if you choose to stick them in place or leave them loose to take your M&Ms with you. The padded (rubber) label with the Edge monogram sits loose on the bottom of the cup to make cleaning simple. The photo (right) shows just the cup, on the left it's installed. Have you looked at the outside edge of your front seats and wondered what that little tray is for? The owner's manual is no help for this one. Some have suggested it's a simple effort to catch things you've dropped before they can roll under the seat. That might be right but....it's also a handy dandy place to keep your collapsible bumbershoot (umbrella).
-
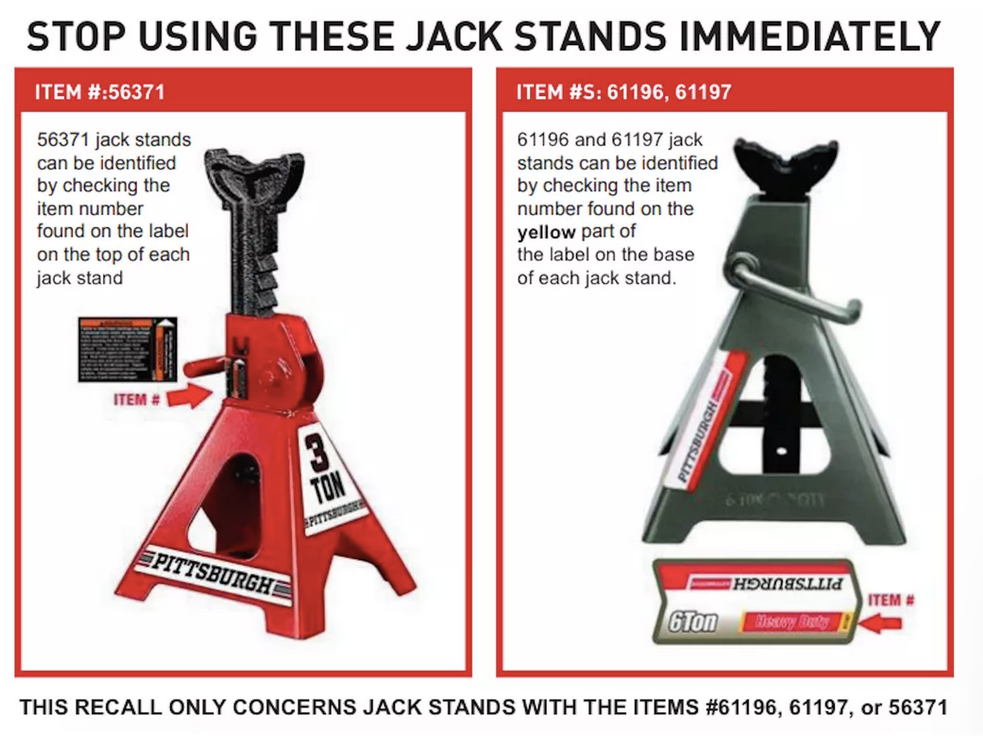
Several model numbers are being recalled because they can unexpectedly collapse (not a good thing in a jack stand). Here's a link with all the info you'll need: https://www.cnet.com/roadshow/news/harbor-freight-recall-jackstands-collapse/?ServiceType=facebook_page&TheTime=2020-05-19T23%3A00%3A12&UniqueID=7EC4748E-9A24-11EA-8E3A-80CAC28169F1&ftag=COS-05-10aaa0a&PostType=link&fbclid=IwAR16iajXdOMeKQPrNjEvEkVtP7YDiMqXeCHO5pZf0ihMnyIUCumQ0eQwAYY
-
2015-2018 V6 Edges still have internal coolant pump?
Gadgetjq replied to y2ksilverbullit's topic in 3.5L
The water pump is still internal in the 2018 3.5L but gaskets, drive chains and other parts are vastly improved over your 2008 version. With proper maintenance the pumps in 2011 and later Edges are (mostly) lasting a very long time. -
2011-2014 3.7 V6 Edges still have internal coolant pump?
Gadgetjq replied to y2ksilverbullit's topic in 3.7L
In 2011 the 'internal' water pump was upgraded with better gaskets, a double roller chain to drive the pump and, I believe, an extra weep hole that helps give fair warning in the event of gasket failure. The water pump in all 3.5 and 3.7 Edges are internal through 2018. The engine was discontinued in the Edge in 2019 in favor of the 2.0L and 2.7L Ecoboost engines. Regular maintenance including coolant changes every 30k miles along with oil changes as required seem to have reduced the failure problem significantly. In fact complaints have 'almost' disappeared for Gen2. The big issue now is coolant intrusion into the block of the 2.0L engine. -
I'm happy to hear it worked for you TK! Now to retrain your braking foot to press just a little harder than before.
-
Can I disable artificial engine sound in cabin?
Gadgetjq replied to Jombi's topic in Interior, A.C., Heat, Interior Trim
A Car & Driver article mentioned the piped in sound for the ST noting it only happens when the 'sport' button is pressed. That kind of makes sense. -
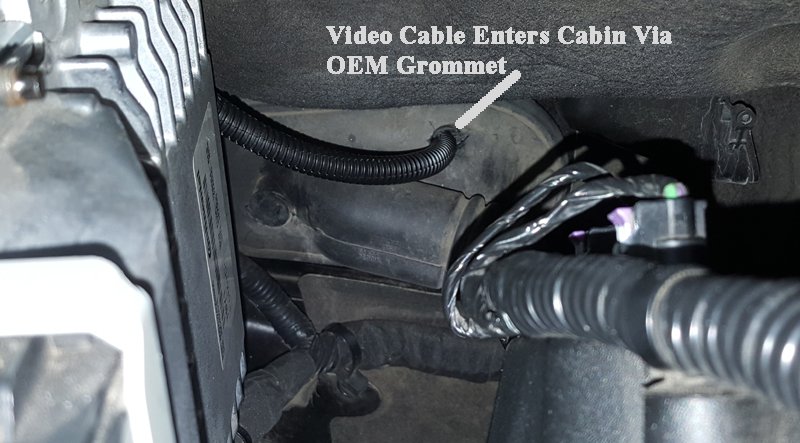
Hi Fred, You're on the right track. There are two grommets in the firewall. One is below the battery holder (battery has to come out to find it) the other is on the passenger side and is the one I used to run my front camera wiring (see pic). If you look closely you'll see a circle molded into the grommet. That can be the path for your underglow wiring. To get through it I pulled the grommet away from the firewall enough to get a finger behind it in the area of that circle and confirm there was no factory wiring in that spot. Then I used a sharp blade to carve out the circle. The grommet under the battery might have the same design, I never looked.
-
This is a very common issue. It's usually the blend doors that have stopped working correctly. Fortunately the fix (unless something has gone very wrong) is easy. With the ignition on, press your ventilation power button and your defrost button simultaneously. Hold them for several seconds. You may hear a click. After the click (or ten seconds) release the buttons and press the power button again. Your system 'should' begin operating normally (with the engine running of course). If it doesn't, try it again. I've seen forum reports indicating owners have had to do this multiple times but eventually the doors came around to their way of thinking.
-
What have you done to/with your Edge/MKX today?
Gadgetjq replied to WWWPerfA_ZN0W's topic in Accessories & Modifications
It's past time to escalate this issue to your regional Ford rep. Ask them to take your car away from the current shop and have the work done elsewhere or whatever solution you can live with. Your current shop is obviously inept. Call if you are in the United States, dial 800-392-3673, if you're in Canada 800-565-3673. If you're elsewhere check your owner's manual. Or use your Ford.com account. Click "About Ford" then "Company Information" and "Contact Ford." Scroll down to the eMail section and find "Email us about vehicles and servics." Follow the rest of the prompts from there. Good luck! -
What have you done to/with your Edge/MKX today?
Gadgetjq replied to WWWPerfA_ZN0W's topic in Accessories & Modifications
Added a shelf to the center console. Details here: -
This easy mod and many others can be found on my Gen2 Edge Mods page: https://www.gadgetjq.net/edge A Renovation Project For Your Console Take That Deep Dark Hole To A Whole New Level I know, you've been waiting for a project that will cost less than ten bucks and doesn't require any modification to your Edge's electronics. Well, this is that project! This project will add a simple shelf inside that cavern we call the center console. The result, there's still plenty of space for large things you rarely use (the old GPS, charging cables etc) and you'll still have the original little top tray (photo top) for the little things you like to keep handy but now you'll have an actual shelf for a second pair of sun glasses and other items. Oh, did I mention this could cost as little as a dollar or as much as $10? It's a beautiful thing having choices. What You'll Need 1 - Old file folder for making patterns. Construction paper would work too. 1 - Sheet of Readi-Board. This is a quarter inch thick foam board with paper applied to both sides. The cost? One dollar at....The Dollar Store Pencil, scissors, sharp blade and possibly a scroll or band saw if you choose to use the optional MDF as a finish material Optional: A 2x2 sheet of 1/4" MDF (enough to do this project 3 times over), Paint How To Do It 1. Empty your center console. Toss all the assorted clutter that's found its way down there over time. 2. Cut your file folder in half lengthwise and start making your pattern along one wall of the console. The other wall will match exactly so you only have to do this once. You can make the height any dimension you want. I chose to put my new shelf right below the 12V powerpoint. While making your paper pattern you're going to notice whoever designed the console had a twisted sense of humor. The walls aren't straight, the ends are sloped and then there's the emergency tray where you put your fob in the event the fob battery dies (or you can't remember your factory security code for the keypad). As you can see in the pattern photo (right) I started with a full piece at the rear with a cutout for the built in light. In the end I dumped that because of the slope and curvature of the wall. The front is open so you still have easy access to the fob tray in the event you have an issue with the fob battery. 3. With your paper pattern made for the sides and lid (you might end up making several which is what the other side of the folder is good for) and tested for a rudimentary fit, transfer the patterns to your Readi-board. For this a very sharp knife or other blade (not scissors) will be handy. Do another test fit with your pencil and knife handy to make changes. If something needs to be expanded a little, use a piece of file folder taped to the foam pattern. 4. Fit the lid with cutouts as necessary to get around the charging port and other (mysterious) intrusions. You'll want to drill a hole in the lid for easy removal or install a knob of some sort. Totally up to you. 5. At this point it would be a good idea to start stashing your stuff. Does everything fit the way you thought it might or...would it be handy to have yet another shelf? That's the beauty of this project. You can do anything you want and to this point it's all just paper and easy to modify foam! 6. You can now choose to rest on your laurels You've got a perfectly serviceable shelf made from foam board. Put a small dot of silicone glue on each of your new sides and stick them to the inside of the console (a tiny piece of Velcro would work too) OR go one step further so you can be proud of your work. 7. A small 2x2 pre-cut piece of MDF at The Home Depot will cost you about $4. With that in hand, transfer your foam patterns to the MDF. If possible use a straight edge to keep everything in line (the foam edges are probably a little wavy). Cut out your parts using a scroll saw, band saw or whatever you have. 8. With your parts cut test fit them. Sand or file as necessary to make everything fit correctly. 9. Now it's time to make things pretty. Paint your MDF in the color of your choice. When the paint is dry you might want to glue a layer of felt on top of the new 'shelf' not only to make it look nicer but to prevent rattles. 10. You're Done! Less than $10 and an hour or two of quality time inside your Edge has produced an entirely new center console experience you should be proud to show other Edge owners. But wait, there could be more! Now that you've got both sides and a lid how about adding a little divider? Again, make it any height and location that works with the items you tend to keep down there. Paper Then Foam Pattern Then MDF Place Divider Where It Works For You Add Your Stuff & Replace The Lid
-
What have you done to/with your Edge/MKX today?
Gadgetjq replied to WWWPerfA_ZN0W's topic in Accessories & Modifications
Wow, sorry to hear this. The '13 is 'after' the improved seals and double drive chain and your Edge looks really well cared for. Did you just notice coolant at the weep holes so you know the pump is on the way out with plenty of notice or did it get to 'kill the engine' stage? How many miles are on the car? -
Ok, ya know all that stuff I told you earlier? Fuhgetaboudit You're probably just going to have to reach down and hit your radio 'off' button on the dash.
-
You didn't offer the year of your Edge so I'm kind of shooting in the dark here. Plowing through a couple of FORScan spreadsheets this is the closest thing I can find. If you reset the timeout to "off" then 'maybe' the radio will shut off when the engine does. No guarantees. The other times (30,40,60 minutes) shut the radio off at that time setting if you've pushed the radio power button (engine off) or if you turn the engine off and leave the radio playing. Stereo Extended Play 17-19MY APIM 7D0-01-01 xx*x xxxx xxxx A=off 2=20min 4-40min 6=60min Please let us know if it works, there may be others who want to do the same now or in the future and all they'll have to do is use the search to find the solution.
-
What have you done to/with your Edge/MKX today?
Gadgetjq replied to WWWPerfA_ZN0W's topic in Accessories & Modifications
Look ma, no hands! I cobbled together a quick video showing how the Meross Garage Door Opener module works in my Edge and via (Alexa) voice command. The video is on YouTube here: Details are on the Gadget Edge page here: https://www.gadgetjq.net/edge/garage/gdopener.html -
Clarification on a few Forscan Codes
Gadgetjq replied to soUNTOUCHABLE's topic in Accessories & Modifications
FORScan is a program you can download and use for free (2 month renewable license). Here's a link: www.forscan.org Here's the catch. Not all OBDII readers are created equal. The inexpensive ones you commonly find on eBay will only read 'some' of the Ford's modules. You need to use either a cabled type reader that has a mode switch built in, a slightly more expensive cabled reader that does the switching for you or a really good wireless reader if you want to free yourself from the cable and use your phone (and appropriate software) to view vehicle data. So, more links: Here's a switched cable type that many people use: https://amzn.to/3fsJnck Here's the automatic switched cable type: https://amzn.to/3fqwhfs Here's a very good wireless reader from OBDLink (works with Android): https://amzn.to/2WxbjTI And another OBDLink offering that works with iOS and Android: https://amzn.to/2zgmqs6 (Wait for it to go on sale during Amazon Prime Days) And finally, I'm not sure FORScan will add your camera distance lines back. It's my understanding (possibly wrong) that is actually built into the camera. Maybe it depends on whether you're using an aftermarket camera or an actual Ford replacement for your model year. You'll want to take a look at one or more of the FORScan tutorials to find that information. Here's a good one: https://docs.google.com/document/d/1-8dKaS_Spu4Zw4hV_CrKC4tLoP9G8yejqegF1wxIqxY/edit Cheers! -
Add A Charger Quick Connector To Your Battery
Gadgetjq replied to Gadgetjq's topic in Accessories & Modifications
Hey guys, thanks for the heads up. I saw those but couldn't find the mate for the charger side I don't have a Battery Tender and my maintenance charger uses the same type of plug I used. I guess it'll depend what people already have on the charger end. I've added your option (as a simple solution) to the web page version of the mod. This may come as a shock to some but my drummer marches to a different beat than many others. I just enjoy creating a 'novel' way around a problem (or sometimes just create solutions where there was never a problem). In the end it's fun, people read these things and, hopefully, develop their own ideas to match their situation. BTW, if anyone can find the plug that mates to that pigtail and isn't part of an existing charger please let me know! Cheers!

