Nick Halstead Posted January 14, 2018 Report Share Posted January 14, 2018 Nick, with that before and after shot of the F150 tailgate, was it just polished out and coated? Huge difference, you can't see any of the vertical surface scratches that were there before that was just two passes with compound, haven't got to coating yet Quote Link to comment Share on other sites More sharing options...
Nick Halstead Posted January 14, 2018 Report Share Posted January 14, 2018 Did either of you guys remove the exhaust bezels? i know someone here did so they could be wrapped or something, and i think it was one of you two. I'm fabricating a 2.5" exhaust for it and as it turns out, those bezels aren't large enough to get a 2.5" tailpipe through. my original plan was to put staggered quad tips on it, hanging out of the bezels slightly. after buying all the parts before measuring (because after all, I was more excited about the project than actually planning it out) the bezels won't allow for a 2.5" pipe to hang out of the back. so I have a 2 options... I'm either going to cut off the bottom of the bezels, and wrap them/paint them black, and then put the quad tips on OR I'm going to go extreme. I think I can weld a plate to the thin metal piece inside the bezel, and paint the whole area, to eliminate the exhaust cutout entirely. Then I'm thinking of making it a center exit, like the corvette or i can put some space between them, like the bmw m3 . either way, I can make the cutout, and put a nice bezel or trim piece in there and make it look like it belongs. obviously more labor intensive, but way more unique. Nick, i know you wanted to go 3" exhaust at some point. As long as you're not planning to have the exhaust show out of the back, you'll be fine, because the current tailpipe out of the muffler is 2.5", it just hangs inside a bit for clearance. but if i'm going to put the effort in to make a custom exhaust, i want people to see it! I was removing the shroud and the bracketry so I could run quad 4in tips Quote Link to comment Share on other sites More sharing options...
roots57 Posted January 14, 2018 Report Share Posted January 14, 2018 (edited) Turned out pretty good, we'll see how it holds up, I used some leftover 3M primer 94 around the edges so hopefully it will help. But there isn't near the same adhesion you get on paint. I was able to cut my 12" x 96" piece in half the long way so I still have enough to redo it with better primer if it fails. Gona do the side skirts too, they're even easier. Edited January 14, 2018 by roots57 4 Quote Link to comment Share on other sites More sharing options...
Xtra Posted January 15, 2018 Report Share Posted January 15, 2018 Looks great! 1 Quote Link to comment Share on other sites More sharing options...
Nick Halstead Posted January 15, 2018 Report Share Posted January 15, 2018 Turned out pretty good, we'll see how it holds up, I used some leftover 3M primer 94 around the edges so hopefully it will help. But there isn't near the same adhesion you get on paint. I was able to cut my 12" x 96" piece in half the long way so I still have enough to redo it with better primer if it fails. Gona do the side skirts too, they're even easier. ok, now you have jogged my memory, I dud do my drivers side skirt as a test. It looked way better IMO, but it didn't hold and the ability to NOT get 3m primer 94 in hawaii was the deal breaker. It lasted like 3 weeks and then it started flapping in the wind. 1 Quote Link to comment Share on other sites More sharing options...
roots57 Posted January 15, 2018 Report Share Posted January 15, 2018 ok, now you have jogged my memory, I dud do my drivers side skirt as a test. It looked way better IMO, but it didn't hold and the ability to NOT get 3m primer 94 in hawaii was the deal breaker. It lasted like 3 weeks and then it started flapping in the wind. No primer 94 allowed in HI? That sucks huh. I only had a few ampules left so I'm pretty sure I will be redoing it in the near future, I want to apply it to more area, especially in the little corner recesses. This time I'm gona buy the small tub instead of the glass ampules, those only have about 1ml in them and it goes quick. 1 Quote Link to comment Share on other sites More sharing options...
ezndo Posted January 15, 2018 Report Share Posted January 15, 2018 Exhaust shrouds need to be removed for quad M3 tips 1 Quote Link to comment Share on other sites More sharing options...
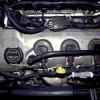
ezndo Posted January 15, 2018 Report Share Posted January 15, 2018 Here is mine 2 Quote Link to comment Share on other sites More sharing options...
MaX83_ZA Posted January 15, 2018 Report Share Posted January 15, 2018 Here is mine That looks fantastic. I noticed the 2018 Ford Explorer Sport and Platinum now also comes with Quad tips! 1 Quote Link to comment Share on other sites More sharing options...
roots57 Posted January 15, 2018 Report Share Posted January 15, 2018 Here is mine Nice, that looks better than I thought. Did you have to cut away the original bezel brackets to clean it up? Is there enough room to move them over towards the middle slightly more so that they are perfectly centered? 2 Quote Link to comment Share on other sites More sharing options...
MaX83_ZA Posted January 15, 2018 Report Share Posted January 15, 2018 Nice, that looks better than I thought. Did you have to cut away the original bezel brackets to clean it up? Is there enough room to move them over towards the middle slightly more so that they are perfectly centered? Also, how much better do they sound? 1 Quote Link to comment Share on other sites More sharing options...
Dehcure82 Posted January 15, 2018 Report Share Posted January 15, 2018 Max83_za what tip did you use? 1 Quote Link to comment Share on other sites More sharing options...
Mikula Posted January 15, 2018 Report Share Posted January 15, 2018 Here is mine looks awesome. I pulled mine off to test the theory and decided that's what i was going to do. your picture finalized it for me! what size are the outlets on that? are they 3"? i can get the quad tips with 2.5", 3", or 3.5" outlets and i'm trying to decide which will look best. 1 Quote Link to comment Share on other sites More sharing options...
Nick Halstead Posted January 15, 2018 Report Share Posted January 15, 2018 Here is mine I'd want them bigger 2 Quote Link to comment Share on other sites More sharing options...
Mikula Posted January 16, 2018 Report Share Posted January 16, 2018 lol jesus nick... you're not allowed to use photoshop! 2 Quote Link to comment Share on other sites More sharing options...
roots57 Posted January 16, 2018 Report Share Posted January 16, 2018 Ordered the 8oz can of 3M primer 94 and some more carbon fiber film to do the side skirts this weekend. Also ordered an empty paint pen with an 8mm wide chisel tip as a convenient primer applicator. I agree with you Nick, I think the carbon fiber vinyl looks way better than the plain textured plastic, I'll post some pics when I'm done, but the primer is essential on this plastic substrate if it's going to last. Probably attempt the rear splitter at some point to finish the look, but it may require doing inlays so it will be a challenge for sure. The front splitter wrap survived a power wash today at least. 1 Quote Link to comment Share on other sites More sharing options...
Nick Halstead Posted January 16, 2018 Report Share Posted January 16, 2018 lol jesus nick... you're not allowed to use photoshop! 3 Quote Link to comment Share on other sites More sharing options...
ezndo Posted January 16, 2018 Report Share Posted January 16, 2018 Just completely remove the Edge exhaust bezels and bracketry, no cutting required. The tips are from my old 2013 M3 that I had lying around - one tip fits over the Edge exhaust pipe while the other “dummy” tip is welded to it. No difference in sound. 1 Quote Link to comment Share on other sites More sharing options...
roots57 Posted January 16, 2018 Report Share Posted January 16, 2018 Just completely remove the Edge exhaust bezels and bracketry, no cutting required. The tips are from my old 2013 M3 that I had lying around - one tip fits over the Edge exhaust pipe while the other “dummy” tip is welded to it. No difference in sound. Still the stock exhaust right? Quote Link to comment Share on other sites More sharing options...
MaX83_ZA Posted January 16, 2018 Report Share Posted January 16, 2018 I would do that, but staggered like a GTR 2 Quote Link to comment Share on other sites More sharing options...
roots57 Posted January 16, 2018 Report Share Posted January 16, 2018 Yes, I was thinking the same thing, offset them so the outboard tips are slightly shorter, that would look really good. That way they would probably line up more with the curvature of the bodywork in the corners. 3 Quote Link to comment Share on other sites More sharing options...
Mikula Posted January 17, 2018 Report Share Posted January 17, 2018 Yes, I was thinking the same thing, offset them so the outboard tips are slightly shorter, that would look really good. That way they would probably line up more with the curvature of the bodywork in the corners. my plan exactly. they are going to be slant cut and staggered with the burnt tips. should follow the body contour nicely. found a pair on ebay for less than $100. planning on having them sit about 3/4"-1" out from the bumper Quote Link to comment Share on other sites More sharing options...
ezndo Posted January 17, 2018 Report Share Posted January 17, 2018 Yup Still the stock exhaust right? Quote Link to comment Share on other sites More sharing options...
MaX83_ZA Posted January 17, 2018 Report Share Posted January 17, 2018 So the old gal got a well deserved clean!! For those interested: Sonax Polymer Net used for sealant with a Turtle Wax Carnauba ontop of it. 2 Quote Link to comment Share on other sites More sharing options...
WWWPerfA_ZN0W Posted January 17, 2018 Author Report Share Posted January 17, 2018 Nice Nice Nice! 1 Quote Link to comment Share on other sites More sharing options...


Recommended Posts
Join the conversation
You can post now and register later. If you have an account, sign in now to post with your account.
Note: Your post will require moderator approval before it will be visible.