gjb89 Posted June 9, 2016 Report Share Posted June 9, 2016 I have a non HID option and wanted the extra light output so i did a h9 to h11 & 9005 to 9011 conversion. Well worth the hour of time spent. 1 Quote Link to comment Share on other sites More sharing options...
WWWPerfA_ZN0W Posted June 9, 2016 Author Report Share Posted June 9, 2016 Any comparative photos? Quote Link to comment Share on other sites More sharing options...
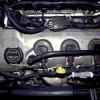
WWWPerfA_ZN0W Posted June 13, 2016 Author Report Share Posted June 13, 2016 Had the joy of driving in hot weather without a working fan As soon as I started the AC, the fan came on full strength and then quit. Everytime I tried to restart the fan, it just rumbled, and grumbled, but threw out very little air. So, decision time! Replace the fan myself, or get it done under warranty ... Quote Link to comment Share on other sites More sharing options...
Nick Halstead Posted June 14, 2016 Report Share Posted June 14, 2016 I have a non HID option and wanted the extra light output so i did a h9 to h11 & 9005 to 9011 conversion. Well worth the hour of time spent. BEST OPTION! Glad to see someone installing correct filament in their halogen based lighting. 2 Quote Link to comment Share on other sites More sharing options...
Brucifer Posted June 14, 2016 Report Share Posted June 14, 2016 I have a non HID option and wanted the extra light output so i did a h9 to h11 & 9005 to 9011 conversion. Well worth the hour of time spent. Is there a How To on this? Quote Link to comment Share on other sites More sharing options...
WWWPerfA_ZN0W Posted June 14, 2016 Author Report Share Posted June 14, 2016 (edited) Great howto on this site: http://www.toyota-4runner.org/5th-gen-t4rs/150621-how-headlight-bulb-conversion-h11-h9-9005-9011-a.html How To: Headlight Bulb Conversion (H11 to H9 & 9005 to 9011) I've gotten a lot PMs requesting instructions on doing this relatively cheap light bulb mod, so I decided to make a new thread and make life easier for everyone. Just to be clear, there's already a lot of threads floating around on the internet on how to do this, so I am not trying to take credit for anything. I figured everyone loves pictures and I happened to snap a few when I did this a few months ago, so why not share Before I begin, please note that this is not street legal nor DOT approved, so proceed at your own risk. Obviously, it's going to be pretty hard to tell since everything looks factory (just brighter), so chances of getting ticketed are next to nil. Also, the factory harnesses and fuses should be able to handle these just fine since we're only bumping up the wattage a tiny bit. Lastly, the slight additional heat generated from the new bulbs should fine as well since it's basically just putting a standard high beam bulb in place of a low beam bulb.To do this mod you will probably need some wire clippers, small files, needle nose pliers and maybe even a Dremel, if you have. The pictures speak for themselves so you decide on how you plan to attack this. Personally, I just used a wire clipper and a needle nose pliers to nip off the excess material; then cleaned it all up with a variety of metal files.Parts:-2x Amazon.com: Philips H9 Standard Headlight Bulb, Pack of 1: Automotive-2x Philips 9011 Standard Headlight Bulb, Pack of 1 : Amazon.com : AutomotiveI ordered these bulbs from Amazon because they were the cheapest and still high quality bulbs, but any standard H9 and 9011 will do. So you can just pick them up at you local auto parts store if you don't mind paying a bit more.The concept of this mod is to replace the factory H11 low beam bulb with a modified H9 bulb, and replace the factory 9005 high beam bulb with a modified 9011 bulb, respectively. As you can see from the pictures below, the only difference between the bulbs are tabs on the base and/or the plug.H9 Bulb Conversion:On the base of the bulb you will see a wide metal tab on the base, this tab needs to be trimmed down a bit to make it go into the headlight housing easier. If you don't feel like trimming it, you might be able to shoe horn it in at a slant (you'll see what I'm talking about if you put the base of the H9 bulb up to the headlight housing); but personally, I rather just trim it off so I can put it in and take it out easier. This does not need to be trimmed to exacting standards, just trim off enough so you can get it past the slot on the headlight housing. It does not have to be perfect or neat either because it does nothing as far as securing the bulb to the housing goes.On the plug end you will see that there is an extra plastic tab towards the top of the plug, this needs to go or else you won't be able to push the factory plug on. You need to get this as flat as possible and as far down as possible into the inner surface of the plug.Close up view in case you guys can't see exactly what's going on from the pictures above.And well, that's all folks! Remember to clean off all the left over debris and wipe down the bulb with a soft towel and 91% Isopropyl Alcohol (Rubbing Alcohol leaves more residue) before installing them. Also, don't touch the quartz envelope of the bulb after wiping it down in order to ensure longer bulb life Since I know someone's going to ask, no I don't have before and after pictures comparing the light output, lol. The color of the light will be a "whiter" light in the sense that it's not as dull/brown looking as the OEM bulb. If you're looking for that cool white HID look, you'll be disappointed. Just picture high beam color output and that's about what you will have.The pattern is pretty much just like stock but brighter. Glare is controlled just fine because the filament is in the same exact spot as the H11 bulb and you have glare shields built into the headlights in front of the bulbs too.Please note, this would be a good time to re-aim your headlights and make sure they are not pointed too high because while there isn't any extra glare from the H9 bulbs, the still H9 bulbs are significantly brighter and way more annoying if you're shinning them right into someones eyes vs. the H11 bulbs.Lastly, this mod works the same exact way if you want to put them in the fog light housings; but I must say that you may or may not want to install them there depending on how you use your fog lights. This is because the tip of the H11 bulbs are dipped with opaque paint to prevent forward glare, and the H9 bulb tips are not. Unfortunately for us, the fog light housings do not have an additional glare shield in front of the bulb, so do this mod at your own discretion.Happy modding! I completely forgot to post the rest of the 9005 to 9011 pictures, so moving on...9011 Bulb Conversion:As you can see above, this modification is much more simple since you're only cutting plastic and only cutting the one tab on the base of the bulb.Here's another view of how far to trim the tab.Finally, a blown up view of exactly how much to cut off (the section highlighted in red). You probably want to be pretty precise on cutting (at least around the circular part) because from what I remember it was kind of a tight fit.After cutting this one tab, you're pretty much done! Just clean off the bulb as mentioned above with some isopropyl alcohol and install. Quote: Originally Posted by syndicate1 All the headlight chatter lately has me engaged..... Is the (H11 to H9 & 9005 to 9011) conversion brighter and whiter than installing Philips H11 CrystalVision Ultra Headlight Bulb? Also, what the legal concern? The Amazon link for the 9011 states "DOT Compliant and Street Legal" I've personally never used those CrystalVision Ultra bulbs on the 4runner, but I would put money on the H9 conversion being brighter simply because it's a higher wattage and un-coated. As far as whiter or not, the CrystalVision will most likely appear whiter since well...it's tinted in blue, lol.As I've said before, if anyone is looking for the appearance of HID light color, you will surely be disappointed; but for raw increase in lumens, dollar for dollar, this can't be beat.The legal concern lies in the fact that you're illegally modifying a DOT compliant bulb for other than it's intended purpose. Simply put, you're sticking a high beam bulb in a low beam position; yet the bulb was certified compliant for use as a high beam and not a low beam. Edited June 14, 2016 by WWWPerfA_ZN0W 1 Quote Link to comment Share on other sites More sharing options...
gjb89 Posted June 14, 2016 Report Share Posted June 14, 2016 BEST OPTION! Glad to see someone installing correct filament in their halogen based lighting. Your posts actually informed me to make this mod. I was going to do HIDs until i read your posts so thank you! 1 Quote Link to comment Share on other sites More sharing options...
Brucifer Posted June 14, 2016 Report Share Posted June 14, 2016 I'll keep this in mind if/when a bulb goes out. Bummer is that I have a set of Osram H7's that don't fit anything I have at the moment. Installed the Husky mud guards. Everything went fine, but I feel the front guards are a tad too big....maybe if they were an inch or so smaller. Oh well. Not going to send them back for that. Quote Link to comment Share on other sites More sharing options...
WWWPerfA_ZN0W Posted June 14, 2016 Author Report Share Posted June 14, 2016 (edited) That IS a bummer! Time to find an adapter Did they come off a BMW or something? Can the mud guards be trimmed? EDIT: I just remembered, the Fusion uses H7 bulbs. Which Osram bulbs do you have specifically? How much life left? Post some pics if you wanna trade 'em off, I have the Phillips already, but don't mind picking up another set. Edited June 14, 2016 by WWWPerfA_ZN0W Quote Link to comment Share on other sites More sharing options...
Brucifer Posted June 14, 2016 Report Share Posted June 14, 2016 That IS a bummer! Time to find an adapter Did they come off a BMW or something? Can the mud guards be trimmed? EDIT: I just remembered, the Fusion uses H7 bulbs. Which Osram bulbs do you have specifically? How much life left? Post some pics if you wanna trade 'em off, I have the Phillips already, but don't mind picking up another set. OSRAM Night Breaker Plus 12v 55w Still in the sealed plastic box. Husky's can't be trimmed. Just something I will have to get used to. Quote Link to comment Share on other sites More sharing options...
WWWPerfA_ZN0W Posted June 14, 2016 Author Report Share Posted June 14, 2016 (edited) So you want to keep the H7s or what? I am assuming a pair of bulbs ... PM me please. Edited June 14, 2016 by WWWPerfA_ZN0W Quote Link to comment Share on other sites More sharing options...
gjb89 Posted June 15, 2016 Report Share Posted June 15, 2016 Installed these LED puddle lights http://www.daytimebrightlites.com/Puddle_Lights_NL3C.htm 1 Quote Link to comment Share on other sites More sharing options...
gjb89 Posted June 16, 2016 Report Share Posted June 16, 2016 Do they dim like the factory ones? That's a good question... I wasn't aware the puddle lights dimmed down. Quote Link to comment Share on other sites More sharing options...
omar302 Posted June 16, 2016 Report Share Posted June 16, 2016 (edited) Since my turn signal stalk has been sticking lately, today I replaced it with a new one. I used the part number for a 2013/2014 Edge/MKX instead of the 2011/2012 part number. I checked beforehand and all other part numbers behind the steering wheel were the same, so I thought it must work, and it worked. The reason for different part numbers, I believe, is that 2011/2012 models have both the flash to pass & high beam on/off functions by pulling the stalk. 2013/2014, have pull for flash to pass and push for high beam on/off. Also the 2013/2014 part is cheaper & is now smooth to operate with a clear second detent for the turn signals.This is the part I bought: http://www.ebay.com/itm/111552985755Edit: I just realized that the signals don't work properly, it only blinks 3 times either way, left or right. The turn signal is not going into the full turn signal mode. Need to investigate it a little. Edited June 17, 2016 by omar302 1 Quote Link to comment Share on other sites More sharing options...
WWWPerfA_ZN0W Posted June 17, 2016 Author Report Share Posted June 17, 2016 Good info, omar! Makes more sense to do it the 2013-14 way. Update on my Edge: Picked it up today. Blower motor replaced, fuel tank replaced (rusting apparently), and front swaybar links replaced (I believe one was broken) though I did not mention it when I took it in, as I had intended to have another shop do it. Not sure yet what the final tally is, but expect it to be the $100 deductible. 1 Quote Link to comment Share on other sites More sharing options...
cjh Posted June 17, 2016 Report Share Posted June 17, 2016 Do they dim like the factory ones? Yes they do. I have them and LOVE them. So bright. Quote Link to comment Share on other sites More sharing options...
Hermans Posted June 17, 2016 Report Share Posted June 17, 2016 (edited) I put on the side window rain guards and a rear bumper protector. Also Aries 3-D all weather mats. Edited June 17, 2016 by Hermans 1 Quote Link to comment Share on other sites More sharing options...
WWWPerfA_ZN0W Posted June 17, 2016 Author Report Share Posted June 17, 2016 Which products did you go with, pics? Quote Link to comment Share on other sites More sharing options...
Hermans Posted June 17, 2016 Report Share Posted June 17, 2016 (edited) I went with the Ford OEM rain guards and bumper protector. Here's a link to the mats. The 2015 fit the 2016 perfectly......http://www.autoanything.com/floor-mats/61A7570A0A0.aspx Edited June 17, 2016 by Hermans 1 Quote Link to comment Share on other sites More sharing options...
WWWPerfA_ZN0W Posted June 17, 2016 Author Report Share Posted June 17, 2016 Thanks, Brucifer, for shipping out the H7s quickly & securely 1 Quote Link to comment Share on other sites More sharing options...
Brucifer Posted June 18, 2016 Report Share Posted June 18, 2016 If you hadn't gotten a new one, I could of thrown in a squeaky blower motor, too. 1 Quote Link to comment Share on other sites More sharing options...
WWWPerfA_ZN0W Posted June 18, 2016 Author Report Share Posted June 18, 2016 Yeah, all I need is an on-command Tasmanian devil! Quote Link to comment Share on other sites More sharing options...
TourGuide Posted June 18, 2016 Report Share Posted June 18, 2016 I'll add my changes here. I have a 16 Sport and I did the following things to it: 1.) New hidden hitch with trailer wiring. 2.) Rustproofed. 3.) Paint protection film installed on the front bumper, headlights, mirrors, and door sills. 1 Quote Link to comment Share on other sites More sharing options...
WWWPerfA_ZN0W Posted June 18, 2016 Author Report Share Posted June 18, 2016 What rustproofing? DIY/3M, Ziebart, etc? ClearBra or 3M or ...? Quote Link to comment Share on other sites More sharing options...
TourGuide Posted June 18, 2016 Report Share Posted June 18, 2016 (edited) What rustproofing? DIY/3M, Ziebart, etc? ClearBra or 3M or ...? For the rustproofing I did Ziebart. I've dealt with them for years and always had great luck. The local shop is a winner to deal with. The paint protection tape was 3M I believe. The shop I went with does fantastic work on this - very happy with the result. Lifetime warranty - if it ever yellows or goes bad they will replace it. Edited June 18, 2016 by TourGuide 1 Quote Link to comment Share on other sites More sharing options...


Recommended Posts
Join the conversation
You can post now and register later. If you have an account, sign in now to post with your account.
Note: Your post will require moderator approval before it will be visible.