Leaderboard


Popular Content
Showing content with the highest reputation since 01/11/2010 in all areas
-
Ford for some reason is putting single horn rather than dual horns on their cars. My Edge ST has this and my Bullitt also has this. Well, it is an easy fix. I got the duel horn from a 2018 Edge. It is the same horn and bracket except one extra horn! Part number is FA1Z-13832-B. Shouldn't take more than 20 min. Here is a link to the video I created:13 points
-
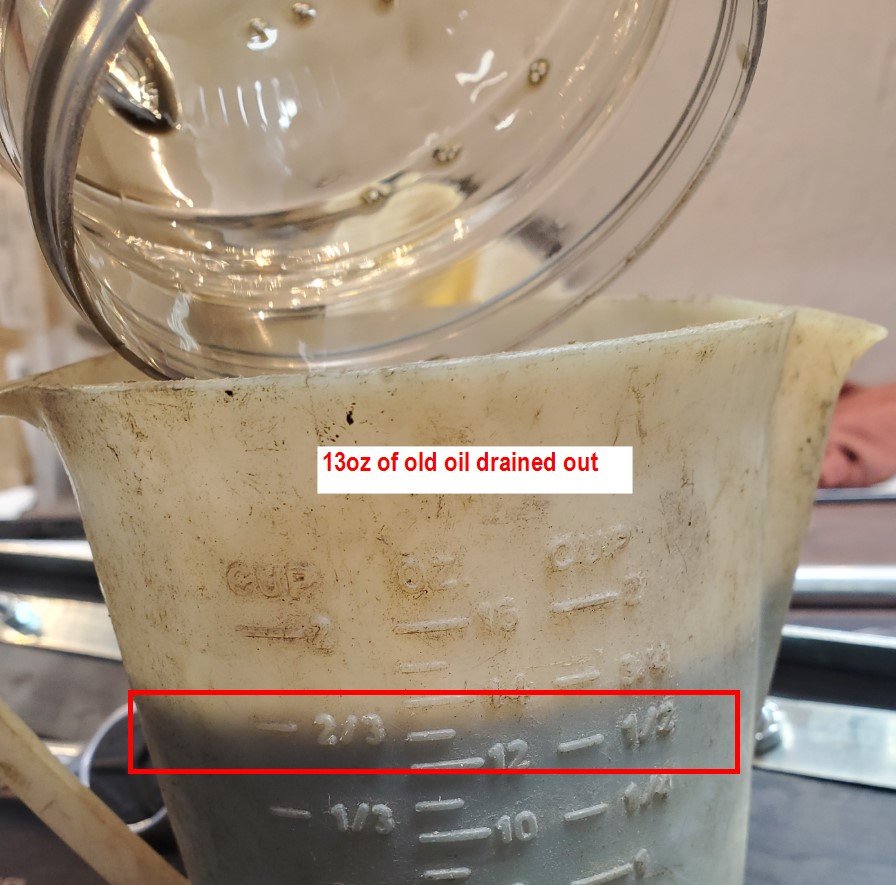
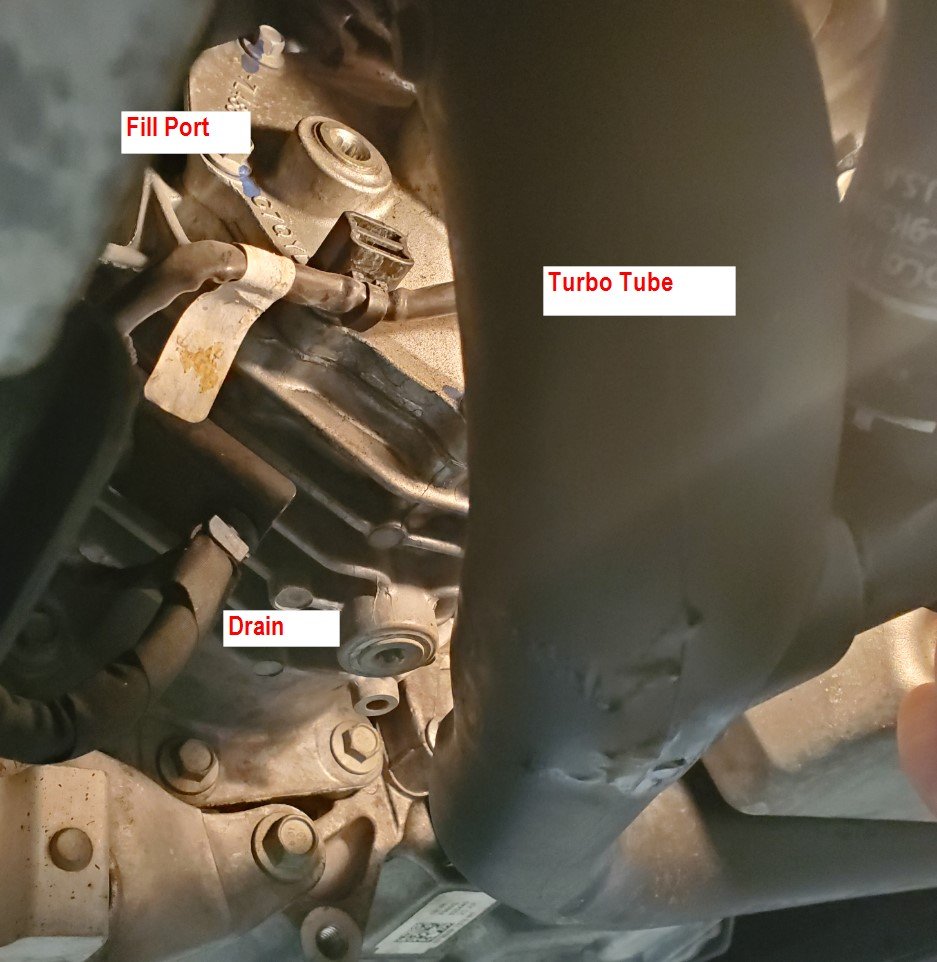
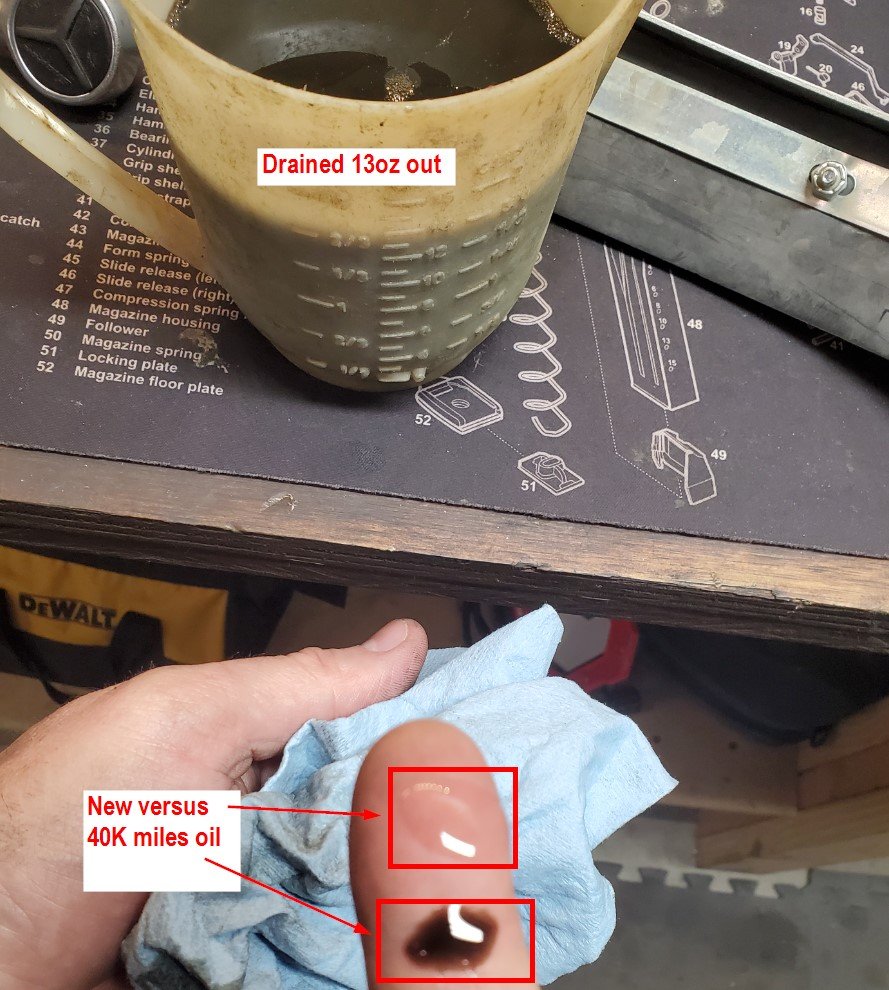
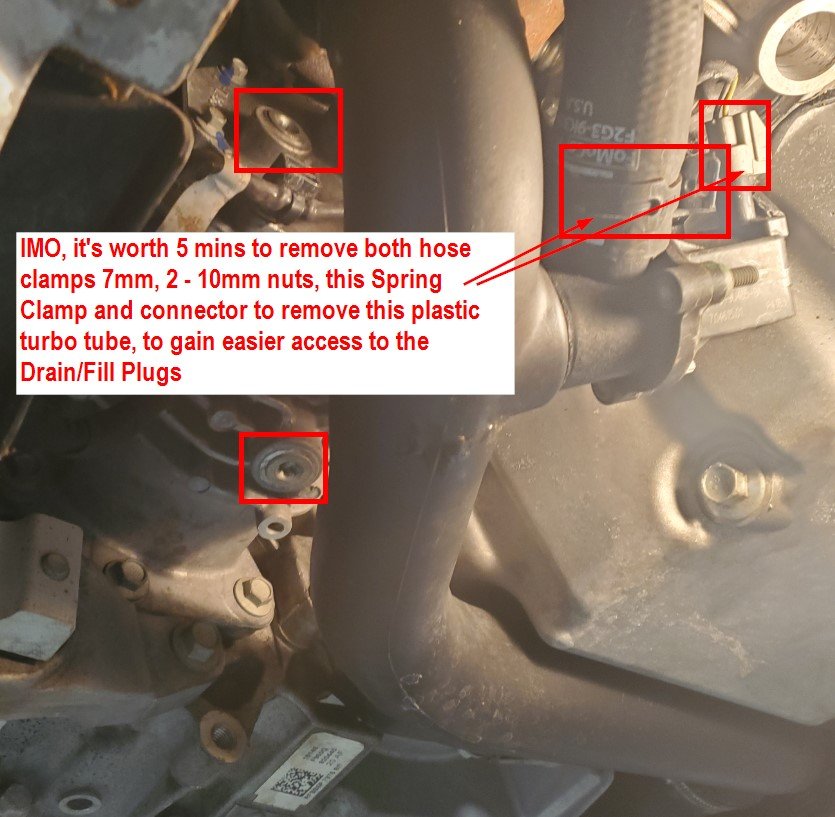
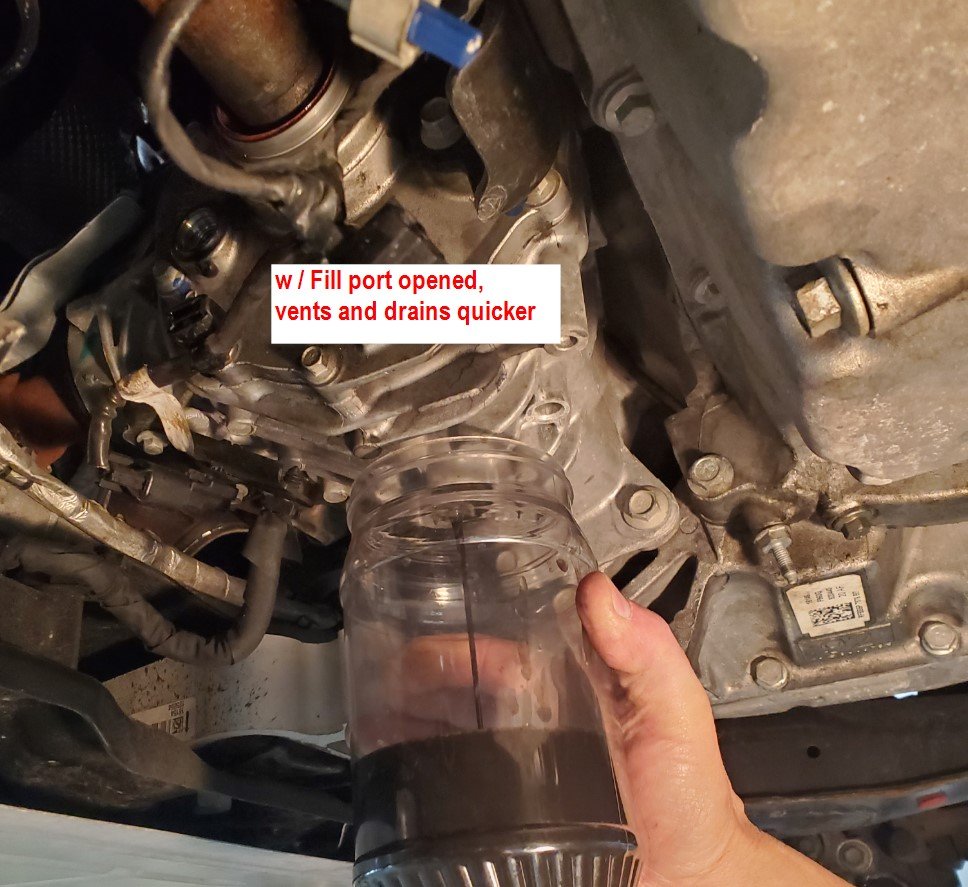
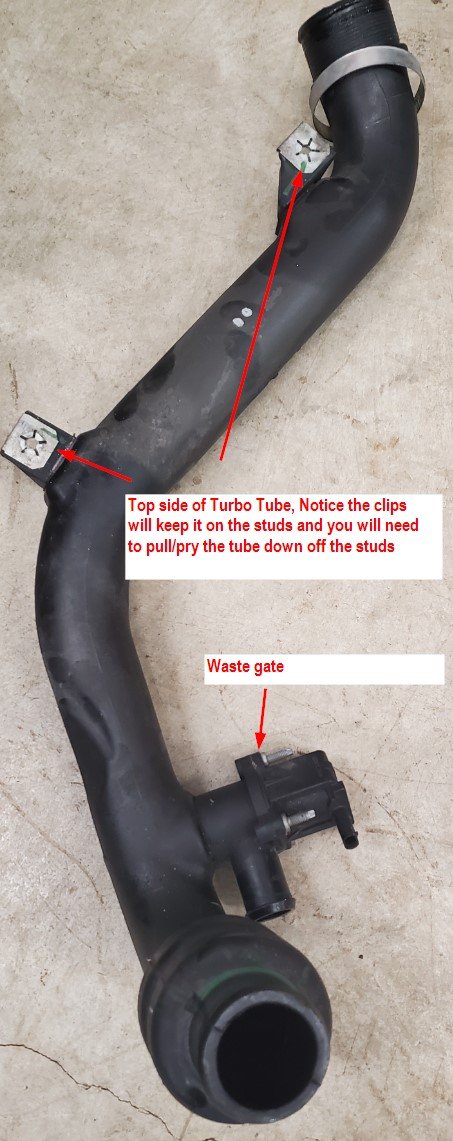
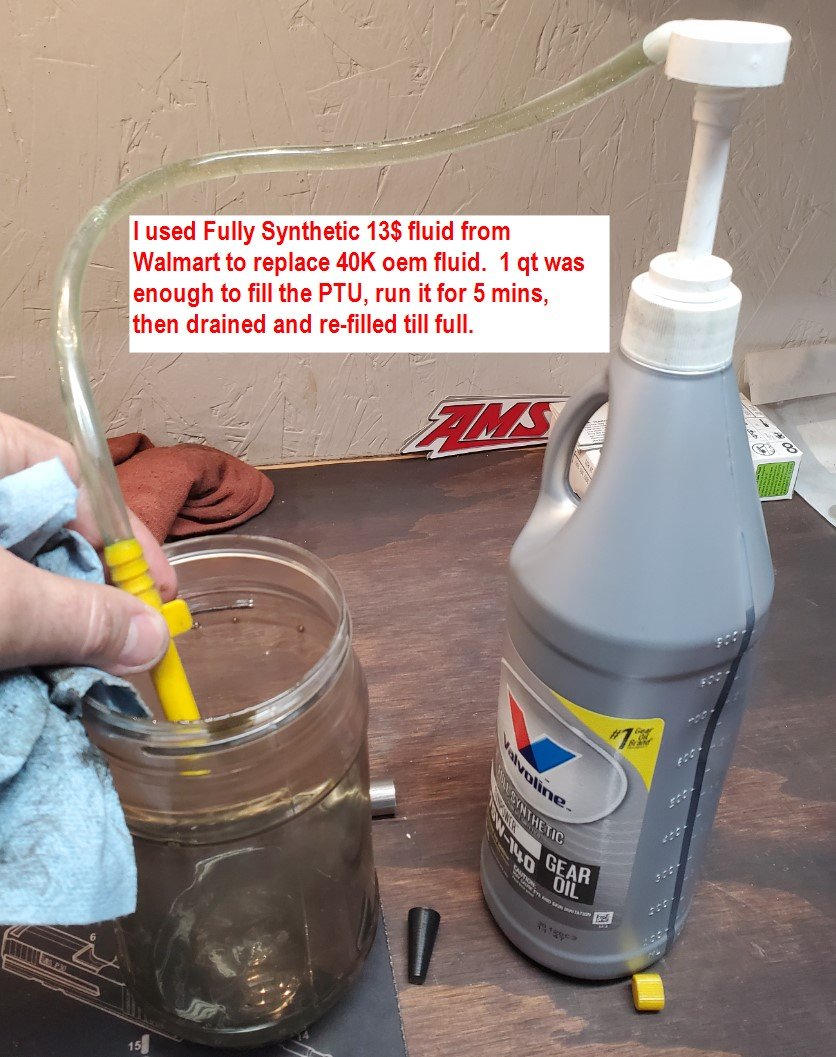
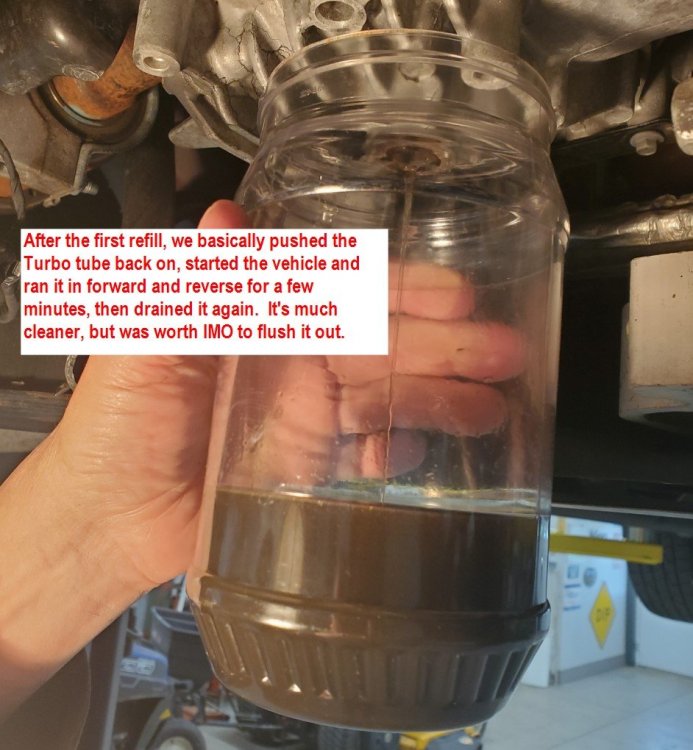
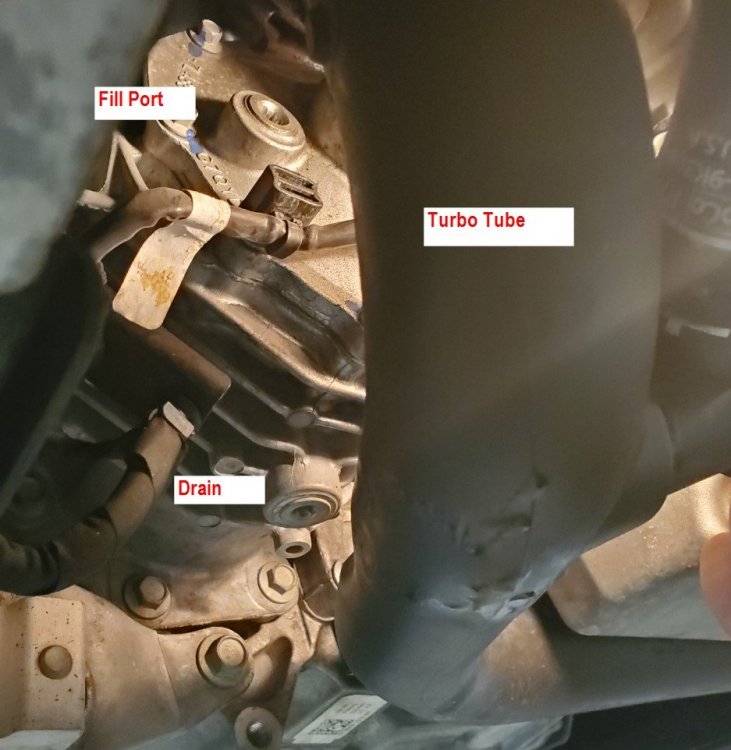
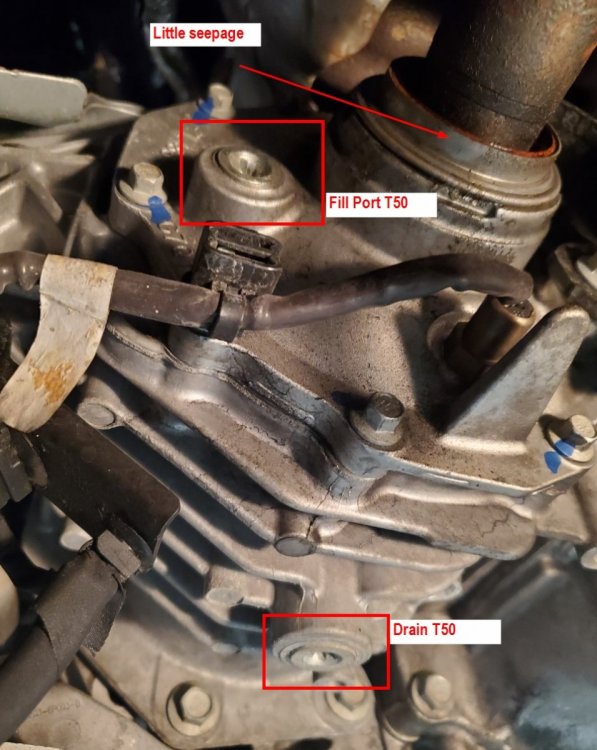
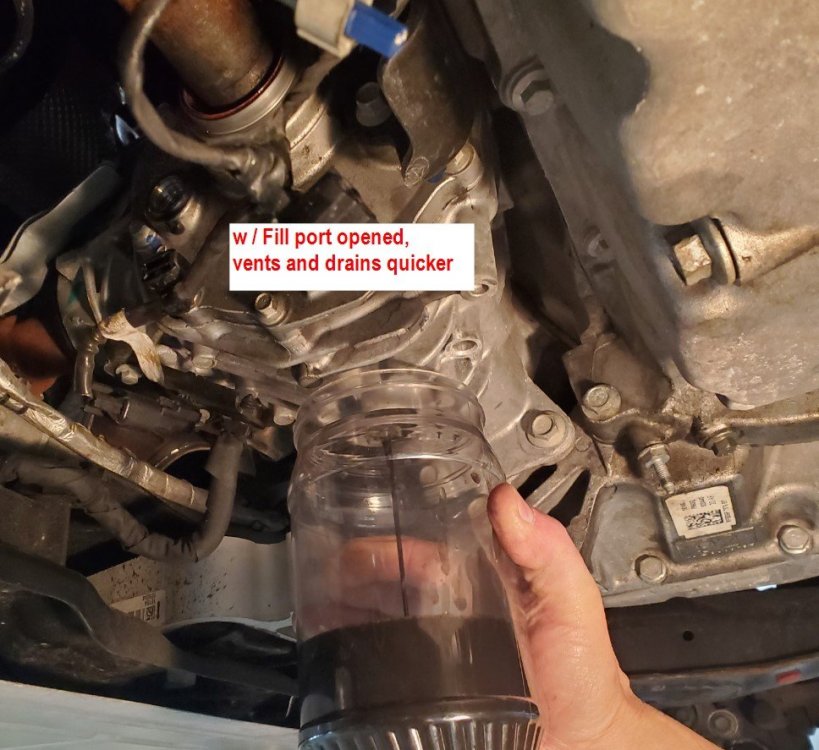
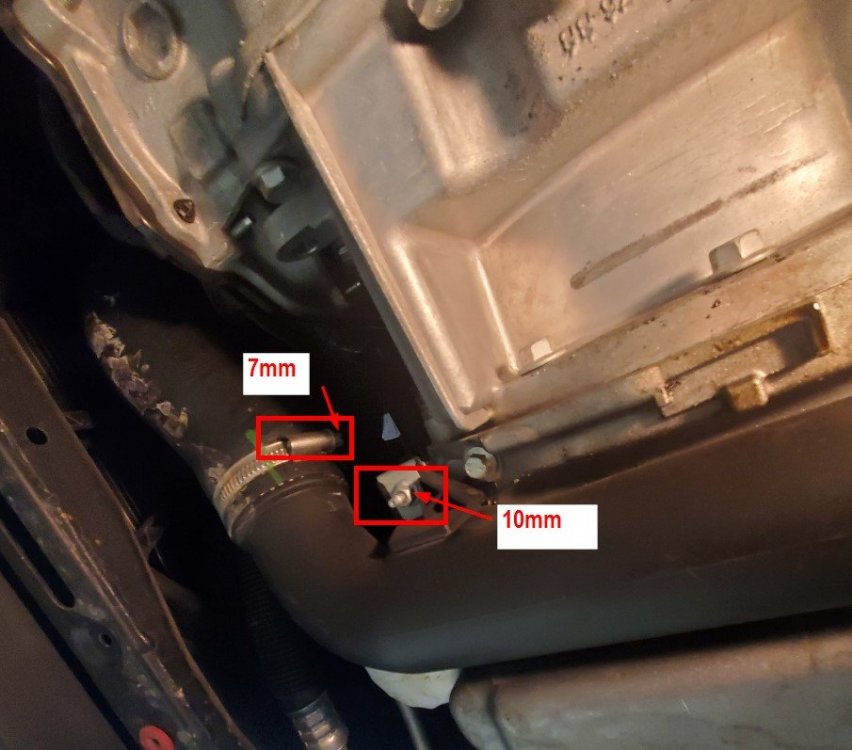
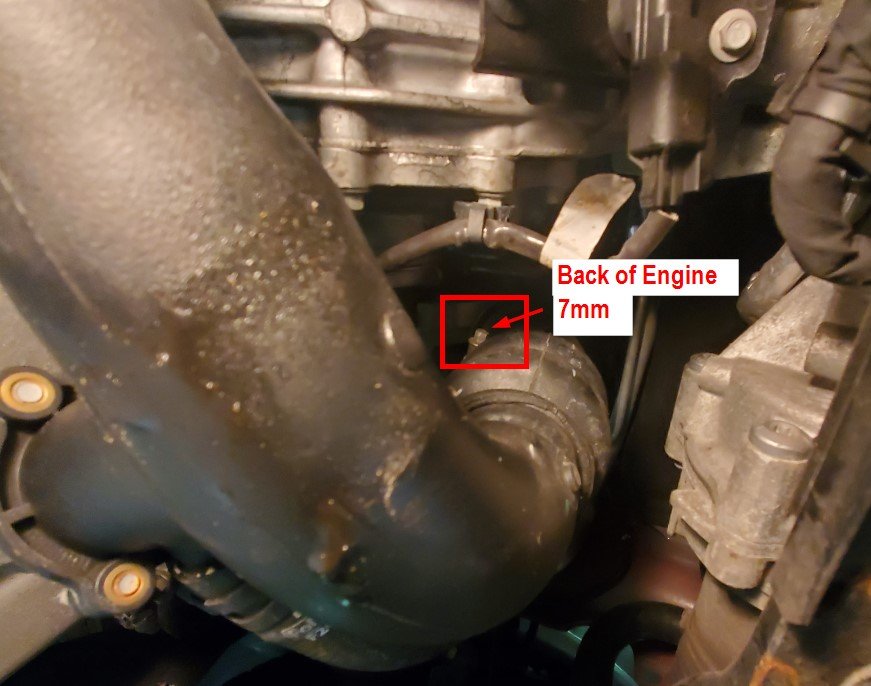
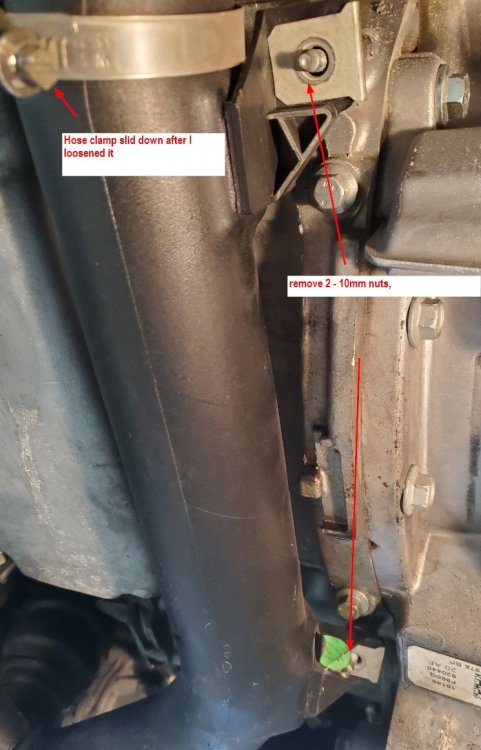
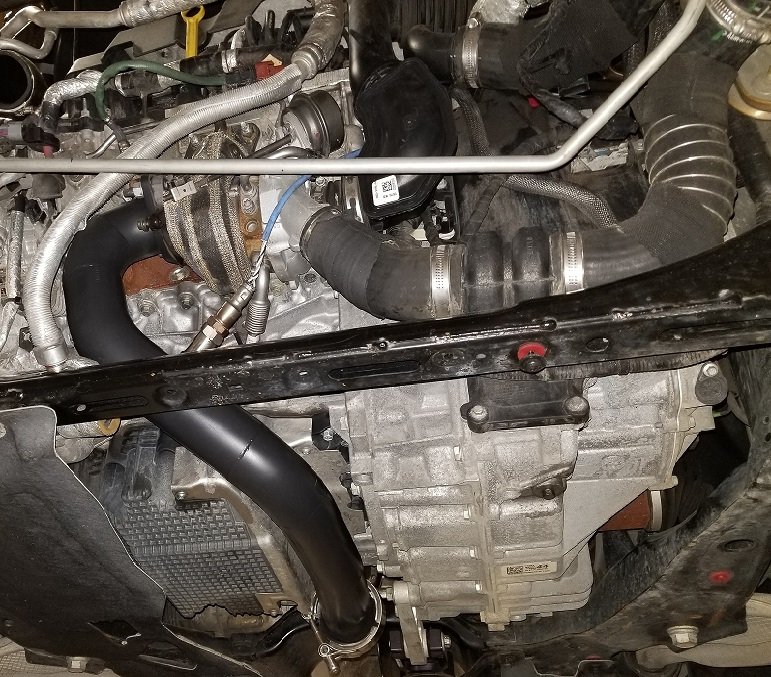
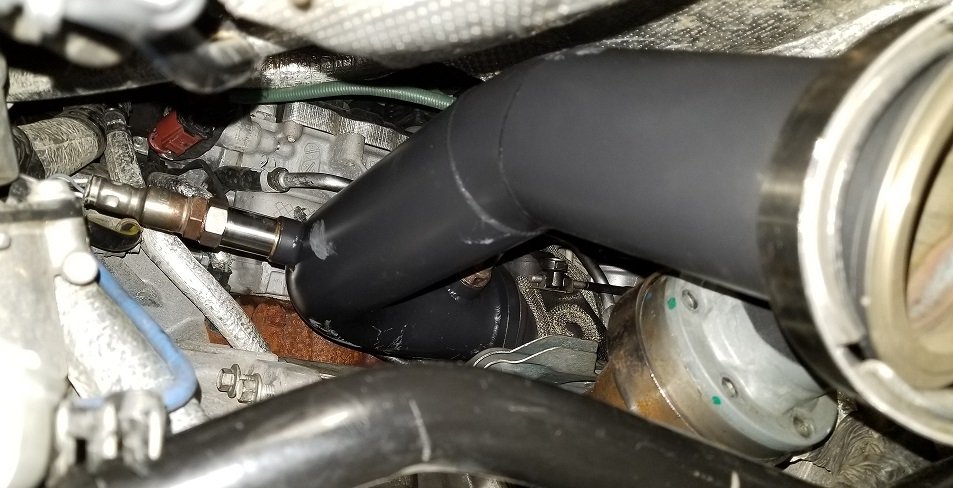
I just changed my PTU 75w140 fluid on my 2016 2.0 Eco Very straight forward process. Among other obvious items(jack stands, rags, drain pan) You'll need the following specific tools Pliers/Channel locks, 7mm socket, 10mm socket, T30 and T50 Torx, 16oz of 75w140 - Ratchets and extensions to fit your sockets (1/4" or 3/8") drive. Manual Oil pump 1. Jack / Lift Vehicle 2. Remove enviro cover - Various T30's 3. To make the fill port more accessible, I chose to remove the Turbo tube which took 5 extra mins by removing 2 - 7mm screw Hose clamps, 1 - electrical connector 1 spring Clamp and 2 - 10mm nuts. 4. Breaking the Fill and Drain port loose is a TAD scary as they seem to be overly tight.. Constant steady pressure, and a fresh T50 torx without any wear is recommended. 5. My fluid was coming out of the fill port, so I temporarily put it back in, Removed the Drain plug, then removed fill plug to vent and drain quicker. 6. cleaned drain/fill plugs and once empty, replaced Drain plug 7. I Pumped 12 oz of new fluid back in, (At times I had to wait a bit for it to drain down inside, as the last 4 oz took a while as it wanted to come back out at me. 8. Replaced fill plug. 9. Optional, I chose to put the turbo tube back on (pushed it on the hoses but didn't retighten clamps. Started the vehicle while all 4 wheels off the ground, and ran it fwd reverse for a few minutes. 10. Removed turbo tube again, and drained PTU once more to FLUSH any more residual old fluid. 11. Refilled PTU with fresh fluid and reversed the removal process. 12. Next Oil change, I'm going to replace the fluid one more time, but I had ordered Amsoil SEVERE Gear 75w140 for $30 and will then change the fluid between 25-30K for the remaining time I own the vehicle. See the following photos.. Some are just different views, but I marked them up with details to best show what's needed. I hope this builds confidence for some that want to Do it yourself. GOOD Luck!!?


 11 points
 -
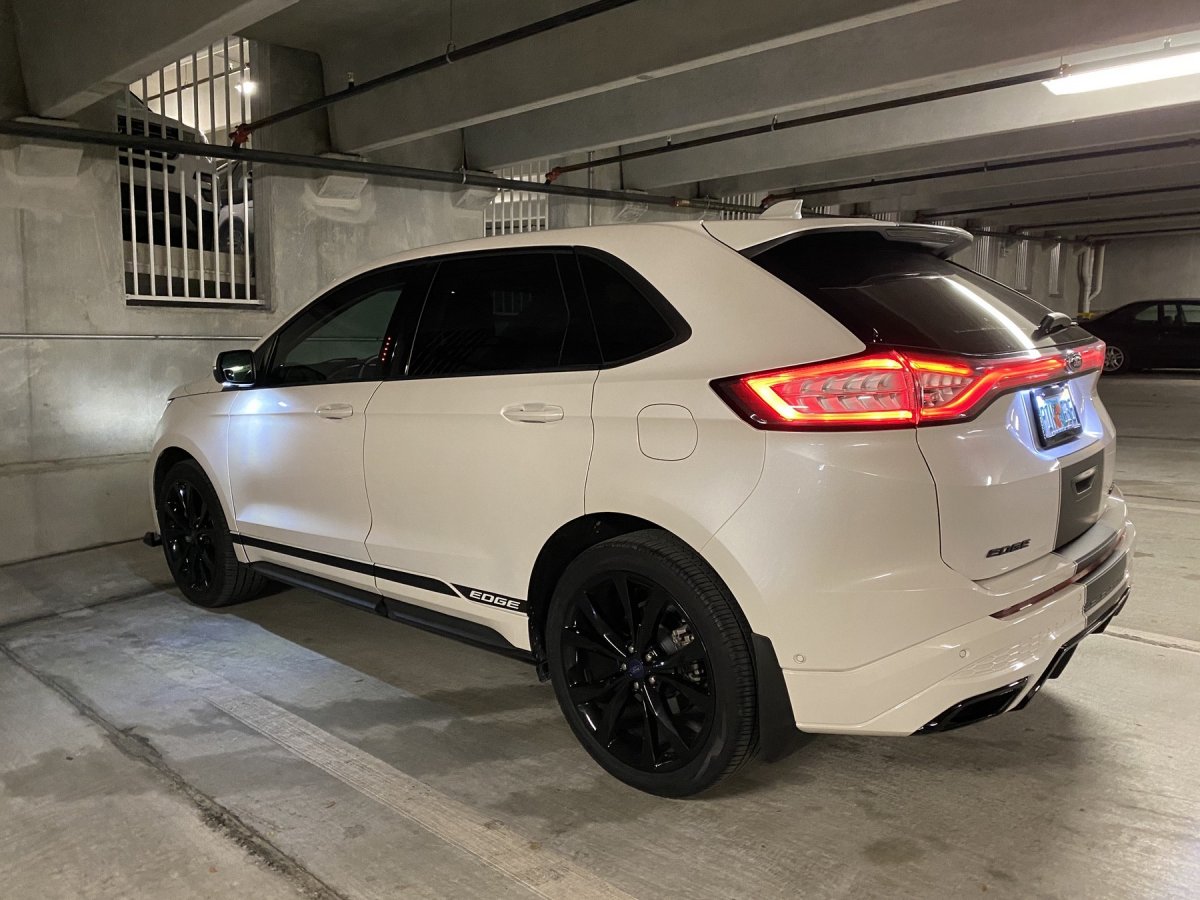
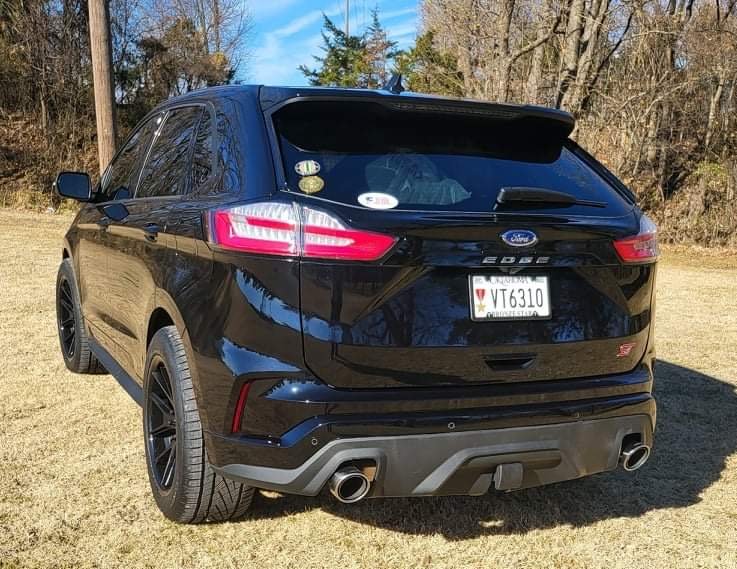
I’ve has em on for about two weeks now and absolutely LOVE the look and even more importantly the HUGE change in the way my ST handles and sticks to the corners and curves . It’s a night and day improvement over the stock OEM 20 inch wheels and junk Hankook tires My new shoes are : Ferrada Wheels FR2 , 20x10.5 , 5x10⁸ +38 offset Continental DWS06 Plus Extreme Contact 295/45/20 NO rubbing & a PERFECT Fit .... #MEATY
 10 points
 -
Prototype parts are being molded this week, and testing will begin soon after. I know that the testing will take a few weeks. I can't say exactly when the V3 will be available, if you follow this thread you will be one of the first to know when the V3 air box and filter will become available. I regularly post updates on progress, and I am committed to getting the V3 into production ASAP. Thanks for your interest.10 points
-
Hello everyone, I wanted to share some facts and opinions about my first 1200 miles on my new 2019 Ford Edge ST. I had a prior 2016 Edge Sport that I enjoyed very much. It had a little over 46,000 miles on it before I traded it in for the ST. I wasn't considering purchasing a 2019 at first but after seeing one in person and striking a good enough deal, I ended up getting one in inventory that had all the features I would want. My review will be mixed with comparisons with the '16 Sport and other findings. The ST has a tighter feel to it on the road compared to the '16 Sport. I have the 20" wheels/ all season tires that I wanted for everyday driving through New England weather. Although it feels stiffer over bumps, it won't rattle your brain like a sports car. The reward for this is more control through turns and steering response. ( Also less body lean and front end diving with braking) Acceleration at first was OK, but improved with more miles. I like the addition of a turbo boost gauge on the ST to see how much boost I'm getting at times. After burning up the dealer's full tank of whatever they used, I filled up with 93 octane. Within the first 300 miles I would only get to 12.5psi. After about 500 miles I could get about 15psi on the gauge. After 800 miles it allowed 16psi. After 1000 miles I got up to 17psi. The ST owner's manual states up to 21psi is available depending on octane and conditions. "SAE Certified Performance ratings are achieved with 19.5 psi, but up to 21 psi can be delivered to maximize power depending on fuel quality and atmospheric conditions." Once I went past the first 1000 mile break in point, I decided to do a quarter mile run with my personal timer I have on a deserted roadway I used as well for my prior '16 Sport. I ran the exact stretch of road and a fairly similar outside temperature. The results are as follows: 2016 Edge Sport 14.1 seconds at 101mph 2019 Edge ST 13.7 seconds at 106mph This is a slight downhill roadway so it won't be exact to a real track. This is just to show the improvement between the two. These were single runs with no brake torqueing, leaving it in auto but in Sport mode, no paddle shifting, 93 octane fuel. I'm not surprised with the results since Ford advertises a HP/ TQ gain for the ST. Everyday driving by the seat of the pants will reveal the difference as well. As far as exhaust sound in Sport mode, I don't think it sounds that artificial. (It doesn't sound like a Mustang GT though) Cold startup is not too loud either for those concerned about annoying the neighbors in the morning. It has a more low hum bass tone compared to the '16 Sport. Exhaust tone in non Sport mode is mellowed out. I drive in Sport mode 99% of the time unless I'm carrying non sporting passengers. Braking feels good enough for me, nothing else to say on them for street usage. Steering feels direct and heavy enough at all speeds. Exterior: I think the front end is more sporty with a blunt-nose. It just appears a little higher to me in person. The rear end is much better than my 16 Sport. The taillights and mid section appear less busy and more aggressive. I really like the slight shelf Ford used just below the rear window. It really makes a visual difference in person to the back. The bottom half is also nice to me. It has a more European/ German look to it. The rear reflector light design is nice in person too. It seems like a lot of manufacturers are using this look. Overall the rear looks more refined. The side of the vehicle doesn't need mentioning as we know. The 20" wheels are OK if you want less bling than the prior generation Sport 20" wheels. They are mostly black looking with a machined aluminum spoke that appears clear coated. I was able to use my prior wheel lock nuts on the ST. The new towing package is a nice addition. My prior Sport couldn't be optioned with one from Ford. I might use it to tow my Harley or my girlfriend's horse. If you need to use foot motion to open the rear tailgate, you have to move your foot front to back in the area between the tow hitch and exhaust tips. Interior: The seating is comfortable with a little more surrounding support. I don't have much else to say about them yet. The newer perforated steering wheel is great. (Will be a plus for track duty for sweaty hands or gloves if needed) I don't like the rotary dial for gear selection. I am used to gear shifting with a lever, so at times I go blank when I need to go from reverse to drive or park. The result is a more open look to that area. A vertical smart phone holder is in this area now for those who like that sort of thing. I also like the wireless cell phone charger up ahead from there in the storage compartment. My phone gets really hot though from using that space. The B/O sound system is a great sounding system. I liked the Sony system before, but I can hear and feel more low bass sounds compared to the Sony version even at low volumes. I am very happy with the new sound system. The WIFI hotspot works as advertised. I like the Ford Pass link for remote starting, etc. I've used it many times with success. Sync 3 has worked fine so far. My ST with the 401A pkg included a sunroof that I can care less about. The shade makes a buffeting noise when fully closed when going over certain bumps. The one way to alleviate this it to open it up a bit. I don't think I'll like that during the heat of Summer though. I'll have to turn up the music! Technology: This vehicle is a technological achievement. I've tried some of them with great results. I used to scoff at all the driving aids and safety features coming out on newer vehicles. Now that I have them, why not embrace them? I admit it takes away a little of your responsibility, but not all of it. I won't go into detail on each one here, but I applaud Ford for a job well done! Conclusions: At first I thought I would wait until a major design change for this generation Edge to buy a newer one. After realizing it won't be too soon, I decided to move on to this ST. For anyone who is waiting for their orders, it will be worth the wait. Hang in there! For anyone who is still skeptical, please try to see one in person and test drive it. I think you are getting a lot of vehicle for the price when you compare. Thanks for reading this review. Feel free to ask me questions or private message me.10 points
-
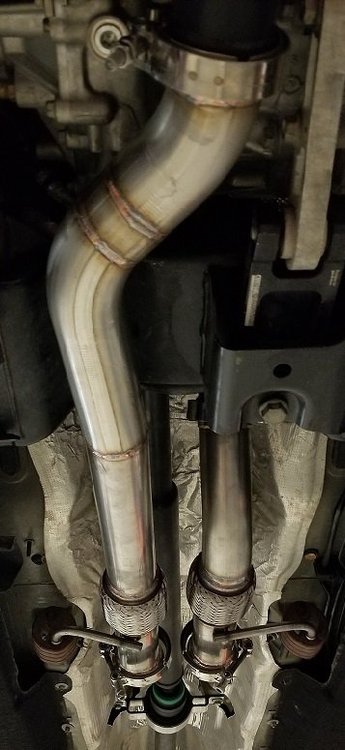
WARNING: Make sure you can remove both the leveling plug and the fill plug BEFORE draining the transmission!!!! Recently I embarked on a task that was, in theory, simple, but in reality, was hell. That task, of course, was a routine transmission fluid change on the 8F35 transmission (found in 2019+ edges with the 2.0). As it turns out, Ford has made changing the transmission fluid on this car incredibly difficult, but there are some useful things I learned along the way that should hopefully make it easier for any DIY'ers wanting to take this on. The 8F35 fluid change procedure is pretty much identical to the 6F35 procedure found in the '15-'18 2nd gens. This means that there is no dipstick, fluid level is checked by a leveling plug in the left front wheel well. Sounds simple enough, many cars do this, so what's the big deal? Well, Ford decided to absolutely bury the pressure ring fit fill plug underneath a ton of immovable objects (this is unlike the 6f35 which actually had a very easy-to-access fill plug). Like the shop manual says, the airbox must be removed. This is simple enough but because of the amount of "Christmas tree" wiring harness holders, you will likely be cutting a few zip ties. I would actually recommend cutting them because the wiring harness they hold is actually not in danger of hitting anything. Once the airbox is removed you must first find the cap under all the crap they buried it under. Be careful not to damage the MAF when moving the airbox away from the car. Once that is done, filling the transmission is not as simple as removing the top plastic cap. You must also remove the funnel that the cap rests in because Ford placed a piece of plastic in between the cap and the funnel, blocking any fluid that tries to enter. To remove this you must get a pair of needle-nose pliers and pinch in the snap ring and pull up on the assembly. This window that the pliers can fit in is incredibly tiny and removing this funnel will take a lot of patience. Once the funnel is removed, keep track of that plastic piece that sits inside it. You can now fill the transmission with fluid, I would recommend trying to match what came out and add .25qts-.5qts to it (this is because if you pour too little fluid you can't add anymore without removing everything you just removed). Once all the fluid has been added, you must now reinstall the funnel for the cap. This is where the tip comes into play. Because of the amount of stuff in the way, it is pretty impossible to squeeze the snap ring in and also push the funnel down in the right spot at the right time. What I ended up doing to solve this was to squeeze the snap ring in and have a partner wrap a zip-tie around the teeth (of the snap ring) that the pliers were grabbing onto. If you tweak this and get it tight enough, the zip-tie should hold it at maximum tension. I had to use a large zip-tie so that it did not snap. With tension held, the funnel can be easily slipped on and the rest can be reinstalled. You must now hook up a scan tool and go for a test drive to get the fluid hot enough to level it (usually a 20-minute test drive). Just another side note, the leveling plug is torqued an insane amount from the factory so be prepared to break out the breaker bar and extensions to snap it loose. When you get back from this test drive, pray that at least some fluid trickles out of the level, or it's back to step 1. You can actually do an initial level before the test drive by starting the car and running it through all the gears and then checking the level plug. Just make sure the car is still idling when checking the leveling plug. That initial check is only supposed to be for an overhauled transmission, but it could save driving around with too little fluid for half an hour. Anyway, sorry that seemed like a bit of a rant. There is just a lot of unneeded complexity to this routine maintenance item. It seems Ford has made drain and fills extremely difficult, maybe they'd rather people get their transmissions flushed by machines at dealers than to have the fluid changed by regulars at home. To anyone that gives this a shot, good luck. I was originally going to make all of this a video but was too tired and annoyed by the end of all of it. If these instructions aren't clear enough, I may still do that. I will attach the factory ford guide, it makes the job seem WAY easier than it actually is. Transmission Fluid Drain and Refill.pdf9 points
-
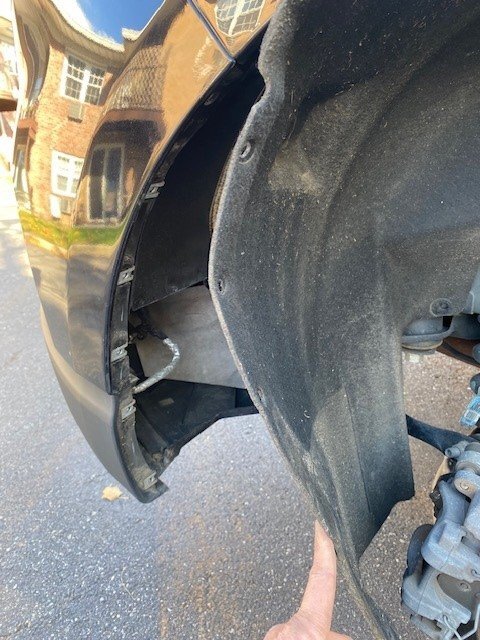
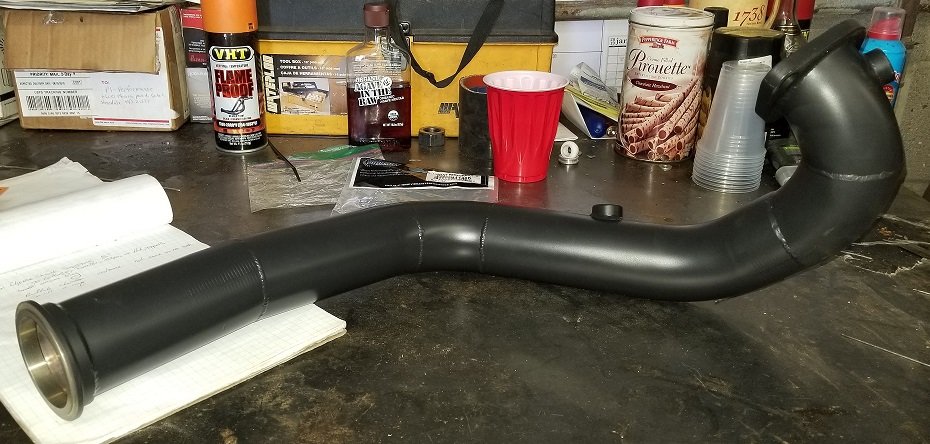
I'm wondering what all of your general opinions are on this tiny mod--reverting to the round exhaust tips over the odd vertical-trapezoid stock tips on the 2019 Edge ST? This is a "round peg in a trapezoid hole" scenario, but I think it works--I had a very odd and strong aversion to the shape of those stock tips. These replacements are stainless, were 9" length with 2.5" in and 4" out, about $40 for the pair. I believe the actual size of the muffler exit pipes are 2.25, but it appears Ford punched an oval flare die into the exit pipe (not sure why--it's hidden). So to get these to slip on without sawing off the flare, I got the 2.5 size inlet for the new tips, used large channel locks to de-oval the exit pipe flare, and to make the clamp work on the smaller pipe after I'd cleared the flare, I had wrapped several layers of aluminum heat tape around the pipe, and the 2.5 clamp worked perfectly. There are 3 stainless 8mm bolts that hold the stock tips to the bumper (they are not connected to the muffler exit pipes). Two bolts on either side--very easy--but one bolt is on top and very hard to see or reach. I used a flex-extension on a 1/4 drive ratchet and blindly found the hex head and got it out. There is also a plastic sort of mounting bracket, which I thought was a fairly elaborate piece of molded plastic for just holding the stock tips. Anyway, I left that in--some of the torx screws were behind the tow-bar cross-frame, so that ended any thought of removing those. But you can't see them unless you get down real close and look. Plus they're black, and I put tiny strips of black gorilla tape over the now-empty bolt holes and tab-slots, so it doesn't have that "something's missing" look.
 9 points
 -
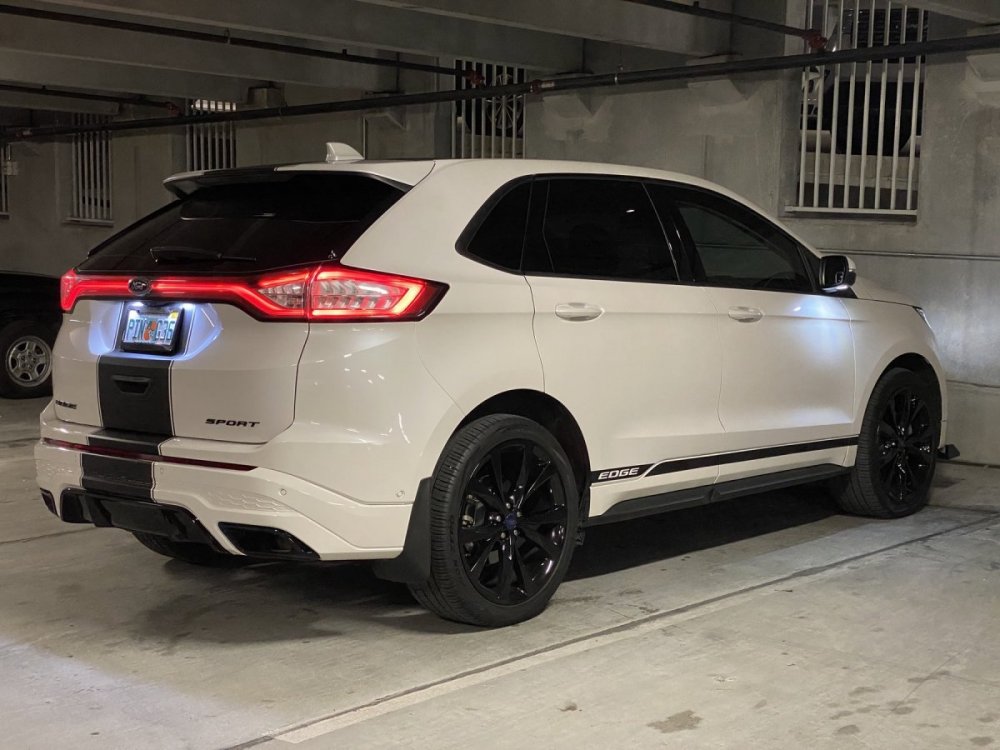
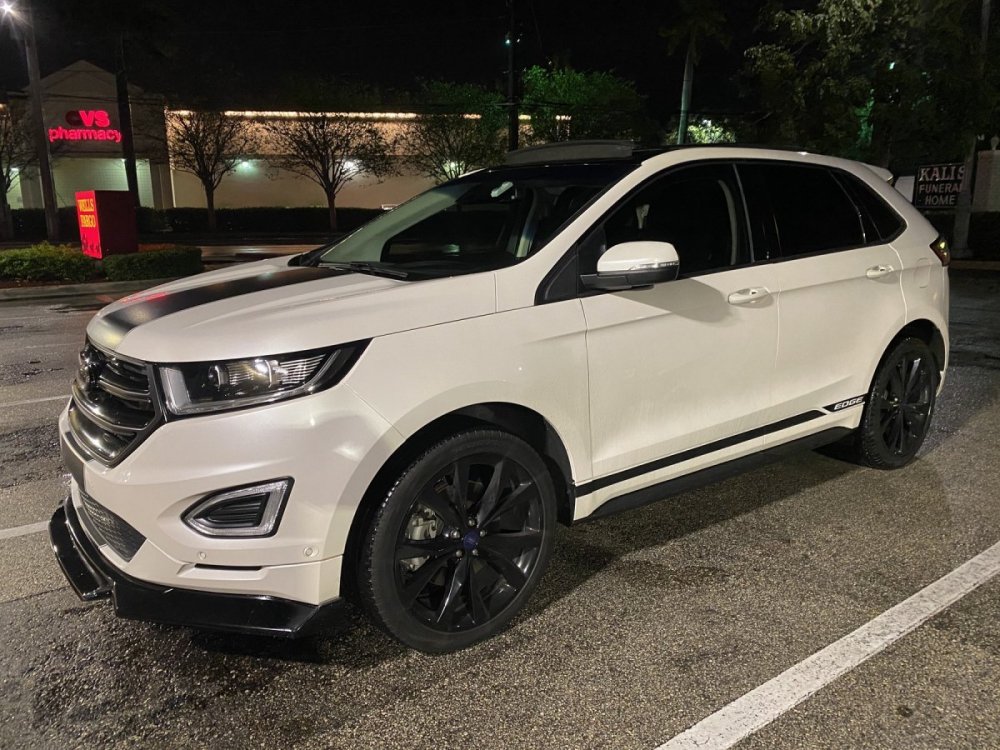
So I'm going to start off by saying that I'm back, but most of you probably never knew I left. I stopped in a long time ago and made a post about my '15 two toned Electric Spice Sport. Well since then I was in a pretty traumatic accident and my love was destroyed, but somehow I managed to come out alive. I will say that it saved my life and I'm a VERY fond believer in that. 20200514_131606 by tgrfly4@sbcglobal.net, on Flickr After the accident I started shopping again and found myself a Lightning Blue Metallic '18 Sport. Everything else is a blur after that. I started spending like it was going out of style, but it was a sort of coping mechanism for me after the wreck. I'm sure many of you can get where I'm coming from. After the purchase, I got with my painter and was ready to get it into the body shop to install the SS Tuning body kit and front splitter that I had originally purchased for my 2015. I ended up purchasing a set of used 3pc AMF Forged 22x10.5 wheels that had originally came off a Edge that was built for SEMA a couple years back. The car also got a different stance using the H&R Springs that everyone knows and loves, as well as a Addco rear sway bar. After I got all that ironed out, I scheduled a photoshoot and here's a few from the group. AAS_6505 by tgrfly4@sbcglobal.net, on Flickr AAS_6516 by tgrfly4@sbcglobal.net, on Flickr AAS_6452 by tgrfly4@sbcglobal.net, on Flickr AAS_6626 by tgrfly4@sbcglobal.net, on Flickr And from there, I started working on the little things. Completed a full stereo install. 20200912_150409 by tgrfly4@sbcglobal.net, on Flickr 20200912_140314 by tgrfly4@sbcglobal.net, on Flickr Full two step paint correction... 20200717_172042 by tgrfly4@sbcglobal.net, on Flickr Minor change, but new blue spiked lugs 20200808_130311 by tgrfly4@sbcglobal.net, on Flickr 20200808_131447 by tgrfly4@sbcglobal.net, on Flickr And most recently, I installed Oracle Colorshift underglow and wheel rings.... 20201007_200100 by tgrfly4@sbcglobal.net, on Flickr 20201007_200038 by tgrfly4@sbcglobal.net, on Flickr Next piece of the puzzle is to start on the interior. Plan is to wrap most of the trim pieces in Hexis forged carbon fiber and then all the stainless trim will be color matched to the outside of the car. We all know its NEVER done so we will see where it goes from there. Thanks for looking. Please ask any questions and feel free to comment.9 points
-
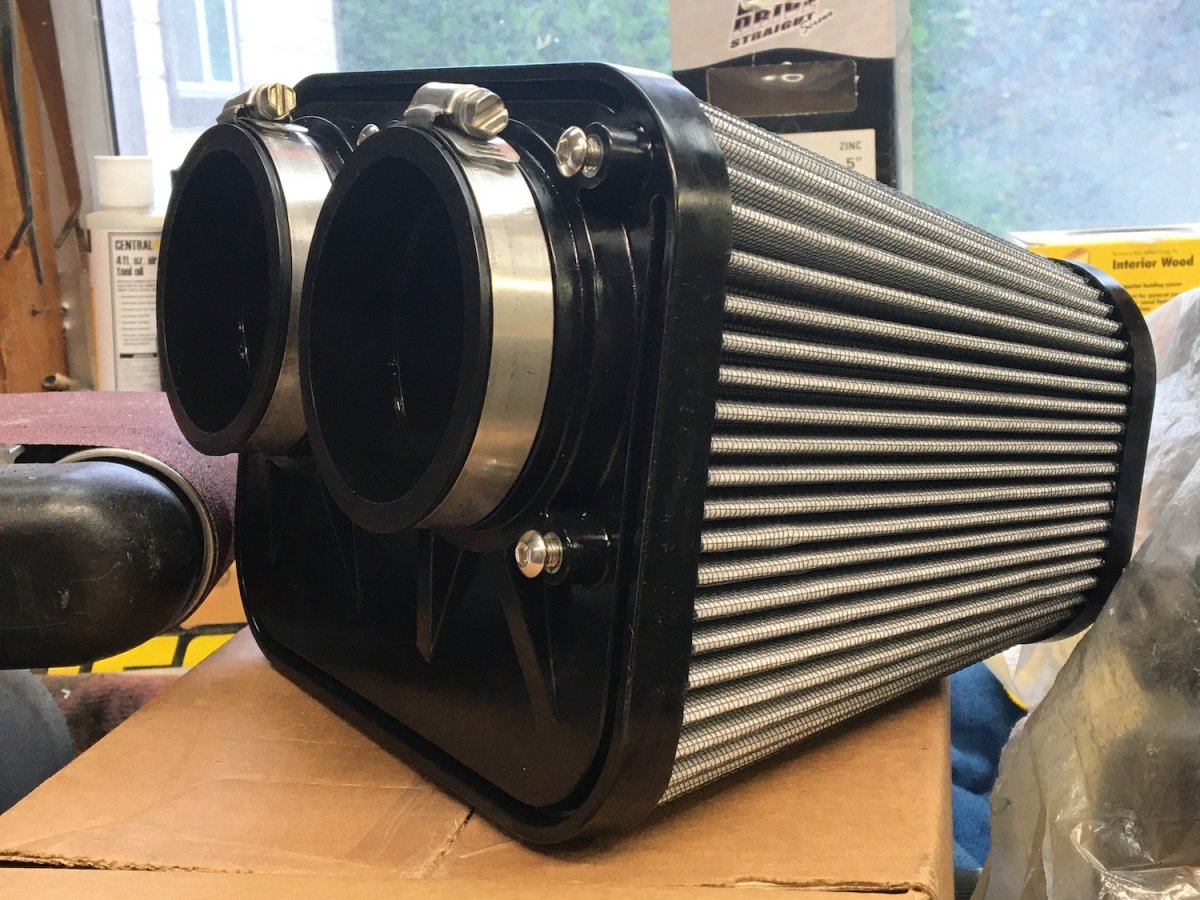
It is happening. I have been doing a lot of research and design into an air box that will fit both the Edge ST and the Sport. The design may change but as of now it is all about adaptors. Adaptors for the filter that have to be fabricated and welded. Adaptors for the filter that has to be molded . I am working on the mold now and it is much easier than the V2 intake mold. I learned so much with the V2 that this time I know what to expect and the daily surprises should be less. ***** Update 5-8 -21 The design has changed and fitment into the ST has not been re - established . I really want it to fit , but I have no access to a ST at this time to check for fit. Now is the time as once the molds are made I am locked in . It would take about 20 min to check and make notes. Anyone in the Los Angeles area that has a ST and would like to help please PM me. Some of the parameters for the air box: 1. It must be easy to install and something anyone can do. 2. It must require a minimum of tools to install. Right now the tools needed are a 7mm and 8mm nut driver, wrench or socket, and a big hammer...LOL. Just kidding about the big hammer. 3. It must move more air than stock with less restriction,. 4. t must look good ! As I don't want my ideas copied by a big company this thread will help establish my “ intellectual property “ Here is some info about the air filter: It can move over twice the air as the stock filter and will be available in a wet or dry configuration.
 9 points
 -
Here is the dry filter that will be used. It is huge! It will also be available as a washable reusable oiled filter.

 9 points
 -
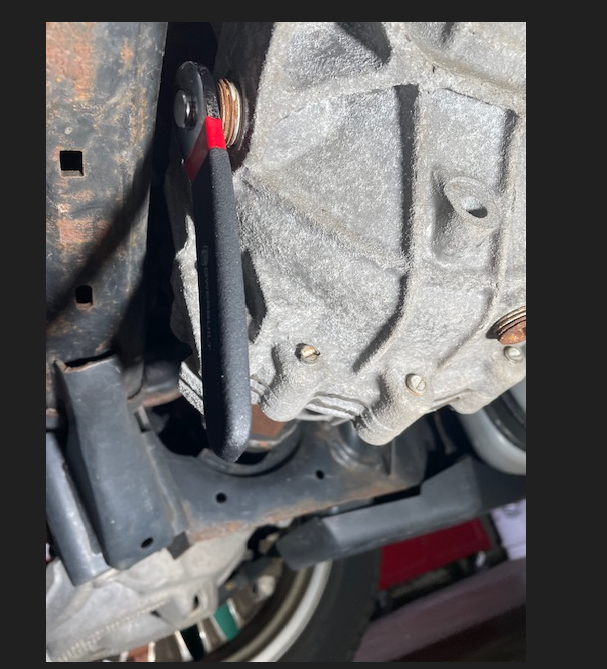
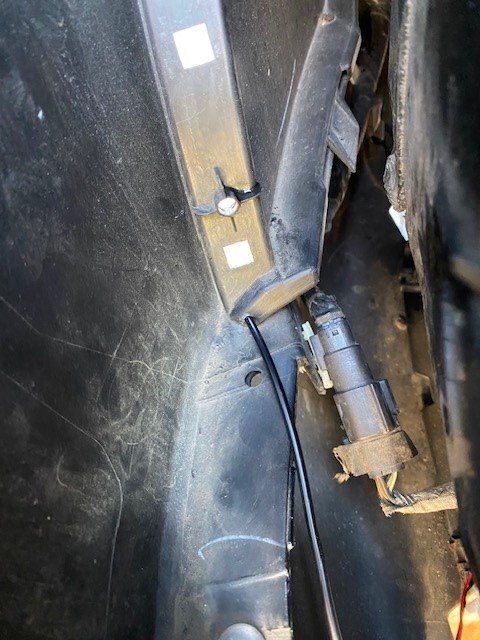
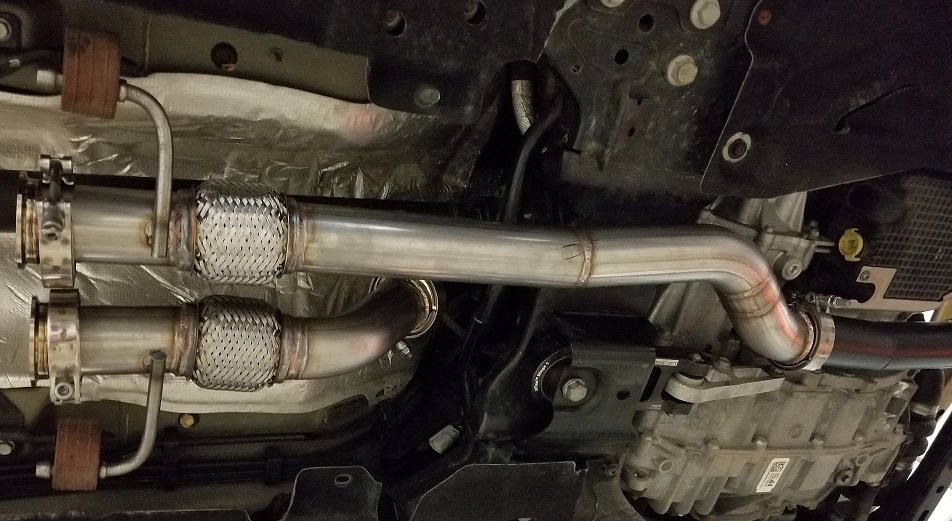
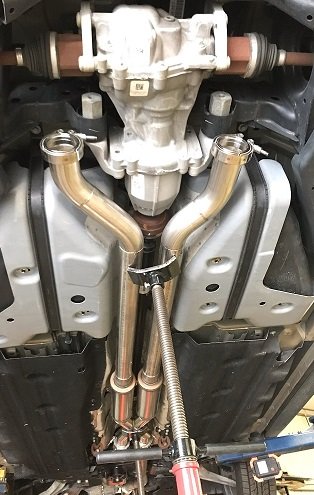
Not lot of detailed info on this; only a handful of threads here. The procedure was pretty simple but has gotchas and other things I didn't really care for. For example the torque on the PTU fill plug, you'll never get 33 ft/lbs on that. I stopped turning before I got to 28 ft/lb and noticed the plug was deeper than when I first took it out and stopped. There's also no way, as mentioned in another thread here, that you can completely remove the PTU cooler without removing the crossmember there. You can however, pull the cooler out far enough to drain the fluid. Make sure not to screw up the o-ring on the cooler though, or you will be dropping the crossmember. Those of you with just a plug here and no cooler don't have to worry about this as your plug comes right out. Here's the fill plug and PTU cooler with the stud/nut showing. When I opened the fill plug not even a dribble of fluid came out. I had to use a combo of 1/4" 8mm socket and 8mm flex head closed end ratchet on the nuts. Or you can drop the exhaust. I kept the 1-piece stud/nut and just reused them. The PTU cooler pops out easily, or as much as it can before hitting the subframe. The coolers metal rod elements extend the length of PTU basically. Here she is draining. You can see the o-ring - do not mess it up. Brake cleaner will be your exhausts best friend. I'd say I spilled an ounce or more other than what's in the container but I tried to measure what came out of it. In the sun. Didn't look too bad I thought for ~35k miles but idk. Reinstalled PTU cooler and cleaned everything up. Inserted the stud/nuts and torqued to 97 in/lb Here's what I use to fill up transmissions and differentials. Just a regular water vacuum pump you can get on Amazon for $10. Easy peasy no mess no pumping just press a button. I put as much oil as it would take until it started streaming out. Then I spun the tires several times by hand and waited a few more minutes before pumping more fluid in. When the stream stopped and turned into a drip I put the fill plug back on with some thread sealant. Like I said above I don't like how Ford says 33 ft/lbs on the fill plug - that's not happening at least on mine. All cleaned up and done. I'll check the level again in 100 miles or so. The fill plug is inserted further than it was from the factory at 28ft/lbs. Be careful with aluminum. And that's pretty much it. It should take about an hour if you have access to a lift. As with everyone else, I have no idea why Ford couldn't put a drain plug other than to purposely let PTU's eat themselves after the warranty period.8 points
-
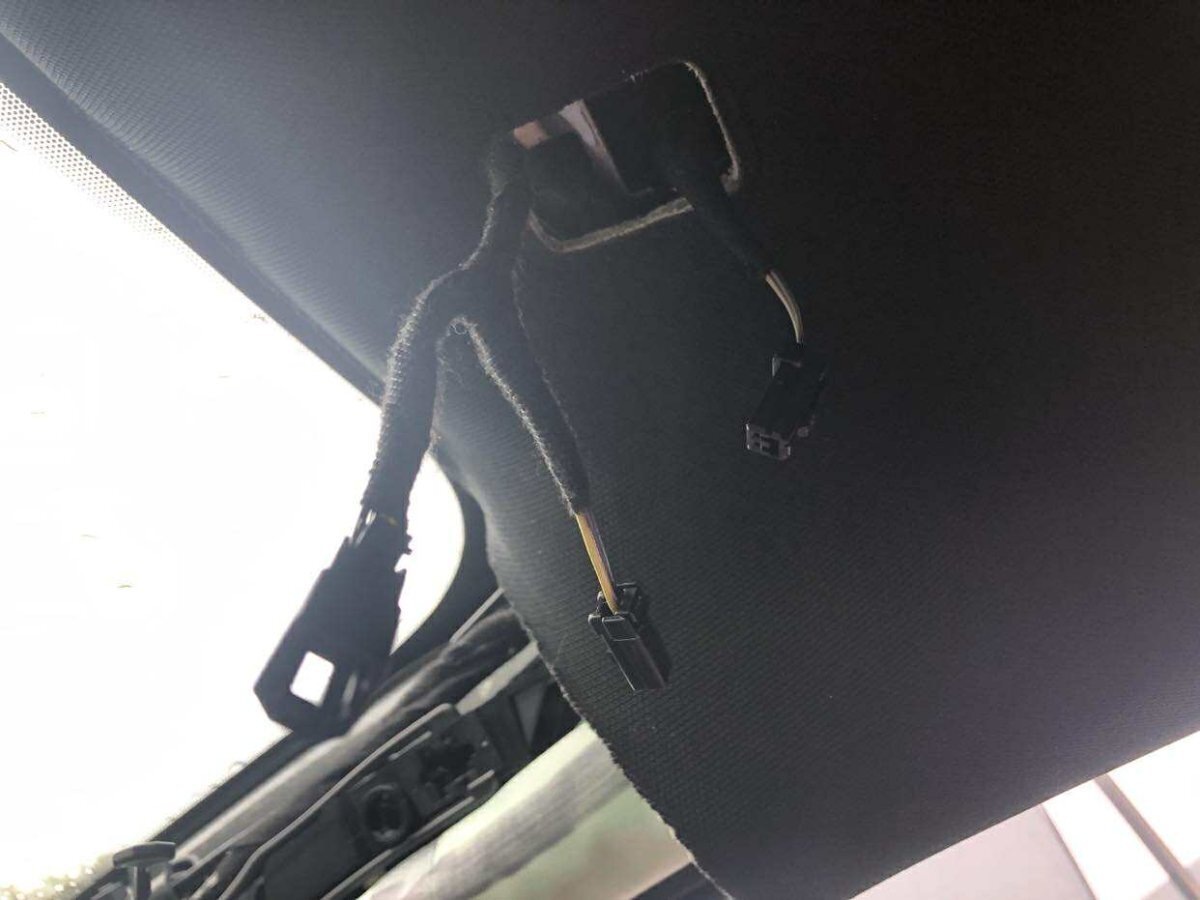
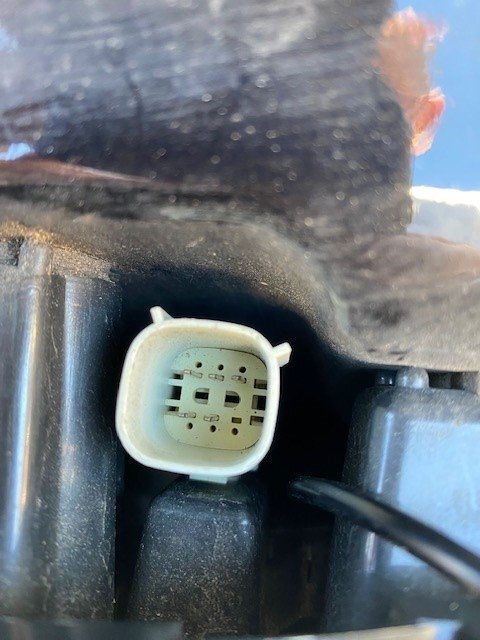
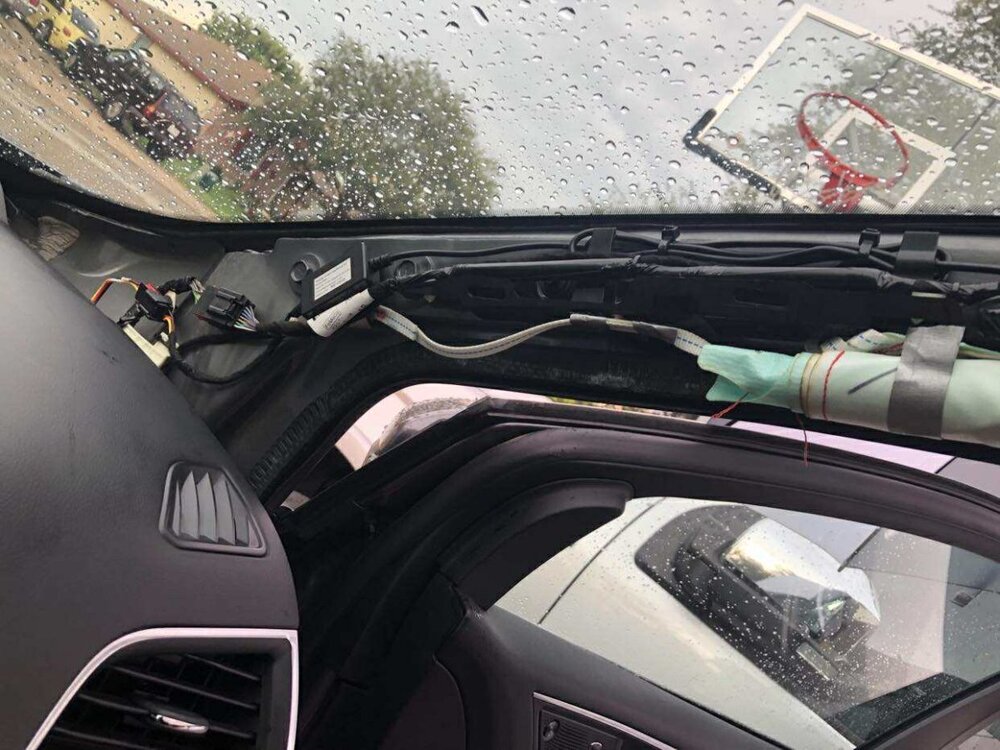
Hey folks. Just thought I'd give you a heads up. Dongar Technologies finally made a 5-PIN adapter for our Ford Edges. This allows you to quickly and easily run a dashcam off your rearview mirror power without having to use a wiretap. I just did a full Install video of it here: Hope it helps!8 points
-
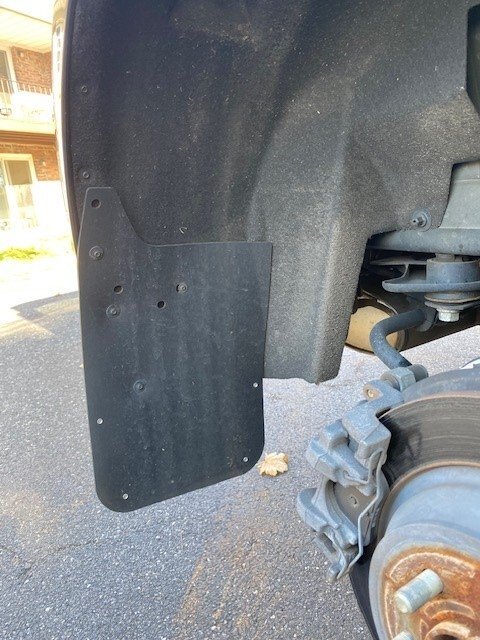
NOTE: YOU ARE RESPONSIBLE FOR FITMENT OF PARTS, 95% of these are interchangeable between the Sport and ST, BUT it is YOUR responsibility to ensure before purchasing. For those of you starting with a used car, please take the proper precautions and steps in getting your Edge Sport up to date on services, fluids, tires, brakes, and general overall condition. Once again, we cannot stress enough how important it is that preventive maintenance is done before anything else. If the car is not up to the task to run efficiently, why would you put more power into it? Before you start: Goals and Patience Lay out what you want to do to your car. Put it on paper. This way you will be able to come back to what your original plan was and the reasons why you wanted to do it. You can make adjustments later as needed. Your goals might be to get 10-20 more horsepower and add a few accessories for style and that's it. Some of you might want to go all out with a big turbo build, a suspension setup, bla bla bla. Either way, sit down and put a plan together. Think about why you want certain parts and why you don't. Think about and research the effects your parts will have on the car. Our philosophy is if it's not above average workmanship and quality, it's probably not worth buying. Do your research like looking at pictures on a google search, finding results from other enthusiasts, and asking others what their experiences have been. However, be careful who you ask and information sources you trust. There are people out there that criticize a part after they install with the wrong tools, didn't follow the directions, and used faulty parts to replace the parts they broke that came in the kit. Then all of a sudden it's the manufacturers fault. DO YOUR RESEARCH and trust your research, not others' opinions!!! Patience is really directly related to the amount of money you are spending and can spend at once. Patience is absolutely necessary when you are on a budget, there are many tempting parts out there because of their price. I'm not saying there are not inexpensive parts that work well, but I truly believe you get what you pay for. I can't tell you how many stories I have heard and still hear about cracked this and failed that. Underdeveloped, poorly manufactured, and cheap material will break or fail prematurely at some point. Failure is not the only reason why cheap parts aren't smart, they often underperform other comparable parts that are developed and tested thoroughly. The order of mods below isn't very important , but it is important to have many of them before moving on to the next progressive mod. You don't have to follow it exactly but use this as a guide. Many people have taken similar paths as you will with variations. Of course, you can always ask us what we think in a PM or in another thread. We might be able to make good suggestions. This will be a living document and forever changing. Please feel free to add input below and I will keep the OP updated ! If you post a part, please include part name, part number, and a link if there is a specific site it has to be bought from! Engine: - Tune 87, 93 & E30 This is probably the most important and most effective upgrade possible. These days, newer model cars are under strict guidelines from emissions regulation to get the most gas mileage they can and to reduce emissions as much as possible. Once you start adding parts, the settings that the ECU came from the factory with don't work for all the additional airflow present with all these parts. The ECU will actually start to detune the car naturally because of all the changes in airflow and combustion. With this said, you must make the ECU learn to work with the parts that you have. There are tons of benefits to getting your ECU tuned. You can really start to play with the boost settings, timing, fuel, and many more things. You can make your car extremely efficient under normal driving conditions like the factory originally wanted and make it scream once you put your foot to the floor. You can monitor all the important sensors of the vehicle and make sure the car is running smoothly and also see why it's not. There aren't a ton of ECU tuning options out there for the Edge Sport but the one that is out there is awesome. The SCT X4 had a major impact on accessibility to tuning these ECUs. Make no mistake, at this point, it's a very good idea to tune the ECU. We highly recommend getting the SCT X4 as the first modification in this stage. It's a scalable upgrade that works better and better as you keep modifying. We can't say enough about it. ZFG Racing 91, 93, e50, e85, Brew City Boost 87,91,93, e30, e85, 110 Unleashed 87, 91, 93 , E30 Livernois Motorsports 87, 91, 93, 100, ms109 - HPFP http://www.xtreme-di.com/product/xdi-hpfp-ford-nano/ - Drop-in Intake filters This is the easiest and most effective first modification which is why it's so popular. Making power is all about more airflow and better efficiency. Plan on a slight increase hp and slightly more torque from this drop in part. It's as simple as opening the airbox, and putting the new filter in. No need to put the car on a lift or jacks. Just open up the hood, get a few basic tools and you're good to go. Along with adding some nice less-restricted airflow. K&N Part number: 33-5000 aFe aFe Magnum FLOW pro DRY s Air Filter: 31-10269 AfE Magnum FLOW Pro 5R Air Filter (oiled) : 31-1026 - Oil Filter Options Ford Motorcraft FL-2087 - Thermostat Most tuners will request that you install a cooler aftermarket thermostat to keep the engine cooler. There are no negative side affects that have been reported as of yet. Not a hard install but does require some mechanical experience. Read More At: http://www.fordedgeforum.com/topic/22703-thermostat-2016-edge-sport/page-3) 170 Degree thermostat: http://www.unleashedtuning.com/reische-170-degree-thermostat/ 160 Degree LMS thermostat: https://www.livernoismotorsports.com/product/LPP2358-160 - Rear Motor Mount Some people will tell you this is the first modification you should do. Although I can understand why they say that, just make sure you don't mod crazy without it. The factory Ford mounts are crap. The bushings are a really weak and squishy rubber. This is GREAT for maximum comfort and eliminating noise, vibration, and harshness which is what the general population wants when they are driving to work and back home. But you are reading this because you want more performance out of your Edge Sport. An upgraded RMM will hold your engine in place much better while accelerating, shifting, and quickly decelerating. It will also keep the car more stable driving and shifting on rougher roads and more aggressive driving. The positive feedback given to the driver is instantly and significantly improved with this part. Installation does require you (or someone else) to get under the car or put it on a lift. It is not accessible without getting underneath the car somehow. However, once you're under the car, it's about as easy as pie. Remove a few bolts, take the old mount out, put the new mount on, and retighten the bolts with a little loctite and you're off to the races. Read More At: http://www.fordedgeforum.com/topic/23572-rear-motor-mount-rmm-2016-edge-sport/?hl=%2Brear+%2Bmotor+%2Bmount CP-e: https://cp-e.com/shop/product/cp-e-xflex-2-7tt-ford-edge-rmm-rear-motor-mount/ uses 60 duro and increase NVH very little in the cabin Ultimate Performance: https://ultimateperformancenm.com/performance-parts uses 70 duro and there is a lot of NVH translated from the engine - Intercooler There aren't too many options here yet sadly. The stock Front Mount Intercooler (FMIC) is not only very restrictive and super small but it also suffers tremendously from heat soak. Your engine is generating very hot temperatures underneath the hood and the FMIC is the recipient of some of the heat. We all know that the cooler you can keep the intake temperatures the more power you can make and keep the motor safe at the same time. An upgraded FMIC like UP's or CXracing's will create much more area for the air to cool down before it enters the engine. They also allow much more air to flow in general. It does stay cooler than the stock TMIC because it takes longer for the intercooler to heat up, negatively affecting intake temperatures. But it also takes longer for it to cool down once it heats up because of the extra mass of the intercooler. Upgrading the FMIC is a great improvement to flow and cooling overall. Your intake temperatures will stay much more consistent and cooler which ultimately yields more power and safer power. Read More At: http://www.fordedgeforum.com/topic/21117-intercooler-sport/page-10) https://ultimateperformancenm.com/shop?olsPage=products%2F15-ford-edge-sport-27-front-mount-intercooler http://www.autoperformancealbuquerque.com/auto-performance/ 505-344-9227 - IC Cold/Outlet This modification is the the pipe that connects the intercooler to the throttle body. You will be blown away after seeing how small and skinny the stock inlet pipe is compared to ANY upgraded inlet pipe. On top of that, it's plastic and dinky. You won't see a ton of power from this part, although some, but you will need it if you want to keep the mods coming.Install requires taking at. For the first time installer it can be a little tricky but nothing that a novice can't figure out if you have ever turned a wrench. Read More At: http://www.fordedgeforum.com/topic/24280-intercooler-outletcold-pipe-upgrade-2015-2018-edge-sport/) Ramfab outlet pipe: Ramfab27@gmail.com - BOV This part will not yield power but typically has 2 major uses. The first use is it's cool factor (who doesn't like to hear PSHHHHHHH). Second, it is absolutely functional and necessary to be working properly once you get more power or crank up the boost. The stock bypass valve has been known to leak slightly when adding more airflow. It doesn't make sense to add more parts and increase the power levels of the car when the stock bypass valve won't be able to even hold the extra air at high boost and RPM's. Read More At: http://www.fordedgeforum.com/topic/23661-2016-sport-27-bov/ Turbosmart: TS-0203-1281 http://www.boombaracing.com/fusion-sport-ecoboost-2-7-blow-off-valve-bov-adapter/ Boomba BOV - Modified Turbos (Thread: http://www.fordedgeforum.com/topic/23269-turbos-needed-gen-ii-27-ecoboost/page-11) BNR: Will provide link later CTI rebuilt turbos that work with stock tune http://comp-turbo.mybigcommerce.com/Comp Turbos http://www.ctiturbo.com a division of Comp Turbos - Turbo blankets Comp Turbos: They are not on the web site call and ask for Ernie http://comp-turbo.mybigcommerce.com/turbine-blankets/ - Downpipes Zury Fabrications, Zurymakesit@yahoo.com, (410) 579-1470 2.5 DOWNPIPES: Note: Fitting to a stock or 2.5 exhaust system must be clarifed!!! Add $100 for cerakote (heat management) Pricing: Catless 304ss downpipe - $925 Hi-Flo Cat 304ss downpipe - $1125 - Upgraded throttle body Stage3 Motorsports:https://www.stage3motorsports.com/1894-2015-2017-mustang-2-3L-EcoBoost-BBK-65mm-power-plus-throttle-body.html) - Intake Velossa Tech Big mouth https://www.velossatechdesign.com/products/2018-2019-ford-edge-st-ram-air-big-mouth-w-flare-intake-snorkel - Catch can The function of a catch can is very simple. When an engine is running, there is a very small amount of the combustion gases (exhaust) inside of the cylinder that end up getting past the piston and head instead of exiting out of the exhaust system. In order to remove that exhaust, known as "blow-by", car manufacturers have systems that take that blow-by and recirculate it back into the intake system so that it doesn't escape into the atmosphere. It keeps the environment cleaner but it also causes all that blow-by to pass back through your intake system and brings a lot of oil with it, leaving behind a lot of oil and buildup along the inside of the entire intake system including your intakes pipes, turbo, intercooler, and intake manifold. This happens very slowly and over time but eventually your motor becomes less powerful and not as safe because of the effects this has on the intake air after long periods of time. An oil catch can intercepts this blow-by before it goes into the intake. After it collects enough, you remove it, empty it out, and put it back on. This is a must at some point if you want to have your car running like a top at all times. Read More at: http://www.fordedgeforum.com/topic/24253-g2-edge-sport-catch-can/page-2 JLT: https://www.jlttruec...roducts_id=1647 TeamRXP http://teamrxp.com/p...al-valve-system - Exhaust MRT Axleback Magnaflow #19048 2015 FWD SPORT ONLY catback exhaust - Oil Drain Plug: UPR Metal Drain plug: https://roninfactory.com/products/ford-f150-raptor-oil-drain-ronin-factory - Crank Case Breather: UPR Crank Case Breather: https://adamtuned.myshopify.com/products/upr-crankcase-breather-for-all-ecoboost-vehicles-focus-rs-mustang-fiesta-focus-f-150?variant=41268812496 - Throttle Response: JMS PedalMax: http://www.jmschip.com/ford-vehicles/ Transmission: - Level 10 Tranmissions Built 6f55 Call level 10 at (973) 827-1000 and ask to talk to pat about the built 6F55 options, make sure to tell him Jim and Colin sent ya for the Edge treatment and he will give you good pricing! - ZipKit Sonnax Zip Kit 6F50-ZIP targets the root cause of multiple concerns by sealing critical circuit pressure losses in the Ford 6F50 and 6F55 valve bodies. The kit contains uniquely designed parts to prevent the loss of pressures within the main line, clutch apply control, solenoid feed and lockup control circuits. The kit also seals multiple circuits known to suffer from end plug leakage or poor checkball sealing. No special tools are required for installing these parts. Sonnax: https://www.sonnax.com/parts/3743-zip-kit Built Transmission XP: https://spprecision.com/products/6f50-6f55-transmission-sale.html Suspension: - Camber bolts ACDELCO: P/N: 45K18052 - Front cross brace (TTCR-II): ebay - Springs H&R p/n 28759-2 - Rear Swaybar ADDCO Part # 2452 1.125 Whiteline lateral locks CarID Product Page Lateral locks from McMasters Discussion on aftermarket lateral locks in the sway bar thread starts here: https://www.fordedge...e-9#entry189069 - Rear Swaybar Mounts https://www.ridetech.com/product/delrin-lined-sway-bar-mounts/ - Brakes BDR Racing 6 piston Front Calipers with 385mm Rotors AMAZING front brakes, can reach out to Brandon Dubose on the Ford Edge World Wide Facebook page for all the information, took over 32feet off of the 80mph-0 stopping distance!!! Forum Reference material: http://www.fordedgeforum.com/topic/25866-brake-pads-rotor-replacement-option-for-edge-sport-2016-2018/ Rotora Brakes 4, 6and 8 piston: These brakes retain the electric Parking brake. http://www.rotora.com/street-challenge/ Body -Sport Mud Flaps Ebay Link Here - CNC IC grill (FEF resource) Email Spencer for the grill sadams.cds@gmail.com - PnP Remote Start https://www.12volt.solutions/collections/ford/products/2015-2017-ford-edge-remote-start-plug-and-play-kit-1 - Honeycomb Front Grill https://www.ebay.com/itm/ABS-Front-Bumper-Grille-Honeycomb-Grill-Vent-Grid-Refit-For-Ford-Edge-2015-2018/362850116515?fits=Year%3A2018|Model%3AEdge|Make%3AFord&epid=8035770920&hash=item547b8d63a3:g:Ig0AAOSwaW1d9KMI Interior - Dash Kits Dash Kits : Wood or Carbon https://www.carid.com/2016-ford-edge-dash-kits/ -Shift Paddle Extensions Steering wheel paddle shifter extenions NOTE: YOU ARE RESPONSIBLE FOR FITMENT OF PARTS, 95% of these are interchangeable between the Sport and ST, BUT it is YOUR responsibility to ensure before purchasing.8 points
-
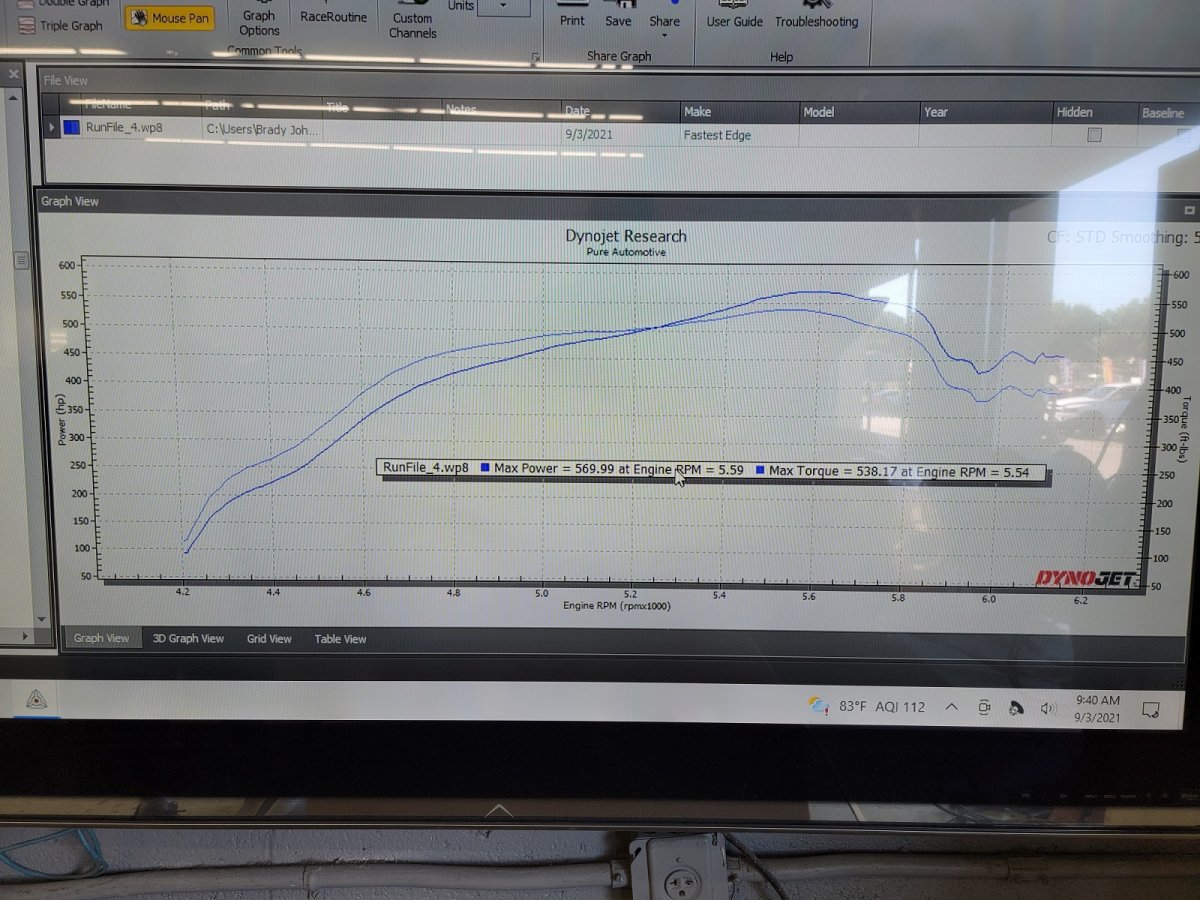
Yea you read that right, 570whp edge! new platform record! we ran out of fueling at 5500ish rpm (redline is 6450) and it pulled boost (25psi to 23psi). Waiting on a new hpfp pump and injectors and we should easily see 600whp!
 8 points
 -
Below are my pics of my 2015 "Roush" themed Ford Edge. Wrapped in full with KPMF Matte White. Lots of work went into the build. For more pics head over to my website at: Current Design | 1of1 (wixsite.com)
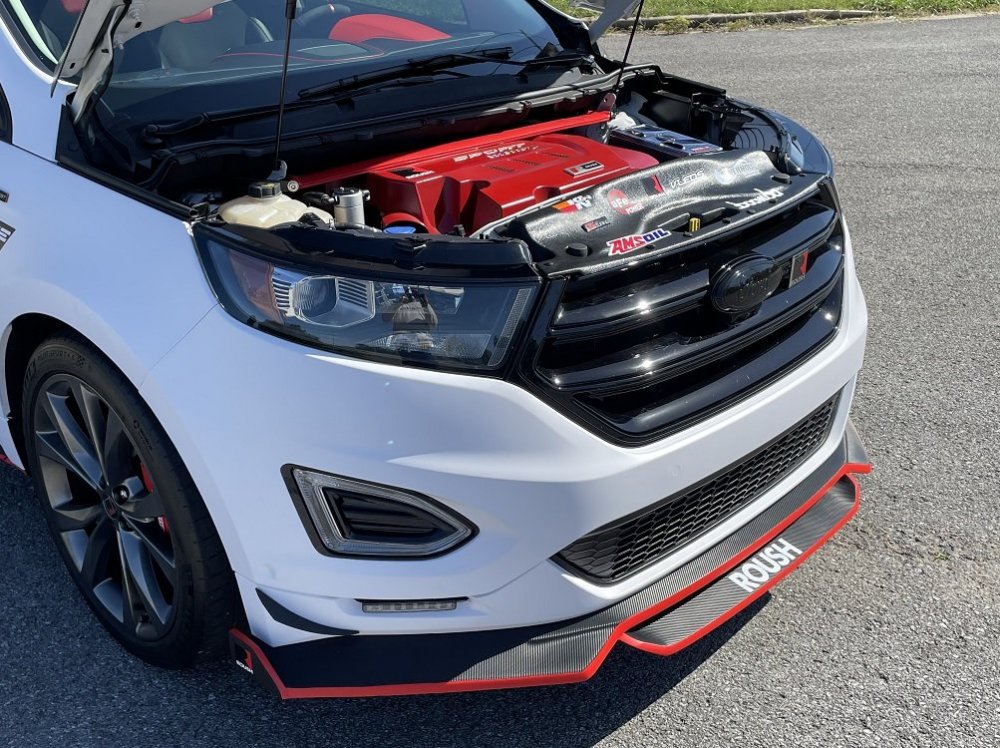 8 points
 -
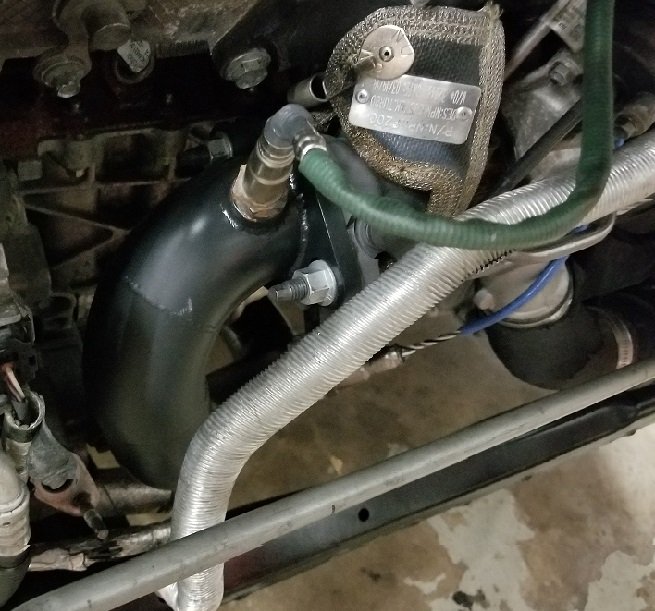
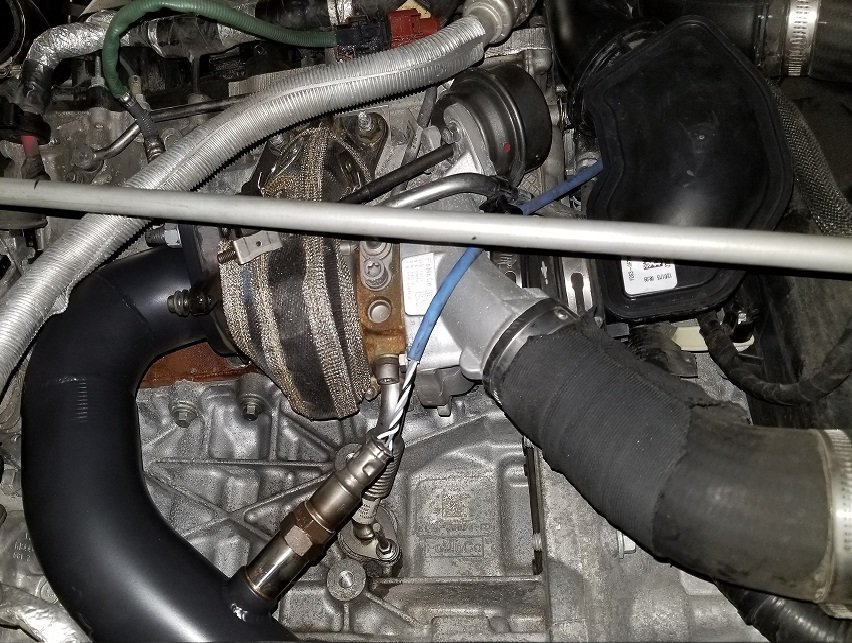
Pulling the front fascia/bumper via the ford manual wasn't the best. It has you pulling the tires, and half pulling the wheel well liners to get to the 3 bolts on each side that hold the bumper on. Screw that noise. Pull the headlights and get them from above. Removing the stock FMIC was a PITA. I dropped the lower rad support, disconnected the Cold and Hotside charge pipes. The did a pry wiggle to pop off the FMIC mounting Hooks off the rad. Thankfully the UP FMIC does not use the same setup, lol. Big size difference. Not as big as the 5.5" core on my Focus ST though, lmao! Had to shim out the TMAP sensor. If installed normally, the O-ring overshot the flange and did not seal at all. If this becomes problematic aka boost leak, then I will have to re-address it. The O ring is sealing tight now. Hopefully it stays that way. These parts hit, took the angle grinder to them, then cleaned them up with a razor knife. I need to do the same to the closest inside dimple on both sides. The front air damn piece has some curvature to it, and those hit as well. Pried off the front overhanging plastic due to it hitting on the radiator lower support cross member. Hit it with some paint afterwards. Rust and all. Re-used the factory hose clamp assemblies, and torqued the crap out of them. You have to push the FMIC as far to the passenger side as possible to get enough clearance to get the cold side hooked up. It took me awhile to get my Ramfab pipe installed. It fits very precisely, once I got it all aligned, it was fantastic. Removed all the AGS shutters, screw that system. Known point of failure on the Focus ST platform, failing closed is no bueno. I still have the motor installed/plugged in, and kept the shrowding for mounting/airflow reasons. Its a lot of FMIC for that space, and the OEM lower grill covers a large portion. I have a more open lower grill arriving via Ebay next week. I'll do before and after pics. I also need to loosen the fmic mounting bolts, and push up on the unit to level it out and possible buy me a little better fitment, not that there's a lot of vertical play in the mounting slots. Going to have to pull the front end again to finish the AEM water meth setup, but right now she rips. Throttle response is better despite having a larger FMIC, that Ramfab pipe really helps. Im on a Unleashed 93 base ish map. Excited to get tuned for the FMIC, coldside, and of course the water meth!!!8 points
-
Let the numbers speak! Tuned by ZFG Racing and so many other sponsors that we cant thank enough for all of the help and patience that it took to take the platform to its peak! Special thanks to: Xtreme-DI (HPFP) ZFG Racing (Tuning) BNR Supercars (Turbos) Ultimate Performance (Intercooler) Zury Fab (Downpipes/Exhaust) Engine mod list: Tuner: ZFG Racing Thermostat; 170 Degree Intake: Custom Throttle body: 65mm Coldpipe: Rambo Intercooler: Ultimate performance with garret core Turbos: BNR Hybrids Turbo Blankets: Comp Turbos Downpipes/exhaust: 2.5" Catless amd custom stainless by Zury Sparkplugs: Step colder @.022 (looking for part number) Misc: UPR Crankcase breather
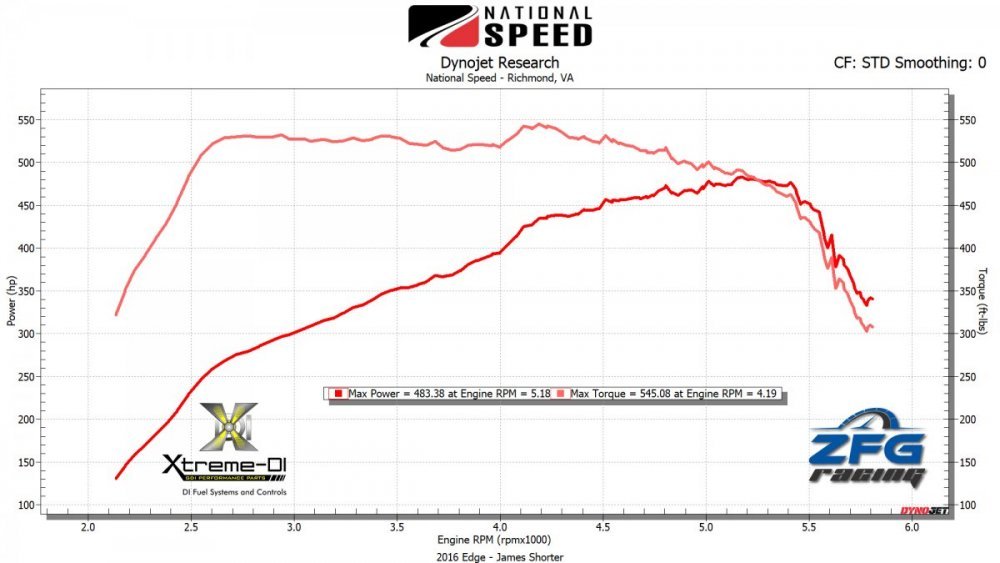 8 points
 -
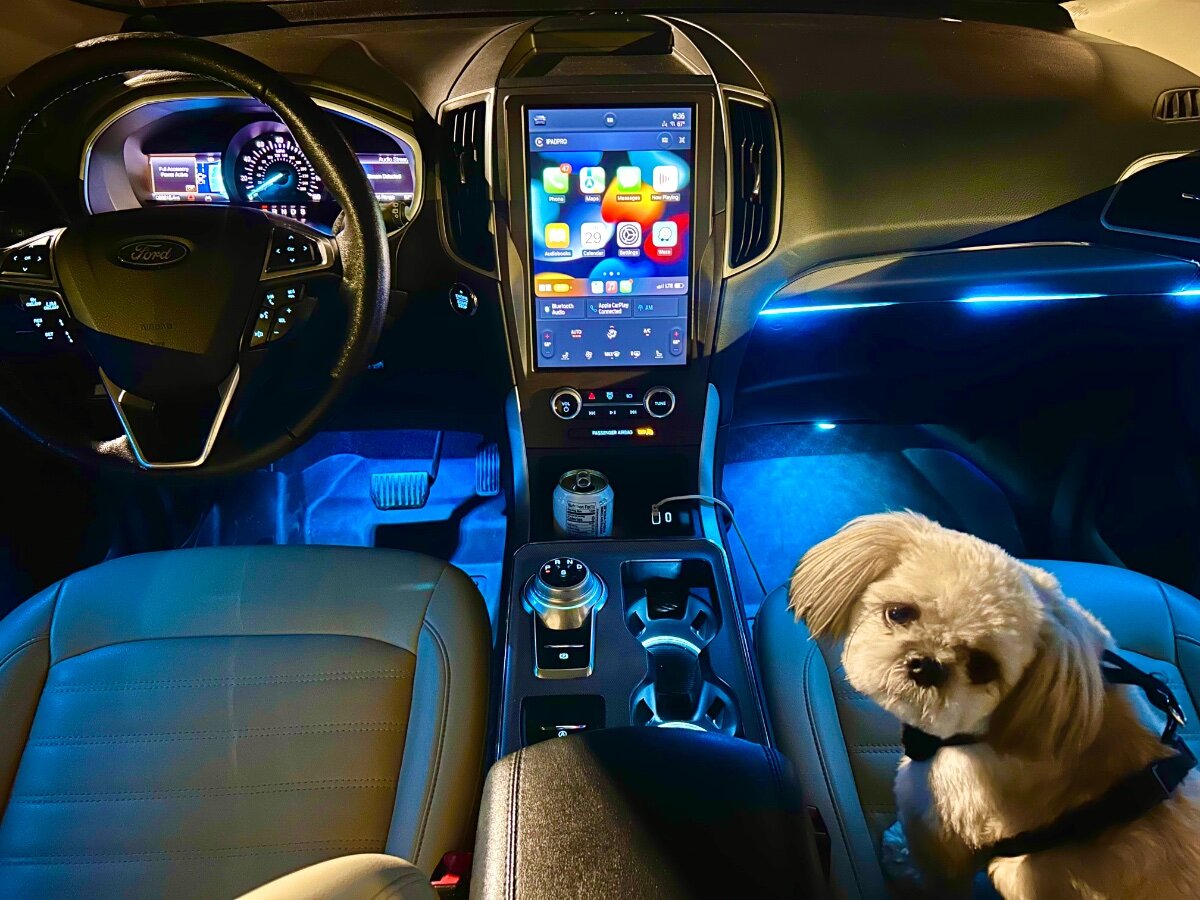
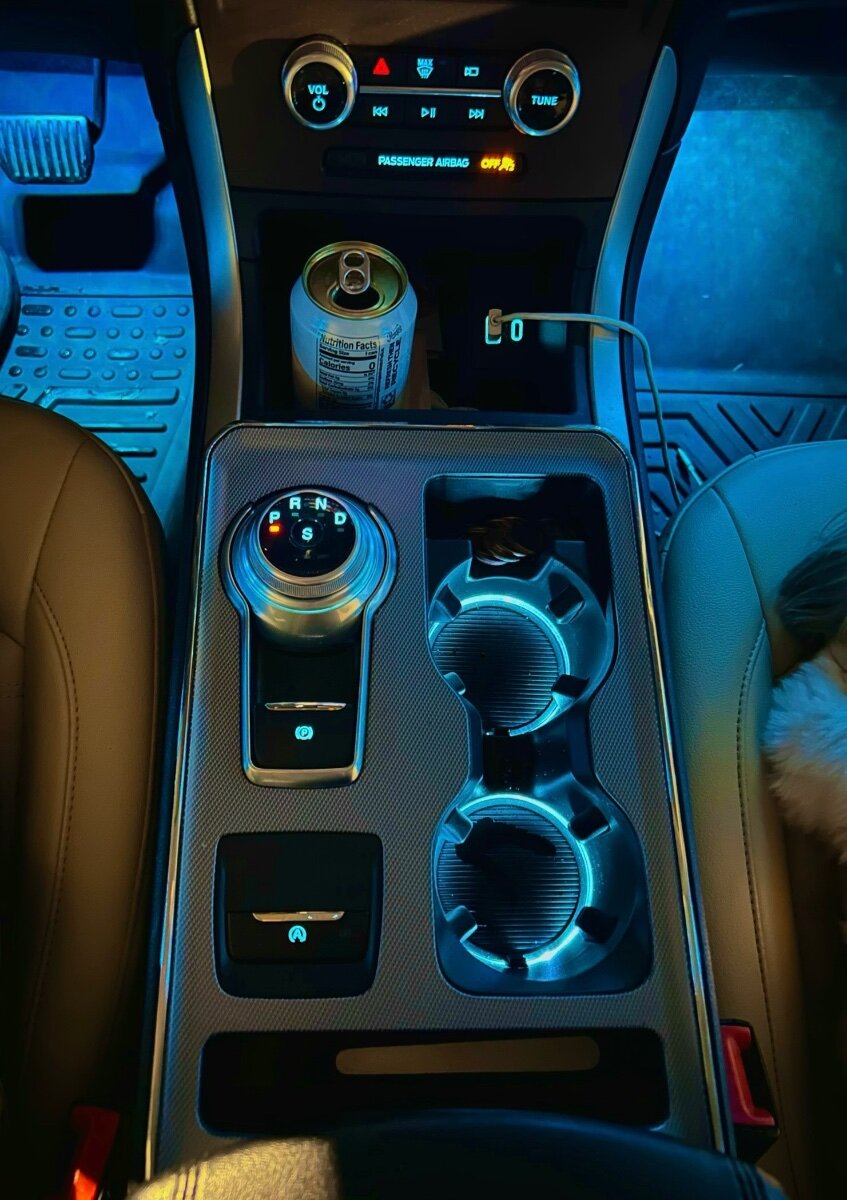
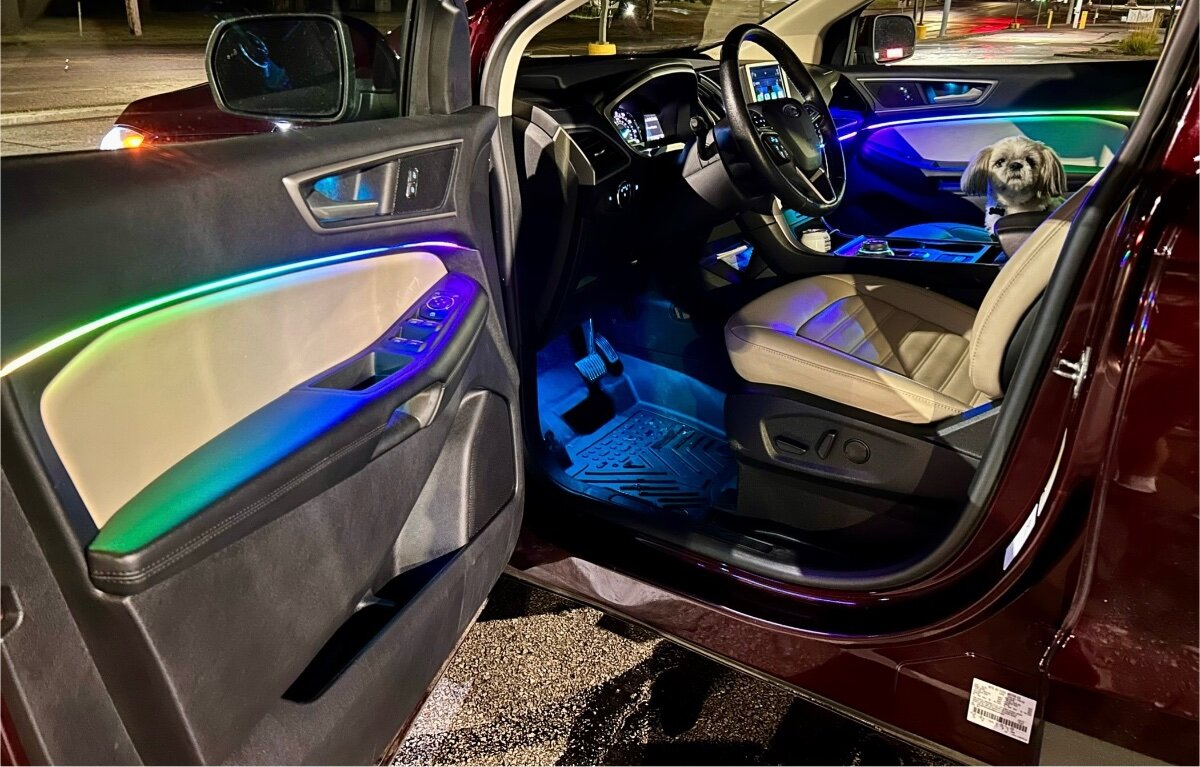
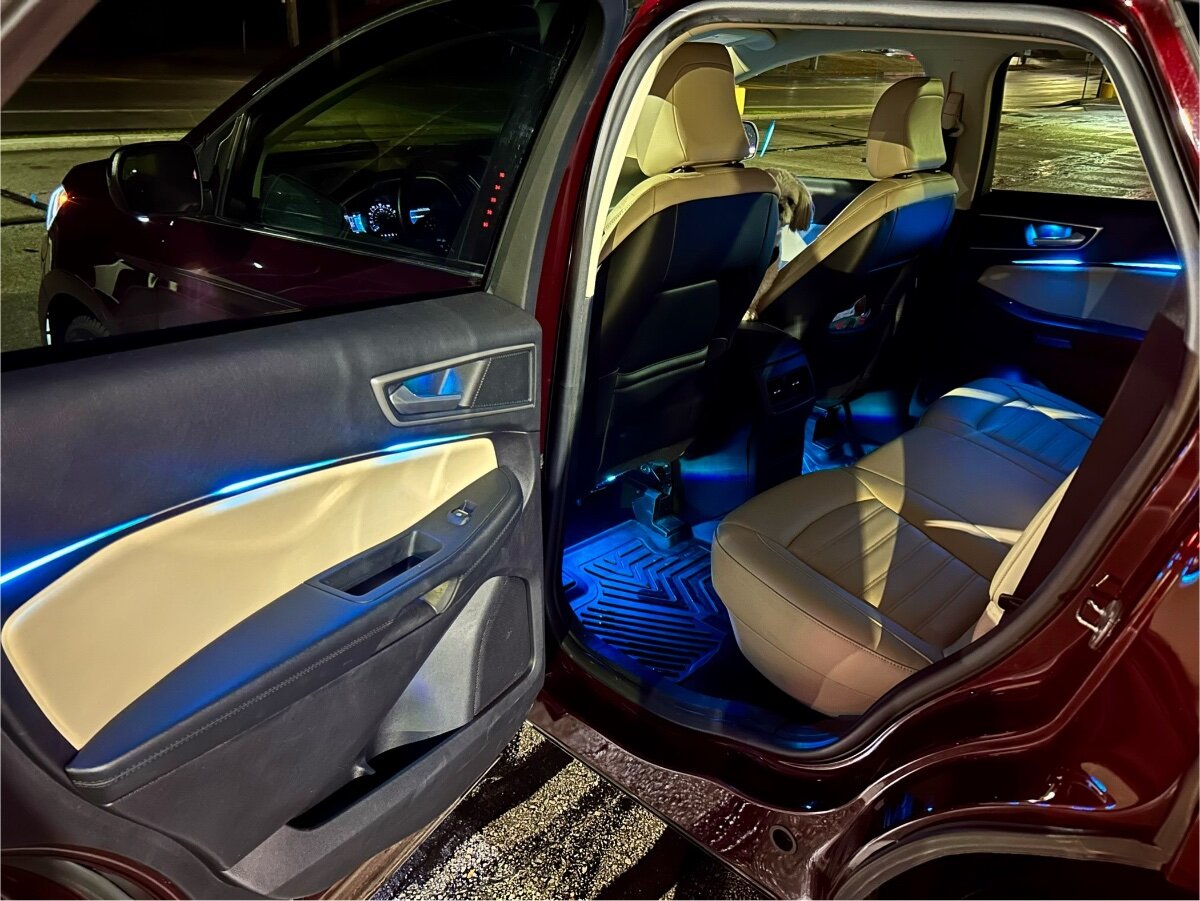
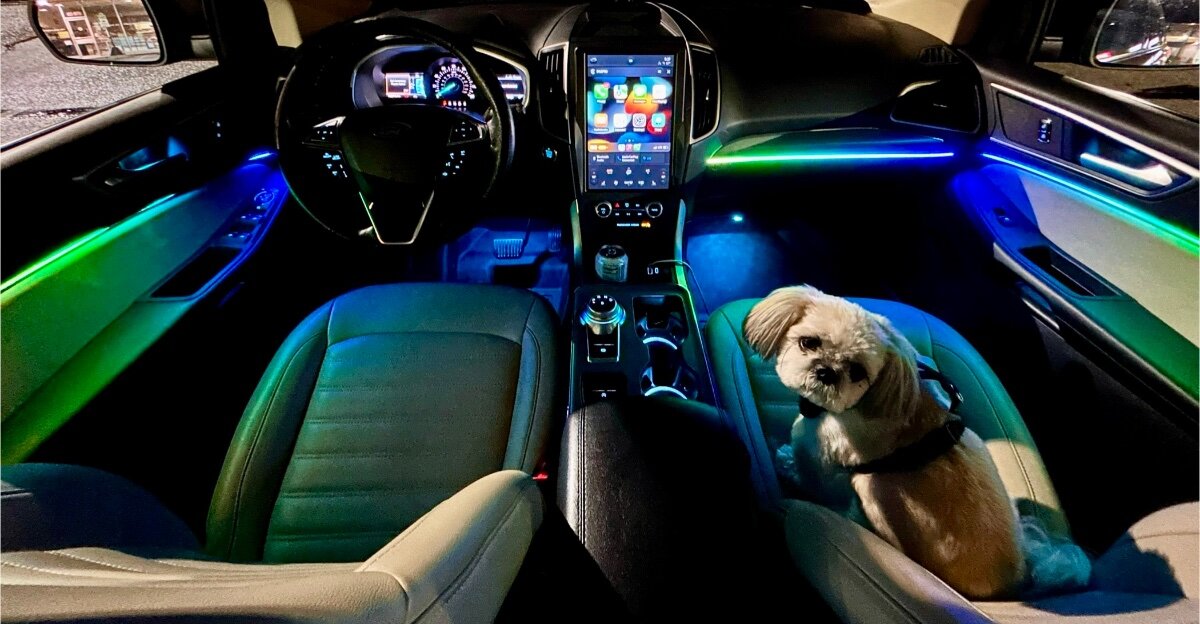
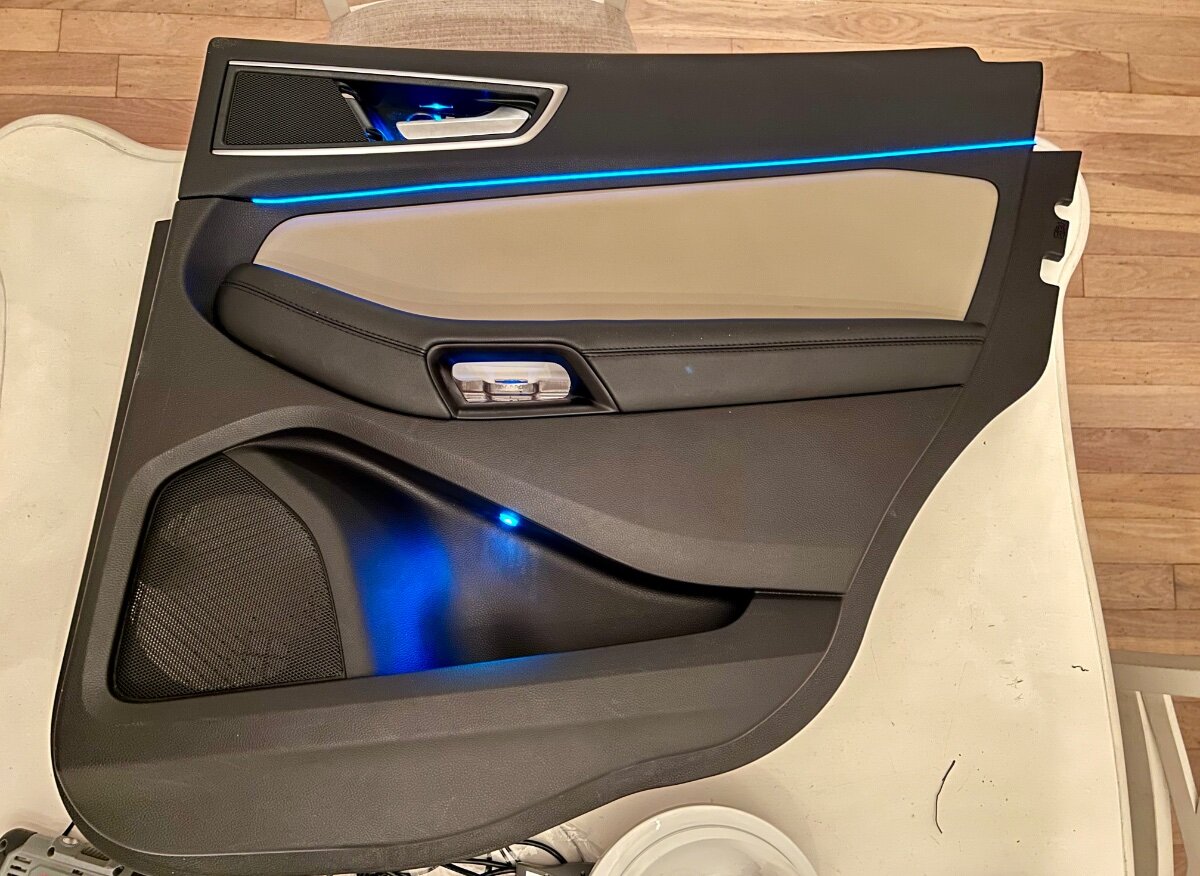
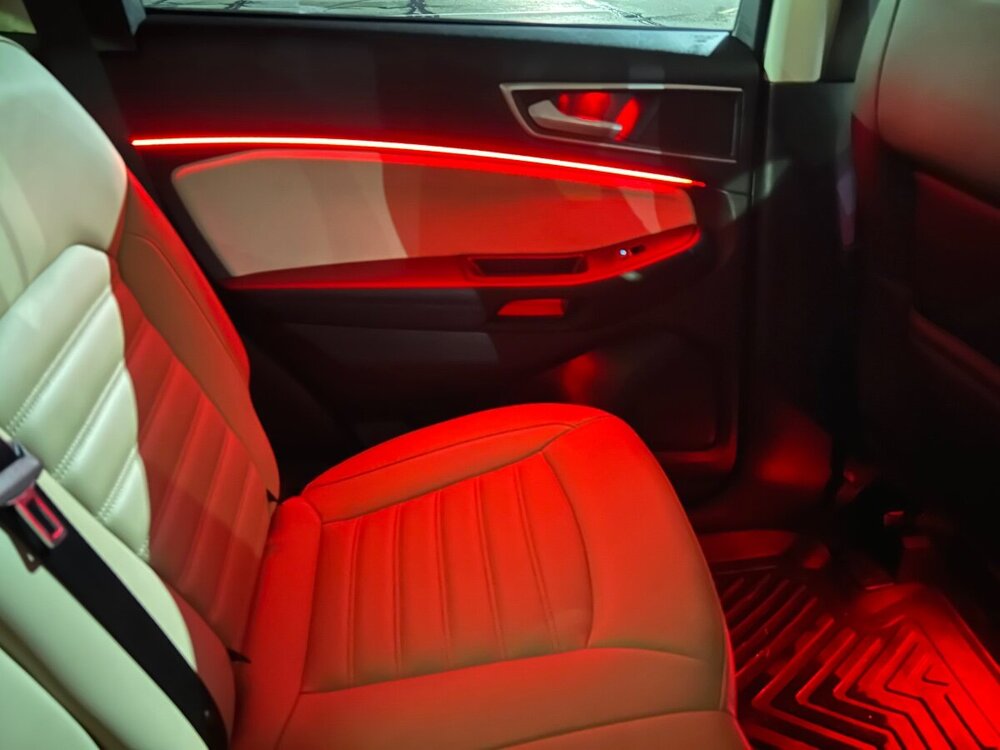
Finally finished installing ambient lighting in my 2021 Edge. The cup holders are OEM and everything else is aftermarket. The cup holders are only ice blue, and they are controlled by the SYNC screen. In each door, I installed a light in the door handle, door storage, and an LED strip along the door trim. I also installed 4 LED lights under the seats to light up the footwell areas. I also installed an LED strip above the glove box. All of the aftermarket lights are controlled by a hidden physical switch or with Bluetooth from my phone. I was able to get the cup holders for free by using Fordpass Points, and the aftermarket lights were only $34 USD (including shipping) for everything. Overall I am happy with the new ambiance.


 7 points
 -
I just replaced the PDU fluid in my 2020 Edge and wanted to detail my experience. I bought it new (Titanium with the Elite Package) and am trying to maximize its life by replacing all the fluids I can regularly. I had the PTU fluid replaced at a dealership when I went for a warranty issue with the touchscreen at 30000 mi. I bought the M/C fluid and decided to have Ford replace it, I paid 45 bucks for the fluid and Ford charged 130 for the change. For the RDU @ 36000 mi, I decided to replace the fluid. I didn't jack up the car, I just crawled under and kept it level. To remove the filler plug on the rear diff, I had to buy a slim "3/8" "breaker bar" from AMZ for ten bucks because there was very little clearance between a rear cross member and the fill plug. With this small wrench, I could remove the filler plug using a small pipe for leverage with no problem. The drain was easily accessible with a 3/8" rachet. The drain plug had a good amount of debris on the magnet and the fluid was very dark but I guess this is normal for break-in as my Subaru Forester had the RDU fluid in a similar condition at the same mileage when I changed it. I used Permatex high temp on the plugs and pumped the new fluid from the oil bottle using a screw-on pump from AMZ that worked great. I used about 3/4 of a Qt. which makes sense because the capacity is 28 oz +/- 1oz. I filled it until it started draining from the fill plug. Then I torqued the drain plug to 20 ft-lbs and used Permatex high temp on threads. Hope this helps - Peace.

 7 points
 -
I am about to close a deal on a 2019 Edge Titanium Elite. I'm excited to learn more about it. I am a retired Ford parts manager, but have never owned an Edge.
 7 points
 -
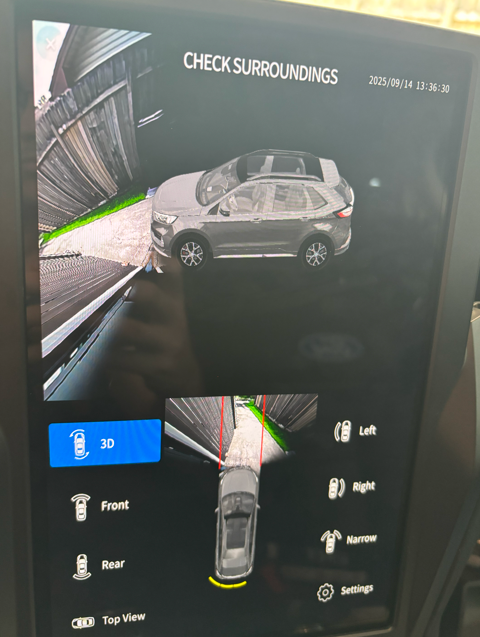
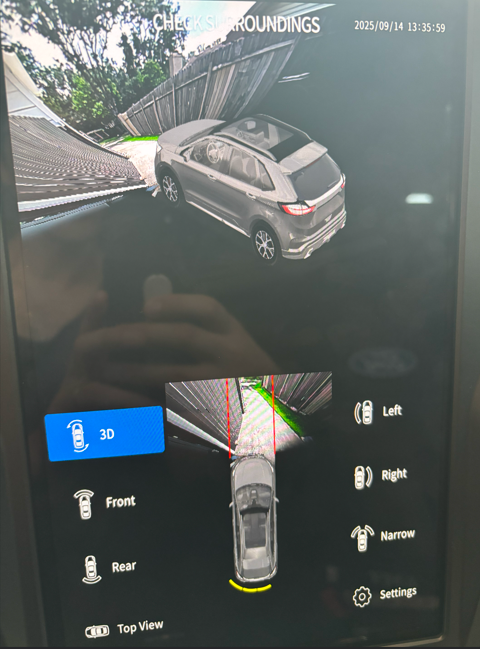
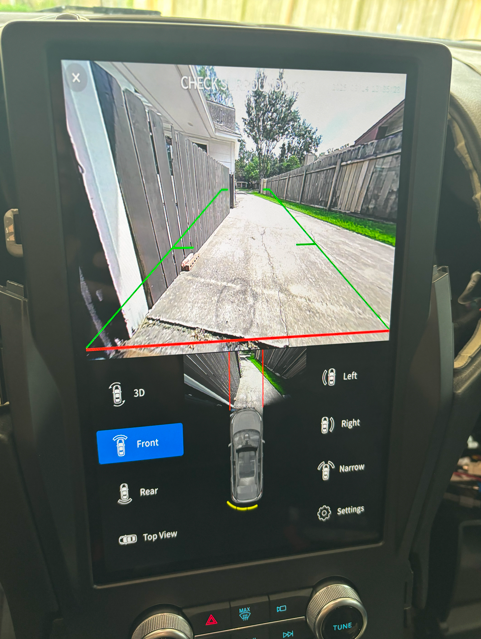
Hello everyone, I’ve been following this thread with a lot of interest — great work from all of you digging into the 360 retrofit! I’ve been wanting to achieve a similar result, but I decided to take a different approach. I went with a third-party 360 AVM kit and set it up to integrate with the SYNC screen on my 2023 Ford Edge. There really isn’t anything compatible out of the box with the Edge, but I noticed the Edge and Ranger share similar hardware and modules. And notice I said similar — not the same. It’s been a long process — I’ve done tons of research and a fair amount of trial and error to figure out the video inputs, CANBUS integration, and DIP switch configurations needed to get everything displaying correctly with the factory screen and triggers. With this I do have dynamic guidelines, parking sensors, multiple views along with the top-down bird view. Also I did retain the factory camera and camera view, and I can jump between factory view and 360 kit view. It’s still a work in progress, but going this route gives me more flexibility compared to being locked into the OEM restrictions. I’ll share more updates as I continue refining the setup. Next steps will be to mount all the cameras
 7 points
 -
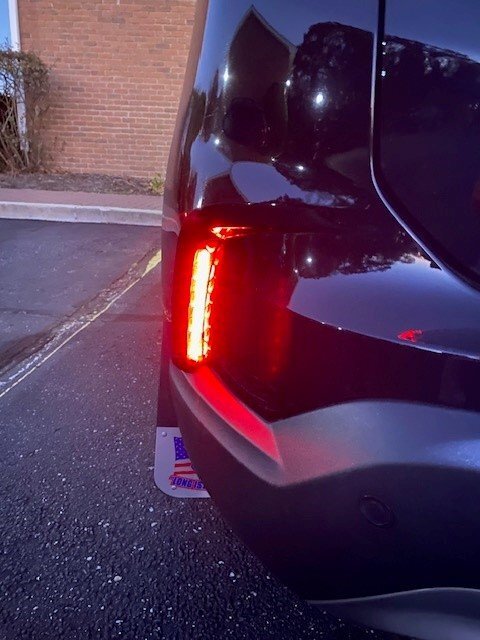
I bought this car in July and like a lot about it. There's other things I don't like so much, but have been addressing and improving these things over time. One of the worst design features of this car is the absolute anemic rear lighting. With the rear hatch lights not functional in this 2020 SEL trim model, and the cost to upgrade to Titanium or ST hatch lights, I knew there had to be a better solution. I needed more "rear facing" lights mostly for safety reasons, as opposed to "side lighting", which is mostly what the current tail lights give me. Came across Zeus 3D Printing in Clearwater, Florida owned by Emil Katzarski quite accidentally during an extensive Google search: https://zeus3d.net/?srsltid=AfmBOorO0O2DjTbDAtMV25AiJb1mms3rWaBZ3b_Lf2Hg2sQetAp7yW8u After several phone conversations and e-mails, I pulled the trigger on a pair of his "ST Rear Reflector Replacements": https://zeus3d.net/products/2019-ford-edge-rear-reflector-replacement Ordered them on 10/4/2024 and received them today on 11/7/2024. They're custom made, not sitting on a shelf, and I suppose the recent hurricane didn't help. I ordered "custom color with LED strips" which got me the matt black version. Cost was $60 for the set of two, and there's a discount code for free shipping. Here's a pictorial of how I did the installation, and why I did it the way I did. First side took me about an hour or an hour and a half, as there was a learning curve. Second side took all of maybe 15 minutes. First, tail lights need to be removed. There's a little square shaped plastic plug which is (gently) and easily pried off with a small flat head screwdriver. Under that is a T25 torx head screw that needs to be removed. I put some painter's tape inside that recess prior to removing that screw, so if I dropped it, it wouldn't disappear into the abyss. Then I followed a YouTube video (there are several) to slide the tail light rearward and remove it. There are simply pins in the housing that go into recessed holes in the body. Only thing is I tried masking tape like the guy in the video did, and it immediately ripped. Duct tape worked much better. Once the light has been removed from the body, just unplug the connector coming out of the light from the other connector fixed to the body. Set the light aside. Next I had to remove the OEM reflector. Its got 2 plastic pins and 2 "springy" plastic clips. Each pin is supposed to have a metal push nut on it, but mine only had the one push nut on the top pin. Either it fell off many years ago, or was never installed. Either way, here's a photo of what's supposed to be there: Here's what the push nut looks like: Even though I know it was pushed on, I used a 10mm deep socket on a 1/4" drive ratchet with an extension to unscrew it. Used the same method to reinstall it although you might want to try actually pushing it back on to avoid the possibility of breaking one of the new pins. Thankfully I broke nothing today (for a change)! Here's a comparison of the OEM reflector and the new LED light (more later): For the installation of the new lights I added a bit of extra 3M double sided tape just for insurance, and wiped down the recess that it fits into with rubbing alcohol first: Now.....how do you get to said OEM reflector? Well I'll tell you it's MUCH easier removing the rear wheels first. Gives you much easier access to what you'll need to get at. Also, I removed all the bolts holding in the rear wheel well/fender liners. I think there were like 6 or 7 of those (7/32") around the perimeter of the liner, and two 10mm cap nuts (one towards the front of the well, and one straight ahead over the brake rotor. I did not remove the liner......just took all the fasteners off so I could bend the liner out of my way without creasing or breaking it. However that only allows you to access the lower part of the OEM reflector. To access the upper part (in my case to access the push nut), I partially removed the top of the quarter panel where its simply held in with 4 tabs under the tail light assembly, and then the part that goes around the wheel wheel (I think there were 4 metal clips that just popped out there). I did the top first (pretty gently) then slid my fingers towards the front, and the remaining clips around the wheel well popped easily out. I expected cheap plastic that was bound to break, but they're all pretty robust. I wouldn't yank on them, but easy prying with fingertip pressure was more than enough. Here's a few pics: Inner wheel well..... Inner wheel well after fastener removal..... Top quarter panel tabs under tail light.... Quarter panel wheel well tabs...... Views of OEM reflector from inside Used one hand to gently pull the quarter panel away from the body and the other to remove the push nut, and squeeze the 2 plastic retainer ends together. Then the reflector simply pushes out. When installing the replacement, you'll need to feed the 2 wires from the LED strip up towards the OEM tail light plug. DO NOT make the mistakes I did..... DO NOT try to feed the wires through EITHER of these holes: If you do this, there's not enough room for the new light to lay flat in the recess. On one side I drilled a tiny hole UNDER the bottom square one, and fed the wires through there. On the other side (for some reason) there was enough space to feed them in without drilling. Can't see the hole I drilled anyway, so I'm over it. Also, clip the connectors off the ends of the new light. You don't need them, and they're too large to fit through a small hole (if indeed you choose to drill): Here's a few pics of that process with inside and outside views: Also, the LED strip slides into the bottom of the new 3D printed housing. DON'T FORGET to insert the LED strip into that B-E-F-O-R-E pressing the fixture into the body. Double-sided tape is a bear to remove if you forget. At this stage, assuming you've fed the new wires up towards where you need them, you can reinstall the fender liner. Electrical-wise. I used a test light on the harness that remained in the body to check for grounds and hots. There's 6 wires coming out of the light fixture, but only 5 pins in the onboard socket. The delivery came with a bunch of plastic snap splices, but I prefer Posi-Taps. The 20-22g ones worked fine. I bought them on Amazon but you can buy them direct or shop around. You only need four. Two for the grounds and two for the hots. https://www.amazon.com/dp/B0B3815XSG?ref=ppx_yo2ov_dt_b_fed_asin_title&th=1 In the harness plug, there's 3 pins on one side, and 2 on the other (with a blank space next to them). The pin closest to the empty space matched up with one of the black ground wires coming out of the tail light housing harness. The pin next to that matched up with a solid green wire coming out of the tail light housing harness. Here's how and where I tapped into them: Socket that stays in the car with 2 pins on bottom, and 3 on top.... Posi-Taps: (22g)...... Once the wires are tapped, good idea to plug the tail light back in, turn on your parking lights or headlights and make sure everything is working. If so, slide the headlight pins back into the holes, replace the T25 screw (shove something in the hole in case you drop it), push the plastic trim piece back over the hole, and you're all done. Here's how they look unlit (they are available in most any custom color you want): Here's how horrible my car's rear lighting was before: And here's the after: I gotta say, it was worth the wait, worth the money and worth the time I spent today. Oh yeah, no bumper removal was required. No body parts were actually removed at all. Just loosened and pushed out of the way. All in all, maybe 2 to 2-1/2 hours. Basic hand tools and a little patience went a long way. I highly recommend this relatively easy, inexpensive upgrade if you have the same feelings I did. Beats the heck out of trying to find reasonably priced used Titanium or ST lights, or the European fog light thing, then trying to figure out how to get them to work. I tried to summarize this as best I could. Feel free to ask any additional questions if you think I missed something......... P.S. These serve as "running" lights and are on when either the parking lights or headlights are turned on. They are not spliced into, nor function as turn signals or brake lights. If you choose you can figure out which wire feeds the brake lights or turn signals and tap into either of those lines instead, but these replacements are SINGLE feature lights.


 7 points
 -
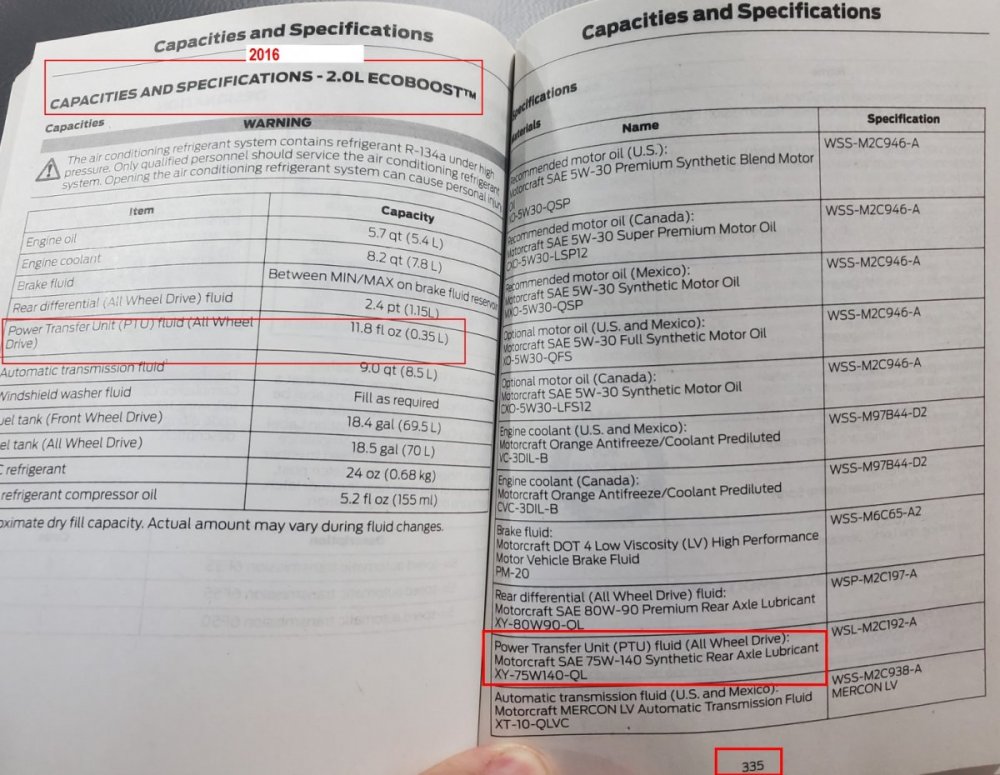
Not entirely true. 2019+ have a different style of PTU/RDU. It disengages at the PTU & the drive shaft quits spinning & currently has the special 75W fluid. The previous Gen (2015 - 2018) has a PTU that keeps the drive shaft spinning even when not in use & uses more traditional fluid. https://youtu.be/SU8XFyIhTe0 Screenshot is from the 2016 owners manual
 7 points
 -
Installed a car seat base as we finally brought our daughter home from the NICU7 points
-
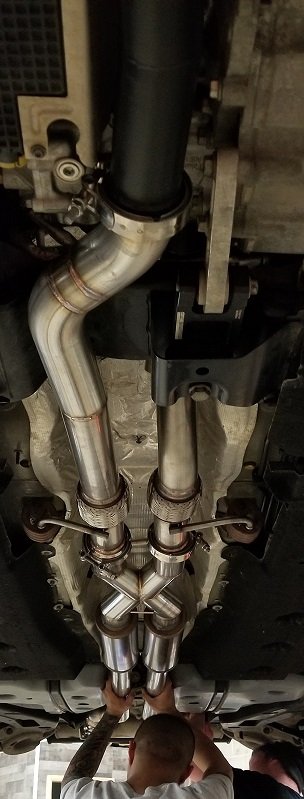
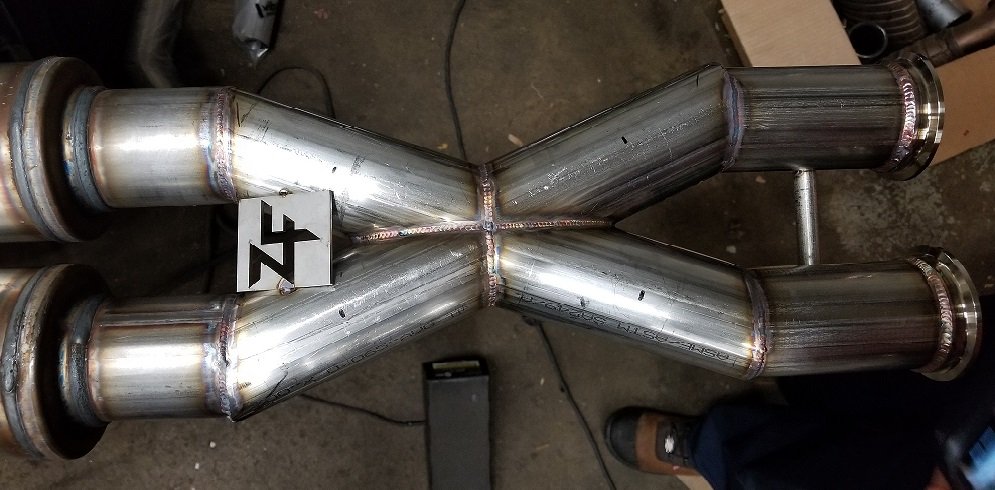
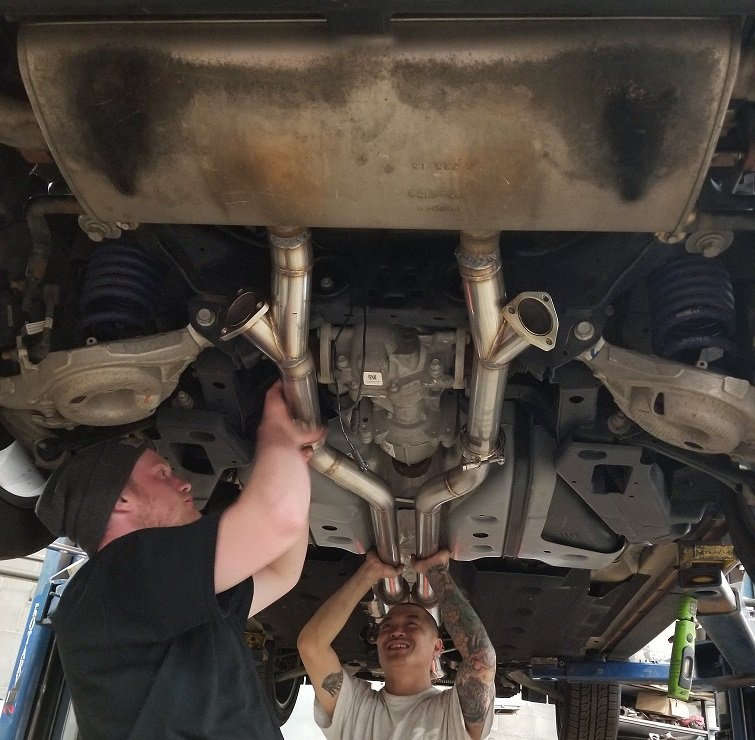
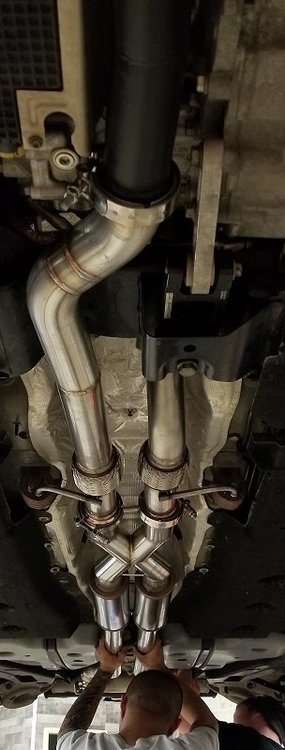
As for the intake & exhaust system developments to date... For a quick drive by sound clip at WOT & cutouts open: https://youtu.be/639Cx_dxJwo We've fully developed & provided DIY instructions on the following for the subject vehicle: - R&D the CAI - Corrected the restrictive IC cold side boost tube and selected the fabricator - ID a bolt in Hi-Perf IC & fabricator - ID a quality Turbo modification source for maximizing the stock Turbos - ID a method to maximize the stock exhaust Sys - ID an adjustable BOV & source - ID an eco boost specialty Tuner One thing remains to complete the maximizing of the intake & exhaust system.....wait for it..... DOWNPIPES..... We're currently in the process of working with fabricators to develop & fabricate Catless & Hi-Flow Cat downpipes... The Pic is of a new set of stock pipes loaned to us by Ford as templates, hopefully we can return them unscathed or they'll no longer be free... Standby for updates..... Update (11/29/2018): The National Speed Project Team has reviewed historical HP & torque gains on other 2.7 TT eco boost applications using Cat-less & Hi-Flow Cats and has reached the consensus that value added for HP achieved Cat-less will be the way to go for this project along with a retune. For heat management, instead of heat wrap NS has been having great success using special ceramic coating, with the added benefit of color choice... Our intention of providing a set of Ford OEM pipes to the fabricator is to enable the fabricator to generate specifications and/or templates in order to reproduce these on demand for those of you who may be interested in a set. Update (01/15/2019) National Speed has determined that 3" downpipes will not work due to the extreme U-turn the front downpipe must make, therefore we're working with 2.5" pipe of which National Speed stated that with stock Turbo housings this should not have any negative impacts on power gains. It is anticipated that the pipes will be heat treated by end of Jan beginning of Feb. In the mean time SpecialK has been designing the remainder of the exhaust system to meet my stock sound/sleeper requirements but with full power capability. So he came up with this awesomely creative concept design that we've settled on (Ref Pic)...? Update (03/21/2019) Project stalled and was transferred to a fabricator in Maryland to facilitate better oversite & consult. Update (04/09/2019) Fabrication is halfway done and soon to be reassembled then track & Dyno testing begins. In support of the community we have the fabricator making templates in support of anyone who would be interested in a set of Catless downpipes or Hi-Flow Cat downpipes, for those that elect to comply with emissions, in a 2.5 size pipe. This way you can easily order the pipes and not have to give your car up for fitment and development time & costs. Therefore, you benefit by getting lower cost and no wait! Update (04/25/19) Fabrication & coating complete!!! Assy process begins...??? Update (05/04/19) Assy complete with no codes & surprising results so far on the base line BCB initial Tune. Tuning refinement has begun... Stay Tuned, more Pics to come...


 7 points
 -
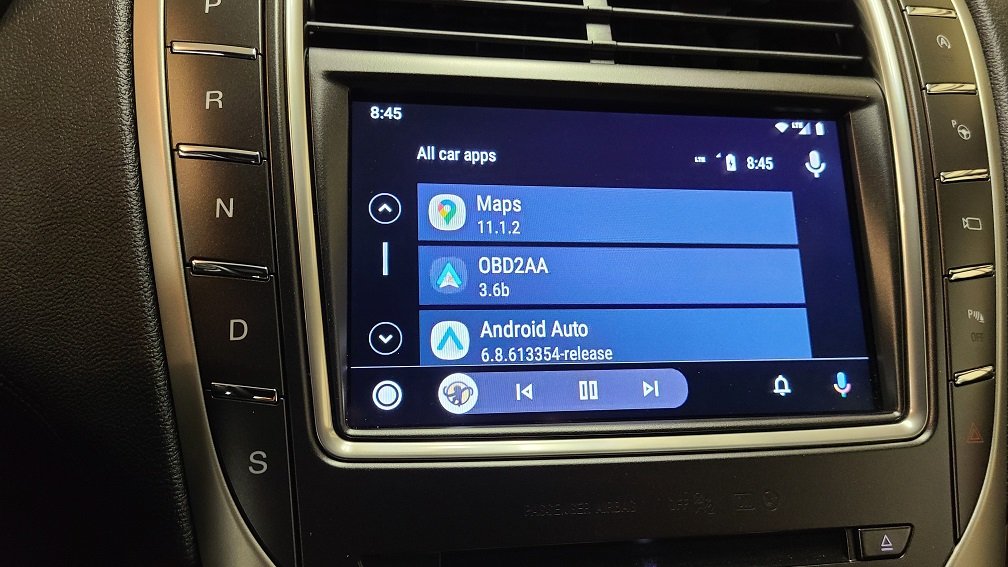
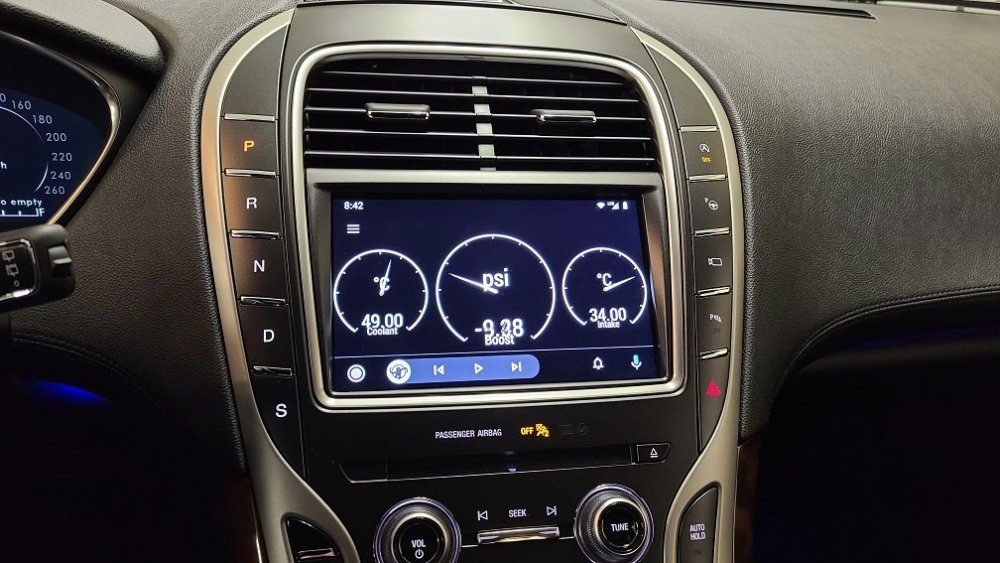
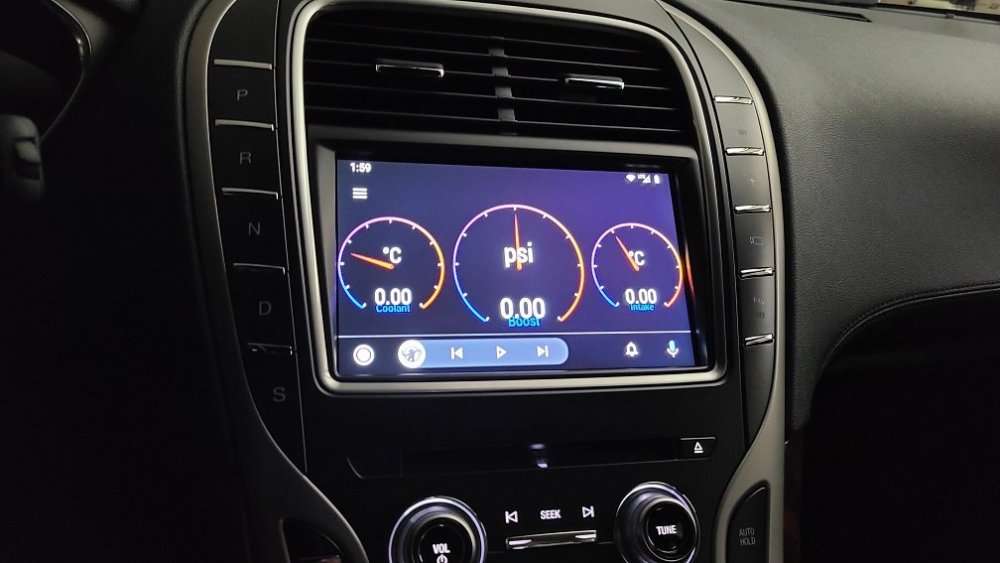
As a longtime user of the Torque Pro app I stumbled across this companion app for Torque Pro that works in conjunction with Android Auto. It lets you project up to 6 gauges in a variety of colors and configurations to your navigation screen. DPI is also adjustable. I settled on Coolant, Boost and IA2 in white to match the gauges in the cluster. The guy that invented the AAWireless dongle is also the creator of this nifty app. OBD2AA
 7 points
 -
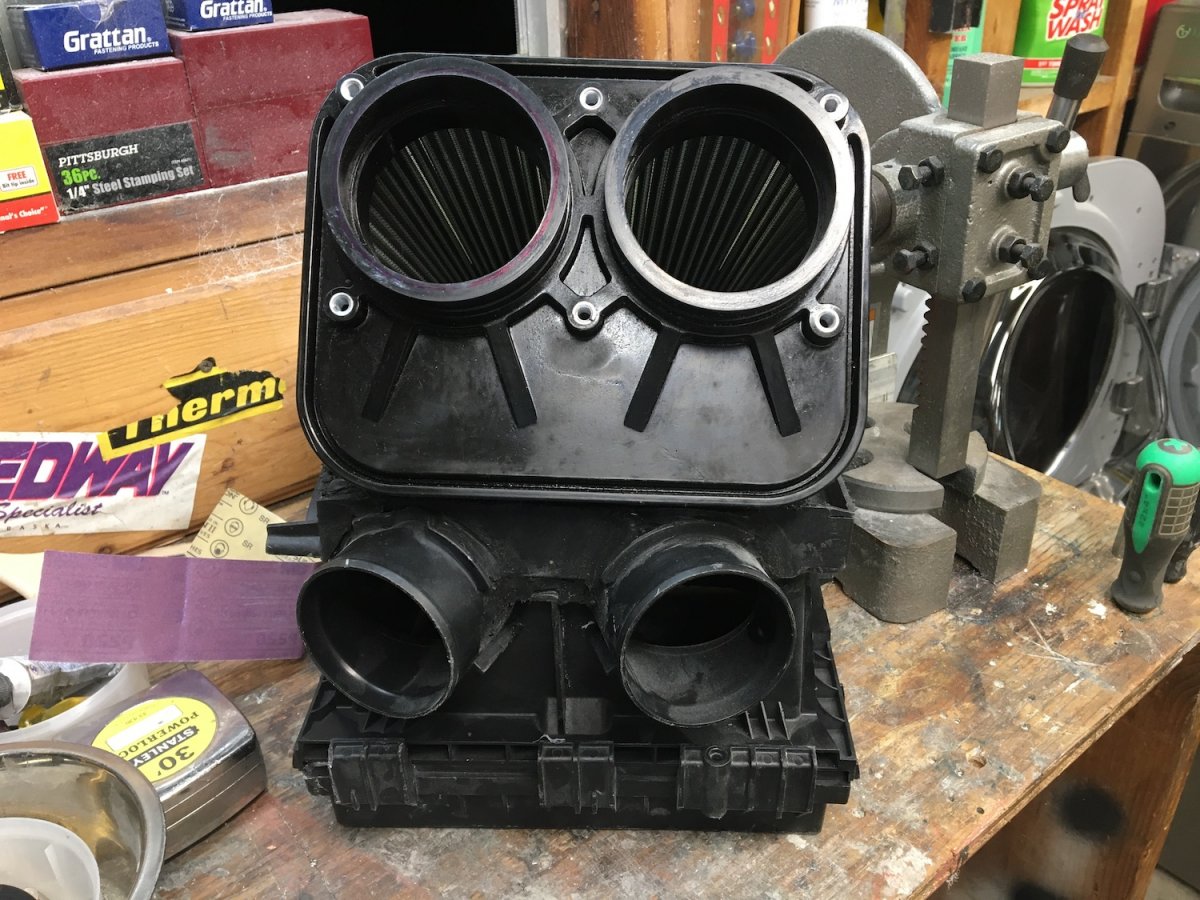
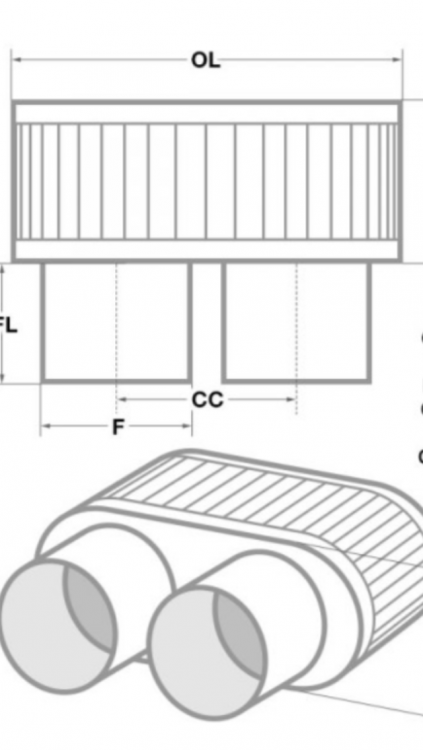
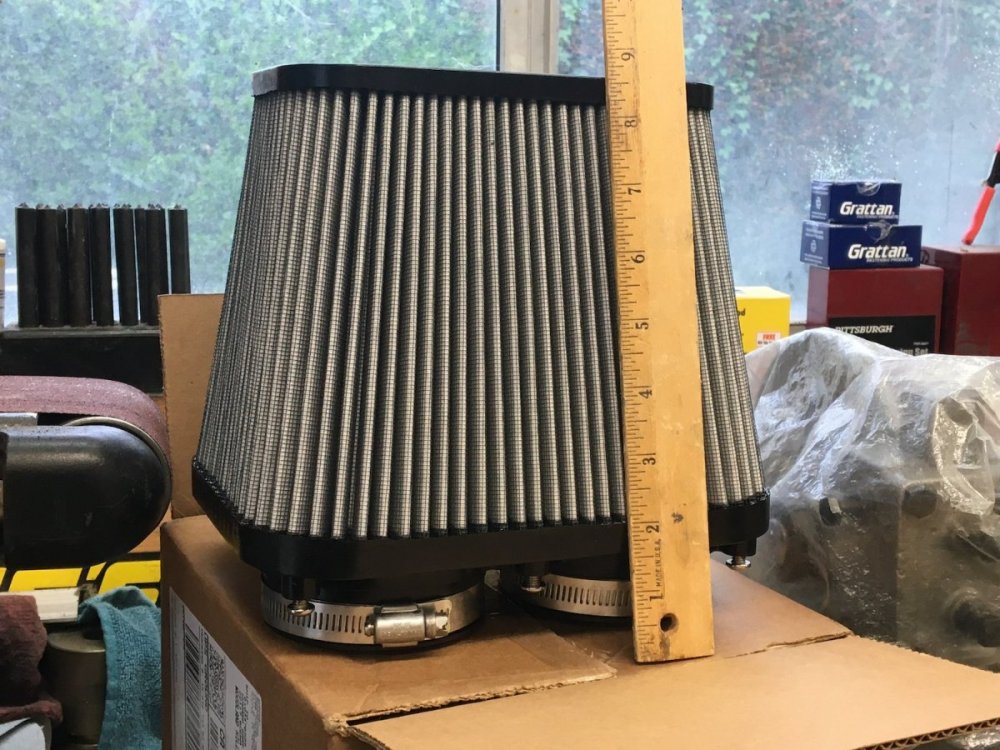
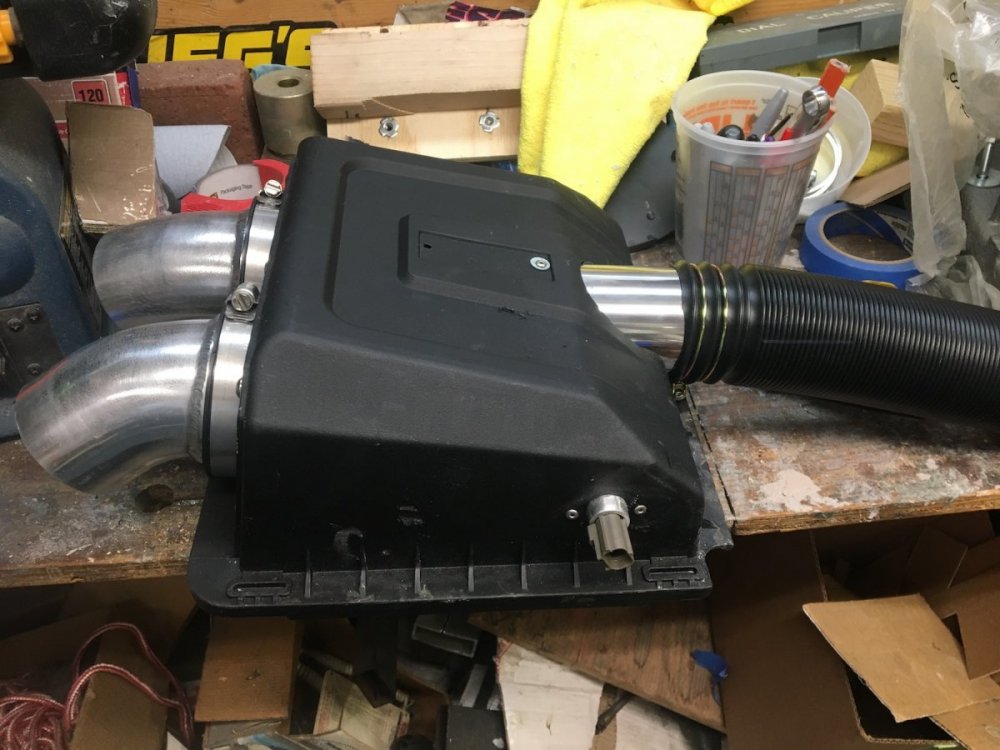
I hope that everyone had a great 4th of July and are enjoying this long Independence Day weekend. Although I have posted photos of the V3 air filter before in this thread there was nothing to show the scale of just how large it is, these two photos should help. I obtained a OEM air box at the start of this project to help create the adaptor. These photos show the V3 filter compared to the stock air box. I think the V3 filter should flow more air than OEM with less resistance. What do you think? The V3 filter dwarfs the OEM air box.

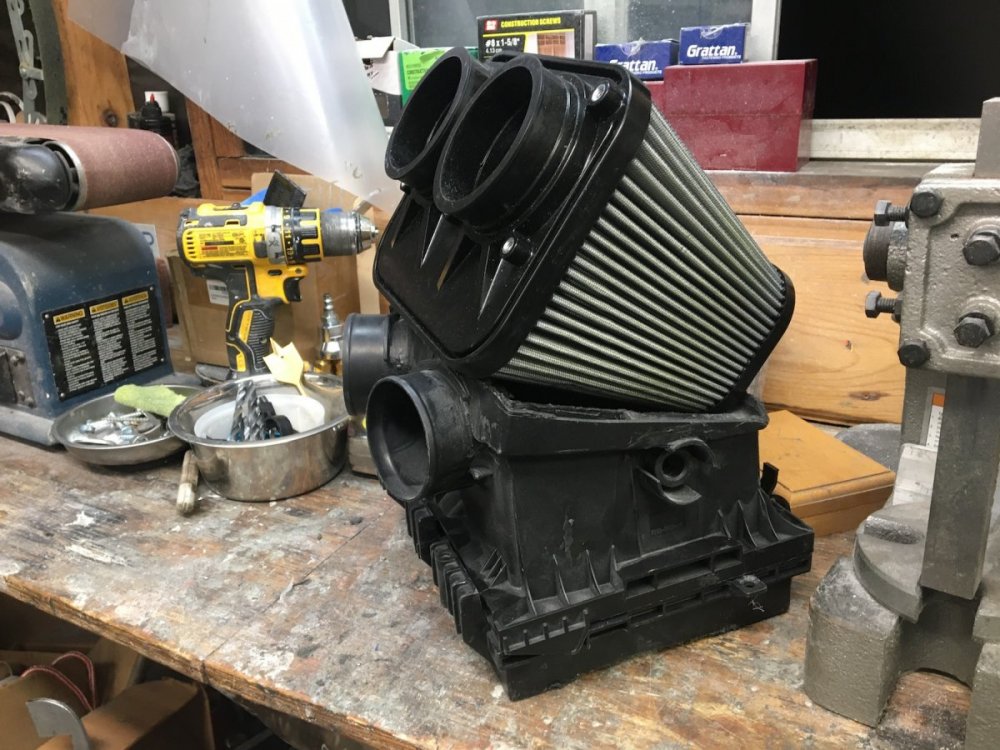 7 points
 -
Would you be open to crowd funding? It doesn't have to be any like a gofundme page etc. I can't speak for every member but I feel that I can honestly say that you're working for the collective good of the community! I would donate! Perhaps I'm alone in this but you may be pleasantly surprised if the option is available! Just a thought!7 points
-
Completed molding the first run of V2 Carbon Fiber intakes. Just had enough of the Carbon Fiber material in stock to cover the backorders from the V1 days. More material is on order and should arrive in 2 to 3 weeks. It is custom made for me that is why the long wait. When it arrives I will have enough to cover all the orders including the black ABS ones.7 points
-
Update 12/10: I've had my car like this for a month. But got the stripe done! I wish I went a bit thicker on the pinstripe but I'm still very happy with it. I also recently installed mudflaps on the rear which you'll see are only in some photos. Next will be sequential mirror signals that I already have but need to install. And also side splitters I bought from Aerotekk. For some reason I don't have many day photos. I guess I need to get better at that.


 7 points
 -
I installed it this afternoon, less than a 10 min job. I hope my video helps.7 points
-
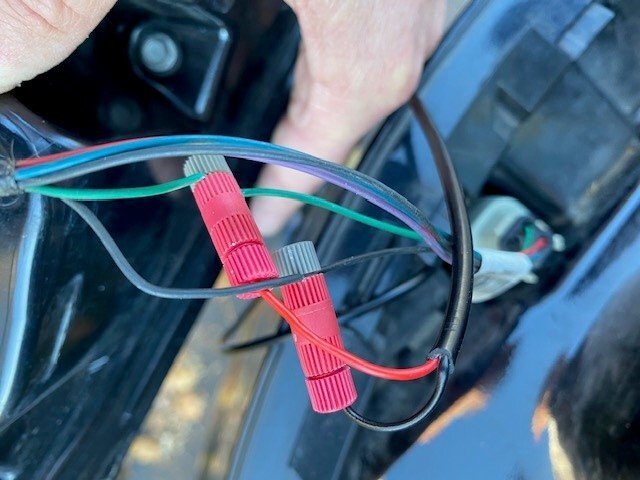
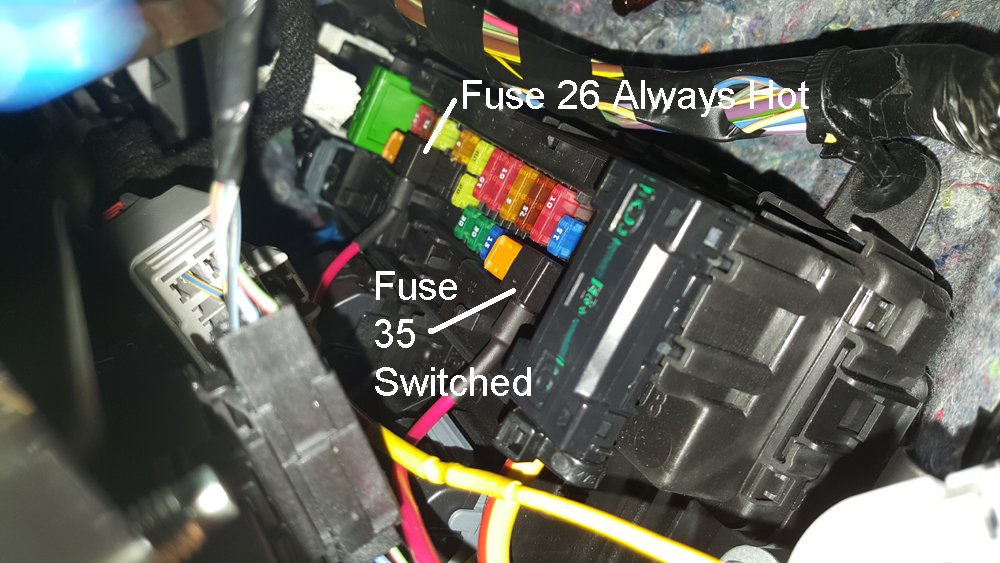
Hi Tronjo, I feel your pain trying to reach the fuse box but here's a tip. Some Edge's have a storage drawer others a cover on the dash to the left of the steering column. Whichever you have if you'll remove it getting eyes on the fuse panel will be much easier. I found using that opening as a view port then reaching up under the dash to remove/replace fuses was a whole lot easier than working from the floor of the car To your question. For the exact same application I used fuses 35 (labeled as a spare and switched) and 26 (front passenger lock indicator always hot). An Add-a-Fuse in each slot made the connection easy. Another tip. Attach a length of wire to the add-a-fuse before plugging into the fusebox. Make the pigtail long enough to reach under the dash and into the cabin making it easier to connect your camera. Once connected and tested you'll be able to coil up the extra wire and tuck it behind the kick panel.
 7 points
 -
Finally took some pics. I absolutely love this car. All of the original concerns I had appear to have been fixed in this production batch. There is no “piped in engine sound” and no shift delay or lag.
 7 points
 -
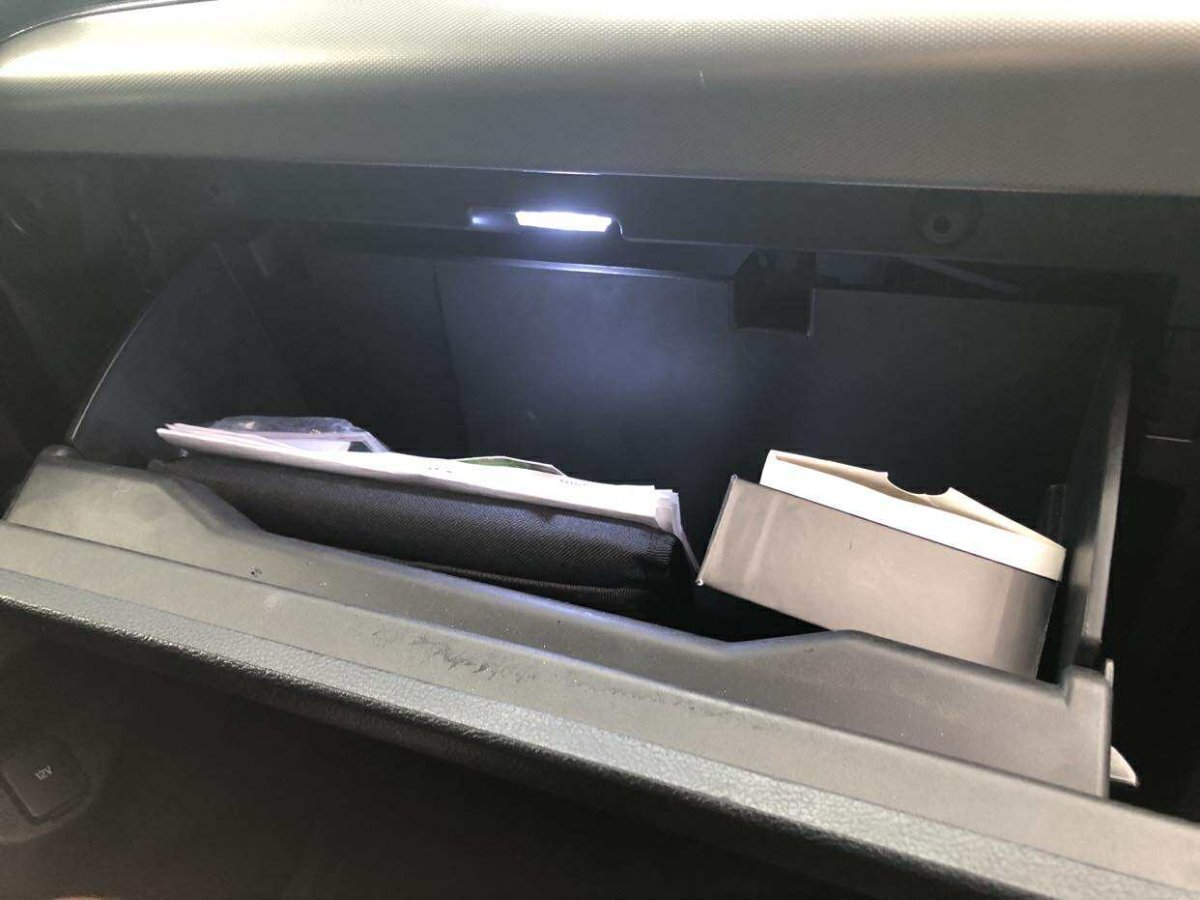
The little things matter 😉 Added glove box compartment light back in the Edge. Don't know why Ford deleted it in the first place. Scored a 2017 Edge glove box lamp harness and damper from the junkyard. With a little bit of DIY (dremel action & soldering), swapped out the LED PCB for a brighter aftermarket one. I made a T-harness to tap into the passenger side (visor) vanity mirror lamp circuit. Ran that down the psngr side A-pillar all the way to the glove box.


 6 points
 -
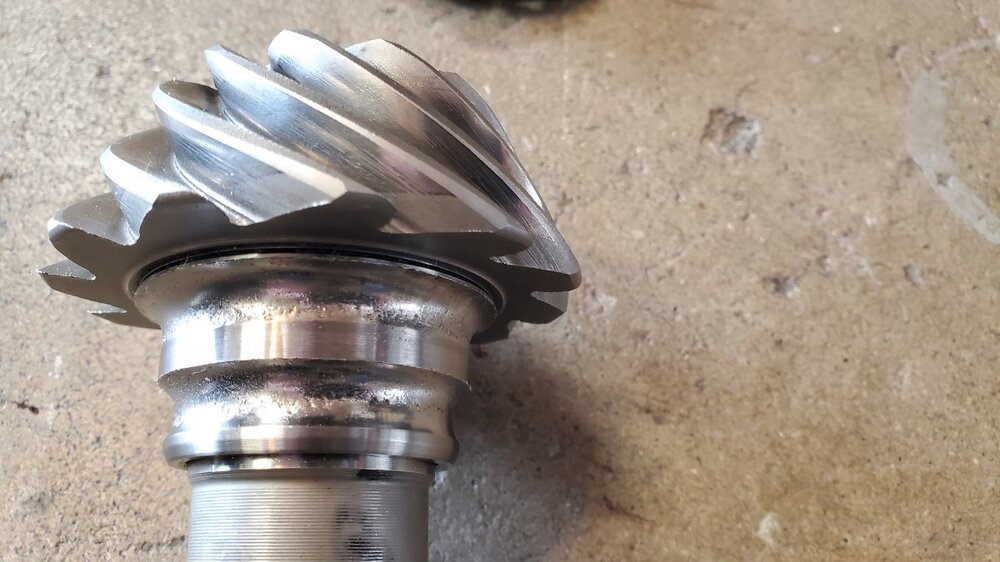
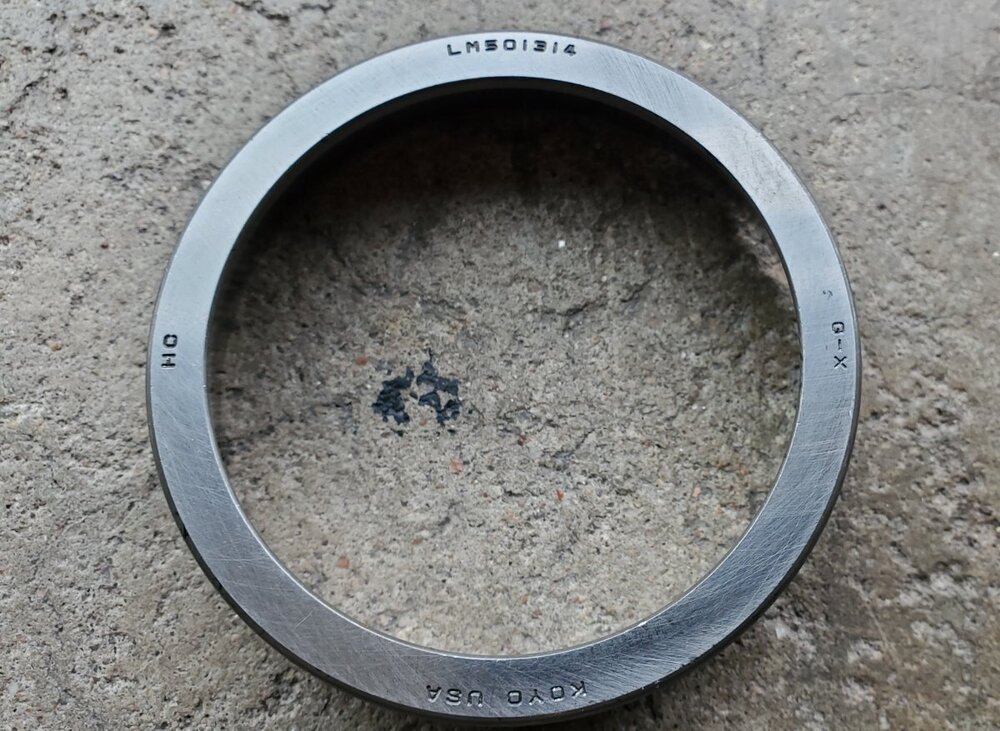
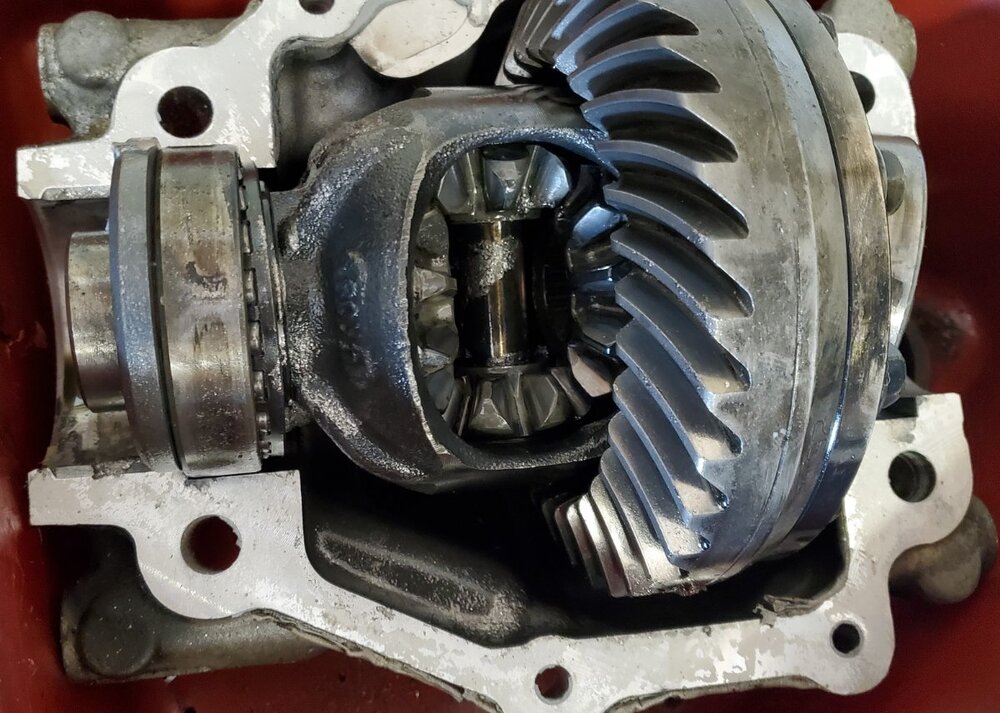
The RDU saga - long post So I tackled the install of my “new” RDU last week – it took about 7-8 hours for the complete job – seemed too long for me – the problem was those T-50 torx bolts that hold the RDU to the front brackets – I got the drivers side loose and out easily, but the passenger side ones would not come loose – to the point that the spines in the bolt stripped out and ruined my bit – wound up just removing the entire bracket and using the air hammer and chisel to get those bolts out of the RDU – that accounts for at least an hour and a half The rest was pretty ordinary – just a lot of removing and installing bolts – one problem I encountered was the axle nut on the RR roughed up it’s threads while removing it – the edge of the nut was hammered in to lock it (I assume) – I could not see a way to release it from the threads so it flattened out the threads a bit – It went back on and torqued to specs but, if I ever have to remove it again I might need a new axle shaft - my Launch code tool coded the replacement RDU to the PCM So got it all back together and took it for a test drive – while the growling/grinding noise is gone, it clicked when turning from a stop – I disconnected the electrical connection on RDU and noise disappeared – so I’m figuring the clutch portion of the replacement RDU is defective..?? – I removed the clutch part of the replacement and it had gear oil in it – there is a seal between the two but it failed – I don’t know what the oil does to the clutch part but I’m pretty sure that’s what caused the clutch to fail To remove that seal with diff in car you have to basically destroy it – the seal on my original diff did not leak, but it to was looking rough from the removal process - I thought it a good idea to replace it and looked up the part number stamped on it – went to Ford and the one they had (same part number) was way to big – when they looked up the part number it showed the seal for the front of the clutch where it connects to drive shaft, not the seal between the diff and the clutch – they could not explain why they both have the same part number and that was that – I wound up rehabbing my original seal and reinstalling it I took the clutch portion off my original RDU and put it on the replacement RDU – removing that from the gear portion is pretty simple – the code for the clutch portion is etched into the unit (pic) – recoded my original clutch back into PCM I disassembled the gear portion of my original bad RDU – the gear set looked to be ok as did the left and right side output bearings – the growling was from the pinion bearings – these are double row ball bearings – the cage they are in is plastic – I’ve never seen that before – I don’t know what caused the bearing to fail (it was always lubricated) – it gouged up the race and balls pretty bad, so that’s where all the metal in my oil was from – I removed the race from the pinion gear with a puller – if you could find these bearings I think these units would be rebuildable – the L/R side bearings are a standard bearing (LM-501314) – the pinion ball bearings had no identity markings on them so I’m not sure if they can be obtained So the car is back on the road and the AWD seems to be operating normally – if that rehabbed seal does not leak I think it’s a good fix - total cost for this was around $500 – that includes new wheel bearings, axle shafts, the junkyard RDU, seals, and fluid – hopefully it lasts the rest of the car’s life – thanks to all for the input and advice – and I took the above advice and did not drill a drain into the RDU – I’ll change as much of the oil as I can every 20K miles or so and hope it holds

 6 points
 -
Just wanted to clarify on garycrist procedures concerning the refill process. The following is taken from my service manual. For me to reach that required temperature I had to drive the vehicle for awhile. Just by sitting parked and idling, the temps would not go up enough. After I had drained the fluid I refilled it with a little more than I took out before driving. Connect the diagnostic scan tool to the vehicle. Monitor the TFT PID . With the engine running in PARK on a level surface make sure the transmission is at normal operating temperature 85-93° C (185-200° F). With foot on the brake, slowly select each gear position, stopping in each position and allowing the transmission to engage. With the engine running in PARK, remove the oil leveling plug.6 points
-
From the 2019 Edge Workshop Manual... Power Transfer Unit (PTU) Description The Power Transfer Unit (PTU) is a gearbox that attaches to the transmission. The PTU directs power from the transmission differential case through a dog clutch to a hypoid ring gear. A hypoid pinion gear is meshed to the ring gear and splined to the output flange. A dog clutch is used to transfer drive torque from the input shaft to the ring gear. When the dog clutch is released, no torque is transferred through the ring gear and pinion to the rear driveshaft. When the dog clutch is engaged, normal AWD function is achieved by directing torque to the rear wheels as needed to prevent or control wheel slip and improve handling There are two different models of the PTU. The low torque PTU is paired with the 8F35, 8F40, and MMT6 transmissions. The high torque PTU is paired with the 8F57 transmission. The low torque and high torque PTUs are similar in design and operation. Power Transfer Unit (PTU) Operation The PTU has four (4) distinct modes of operation: Connected, Connecting, Disconnected, and Disconnecting. Each mode is commanded by the AWD module. The PTU contains a reversible DC motor and two hall effect position sensors. The motor moves the shift fork which connects or disconnects the dog clutch collar. PTU Position sensor A monitors the position of the actuator cam. PTU Position sensor B monitors the position of the shift fork. Some PTU models are equipped with an oil temperature sensor. Connected Mode Connected Mode is the default mode for the PTU. The AWD module will command Connected mode at the beginning of each key cycle. In connected mode, the fork and dog clutch collar are positioned towards the RH side of the PTU. The dog clutch is engaged. The driveshaft is rotating at an overdrive ratio compared to the front axle shafts. Torque is available at the RDU. Connecting Mode To connect the PTU, the two halves of the Dog clutch must be within 40 RPM of each other. The AWD module calculates the speed differential based on transmission OSS, RDU Driveshaft Speed, and PTU gear ratio. The actuator motor will energize and rotate the gear reduction drive and the actuator cam against the actuator fork. When the dog clutch teeth line up, the cam pushes the actuator fork into position and the clutch engages. It can take approximately 100 - 150ms for the dog clutch to engage after the command is sent. Disconnected Mode The AWD module will command disconnected mode based on vehicle conditions. The purpose of the disconnected mode is to reduce drag losses from spinning the driveshaft when conditions indicate AWD will probably not be needed in the near future. In disconnected mode, the fork and dog clutch collar are positioned towards the LH or transmission side of the PTU. The dog clutch is disengaged. Disconnecting Mode To disengage the PTU, no torque can be routed through the dog clutch. That is, the RDU must be completely disengaged. Depending on vehicle conditions, the AWD module may keep the PTU engaged for the remainder of the key cycle. The actuator motor will energize and rotate the gear reduction drive and pull the actuator cam away from the actuator fork. When the dog clutch collar has moved far enough to the LH or transmission side, the dog clutch teeth disengage. Good luck!6 points
-
ST is assembled in Canada, the the "A" is just for the pronunciation. Sorry, couldn't avoid that joke.6 points
-
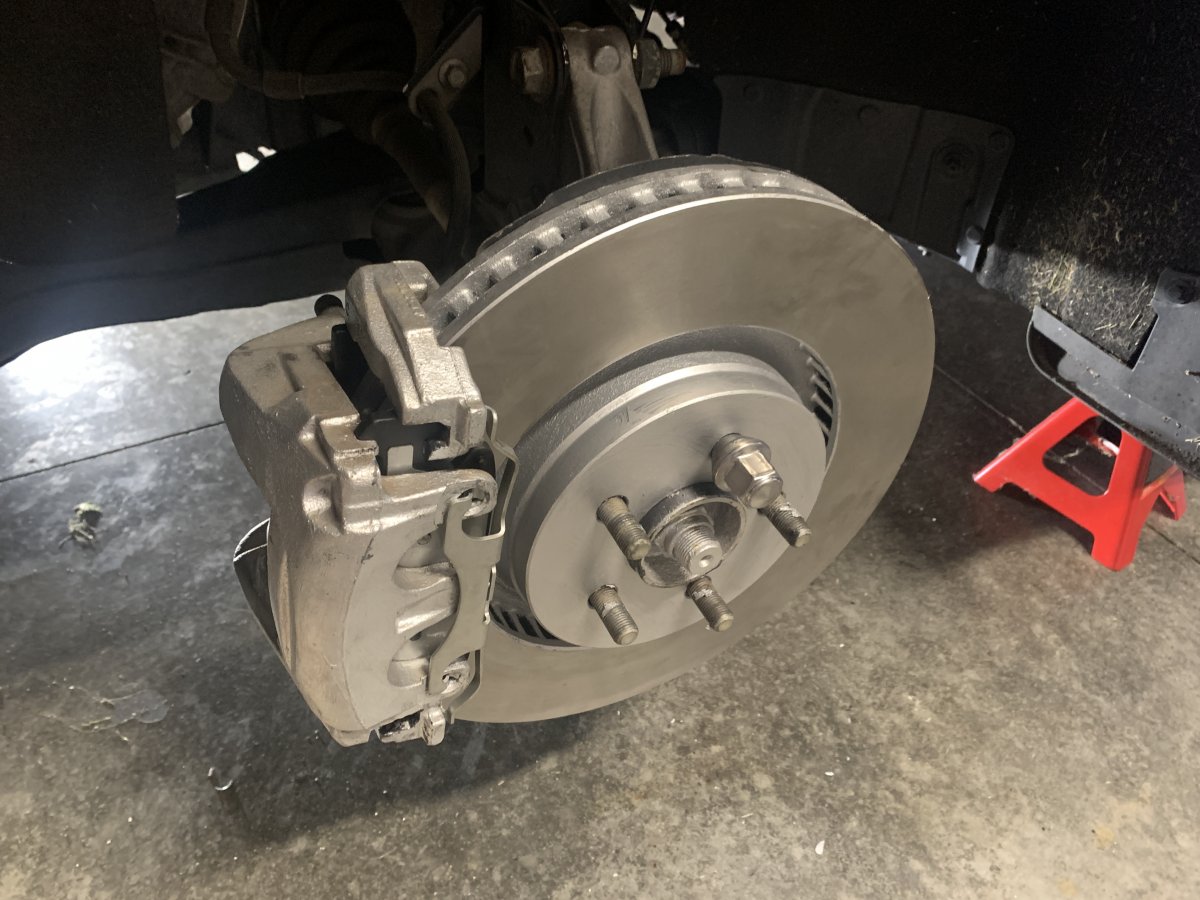
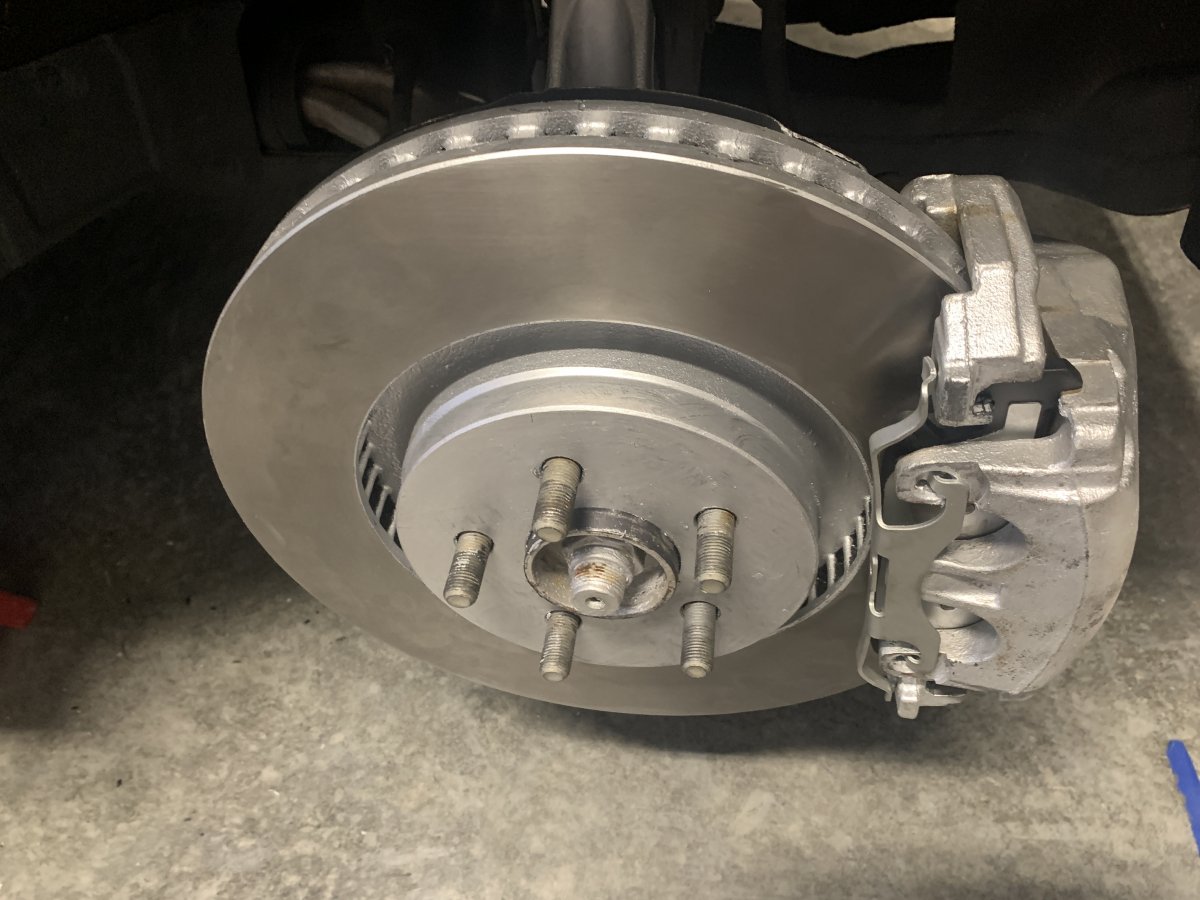
I got tired of the growl and vibration of the StopTech drilled & slotted rotors, so yesterday I installed Centric Hi-Carbon rotors and Centric PQ ceramic pads, and so far very pleased with the results. They come with a black coating on the outside - I painted both sides and the edge with high temp caliper paint. Bought from RockAuto Rotors $95 each Pad set $50 CENTRIC 12561120 {125.61120, 125-61120} (High Carbon) High Carbon Alloy Front; 345mm Front Disc https://www.rockauto.com/en/parts/centric,12561120,rotor,1896 CENTRIC 50018180 {500.18180, 500-18180} (Premium) PQ PRO Front https://www.rockauto.com/en/parts/centric,50018180,brake+pad,1684

 6 points
 -
H7 does fit, put one in our 2016 earlier this year. I removed the air filter box lid and moved the ground wire out of the way to install. I did not have to remove the cowling to fit. The battery tray has threaded holes for 3 different sized batteries, but is not mentioned in any documentation. If you look up the battery on parts.ford.com it shows 90T5, H6 and H7 as compatible options. I found that after the parts store in town only showed the stock battery size and it was special order only. https://imgur.com/EFRbtXS6 points
-
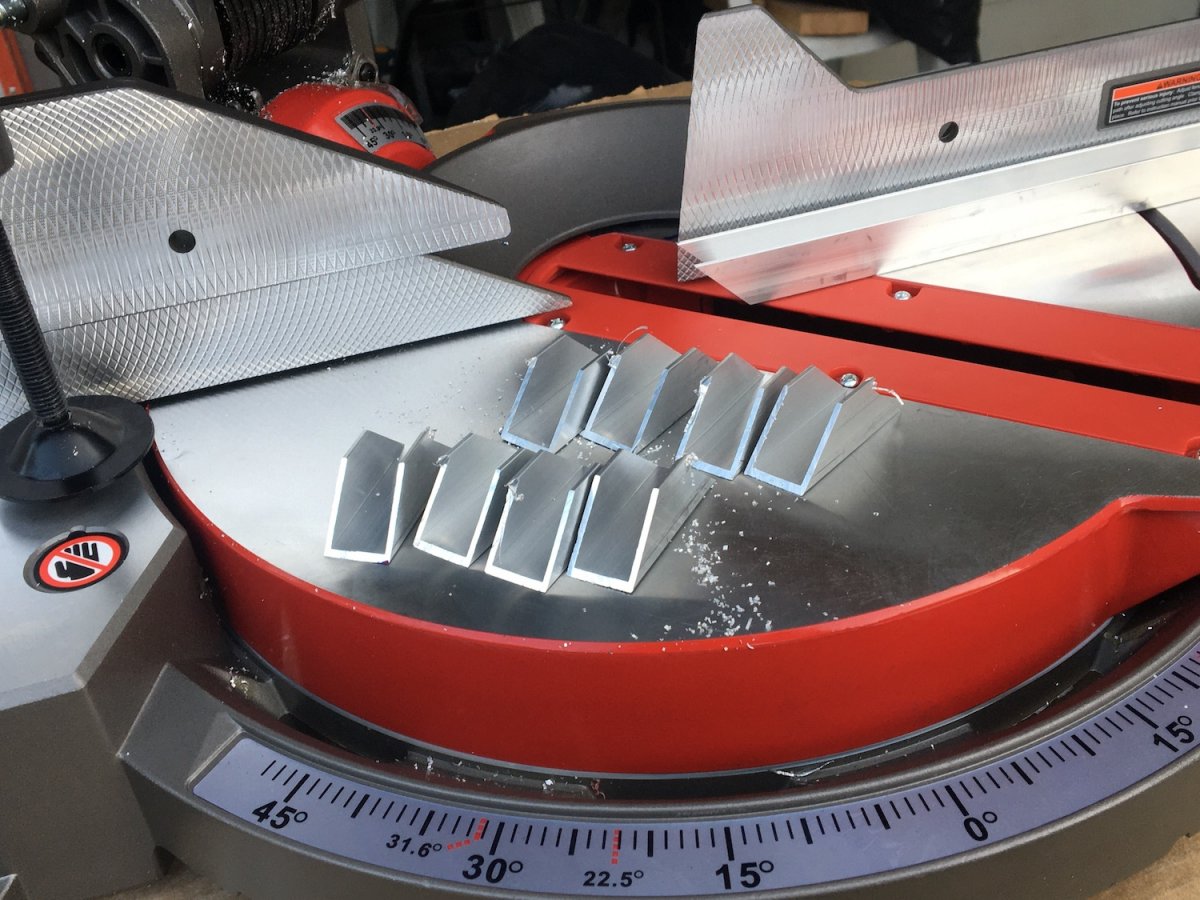
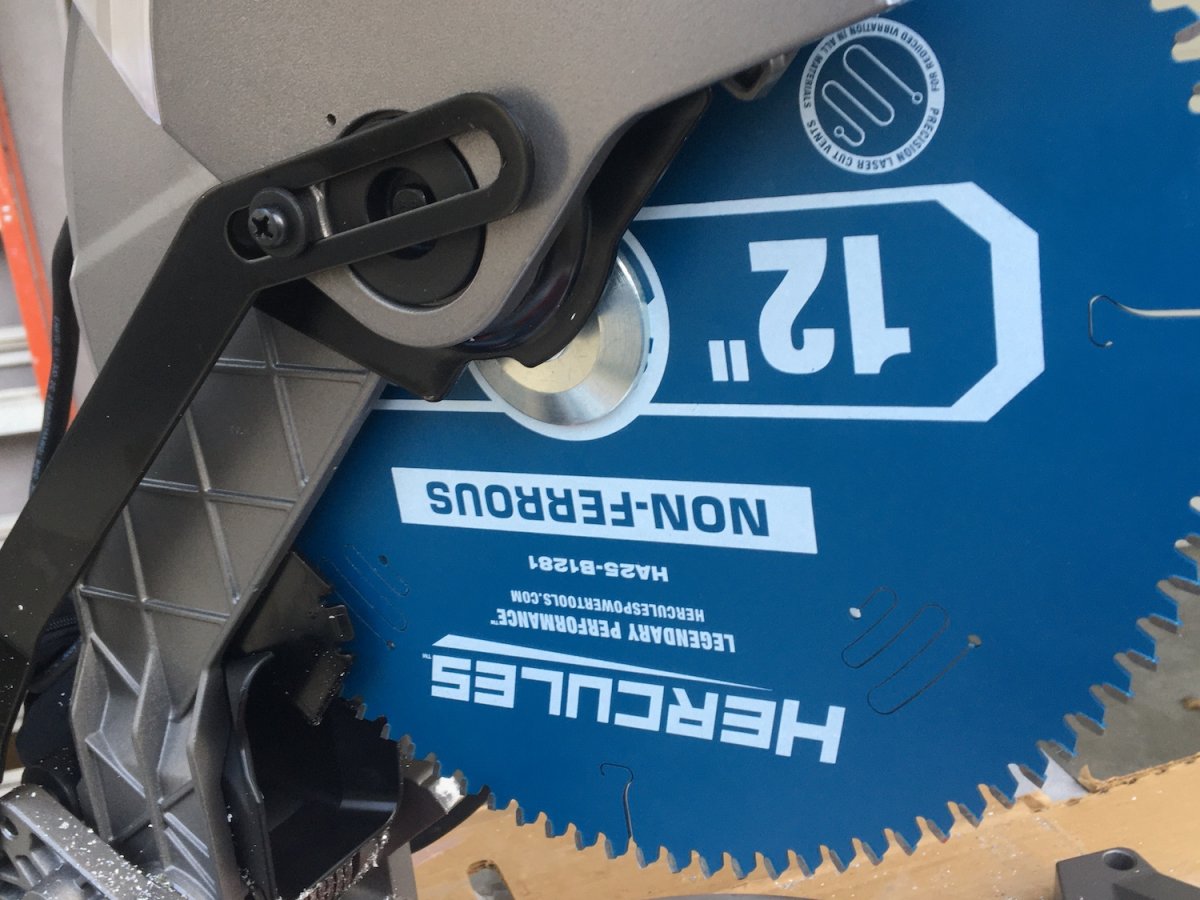
Bought a new 12 inch compound miter saw at Harbor Freight today and tested it out by cutting some latches. I was able to cut out 8 of them quicker than I made the first one by hand. It cuts clean with a special blade made for cutting nonferrous metal. This tool is going to save a lot of time.

 6 points
 -
I finished the prototype V3 lid . It has the elbow reducers , sensor and aux air ports all sorted out. I just have to figure out where I am going to hook up the other end of the aux air hose. And how to route it, and how to it is going to attach This aux air feature may be an option as I believe it is not necessary on an untuned car. The V3 moves a lot more air than stock with less restriction. Optional on a tuned car and defiantly should be used on a modded car. Turbos ,FMAC that kind of stuff. It adds cost and labor and could be difficult to run the hose and install. So that is why I am thinking optional, not everyone may want it or need it.
 6 points
 -
I just shipped the first V2 and by next Monday I hope to know if I can go ahead with a run of them .6 points
-
Finally have an update. The V2 mold was tested and I have one intake molded. Because I rounded off the edges of the wood on the mold there was a problem with getting proper vacuum . This did not hurt the part but made it more difficult for the shop to work with . In the photo of the untrimmed part you can see where the material melted and pulled through. The shop is working on a solution for me and I may have to modify the wood part of the mold again and remove the rounded edges. The good news is that The fiberglass part of the mold is working better than ever. Here you can see how the ABS melted and holes formed along the rounded edges loosing vacuum This compares V1 on the bottom and V2 on top. The gasket line is much better defined on the V2 Test fit of the V2 . I have not even finished hand fitting it and it is looking good. The hood rubber bumpers stick above the intake a little more, and there is added room for the hood latch. I took it for a test drive and I can't tell any difference in performance between V1 and V2. All that is needed is to complete the finishing and then test for universal fit on 2015 to 18 Edges.

 6 points
 -
6 points
-
Well the merging of the 3 files has not worked so I am inserting the links to the three video's I made. No fancy editing software just a go-pro and the raw footage. Thoughts on the Borla Exhaust: It has a unique sound to it that doesn't sound like a V8 of course but when you stand on the loud pedal you now can hear it. I have always felt that it is hard getting a great exhaust note from a V6 let alone a twin turbo V6. At highway speeds and no radio windows up you can hear a slight growl. If your putting a load on the vehicle or going up a incline you will hear it more. There is no drone but their is exhaust sound. There is a difference between drone and exhaust and each of us have our own definition. For me if a car is making noise no matter what speed or what gear than that is drone. When you doing 65-80 mph just a slight sound inside the car, if your on the gas than you will hear it. Anyhow here is 3 different sound clips that might help you in your decision.6 points
-
Octane and fuel quality are indeed two separate things. There are also a couple of other specifications of gasoline which affect performance and are independent of octane rating. Octane is just a measure of the fuel's resistance to pre-ignition (known as "knocking" or "pinging" because of the sound created when fuel doesn't ignite smoothly when the spark is applied). Octane by itself has absolutely nothing to do with performance or fuel efficiency and higher octane is not "better gas". However, some modern computerized engines have the ability to advance their ignition timing in response to detecting higher octane and this change in timing can improve both performance and efficiency. If a particular engine doesn't have that timing change ability then using higher octane fuel is simply a waste of money. Ethanol blending has a significant impact on both performance and mileage. Ethanol has about 33% less energy by volume than gasoline so any ethanol blend will cause lower performance and mileage compared to pure gasoline. Ethanol also raises octane and RVP so its exact impact can be difficult to determine. RVP (Reid Vapor Pressure) is a measure of the volatility of fuel... its tendency to evaporate. It is measured in PSI with higher numbers being more prone to evaporation. In general, winter gas has an RVP of 9.0 while summer gas is usually RVP 7.8. Winter gas is blended with butane which is plentiful and inexpensive but has a high RVP. Summer gas can't take the volatility of butane so it contains much less and is therefore more expensive. But butane also has less energy content by volume so winter gas, although cheaper, produces less performance and mileage. Basic gasoline is the same regardless of which refinery produces it. It's the additive package which makes the difference. In fact, in many areas the base gasoline for all local stations (regardless of brand) comes from a single refinery or terminal. The additives for each brand (BP, Exxon, Shell, etc.) are added to the tanker truck when it picks up a load at the terminal as appropriate for the brand of station it is delivering to. All gasoline in North America must have a certain minimum standard additive package but the big brand names and Top Tier fuel providers add significantly more (and different) additives to improve their fuel and differentiate themselves from the competition.6 points
-
So....I went to the dealer this morning and met with the service mgr. They brought my Edge back to the shop and the service mgr. said he would be back in 10 minutes after a test ride with another customer. When he returned about 20 minutes later we went to the shop. Approached my car and the tech was already under it!! And he was frantically rushing. I was pissed. He had already removed the old fluid before we arrived and was starting to pump the new fluid in. As he pumps it in he shows me that its full because the fluid is OVERFLOWING FROM THE FILL PLUG. All down the side of the PTU like it should have been before! I could tell he was mad or embarrassed , and was trying to cover his tracks, he never mad eye contact. He was so frazzled to get the PTU full he knocked over the quart of fluid onto the floor. The service mgr. and I walked back into the service advisor area and I lit him up. I told him its obvious he didn't do it the first time. He couldn't wait to fill it up so oil could spill all down the side of the PTU. But I had pictures of it before. When I showed the pictures to him he didn't respond. I told him I wanted to see the dirty fluid and the fill plug and the tech purposely started before we got back there. The service mgr. said that he showed me the fill plug, and I told him I wanted to see it when it first came off and if it had any metal shaving on it. He proceeded to tell me he picked up the drain plug and "he personally cleaned off all the metal shavings with his fingers" and showed me his greasy hands. I told him thank you for proving my point. There shouldn't have been any shaving on the plug if the fluid was changed yesterday, and it was obvious from my pictures that no fluid had ever touched the outside of my PTU. He then told me he would give me a full refund for the job. Just shameful. 99.99% of people would never know that they got ripped off. Unfortunately for him, I was the .01%6 points